

"The moment you intercept your first request, you stop being a passive user of the web — and become someone who truly understands it."
Quick Recap from Blog #1
In Blog #1, we covered what Burp Suite is, explored its core tools, compared editions, and installed Burp Suite Community Edition on our machines. If you haven't done that yet, go back and start there — this blog builds directly on it.
Today's goal: Get Burp Suite's proxy fully working, install the CA certificate so we can intercept HTTPS traffic, and capture our very first real HTTP request. By the end of this blog, you'll have Burp actively sitting between your browser and the internet — and you'll see the web in a completely new way.
How Burp Suite's Proxy Actually Works
Before we touch a single setting, let's understand what's actually happening under the hood. This mental model will make everything else in this series click.
The Normal Flow (Without Burp)
Your Browser  ──────────────────▶  Web Server
              HTTP/HTTPS Request

Your Browser  ◀──────────────────  Web Server
              HTTP/HTTPS Response
When you type a URL and hit Enter, your browser packages your request into HTTP format and sends it directly to the web server. The server responds, and your browser renders the page. Simple.
The Burp Proxy Flow (With Burp)
Your Browser  ──▶  Burp Suite Proxy  ──▶  Web Server
              (127.0.0.1:8080)
Your Browser  ◀──  Burp Suite Proxy  ◀──  Web Server
With Burp's proxy enabled, your browser no longer talks directly to web servers. Instead, every single request goes through Burp first. Burp sits in the middle — it receives your browser's request, shows it to you, lets you inspect and modify it, and then forwards it on. The response comes back the same way, through Burp.
This is called a Man-in-the-Middle (MitM) proxy — and it's 100% legal and intentional when used on your own traffic for testing purposes.
Why HTTPS Is Tricky
HTTP traffic is plain text — easy to intercept. But HTTPS traffic is encrypted using TLS/SSL. If Burp just sat in the middle of HTTPS traffic, it would see gibberish it can't read or modify.
To solve this, Burp acts as its own Certificate Authority (CA). It creates a fake certificate for every HTTPS website you visit, tricks your browser into trusting it (by installing Burp's root CA certificate into your browser's trust store), and then decrypts, shows you, and re-encrypts the traffic as it passes through.
This is why installing the CA certificate is non-negotiable for testing HTTPS sites — which is basically every modern website.
⚙ Step-by-Step: Configuring the Burp Proxy
Step 1: Launch Burp Suite
Open Burp Suite. On the startup screen:
- Select "Temporary project"
- Click Next
- Select "Use Burp defaults"
- Click "Start Burp"
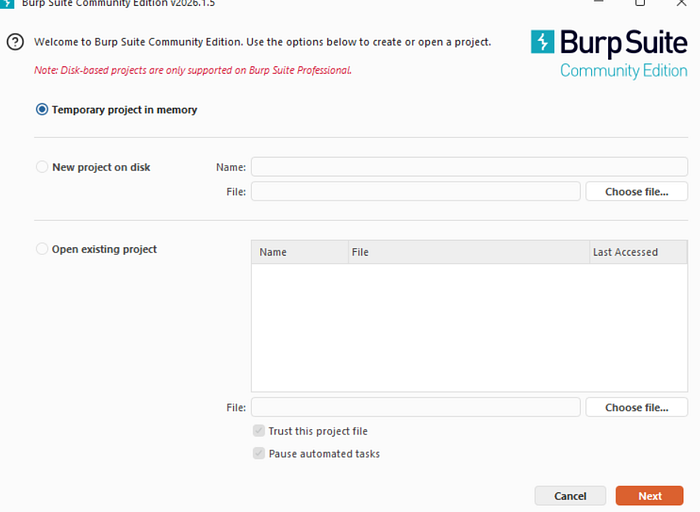
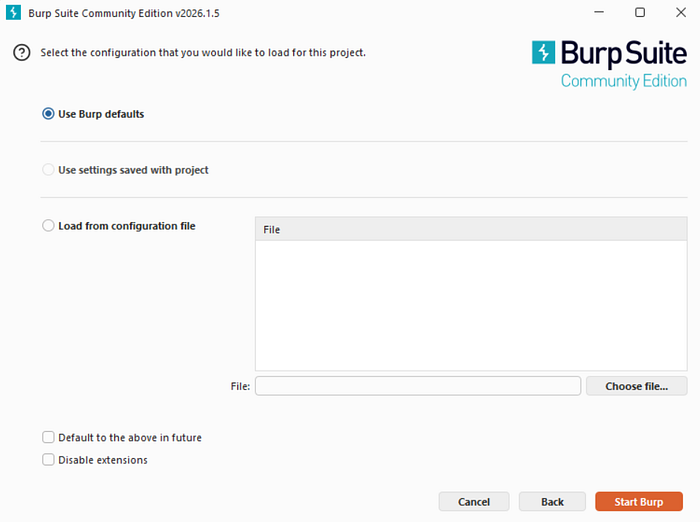
You should now see the main Burp interface.
Step 2: Verify the Proxy Listener is Running
Navigate to: Proxy → Proxy Settings (or Proxy → Options in older versions)
You'll see a table under "Proxy Listeners". You should see one entry:
RunningInterface✅127.0.0.1:8080
This means Burp is actively listening for traffic on localhost port 8080. If it shows as not running, click the checkbox to enable it.
💡 What is 127.0.0.1? It's the "loopback" address — it means "this machine itself." Port 8080 is the channel Burp listens on. Together,
127.0.0.1:8080is the address your browser will send traffic to.
Step 3: Check Intercept Status
Go to the Proxy → Intercept tab.
You'll see a large button that says either "Intercept is on" or "Intercept is off".
- Intercept ON = Burp pauses every request, waiting for your approval
- Intercept OFF = Traffic flows through Burp passively (it's logged but not paused)
For now, turn intercept OFF. We'll turn it on shortly when we want to capture a specific request.
Setting Up Your Browser
You have two options: use Burp's built-in browser (easiest), or configure Firefox manually (more control). We'll cover both.
Option A: Burp's Built-In Browser (Recommended for Beginners)
This is the fastest path. Burp ships with a Chromium-based browser that is pre-configured to route all traffic through Burp's proxy automatically — no manual setup needed.
- In Burp Suite, go to the Proxy tab
- Click the "Open Browser" button
- A browser window will open — this is your Burp browser
That's it. Any traffic from this browser flows straight into Burp. The CA certificate is also pre-installed, so HTTPS works out of the box.
⚠️ One limitation: This browser doesn't save your browsing history, cookies, or extensions between sessions. It's meant purely as a testing tool — treat it that way.
Option B: Configuring Firefox Manually (Recommended for Deeper Learning)
Using Firefox teaches you exactly how proxy configuration works, which is an important concept for any pen tester.
1. Configure Firefox's Network Proxy Settings
- Open Firefox
- Click the hamburger menu (☰) → Settings
- Scroll to the bottom → click "Settings…" under Network Settings
- Select "Manual proxy configuration"
- Enter:
- HTTP Proxy:
127.0.0.1 - Port:
8080
- Check "Also use this proxy for HTTPS"
- Leave "No proxy for" as-is (or add exceptions like
localhostif needed) - Click OK
Now Firefox routes all its traffic through Burp. But we're not done — HTTPS will fail with a security error until we install the CA certificate.
Installing Burp's CA Certificate (Critical Step)
This is the step most beginners get confused by, but it's actually straightforward. Follow carefully.
Step 1: Download the Burp CA Certificate
Make sure Burp is running AND your browser is configured to use Burp's proxy (127.0.0.1:8080). Then:
- Open your Firefox browser (the one pointing to Burp)
- In the address bar, type exactly:
http://burpsuite - Press Enter
You should see the PortSwigger Burp Suite page. If you see a connection error, Burp isn't running or your proxy settings are wrong — go back and check.
- Click "CA Certificate" in the top right corner
- This downloads a file called
cacert.der— save it somewhere you can find it (like your Desktop)
💡 Alternative URL: If
http://burpsuitedoesn't work, tryhttp://127.0.0.1:8080— you'll see the same page.
Step 2: Install the Certificate in Firefox
- In Firefox, go to: Settings → Privacy & Security
- Scroll down to "Certificates" section
- Click "View Certificates…"
- Go to the "Authorities" tab
- Click "Import…"
- Navigate to and select the
cacert.derfile you downloaded - A dialog appears — check BOTH boxes:
- "Trust this CA to identify websites."
- "Trust this CA to identify email users." (optional but harmless)
- Click OK
- Restart Firefox
Step 3: Verify HTTPS Interception Works
- Make sure Burp is running
- Go to Proxy → Intercept and turn intercept ON
- In Firefox, navigate to
https://google.com - The browser should appear to hang/freeze — this is Burp intercepting the request!
- Switch to Burp — you'll see the intercepted request in the Proxy → Intercept tab
- Click "Forward" to let it pass through
- Google loads in the browser ✅
Congratulations — you are now intercepting HTTPS traffic. 🎉
Installing the Certificate in Chrome / Chromium
If you prefer Chrome:
- Download the
cacert.derfromhttp://127.0.0.1:8080as above - Go to Chrome Settings → Privacy and Security → Security → Manage Certificates
- Go to the "Trusted Root Certification Authorities" tab
- Click "Import" and follow the wizard to import
cacert.der - Restart Chrome
On macOS, Chrome uses the system keychain. You may need to open Keychain Access, find the PortSwigger certificate, double-click it, and set it to "Always Trust".
Now for the exciting part. Let's capture, read, and modify a real HTTP request.
What We'll Do:
We'll visit a simple web page, intercept the request in Burp, inspect every part of it, modify a header, forward it, and observe the difference.
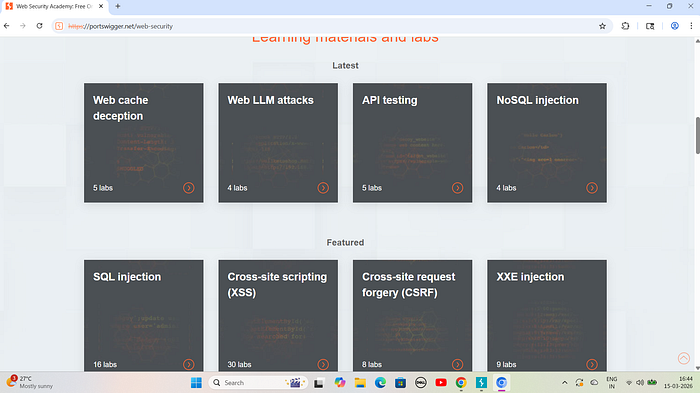
We'll use PortSwigger's Web Security Academy (https://portswigger.net/web-security) — a free, legal target designed exactly for this.
Step 1: Set Up
- Make sure Burp Suite is running
- Open the Burp Browser (or your configured Firefox)
- Go to Proxy → Intercept and turn Intercept ON
Step 2: Make a Request
In your browser, navigate to: https://portswigger.net/web-security
The browser freezes — Burp has captured the request. Switch to Burp.
Step 3: Dissecting the Intercepted Request
In the Proxy → Intercept tab, you'll see something like this:

GET /web-security HTTP/2
Host: portswigger.net
User-Agent: Mozilla/5.0 (Windows NT 10.0; Win64; x64) AppleWebKit/537.36 ...
Accept: text/html,application/xhtml+xml,application/xml;q=0.9,*/*;q=0.8
Accept-Language: en-US,en;q=0.5
Accept-Encoding: gzip, deflate, br
Connection: keep-alive
Upgrade-Insecure-Requests: 1
Let's break this down line by line:
Line 1 — The Request Line:
GET /web-security HTTP/2GET= the HTTP method (we're asking to retrieve a page, not submit data)/web-security= the path on the server we're requestingHTTP/2= the protocol version being used
The Headers: Every line after the first is an HTTP header — key-value pairs that send metadata about the request.
HeaderWhat It DoesHostWhich domain/server this request is going toUser-AgentIdentifies your browser and OS to the serverAcceptTells the server what types of content you'll acceptAccept-LanguageYour preferred language(s)Accept-EncodingCompression methods you support (gzip, etc.)ConnectionWhether to keep the connection alive after the responseCookieAny cookies for this domain (you'll see this on logged-in sites)
Step 4: Modify the Request
Let's make a change. Click in the request panel and modify the User-Agent header. Change it to:
User-Agent: BurpSuiteTestBrowser/1.0Now click "Forward" to send the modified request to the server.
The server will now see a request from a browser called "BurpSuiteTestBrowser" — something that doesn't really exist. This is the fundamental basis of how testers spoof identities, bypass user-agent checks, and test application behavior with unexpected inputs.
Think about it: If an application only allows certain user-agents (like a mobile-only endpoint), you can use Burp to fake being a mobile device and access it from your laptop.
Step 5: Reading the Response
After forwarding, go to Proxy → HTTP History. Find the request you just made and click on it. In the right panel, click the "Response" tab.
You'll see:
HTTP/2 200 OK
Content-Type: text/html; charset=utf-8
Content-Length: 45231
Date: Sun, 15 Mar 2026 10:00:00 GMT
Server: nginx
...
<!DOCTYPE html>
<html>
...
The Response Status Line:
HTTP/2 200 OK200= Status code meaning successOK= Human-readable status message
💡 Pen Tester Tip: A
500 Internal Server Errorafter injecting a payload is often a sign that your input caused an unhandled exception on the server — a potential indicator of SQL Injection, Command Injection, or other critical vulnerabilities. Never ignore a 500!
The HTTP History Tab — Your Testing Logbook
While Intercept captures individual requests for you to review one at a time, the HTTP History tab (under Proxy) passively logs every single request that flows through Burp — even when Intercept is off.
This is incredibly powerful. To use it:
- Turn Intercept OFF
- Browse around normally in your test browser
- Come back to Proxy → HTTP History
You'll see a complete log of every request, with:
- # — Request number
- Host — Which server it went to
- Method — GET, POST, PUT, etc.
- URL — The full path requested
- Params — Whether the request had parameters (query strings, POST body, cookies)
- Status — HTTP response code
- Length — Size of the response in bytes
- MIME Type — Type of content returned (HTML, JSON, JS, etc.)
Click any row to see the full request and response. This is your map of the application's entire communication.
🧠 Why this matters: When doing a pen test, you typically browse an entire application with Intercept off first, letting HTTP History build a complete map of all endpoints. Then you go back and analyze interesting requests one by one. This is called passive reconnaissance.
Understanding the Target Tab
While you've been browsing, the Target tab has been quietly building a map of the application.
Go to Target → Site Map. You'll see a tree structure on the left showing:
- All the domains you've visited
- Under each domain, all the paths/endpoints discovered
- For each endpoint, all the requests and responses
Click on any endpoint to see its full details on the right.
This is your attack surface map — a complete picture of everything Burp has discovered about the application. When you're doing a real pen test, a well-populated Site Map is one of your most valuable assets.
Setting Scope
One crucial thing you should always do in a real assessment: define the scope.
- Right-click on the target domain in the Site Map
- Select "Add to scope"
- Go to Target → Scope and verify it's been added
Now go to Proxy → HTTP History and check "Filter" at the top. Enable "Show only in-scope items".
This filters everything down to just the target you're testing, preventing accidental testing of third-party sites (like Google Analytics, CDNs, etc.) that might be loaded by the target page.
🏆 Professional habit: Always set scope before testing. It keeps your work clean, legal, and focused.
Burp Proxy Options Deep Dive
Let's look at some important settings in Proxy → Proxy Settings that every tester should know about.
Intercept Rules
You can configure which requests Burp intercepts rather than pausing on every single one. For example:
- Only intercept requests to specific hosts
- Only intercept requests with specific file extensions
- Skip intercepting image files (
.jpg,.png,.gif) to reduce noise
This is found under "Intercept Client Requests" and "Intercept Server Responses" in Proxy Settings.
Response Interception
By default, Burp intercepts requests (what your browser sends). But you can also intercept responses (what the server sends back). This lets you modify what the browser receives — for example:
- Remove JavaScript that blocks right-clicking
- Change a
falsetotruein a JSON response to enable hidden features - Modify HTML content before it renders in your browser
Enable this in Proxy Settings → Intercept Server Responses → check "Intercept responses based on the following rules".
Match and Replace
This is a powerful automation feature. You can tell Burp to automatically replace specific strings in every request or response — without manual interception.
For example:
- Automatically replace your User-Agent string in every request
- Automatically add a custom header to every request
- Replace
falsewithtruein every response automatically
Find it at: Proxy → Proxy Settings → Match and Replace
Troubleshooting Common Issues
Problem: Browser shows "Your connection is not private" / SSL Error
Cause: The Burp CA certificate isn't installed or trusted.
Fix: Re-follow the CA certificate installation steps above. Make sure you checked both trust boxes when importing.
Problem: Browser can't connect to any websites
Cause: Burp isn't running, or the proxy settings are wrong.
Fix:
- Verify Burp is running and the listener shows on 127.0.0.1:8080
- Verify your browser proxy settings are exactly
127.0.0.1port8080 - Try navigating to
http://127.0.0.1:8080— if you see the Burp page, the proxy is working
Problem: Burp listener says "Address already in use"
Cause: Something else on your machine is already using port 8080 (another app, a previous Burp instance, etc.)
Fix: Either close whatever is using port 8080, or change Burp's listener port:
- Go to Proxy → Proxy Settings → Proxy Listeners
- Select the listener and click Edit
- Change the port to something free, like
8081 - Update your browser proxy settings to match the new port
🧠 Pen Tester Tip: Always send an
OPTIONSrequest to interesting endpoints. If the server responds with methods it supports (likePUTorDELETE), that's a significant finding — especially on REST APIs.
🔄 The Request/Response Cycle — Full Picture
Here's the complete mental model you should now have:
┌─────────────┐     ①Request      ┌─────────────────┐    ③Forward     ┌────────────┐
│   Browser   │ ───────────────▶  │   Burp Proxy    │ ─────────────▶  │ Web Server │
│             │                   │                 │                  │            │
│             │ ◀───────────────  │  ②Inspect/Modify│ ◀─────────────  │            │
└─────────────┘    ⑥Rendered      └─────────────────┘   ④Response     └────────────┘
                                         ⑤Forward
(to browser)- Browser sends request → Burp catches it
- Burp shows it to you — you can modify it
- You click Forward → Burp sends it to the web server
- Server sends response → Burp catches it
- Burp shows it to you — you can modify it
- You forward → Browser renders the (possibly modified) page
This cycle is the heartbeat of web application pen testing. Master it and everything else becomes possible.
Coming Up in Blog #3
Now that you can intercept requests and read responses, it's time to weaponize that ability. In Blog #3, we'll master the Repeater — Burp's most important manual testing tool.
We'll cover:
- Sending requests from HTTP History to Repeater in one click
- Manually fuzzing parameters to test for vulnerabilities
- Comparing responses to detect subtle differences
- Using Repeater for manual SQL injection testing
- Chaining requests in Repeater workflows
- Real-world examples: Finding an IDOR using Repeater
The Burp proxy is not just a feature — it's a mindset shift. The moment you start intercepting your own traffic, you realize how much data your browser is sending without you ever seeing it. Cookies, tokens, tracking headers, device fingerprints — it's all there in every request.
This visibility is exactly what makes Burp Suite so powerful, and it's exactly what you need to find security vulnerabilities. Every hack starts with understanding — and now you can see everything.
Do the homework. Get comfortable with interception. Blog #3 gets hands-on with real vulnerability testing. 🔥
Enjoying the series? Give this a clap 👏 and follow so you don't miss Blog #3 — where we start finding real vulnerabilities with the Repeater.
Tags: #BurpSuite #EthicalHacking #CyberSecurity #PenTesting #WebSecurity #HTTPProxy #BurpProxy #CACertificate #BeginnerHacker #PortSwigger #InfoSec #WebAppSecurity