
Introduction
When I first started studying vulnerability management, every tutorial said the same thing: download Kali, run a scan, look at the results. What none of them talked about was what comes after. In the real world, a scanner doesn't tell you what to fix first. That's a human judgment call, and it's the skill that actually matters.
So I built a project that covers the full workflow: set up a lab, run a professional-grade scan, then build a prioritization dashboard that ranks findings by real risk, not just severity labels.
Here's exactly how I did it, and more importantly, why I made the decisions I did.
The Setup: Two Virtual Machines, One Private Network
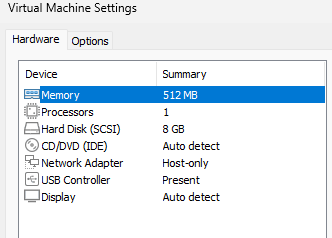
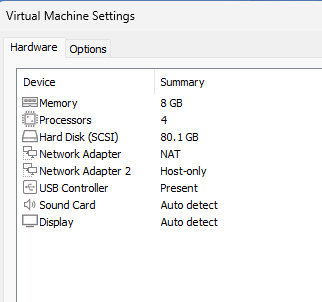
The foundation is simple. I created two virtual machines on my own computer using VMware(free):
- Metasploitable2 — a Linux machine deliberately built with dozens of vulnerabilities. It's the target.
- Kali Linux — the attacker/analyst machine with all the security tools pre-installed.
Both machines run on a Host-Only network — a private, isolated bubble that lets them talk to each other but prevents either from reaching the real internet. This is a critical step. Metasploitable2 is intentionally full of holes; you never want it exposed to a live network.
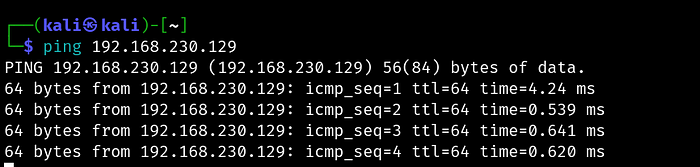
Once both VMs were running, I confirmed connectivity with a simple ping from Kali to Metasploitable2's IP. One successful ping and you're ready to scan.
Some Theory: NVT, SCAP and CERT
Modern vulnerability scanners like OpenVAS don't just "find bugs." They rely on structured security intelligence feeds, standardized scoring systems, and continuously updated threat databases. Understanding how these work together helps explain how enterprise vulnerability management actually operates behind the scenes. concepts you'll encounter in tools like Greenbone/OpenVAS are:
- NVT (Network Vulnerability Tests): An NVT (Network Vulnerability Test) is a security test used by a vulnerability scanner to determine whether a system is vulnerable to a specific issue. In OpenVAS, thousands of NVTs are executed during a scan.
- SCAP (Security Content Automation Protocol): An SCAP (Security Content Automation Protocol) is a standardized framework created by National Institute of Standards and Technology (NIST) for automating vulnerability management, compliance checking, and security reporting. SCAP standardized the ecosystem so tools could exchange security data, correlate vulnerabilities consistently and automate compliance workflows.
- CERT vulnerability advisories: CERT organizations coordinate cybersecurity threat intelligence, incident response, and vulnerability disclosures.
In the real world, these concepts work together in the following manner
- CERT publishes an advisory warns about a new critical vulnerability which receives a CVE identifier.
- SCAP content is updated with CVSS scores, CPE mappings, and OVAL definitions.
- NVT feed is updated as scanner vendors release new detection scripts.
- The vulnerability scanner detects affected assets.
Now, back to the fun part…
The Scan: OpenVAS on Kali Linux
OpenVAS (Greenbone Community Edition) comes pre-installed on Kali but needs a first-time setup:
sudo gvm-setup        # downloads vulnerability definitions (~20 mins)
sudo gvm-check-setup  # verifies everything is working
sudo gvm-start        # starts the service
Then I opened the web interface at https://127.0.0.1:9392, created a scan task targeting Metasploitable2's IP, and ran a full scan. It took about 30–40 minutes and came back with a significant number of findings — which honestly, for a machine designed to be vulnerable, was expected.
The Problem With "Fix Critical Things First"
Here's where most guides stop. They tell you to sort by severity and work from the top. That sounds right, but it's incomplete, and in a real environment it can lead you to make poor prioritization decisions.
Consider two findings:
- Finding A: CVSS 9.8 (Critical) — but it requires local access to exploit, and the affected service has no open port
- Finding B: CVSS 7.5 (High) — but it's on port 512, exposed on the network, with no patch available
Sorted naively, Finding A looks more urgent. But Finding B is genuinely more dangerous in practice because it's reachable by anyone on the network and can't be patched away.
This is why real vulnerability management is a prioritization problem, not a detection problem.
Building a Smarter Risk Score
When I exported the scan results as CSV from OpenVAS, I had these columns to work with:
IP | Port | CVSS | Severity | QoD | Solution Type | NVT Name | Summary | SolutionFour of these are more useful than most people realize:
- CVSS is your base score, but it's not the whole story.
- Port tells you whether the vulnerability is sitting on a reachable network service. An empty port field means the attacker likely needs local access first which is much harder to exploit remotely.
- QoD (Quality of Detection) is an OpenVAS-specific field that most tutorials completely ignore. It measures how confident OpenVAS is that the finding is real. A CVSS 9.8 with QoD 30 should rank below a CVSS 8.0 with QoD 100. The former might not even be a real finding.
- Solution Type tells you what kind of fix exists:
VendorFixmeans a patch is available,Mitigationmeans no patch; requires a config change or workaround,WillNotFixmeans the vendor is never patching this,NoneAvailablemeans no fix exists yet.WillNotFixandNoneAvailabledeserve higher urgency flags. You can't patch your way out, so you need compensating controls. That takes more time and planning.
The Prioritization Code
Here's the composite scoring model I built in Python that builds a scoring model based on all the four factors discussed above and outputs a ranked CSV that categorizes vulnerabilities into 4 types based on the need to fix it:
import pandas as pd

df = pd.read_csv('openvas_results.csv')

# Clean up CVSS column just in case it loaded as string
df['CVSS'] = pd.to_numeric(df['CVSS'], errors='coerce').fillna(0)
df['QoD'] = pd.to_numeric(df['QoD'], errors='coerce').fillna(0)

def composite_risk_score(row):
    score = 0

    score += row['CVSS'] * 10

    port = row.get('Port', '')
    if pd.notnull(port) and str(port).strip() not in ['', 'nan', '0']:
        score += 20

    qod = row.get('QoD', 50)
    score += (qod / 100) * 15

    solution_urgency = {
        'WillNotFix':    15,
        'NoneAvailable': 15,
        'Mitigation':    10,
        'VendorFix':      5,
        'Workaround':     8,
    }

    score += solution_urgency.get(str(row.get('Solution Type', '')), 0)

    return round(score, 2)


df['Risk Score'] = df.apply(composite_risk_score, axis=1)
df = df.sort_values('Risk Score', ascending=False)

def assign_tier(score):
    if score >= 120:
        return 'P1 - Fix Immediately'
    elif score >= 90:
        return 'P2 - Fix This Sprint'
    elif score >= 70:
        return 'P3 - Fix This Quarter'
    else:
        return 'P4 - Track and Monitor'

df['Priority Tier'] = df['Risk Score'].apply(assign_tier)

output_cols = [
    'IP', 'Port', 'NVT Name', 'CVSS', 'Severity',
    'QoD', 'Solution Type', 'Risk Score', 'Priority Tier', 'Solution'
]

df[output_cols].to_csv('fix_first_ranked.csv', index=False)
print(df[output_cols].head(20).to_string())
A Real Example: The rexec Finding
Let me walk through how one actual finding scored.
OpenVAS flagged port 512/tcp running an rexec service — remote execution that transmits credentials in plaintext over the network. Here's how it scored:
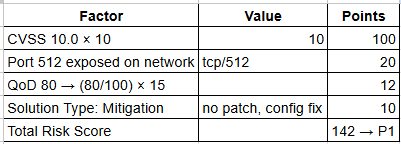
This is correctly flagged as P1 — fix immediately. An attacker anywhere on the network can intercept login credentials in cleartext. The recommended fix is disabling the rexec service entirely and replacing it with SSH.
Notice that QoD 80 (not 100) gives a slightly lower confidence bonus than a fully confirmed finding, which is the right behaviour. It prevents the model from treating every finding as equally real regardless of how it was detected.
The Dashboard Output
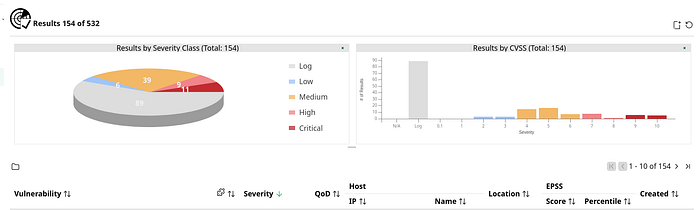
The final output is a ranked CSV and a severity visualizations that shows how many Critical, High, Medium, Low findings were observed.
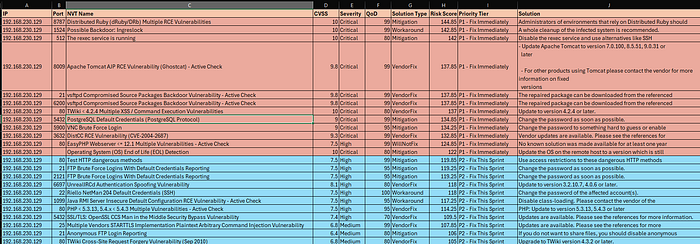
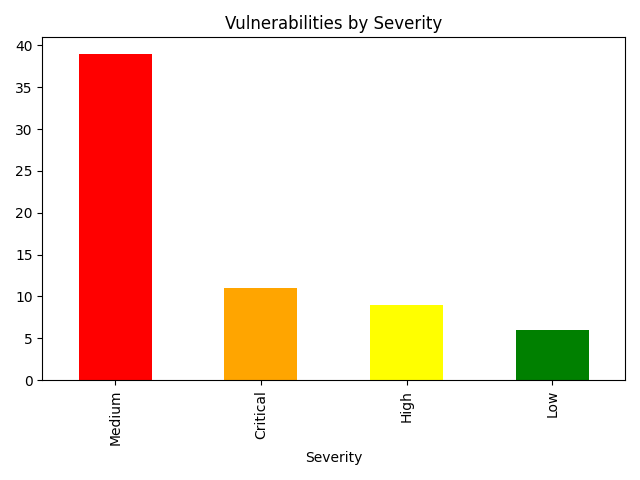
The key insight from my results: High severity findings can be ranked higher than Critical ones, purely because they sat on open network ports with no available patch and high detection confidence. Raw severity alone would have given me the wrong fix order.
What I Took Away From This
A few things stood out that I didn't expect going in:
- QoD is underrated. It filters out noise meaningfully. Low-confidence findings are worth tracking, but they shouldn't be driving your sprint planning.
- Solution Type changes the conversation. "WillNotFix" isn't just a flag. It means you need a whole different response strategy. Firewall rules, network segmentation, disabling the service. That's harder than patching and deserves to be prioritized as such.
- The thresholds need tuning. The score cutoffs I chose (120, 90, 70) work for my dataset, but they may not be right for yours. After scoring your data, print a distribution and look for natural clusters. Adjusting those numbers based on what you actually see is the right approach, not copying mine blindly.
- Prioritization is the real skill. Anyone can run a scanner. The value is in knowing which 5 findings to bring to a sprint planning meeting and being able to explain why in terms the business understands.
Reproduce It Yourself
Everything you need:
- VirtualBox (free) — virtualbox.org
- Kali Linux pre-built VM — kali.org/get-kali
- Metasploitable2 — search "Metasploitable2 SourceForge"
- OpenVAS — pre-installed on Kali, setup via
gvm-setup - Python with
pandasandmatplotlib
Total cost: $0. Time investment: roughly one weekend.