Malware analysis is a crucial skill for cybersecurity professionals such as SOC analysts, blue teamers, and VAPT analysts. In this blog, I demonstrate a complete static malware analysis workflow performed on a suspicious executable file without executing it. This guide is written in a very clear, step-by-step manner so beginners can easily follow along.
⚠️ Disclaimer:
All analysis was conducted inside an isolated Windows 10 Virtual Machine (VMware) strictly for educational purposes. Never analyze malware on a host machine.
────────────────────────────
What is Static Malware Analysis?
Static malware analysis is the process of examining a malicious file without running it. The objective is to understand the malware's structure, behavior indicators, and intent by analyzing its metadata, hashes, strings, and Portable Executable (PE) structure.
Static analysis helps answer:
• What type of file is this?
• Is it suspicious or malicious?
• What capabilities might it have?
• Is it already known malware?
────────────────────────────
Environment Setup
• Windows 10 Virtual Machine
• FLARE VM (recommended for malware analysis)
• No internet or controlled network access
────────────────────────────
Tools Used
• HxD Hex Editor — File signature analysis
• ExeInfo PE — File type & packer detection
• PeStudio — Strings, indicators & PE analysis
• CFF Explorer — Deep PE header inspection
• HashCalc — Cryptographic hash generation
────────────────────────────
Step 1: File Identification (MOST IMPORTANT FIRST STEP)
Before assuming a file is malware, we must identify what type of file it is.
How to do it:
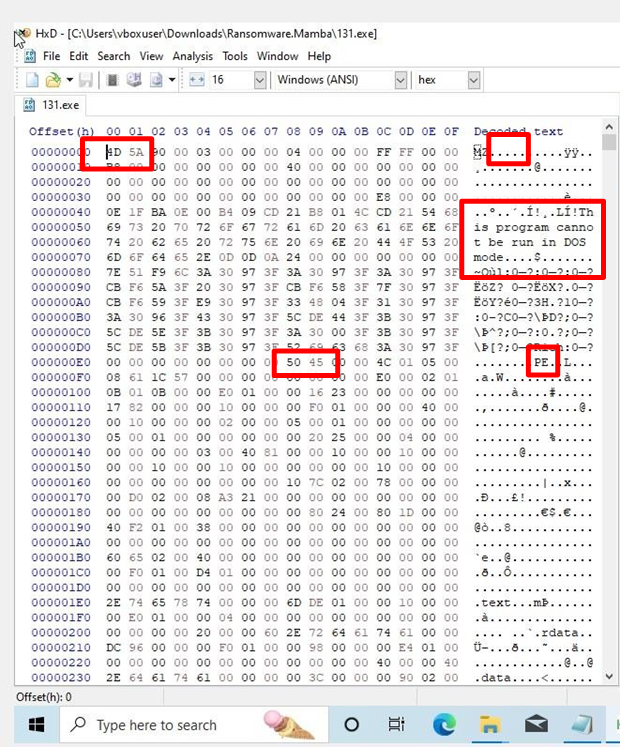
1. Open HxD Hex Editor
2. Drag and drop the suspicious file into HxD
3. Observe the first two bytes (magic bytes)
Observation:
• The first two bytes are 4D 5A
• In ASCII, this translates to "MZ"
Why this matters:
"MZ" confirms the file is a Windows Portable Executable (PE).
Additional confirmation:
• In the decoded text section, we see:
"This program cannot be run in DOS mode"
• PE header signature starts with 50 45
Conclusion:
The file is confirmed as a Windows PE executable.
────────────────────────────
Step 2: Malware Hashing (DIGITAL FINGERPRINTING)
Hashing creates a unique fingerprint for the file. Hash values help analysts determine whether the malware has been seen before.
How to do it:
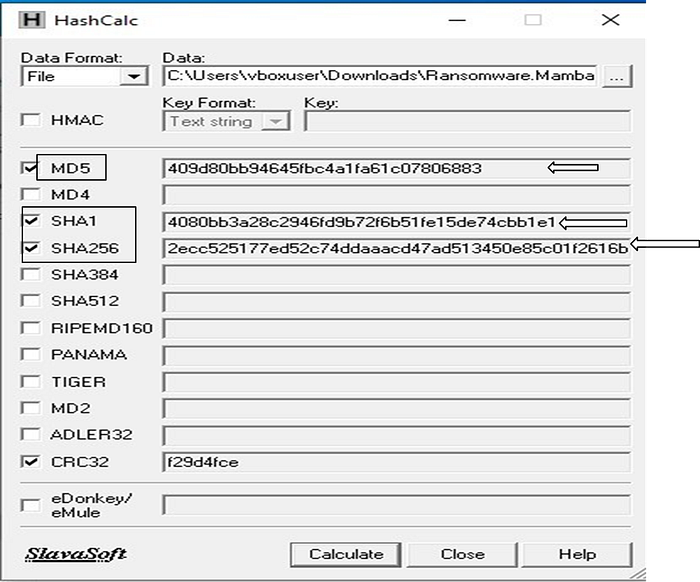
1. Open HashCalc
2. Select the suspicious executable
3. Generate the following hashes:
• MD5
• SHA-1
• SHA-256
Why this matters:
• Even a 1-bit change alters the hash
• Hashes can be searched on:
– VirusTotal
– Hybrid Analysis
- Helps identify known malware families
────────────────────────────
Step 3: String Analysis (MOST INSIGHTFUL STEP)
String analysis extracts readable text embedded inside the binary. These strings often expose what the malware is capable of doing.
How to do it:
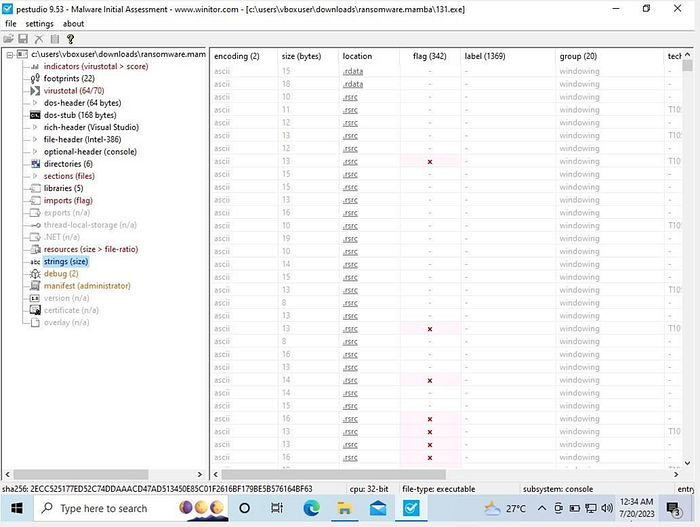
1. Open PeStudio
2. Load the suspicious executable
3. Navigate to the "Strings" section
4. Look for red flags or highlighted entries
What to look for:
• Cryptographic API calls
• Process injection keywords
• Registry manipulation
• Anti-analysis techniques
Suspicious strings identified:
• CryptAcquireContext
• CryptCreateHash
• CryptGetHashParam
• CryptDestroyHash
• SetDefaultDllDirectories
• Execution Through API
• Process Injection
Why this matters:
These APIs strongly indicate encryption behavior and malicious execution techniques, commonly seen in ransomware.
────────────────────────────
Step 4: Packer Detection (OBFUSCATION CHECK)
Malware authors use packers to hide code and evade detection.
How to do it:
1. Open ExeInfo PE or Detect It Easy
2. Load the executable
3. Check for packer/compiler indicators
Observation:
• The overlay section contained packed data
Why this matters:
Packed malware must often be unpacked before deeper analysis or reverse engineering.
────────────────────────────
Step 5: PE Header Analysis (INTERNAL STRUCTURE)
The PE header contains detailed information about how the executable interacts with Windows.
How to do it:
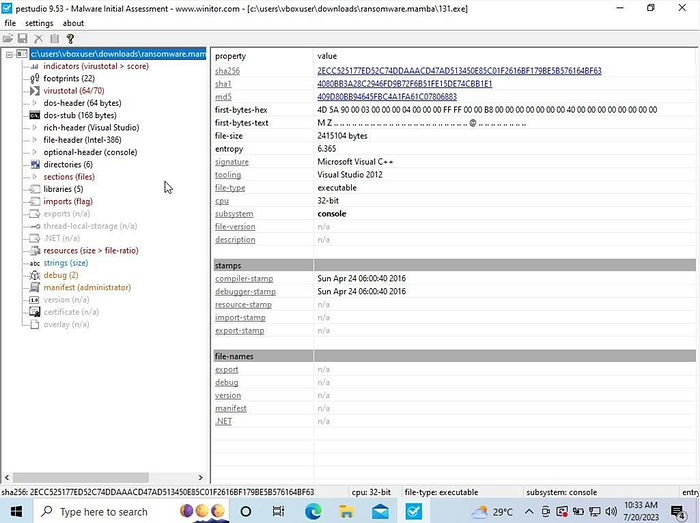
1. Open PeStudio or CFF Explorer
2. Analyze the following:
• DOS Header
• DOS Stub
• File Header
• Optional Header
• Sections
• Imports & Libraries
• Overlay
Key finding:
• Suspicious instructions were present in the overlay section
Why this matters:
Overlay data is often used to store hidden payloads or encrypted malicious logic.
────────────────────────────
Final Conclusion
Without executing the file, static malware analysis successfully revealed multiple malicious indicators.
Key outcomes:
✔ Identified file type as PE executable
✔ Generated forensic hash values
✔ Extracted malicious strings
✔ Detected cryptographic & injection APIs
✔ Identified packed overlay data
Static analysis acts as the first line of defense in malware investigation and helps analysts decide whether to proceed with dynamic analysis or reverse engineering.
────────────────────────────
Skills Gained from This Analysis
• Malware triaging
• Static analysis workflow
• PE file structure understanding
• IOC identification
• Practical tool usage
If you are learning malware analysis, SOC operations, or VAPT, mastering static analysis is non-negotiable.
Happy Hunting & Stay Safe 🔐