
If you've tried following PortSwigger's official documentation for installing Burp Suite's CA certificate in Chrome, you probably noticed the screenshots and instructions don't match what you see on your screen. That's because Chrome has completely redesigned its certificate management interface, and the official guide hasn't caught up yet.
This article provides updated step-by-step instructions that reflect Chrome's current Certificate Manager.
Why You Need This
Burp Suite acts as a proxy between your browser and web applications. To intercept HTTPS traffic without triggering security warnings, your browser needs to trust Burp's Certificate Authority. Without this trust established, Chrome will block connections or show constant security errors.
Prerequisites
Before you begin, make sure you have completed these steps:
- Burp Suite is running (Community or Professional edition)
- Your browser proxy settings point to Burp (typically 127.0.0.1:8080)
- You've confirmed the proxy listener is active in Burp
Step 1: Download the CA Certificate
- Open Chrome and navigate to
http://burpsuite - On the welcome page, click CA Certificate
- Save the
cacert.derfile somewhere you can find it
If this page doesn't load, your proxy configuration isn't working correctly. Go back and verify your proxy settings before continuing.
Step 2: Open Chrome's Certificate Manager
This is where the official documentation becomes inaccurate. The old path through Settings > Privacy and security > Manage certificates no longer exists in modern Chrome versions.
Instead, type this directly into your Chrome address bar:
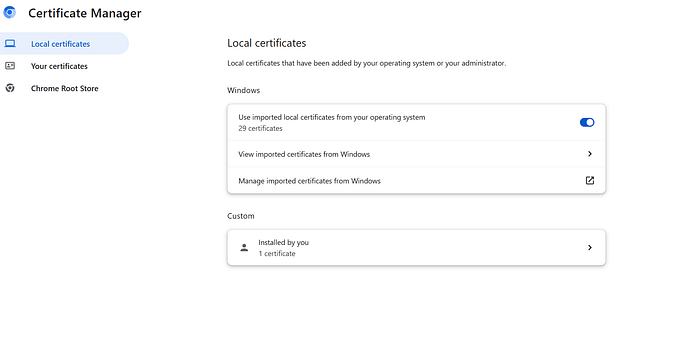
chrome://certificate-managerYou'll see Chrome's new Certificate Manager interface with three sections in the left sidebar:
- Local certificates
- Your certificates
- Chrome Root Store
Step 3: Navigate to Custom Certificates
- Click Local certificates in the left sidebar
- Scroll down past the "Windows" section (or "System" on Linux/Mac)
- Find the Custom section
- Click Installed by you
Step 4: Import the Certificate
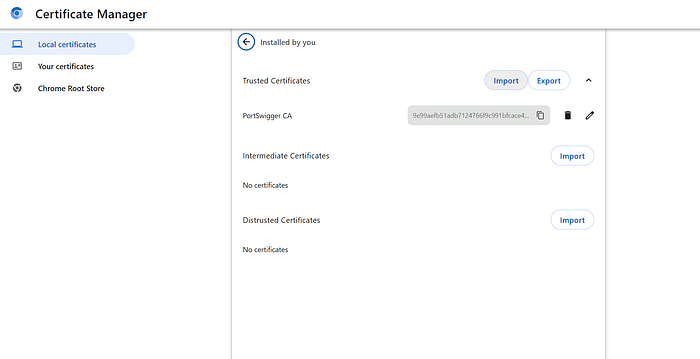
- Under Trusted Certificates, click the Import button
- Select the
cacert.derfile you downloaded earlier - The certificate should now appear as PortSwigger CA in your trusted certificates list
Step 5: Verify the Installation
- Restart Chrome completely
- With Burp Suite running, visit any HTTPS website
- You should no longer see certificate warnings
To confirm the certificate is properly installed, you can return to chrome://certificate-manager, navigate to Local certificates > Custom > Installed by you, and verify that PortSwigger CA appears under Trusted Certificates.
Removing the Certificate
If you need to remove the Burp CA certificate later:
- Open
chrome://certificate-manager - Go to Local certificates > Custom > Installed by you
- Find PortSwigger CA under Trusted Certificates
- Click the trash icon next to it
- Confirm the deletion
What Changed in Chrome
Chrome moved away from the operating system's certificate dialogs to a built-in Certificate Manager. This change rolled out gradually through 2024, which explains why PortSwigger's documentation shows an interface that no longer exists for most users.
The new interface is actually cleaner and gives you better visibility into what certificates you've installed versus what came from your operating system or the Chrome Root Store.
Troubleshooting
Certificate not appearing after import: Make sure you're importing to the correct section. The certificate needs to go under "Trusted Certificates" within "Installed by you", not anywhere else.
Still getting security warnings: Restart Chrome completely after importing. If warnings persist, verify Burp Suite is running and your proxy settings are correct.
Can't find certificate-manager: You might be running an older Chrome version. Update Chrome or try the legacy method through Settings > Privacy and security > Security > Manage certificates.
Sources
- PortSwigger Official Documentation (outdated interface): https://portswigger.net/burp/documentation/desktop/external-browser-config/certificate/ca-cert-chrome-linux
- Chrome Certificate Manager: chrome://certificate-manager (built-in Chrome page)