A few days ago, I tried something new: I turned my MacBook M3 into a Linux server environment without replacing macOS, and without dual-booting. I set up a fully functional Ubuntu Server virtual machine (VM) running inside macOS using a tool called UTM.
What started as a simple idea became a practical dive into how virtual machines work, what hypervisors do, how Apple Silicon affects virtualization, and how to run a Linux server entirely from the command line. By the end, I had a clean Ubuntu Server instance with SSH access, networking, package management, and a server-like terminal all running on my Mac.
If you've ever wanted to run Linux on an Apple Silicon Mac, this guide is both a walkthrough and a plain-language intro to virtualization. I'll cover every step I followed, including small gotchas you might hit along the way.
First Things First: What Even Is a Virtual Machine?
Think of your Mac like a piece of land. On that land, you've built one house, your macOS. It's your main home. A virtual machine (VM) lets you build a second house on the same piece of land, completely independent from the first. It has its own rooms, its own rules, its own locks. The two houses don't interfere with each other.
More technically: a VM is a software-based simulation of a physical computer. It runs inside your real computer but behaves as if it were a completely separate machine with its own processor, memory, storage, and operating system.
A few key terms you'll keep hearing:
- Host Machine : Your real, physical MacBook. It's the "host" because it hosts everything. It supports and manages the guest operating systems running inside it. It supplies : CPU resources, Memory, Storage and Network Connectivity.
- Guest Machine : The virtual machine running inside your Mac. It's the "guest" because it borrows the host's resources. Even though the resources are shared, the guest machine operates independently from the host machine.
- Hypervisor : The software that makes all of this possible. It sits between your real hardware and the guest OS, dividing resources (CPU, RAM, storage) and keeping everything isolated. Think of it as the landlord who manages the land and decides how much goes to each tenant. There are many hypervisors available such as UTM, VMware, VirtualBox, Hyper-V etc. On your Mac M3, the hypervisor we'll use is called UTM.
- ISO File : A packaged disk image that contains a full operating system installer. When you "install" Ubuntu into a VM, you're using an ISO file the same way you'd install from a USB drive on a real computer. The ISO file contains bootable data, operating system files, installer programs and system configurations.
Why Ubuntu Server (Not Ubuntu Desktop)?
You might be wondering: what's the difference between Ubuntu Server and Ubuntu Desktop?
Simple. Ubuntu Desktop has a graphical user interface (GUI): windows, a mouse cursor, icons, the whole visual experience. Ubuntu Server has none of that. It's just a black terminal screen with a blinking cursor, waiting for your commands.
That sounds worse, but for servers it's actually better. No graphics means less RAM used, less processing power wasted, and a system built to run quietly in the background doing actual work i.e hosting websites, running databases, processing tasks. That's what "server-based VM" means: a VM running a server OS.
Why UTM on Mac M3?
Here's a technical detail that matters a lot: your Mac M3 runs on ARM architecture, not the Intel x86 architecture that most Windows PCs use. These are fundamentally different instruction sets (the language the CPU speaks). This means two things:
- You need a virtualization tool built for ARM, that's UTM.
- You need an ARM64 version of Ubuntu Server, not the regular x86 version. If you download the wrong one, it simply won't work (or will run so slowly it's unusable).
UTM checks those boxes. It's lightweight, straightforward to set up, and uses Apple's built‑in virtualization framework on Apple Silicon, which makes it fast and reliable.
What You'll Need?
- A Mac with Apple Silicon (M1/M2/M3) running a recent version of macOS.
- UTM (download from getutm.app or the Mac App Store).
- Ubuntu Server 24.04 LTS ARM64 ISO (e.g., ubuntu-24.04.4-live-server-arm64.iso) from Ubuntu's official site.
- At least 20GB of free disk space
Step 1: Download Ubuntu Server 24.04.5 (ARM64)
Head to: https://ubuntu.com/download/server/arm
Download Ubuntu Server 24.04.5 LTS. Make sure it says ARM64. This is critical for Apple Silicon. The file is around 2–3 GB and ends in .iso. Save it somewhere easy to find, like your Downloads folder.
Step 2: Open UTM and Create a New VM
Open UTM. You'll see a clean interface with a "+" button or a prompt to "Create a New Virtual Machine." Click it. You'll immediately be asked to choose between two modes:
- Virtualize : Runs Ubuntu natively on your ARM hardware. Fast.
- Emulate : Pretends to be a different type of CPU. Extremely slow.
Always choose Virtualize. Then select Linux as your operating system.
Step 3: Attach the Ubuntu ISO
You'll be prompted to select an installation image. Click Browse and navigate to the .iso file you downloaded in Step 1. This is the equivalent of inserting a USB drive with Ubuntu on it into a real computer. The VM will boot from this image to run the installer.
Click Continue.
Step 4: Allocate Hardware Resources
Now you're telling the VM how much of your Mac's real resources it can use. Think of this like deciding how big the second house on your land will be. Here's what to set:
- RAM: 4 GB (4096 MB) is a good starting point. If you have plenty of memory, 6–8 GB is even nicer. Keep at least 8–12 GB free for macOS, depending on your total RAM.
- CPU cores: The default is fine. Don't assign all cores to the VM. Make sure to leave some for macOS.
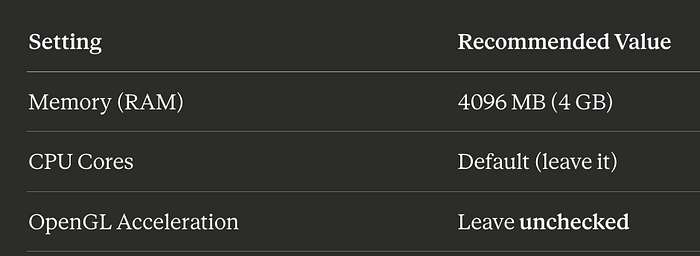
Why 4 GB? Ubuntu Server is lightweight and runs comfortably on 4 GB. This also leaves plenty of RAM for macOS to keep running normally alongside it. Click Continue.
Step 5: Set Storage Size
This is the virtual hard drive . It tells how much disk space your Ubuntu Server gets. The default is 64 GB, which is comfortable. If your Mac is short on space, 32 GB works too. Click Continue, skip the Shared Directory screen (not needed for now), and move on.
Step 6: Name and Save
Give your VM a clear name, something like Ubuntu-Server-24. Then click Save. Your VM now appears in UTM's left sidebar. It exists, but Ubuntu isn't installed yet. We've just built the empty house. Now we'll furnish it.
Step 7: Start the VM and Install Ubuntu
Click the ▶ Play button next to your VM. A black window opens . Your VM is booting from the ISO and launching the Ubuntu installer. You'll navigate this installer using your keyboard only (arrow keys to move, Enter to select, Space to toggle options). Here's exactly what to do on each screen:
(a) Language : Select English, press Enter.
(b) Installer Update : Select Continue without updating (saves time).
(c)Keyboard Layout : Leave default, select Done.
(d) Network Configuration : Leave on automatic (DHCP). This means the VM gets an IP address assigned to it automatically and no manual configuration is needed. Select Done.
(e) Proxy : Leave blank, select Done.
(f) Mirror : Leave default, select Done.
(g) Storage Configuration : Select Use an entire disk. Don't worry this only affects the VM's virtual disk, not your Mac's actual hard drive. Select Done, then Continue when it asks you to confirm.
(h) Profile Setup : Fill in:
- Your name
- A server name (e.g.,
my-ubuntu-server) - A username (e.g.,
student) - A strong password
Remember these details. You'll need them every time you log in.
Step 8: Reboot After Installation
When you see "Installation complete!", select Reboot Now and press Enter. You'll likely see a message like "Failed unmounting cdrom" . This is completely normal message to see. Here's what to do:
- Look at the UTM window (outside the black terminal area : the app controls, not inside the VM)
- Find the CD/DVD option in the bottom-left area of the UTM window
- Click it and select Clear (this ejects the ISO, like removing a USB drive)
- Press Enter inside the VM window
The VM will now reboot into your freshly installed Ubuntu Server.
NOTE: If you can't find the CD/DVD option: Stop the VM using the ■ Stop button at the top of UTM, then right-click your VM in the sidebar → Edit → Drives → find the ISO entry → clear it → Save. Then restart the VM.
Step 9: Log In
Your VM boots and shows a login prompt : A black screen asking for your username and password. Enter the credentials you created during installation.
Success looks like this:
yourname@my-ubuntu-server:~$That blinking cursor is your entire server, ready for commands.
Step 10: First Commands to Run
Run these to confirm everything is working:
uname -aThis shows system info. You should see aarch64 in the output which confirms ARM64 architecture.
Connect to Your VM via SSH
One of the most powerful things about a server VM is that you can connect to it from your Mac's Terminal just like connecting to a real remote server. No need to click into the UTM window at all.
- Inside your VM, run
ip aand note the IP address (e.g.,10.0.2.15) - Open Terminal on your Mac
- Type:
ssh your-username@10.0.2.15You're now controlling your Ubuntu Server from your Mac's terminal. This is exactly how engineers connect to real servers in the cloud.
Shutting Down Properly
Always shut down your VM gracefully . Don't just close the UTM window. Inside the VM, run:
sudo poweroffThis safely shuts everything down. To start it again later, just hit ▶ Play in UTM and log back in.
Final Thoughts?
Virtualization is one of those foundational concepts that quietly powers almost all of modern computing . From the cloud servers your apps run on, to DevOps pipelines, to security research labs. Setting it up yourself, from scratch, on your own laptop, is one of the best ways to really get it. There's theory, and then there's watching Ubuntu Server boot inside a window on your Mac and knowing you built that from nothing.
Start simple: Virtualize (not Emulate), ARM64 ISO, enable SSH during install
Your MacBook is now a server. Go break things :))