
I hope you all are having a wonderful day, I certainly am.
The day becomes even better when I solve a room in TryHackMe after spending a while having no clue what to do. 😅
Before we get into the content of today's blog, I want to highlight the one key element of overcoming the hurdles of a challenge.
Never be afraid of being a beginner.
This is something written on the walls of my kickboxing class, and it really is grounding.
A lot of times we see people do incredible things: solve high difficulty CTF rooms, do 25 pull-ups, get into a really great company, etc.

But remember this, nothing becomes easy the first day you do it. Not even the first month for that matter. Maybe not even the first year.
However, if you embrace the process of learning and being okay with having to try something again, I can assure you that you will get better at it.
This applies to your work, your skills, and your life.
With that being said, I'm happy to be a beginner, and it's time to walk you through a beginner room in TryHackMe called W1seGuy.
So, let's get into it. 🙂
Part 1 — The Attack Box
The first thing we need to do, just like in most TryHackMe rooms, is start the attackbox.
Target IP: 10.64.188.221
The first portion of this attack involves using netcat on port 1337 to try to connect to the attack box's server.
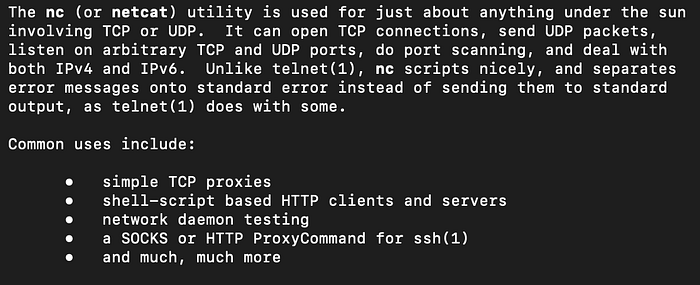
Before I show you the actual connection, let me explain what netcat is.
Netcat is a utility tool that uses TCP and UDP connections to read and write data within a network. You can use it for both attacking and security.
You can do a lot with netcat. A lot. It's often called the 'swiss army knife' of networking by those in the industry.
You can:
- transfer files directly through ports
- scan a range of ports to see which ones are open and accepting connections on a remote machine
- set up a simple chat server
- and much more
For this room, we will use netcat to connect to a remote host over port 1337.
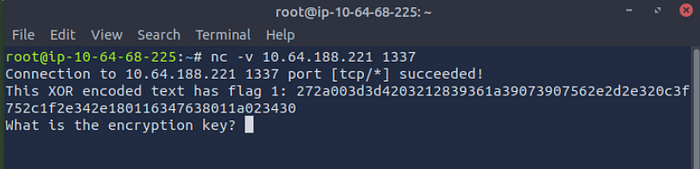
Command Syntax: nc -v <target-IP> <target-port>
We use this to make the connection over TCP, which is a Layer 4 protocol.
If you want to learn more about this layer of the OSI model, please feel free to read part 2 of my OSI model series where I break down Layers 4–7 in thorough detail.
Now that we've made the connection to the target host, we then use the source code in order to help us figure out the encryption key to retrieve the second flag.
We do this by using the XOR encoded text presented to us. This text is the hexadecimal representation of the first flag.
Before I go over how we decode the encoded text, and acquire the key, I'll break down the source code itself. This will help you understand the backend of how the connection is established in the screen you saw above.
Part 2— Source Code
When we enter this room within TryHackMe, we get met with Task 1 — Source Code.
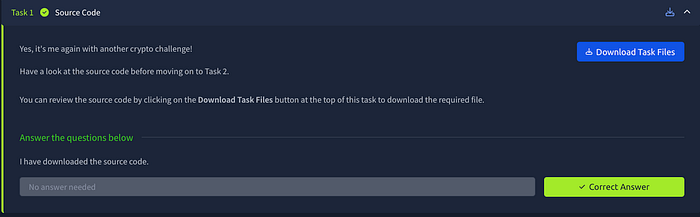
The first thing you need to do is, well, download the task files :)
As mentioned earlier, this is the exact Python code that is used to allow the netcat connection to take place over port 1337.
Here is the Python syntax:
import random
import socketserver
import socket, os
import string

flag = open('flag.txt','r').read().strip()

def send_message(server, message):
    enc = message.encode()
    server.send(enc)

def setup(server, key):
    flag = 'THM{thisisafakeflag}'
    xored = ""

    for i in range(0,len(flag)):
        xored += chr(ord(flag[i]) ^ ord(key[i%len(key)]))

    hex_encoded = xored.encode().hex()
    return hex_encoded

def start(server):
    res = ''.join(random.choices(string.ascii_letters + string.digits, k=5))
    key = str(res)
    hex_encoded = setup(server, key)
    send_message(server, "This XOR encoded text has flag 1: " + hex_encoded + "\n")

    send_message(server,"What is the encryption key? ")
    key_answer = server.recv(4096).decode().strip()

    try:
        if key_answer == key:
            send_message(server, "Congrats! That is the correct key! Here is flag 2: " + flag + "\n")
            server.close()
        else:
            send_message(server, 'Close but no cigar' + "\n")
            server.close()
    except:
        send_message(server, "Something went wrong. Please try again. :)\n")
        server.close()

class RequestHandler(socketserver.BaseRequestHandler):
    def handle(self):
        start(self.request)

if __name__ == '__main__':
    socketserver.ThreadingTCPServer.allow_reuse_address = True
    server = socketserver.ThreadingTCPServer(('0.0.0.0', 1337), RequestHandler)
    server.serve_forever()
If that looks like a lot, don't worry, it did to me too the first 27 times I looked at it.
But let me explain what we are looking at.
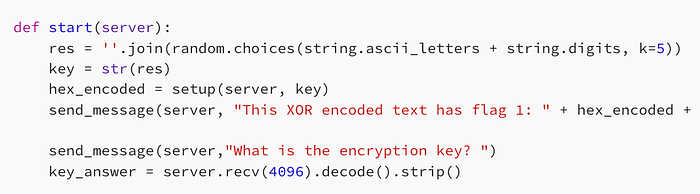
If you look at this specific snipped of the code above, you see the source code for the retrieval of the XOR encoded flag. As mentioned earlier, this is not the plaintext. This is encoded in hexadecimal by using XOR encryption.
So you're going to use the encoded flag 1 to retrieve the key, and use the key to then help you get the second flag.
If that's confusing, it should be. But that's why we are here 😁

Imagine you are trying to enter a house. You need the key to do so. Currently, when you're establishing the connection to the attack box, you are presented with the lock.
You use the grooves of the lock to help you understand which specific key will fit properly. You then decode the encoded text in order to create a mold for a key based on certain clues regarding what the key should look like. Once you create your key, you input it into the lock, and you have a perfect match.

Notice in the source code above, this line says k=5. This is the key length. So, you now know the key itself will be 5 characters long.
I'll explain what makes this relevant.
Quick disclaimer, the attack box did shut down, so I had to do start it up again. This caused the encoded hexadecimal string and target IP to change.

The attack, source code, and all relevant information is still the same.
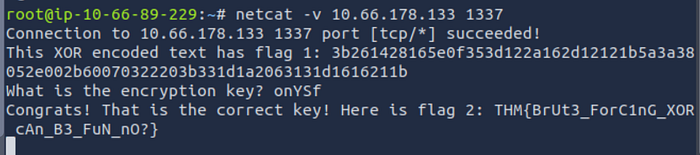
root@ip-10–64–68–225:~# nc -v 10.64.188.221 1337
Connection to 10.64.188.221 1337 port [tcp/*] succeeded!
This XOR encoded text has flag 1: 3b261428165e0f353d122a162d12121b5a3a38052e002b60070322203b331d1a2063131d1616211b
What is the encryption key?
The hexadecimal string above represents XOR-encrypted data. Even though the encoded output is much longer than 5 characters, the encryption key itself is still only 5 characters long.
This is because the key repeats over and over throughout the encryption process.
So to sum up the source code, essentially you take the encoded text and k=5, and you use that information to then begin the decoding process to retrieve the key.
Once you get the key, you use the key itself to turn the lock on the encoded text, and get the second flag that stands on the other side of the door.
Concept Breakdown: XOR, Known-Plaintext Attacks, Hexadecimals
Before we get to the attack, let me briefly explain three important concepts to help make sense of everything. We need to understand XOR, XOR encryption, known-plaintext attacks (KPAs), and how hexadecimal representations work.
Once these make sense, everything I'm going to demonstrate next about the attack box will make a lot more sense.
I do know that I've covered a lot of concepts while leading up to the actual attack, however, establishing the baseline fundamentals are what will enable you to understand everything I do to actually get the flags and solve the room.
For context, I didn't even know what a lot of this was before doing this room, and that's why I love doing them so much.
You get to see something you've never seen and start piecing together the information theoretically, apply it practically, and then eventually solve the room successfully. 😁
Remember what I said earlier, don't be afraid of being a beginner. Let me add, don't be afraid of having no clue how something works.
I had no clue how to do this when I started the room, and now I'm writing about it. 😅
XOR Encryption Walkthrough
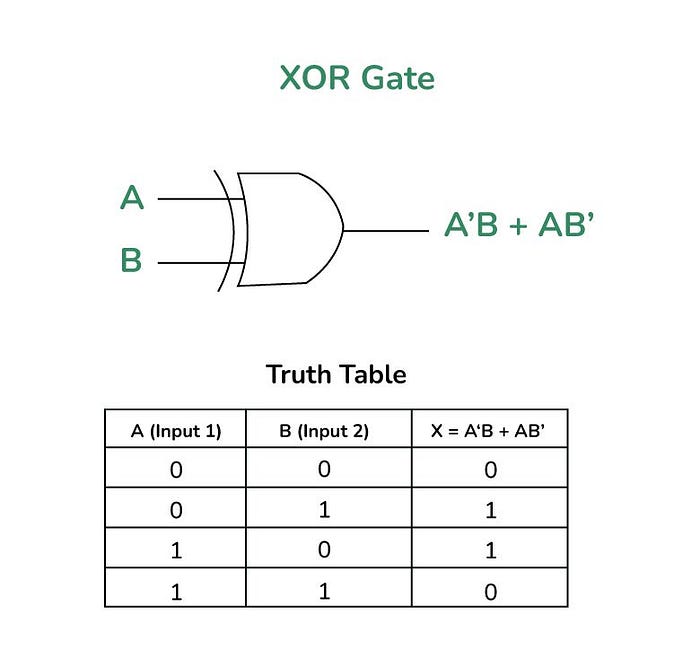
As displayed above, XOR is a boolean algebra operation known as 'exclusive-OR'. If two bits are the same, the result is 0. If the bits are different, the result is 1.
So where is this relevant in this attack box? Well, the image below does a great job illustrating everything we've discussed earlier.
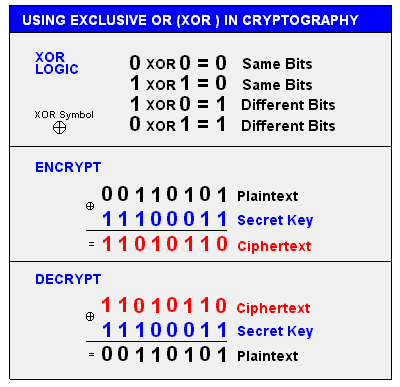
Currently, when we connect to the attackbox, we are presented with the ciphertext. We then need to use the key, to convert the cipher text back into plaintext.
XOR encryption and decryption work the same way multiplication and division do. If 3 x 2 = 6, then 6 / 2 = 3.
In this case, 6 is the ciphertext, 2 is the key, and 3 is the plaintext.
So, let's get into the Known Plaintext Attack.
Known-Plaintext Attack
As the name suggests, we have certain elements of the plaintext that we know to exist in the flag. So we use this information to retrieve the key from the ciphertext.
In the context of TryHackMe flags, they always start with 'THM{' and end with '}'.
As mentioned above, our encoded hexadecimal text (ciphertext) is: 3b261428165e0f353d122a162d12121b5a3a38052e002b60070322203b331d1a2063131d1616211b
We also know that the key length=5.
So notice how THM{} is exactly 5 characters? 🤔
Ah, interesting….💡
Hexadecimals — Why?
Let me explain something briefly about hexadecimals to make this make even more sense.
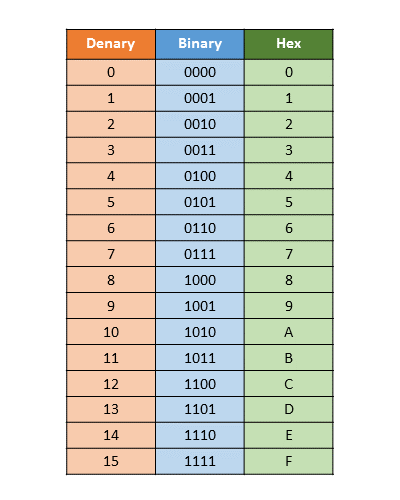
Hexadecimals are used to make it easier to compress long bit strings to more readable formats.
If you ever look at IPv6 addressing, they use hexadecimal representations, because 128 bits looks something like:
11001011011101001010001111011001010111100010011010110101110001110001101001001111110011011000001100011011111001100100011001101111
Thats…quite long. Computers? Yes, they love these. Humans? No, we really don't. 😅
That exact string in hexadecimal representation looks like this: cb74a3d95e26b5c71a4fcd831be6466f
See? 😁
So now that we understand how XOR encryption works, and how hexadecimals are represented, let's perform the actual attack.
Retrieving the Key — Known Plaintext Attack Explained
Yes, we are here. We are going to do the actual attack. :)
So what we will be doing in this portion of the walkthrough is:
- Taking the encoded flag 1
- Using 'known plaintext' to help decode the key using XOR decryption
- Using the key to decode retrieve flag 2
- Retrieve the plaintext flag 1 using Cyberchef
Let's begin.
3b261428165e0f353d122a162d12121b5a3a38052e002b60070322203b331d1a2063131d1616211b
Step 1 — Understanding what we can actually use
We know from the source code that:
- Key length = 5 characters
- XOR is applied byte-by-byte with a repeating key
We also know TryHackMe flags typically start with: THM{
So we have a known plaintext prefix of 5 characters, which aligns perfectly with the 5-byte key window.
That means:
Ciphertext (first 5 bytes) ⊕ Plaintext ("THM{}") = Key (first 5 bytes)Step 2 — Convert hex to bytes
So to do the XOR decryption, we use
- Ciphertext — 3b 26 14 28 1b
- Plaintext- T H M { }
- Key — ???
Step 3 — XOR calculation (byte-level)
So, why do we use ASCII?
We work in ASCII because computers ultimately store and process text as numbers. Each character (like T, H, M, {, }) has a corresponding numerical value defined by the ASCII standard.
Since XOR operates at the bit/byte level, we need a consistent way to represent characters as numbers before we can apply any bitwise operations. ASCII gives us that shared mapping between human-readable text and raw byte values.
So when we say:
T = 0x54H = 0x48M = 0x4D
we're not "converting" in a loose sense.
We're exposing the underlying byte representation that XOR actually operates on.
Without this step, we wouldn't be able to correctly align plaintext with ciphertext or perform byte-by-byte XOR calculations.
- T = 0x54
- H = 0x48
- M = 0x4D
- { = 0x7B
- } = 0x7D
Now compute:
0x3b ⊕ 0x54 = 0x6f → 'o'
0x26 ⊕ 0x48 = 0x6e → 'n'
0x14 ⊕ 0x4d = 0x59 → 'Y'
0x28 ⊕ 0x7b = 0x53 → 'S'
0x16 ⊕ 0x7d = 0x6b → 'k'
So, now we have the key: onYSk
As you can see, we successfully retrieved flag 2! 😁
Flag 2: THM{BrUt3_ForC1nG_XOR_cAn_B3_FuN_nO?}
Using CyberChef to retrieve Flag 1
Now that we have flag 2, the final step is to get flag 1.
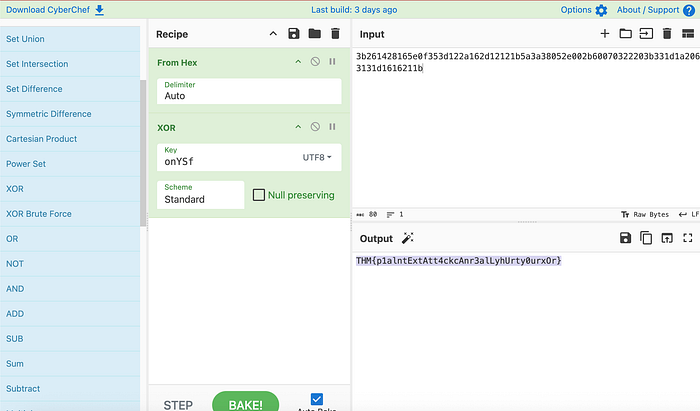
As you can see here, I inputted the encoded XOR string into CyberChef. This is a tool used to make it easier to quickly encode, decode, encrypt, decrypt, compress, and analyze data inside a web browser.
If I didn't use this, I'd have to manually do the XOR math using the onYSk key across the entire encoded strong to get flag 1.
But the great news is, it worked.
Took a while, a lot of concepts and different things we covered but, it worked. We did it everyone. 😅
Here is
- Flag 1: THM{p1alntExtAtt4ckcAnr3alLyhUrty0urxOr}
- Flag 2: THM{BrUt3_ForC1nG_XOR_cAn_B3_FuN_nO?}
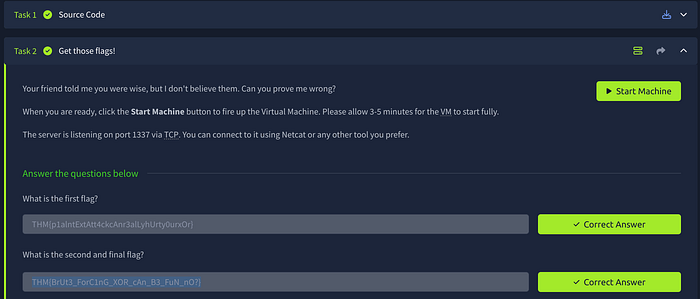
And here it is within the TryHackMe console.
Conclusion

I know it took us a while to get here. If this was dense to read the first time around, don't worry, the concepts are definitely dense the first few times you read it.
For me, it took multiple days to solve this room. Don't let the time set on TryHackMe intimidate you.

Up here it says this room should take you 5 minutes. It does, once you know how to do it. Because executing the operations takes a brief amount of time.

However, learning the concepts takes much longer, and that is how it should be. It is a step by step process.
Everything is a step you take, and some are definitely bigger than others.
But remember, you should be very proud of the initiative you take to step in the first place. It is very easy to get caught up in the result. However, no result is the culmination of your efforts.
The result is simply the final step.
Thank you for tuning in, and I hope to see you all next time. :)