

Port scanning, banner grabbing, and vulnerability matching. The exact methodology security professionals use to find what's running on your servers and whether it can be broken.
Every security engagement I've ever worked on starts the same way.
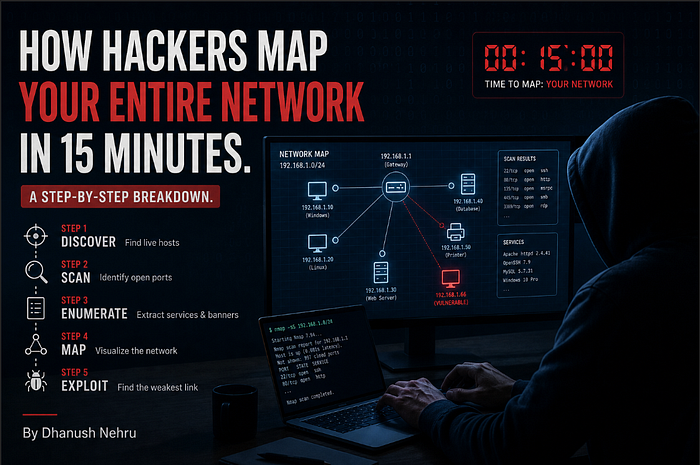
Before you exploit anything, before you test any vulnerability, before you even think about gaining access, you need to answer one question: what is actually running on this network?
That's enumeration. It's the process of discovering which services are listening on a target's open ports and gathering enough detail about each one to support everything that comes next. It sounds simple. But the difference between a thorough enumeration and a lazy one is often the difference between finding the way in and missing it entirely.
Today I'm going to walk you through the exact methodology. Port scanning, banner grabbing, version detection, vulnerability matching, and the critical gap between "vulnerable on paper" and "actually exploitable." Every command is real. Every example is practical. If you're studying for a security certification, building your skills for bug bounties, or just want to understand what happens on the other side of a penetration test, this is the guide.
Phase 1: Port Scanning with Nmap
Nmap is the starting point for virtually every security assessment. It sends packets to a range of ports on a target and reports which ones respond. But here's the thing most beginners get wrong: knowing a port is open tells you almost nothing by itself.
Port 80 is conventionally used for HTTP. Port 22 is conventionally used for SSH. Port 443 is conventionally HTTPS. But nothing prevents an administrator from running SSH on port 80, or hiding a web server on port 8443, or running anything on any port they choose. Relying on port numbers alone leads to wrong assumptions, and wrong assumptions waste time.
That's why we don't just scan. We probe.
Here's the command I run at the start of every engagement:
nmap -sV -sC -p- TARGET_IP -oN scan_resultsLet me break down every flag, because each one matters:
-sV (Version Detection)
This is the most important flag. Rather than just reporting "port 22 is open," Nmap actively probes the service and tries to determine the exact software and its version number. The difference between knowing "port 22 is open" and knowing "port 22 is running OpenSSH 7.6p1 on Ubuntu" is the difference between a data point and actionable intelligence.
-sC (Default Scripts)
This runs Nmap's built-in script engine against each discovered service. The default scripts perform useful checks automatically: testing for anonymous FTP access, retrieving HTTP page titles, checking SMB signing status, and dozens of other reconnaissance tasks. Think of it as automated follow-up questions for each service.
-p- (All Ports)
By default, Nmap only scans the most common 1,000 ports. That means it skips 64,535 others. Services running on non-standard ports (and plenty of interesting ones do) would be completely invisible. The -p- flag scans all 65,535 TCP ports. It takes longer. It's worth it.
-oN scan_results (Save Output)
Saves the results to a file. You'll reference this output throughout the entire engagement. Never rely on scrolling back through terminal history.
The output shows you the protocol, service name, and where Nmap can determine them, the software version for each open port. That version information is the single most valuable output of the entire enumeration phase. It is what lets you match a running service to known vulnerabilities.
Phase 2: Banner Grabbing
Banner grabbing is simpler and more direct than Nmap's probing. You connect to a service and read its initial response. Many services announce themselves the moment you connect, providing a name and version string known as a banner.
You can do this with netcat:
nc TARGET_IP 22And you'll see something like:
SSH-2.0-OpenSSH_7.6p1 Ubuntu-4ubuntu0.3That single line just told you three things:
- The SSH protocol version (2.0)
- The exact OpenSSH version (7.6p1)
- The underlying operating system (Ubuntu)
That's enough to start searching for known vulnerabilities against that specific version. One connection. One line of output. Significant intelligence.
Try it against an SMTP service:
nc TARGET_IP 25
220 mail.target.local ESMTP Postfix (Ubuntu)
Now you know the mail server software (Postfix), the hostname (mail.target.local), and the OS (Ubuntu). You can perform banner grabbing manually with netcat or telnet, or let Nmap's version detection probes handle it automatically.
When Banners Are Missing or Fake
Not every service cooperates. Some are configured to suppress version information entirely, returning only a generic greeting. Nmap handles this by fingerprinting the service: it sends crafted requests and matches the responses against a database of known signatures. This is less precise than reading a banner directly, but it can still narrow things down considerably.
Banners can also be deliberately altered. A security-conscious administrator might change the version string to mislead attackers. In practice, this is uncommon outside of honeypot environments. And even when it happens, other indicators like response behavior, supported protocol features, and timing characteristics often reveal the real identity of the service regardless.
The takeaway: banners are the fastest path to version information, but they're not the only path, and they shouldn't be trusted blindly.
Phase 3: Building a Service Inventory
As you enumerate each port, build an inventory. This is a working document, not a final report. For each service, record the port number, protocol, software name and version, and any extra details revealed by scripts or manual inspection.
Here's what a typical service inventory looks like after the first pass:

Every column matters. The port tells you where. The service tells you what. The version tells you which. And the notes capture context that might be relevant later.
"SMB signing not required" might seem like a minor detail now. During exploitation, it's the difference between a relay attack working or not. "Remote connections enabled" on MySQL means you might be able to authenticate directly if you find credentials elsewhere. These notes accumulate into a map of the target's attack surface.
This inventory is a living document. You'll annotate it, update it, cross out dead ends, and highlight promising targets as the engagement progresses.
Phase 4: Matching Versions to Known Vulnerabilities
With a service inventory in hand, the real work begins. You need to determine whether any of the discovered services contain known weaknesses. This means cross-referencing version information against public vulnerability databases and working out whether the results actually apply to the target.
The Databases You Need to Know
CVE (Common Vulnerabilities and Exposures)
The primary identification system. Each entry describes a specific flaw in a specific piece of software and carries an identifier in the format CVE-YYYY-NNNNN. When security professionals talk about a vulnerability, they reference its CVE number. It's the universal language.
NVD (National Vulnerability Database)
Maintained by NIST, the NVD adds severity scores, technical detail, and references to each CVE. It's where you go for the full picture: what the vulnerability is, how severe it is, and what conditions are required to exploit it.
Exploit-DB
This takes things a step further by linking CVE entries to publicly available exploit code. This gives you an immediate sense of whether a flaw is exploitable in practice and not just in theory. If there's working exploit code on Exploit-DB, someone has already proven the vulnerability works.
You can search Exploit-DB from the command line using searchsploit, which queries a local copy of the database:
searchsploit apache 2.4.29This returns matching entries along with the file path to the exploit code on your system. No browser required. Instant results.
GitHub
Often the fastest source, especially for recent disclosures. When a high-profile CVE drops, proof-of-concept exploit code frequently appears on GitHub within hours. Security researchers and offensive tooling developers publish working PoCs, sometimes before the vulnerability even makes it into Exploit-DB. Searching GitHub for a CVE identifier directly, like CVE-2021-41773, will often turn up multiple repositories containing exploit scripts, detailed write-ups, and scanning tools.
Check GitHub alongside the traditional databases, especially for recently disclosed vulnerabilities where Exploit-DB may not yet have an entry.
The Workflow
For each service in your inventory:
- Take the software name and version from your inventory
- Search the NVD or Exploit-DB for that software and version
- Check GitHub for the CVE identifier to find proof-of-concept code or tooling
- Review the results, noting any CVEs affecting the exact version or a range that includes it
- Assess each result for relevance and exploitability
- Repeat for every service in the inventory
This is methodical work. It's not glamorous. But it's where you find the entries that lead to access.
Understanding Severity Ratings (And Their Limitations)
Most CVE entries carry a CVSS score, rating severity from 0.0 to 10.0. The score accounts for the attack vector (network vs. local access), whether authentication is required, and the impact on confidentiality, integrity, and availability.
A quick reference:

A critical-severity vulnerability allowing unauthenticated remote code execution is a fundamentally different finding from a low-severity information disclosure issue that requires local access. That much is obvious.
But here's what's less obvious: CVSS scores should not be treated as the only measure of usefulness during an engagement.
A medium-severity vulnerability that gives you authenticated access to a system may matter more than a critical one whose prerequisites you can't satisfy. A "low" severity information disclosure that leaks credentials is more useful than a "critical" buffer overflow that requires a specific kernel version the target doesn't run.
Scores give you a starting point for prioritization. Context gives you the actual priority.
The Gap Between "Vulnerable" and "Exploitable"
This is the concept that separates junior testers from experienced ones.
A CVE might describe a buffer overflow in a particular version of a web server. Your scan shows the target is running that exact version. Looks like a hit. But consider:
The target may have applied a patch without updating the version string. Many organizations patch vulnerabilities through backporting, fixing the flaw without upgrading the entire software version. The version number stays the same. The vulnerability is gone. Your scan can't tell the difference.
The flaw may require a specific module or configuration. A vulnerability in Apache's mod_cgi is irrelevant if the target doesn't have mod_cgi enabled. A flaw that requires WebDAV is useless if WebDAV isn't configured. The vulnerability exists in the software, but not in this deployment of it.
Network-level controls may block the attack. A firewall, WAF, or IPS might prevent the traffic needed to trigger the vulnerability from ever reaching the service.
The exploit may require valid credentials. A vulnerability that allows privilege escalation from an authenticated user is powerful, but only if you've already obtained credentials. If you haven't, it sits in your notes as "potential, pending access."
The exploit may depend on a specific environment. A memory corruption exploit that works reliably on x86 might fail on ARM. An exploit that requires a specific library version might not work if the target has a different build.
The filtering looks like this:
All discovered services
   ↓ filter
Services with known CVEs
   ↓ filter
CVEs matching the target's configuration
   ↓ filter
Actually exploitable vulnerabilities
Each filter narrows the list significantly. You might start with 50 services, find CVEs for 15 of them, determine that 8 match the target's configuration, and conclude that 3 are actually exploitable. Those 3 are your prioritized targets.
This is why vulnerability identification is a separate phase from exploitation. The goal here is to build a prioritized list of potential weaknesses, not to confirm each one. Confirmation happens when you try the exploit.
Automated Scanners: Useful, Not Sufficient
Tools like Nessus, OpenVAS, and Nikto automate the process of matching services against vulnerability databases. They run their own enumeration, compare results against known issues, and produce a report of potential vulnerabilities.
These scanners are genuinely useful for covering a broad attack surface quickly. In a time-constrained engagement, they catch things you might miss during manual review. They're particularly good at finding well-known, well-documented vulnerabilities across large numbers of hosts.
But they have real limitations:
False positives. Scanners flag everything that might be a vulnerability. A significant percentage of their findings will be incorrect, triggered by version string matching without deeper verification.
Missed context. Scanners can't understand business logic flaws, chained vulnerabilities that only work in combination, or weaknesses that require understanding how the application actually behaves. They test individual services in isolation.
No adaptation. A scanner runs the same checks regardless of what it finds. A human tester adjusts their approach based on each new piece of information. A scanner that finds MySQL credentials in an exposed config file won't think to use those credentials against the admin panel on a different port.
Scanner output is a starting point for manual investigation. Not a replacement for it. Use them for coverage. Trust your own analysis for depth.
Putting It All Together: The Enumeration Checklist
Here's the complete workflow from first scan to prioritized target list:
1. Full port scan with version detection
nmap -sV -sC -p- TARGET_IP -oN scan_results2. Manual banner grabbing on interesting ports
nc TARGET_IP 22
nc TARGET_IP 25
nc TARGET_IP 80
3. Build the service inventory
Record every service with its port, software, version, and notes.
4. Search vulnerability databases for each service
searchsploit [software] [version]Then check NVD and GitHub for each CVE.
5. Filter for relevance
Does the vulnerability match the target's configuration? Are the prerequisites satisfiable? Is exploit code available?
6. Prioritize
Rank the remaining vulnerabilities by exploitability and impact, not just CVSS score.
7. Document everything
Your service inventory, your vulnerability matches, your filtering rationale, and your prioritized list. This is the document you'll work from during exploitation and the document you'll reference when writing your report.
Why This Matters Even If You're Not a Pentester
If you're a developer or a system administrator, understanding enumeration changes how you think about your own infrastructure.
Every service you leave running is a surface area. Every version you don't update is a potential match in a vulnerability database. Every banner you broadcast is information you're handing to anyone who connects.
Run this scan against your own systems. Build the inventory. Search for your own versions in Exploit-DB. You might be surprised by what you find.
The attackers won't be.
Who Am I ?
Hi, I'm Dhanush Nehru an Engineer, Cybersecurity Enthusiast, Youtuber and Content creator. I document my journey through articles and videos, sharing real-world insights about DevOps, automation, security, cloud engineering and more.
You can support me / sponsor me or follow my work via X, Instagram ,Github or Youtube