
Introduction
We often hear that "Reconnaissance is the most important phase in Bug Bounty," but what does that actually look like in practice? Does it just mean finding subdomains?
For me, Recon goes beyond listing assets; it's about understanding the application's structure and finding those dark, dusty corners that developers forgot about.
In this writeup, I'll share how I used Burp Suite's Content Discovery to find a hidden, neglected page (/accounts/) on a learning subdomain. This page looked like raw HTML from the 90s, but it hid a critical flaw: it allowed me to take over any user account.
Phase 1: The Recon & Discovery
I was testing a specific target scope (let's call it learn.target.com). At first glance, the main application looked secure, modern, and well-tested. Standard fuzzing wasn't returning much.
I decided to dig deeper into the directory structure. I wanted to see if there were any hidden paths branching off the main endpoints.
The Tool: Burp Suite Content Discovery
Instead of just using generic wordlists, I utilized a powerful, often overlooked feature in Burp Suite Professional: Content Discovery.
- I captured a request to the main application.
- Right-clicked the request in Burp.
- Navigated to Engagement tools -> Content Discovery.
- I let Burp do its magic, crawling and fuzzing for hidden paths based on the application's own naming conventions.
The Catch
After letting it run for a while, Burp flagged a status 200 OK for a path that wasn't linked anywhere on the UI:
https://learn.target.com/accounts/
When I opened this URL in the browser, it didn't look like the rest of the site. It wasn't a modern React or Vue page. It was a basic, Raw HTML page. It looked "marginalized" — like a legacy admin or debug page that was left behind during a migration and forgotten.
Usually, these "ugly" pages are gold mines because they often lack the security middleware present on the main site.
Phase 2: The Rollercoaster (False Hope & Dead Ends)
Upon landing on the legacy /accounts/ page, my eyes were immediately drawn to a "Change Password" link. I thought, "Could it be this easy?"
I clicked it, and it redirected me to /password/change.
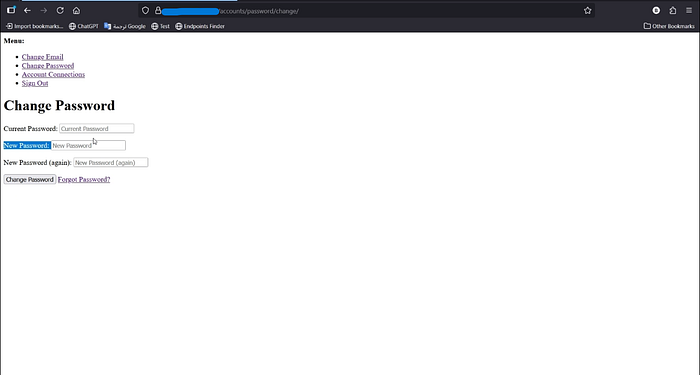
Disappointment #1:
The form required the Old Password to set a new one. Since I didn't have the victim's credentials, this was a dead end. (I was hoping to find a flaw where it didn't require an old password).
I didn't give up. I decided to analyze the "Forgot Password" flow linked on that page.
It redirected me to another path: /password/reset.
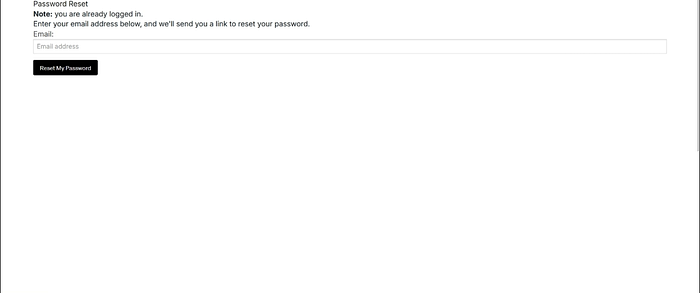
Here, the page simply asked for an email address to send the reset link to.
The Adrenaline Rush:
My heart skipped a beat. I immediately thought, "Does this form validate if the email actually belongs to the account?"
I quickly entered my attacker-controlled email: attacker00@somoj.com.
I hit submit, expecting a link to land in my inbox.
Disappointment #2:
I waited… and waited. Nothing arrived.
It turned out the system did check if the email was associated with the account. Since attacker00@somoj.com wasn't linked to the victim's profile, the backend silently dropped the request.
I was back to square one. Or so I thought.
Phase 3: The Logic Flaw
I remembered the initial legacy page I found via Recon (/accounts/). I went back to it and decided to scroll down and look closer at every single field.
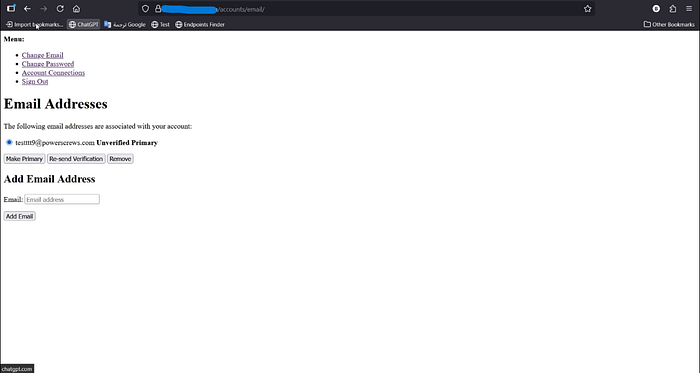
At the very bottom of the page, I found a section: "Add Email Address".
The Setup:
- I entered my attacker email:
attacker00@somoj.com. - I clicked "Add".
- The system accepted it! However, it was clearly marked as "Unverified" next to the email address.
Usually, an unverified email is useless for sensitive actions. But then I noticed a button right next to it: "Make Primary".
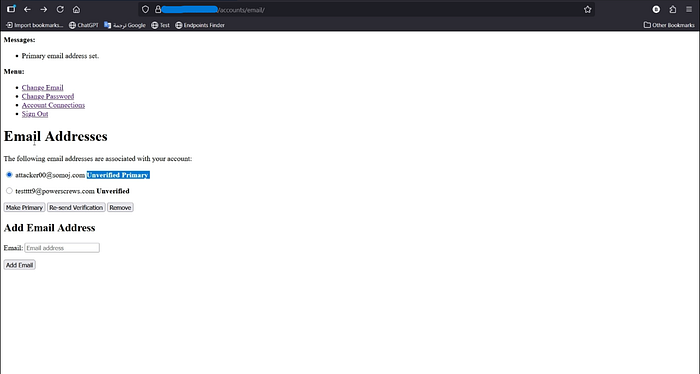
The Bypass:
I clicked "Make Primary".
In a modern application, this would trigger an error: "Please verify email first."
But on this forgotten HTML page? It just worked.
The page refreshed, and attacker00@somoj.com was now the Primary Email of the victim's account—even though it was still unverified!
Phase 4: The Takeover (ATO)
Now that the system considered my email (attacker00@somoj.com) as the primary contact for the account, I knew exactly what to do.
- I went back to the "Forgot Password" page (
/password/reset). - I entered my email (
attacker00@somoj.com) again. - Success: This time, because the email was linked and marked as "Primary," the system immediately sent the reset link to my inbox.
- I opened the link, set a new password, and logged into the victim's account using the new password I just set.
Impact: I had achieved a full account takeover without ever knowing the victim's password or accessing their original email (Bypassing Email Verification).
Lessons Learned
- Fuzzing is Key: Don't rely only on what you see in the browser. Tools like Burp's Content Discovery are essential for finding what's hidden.
- Look for "Ugly" Pages: If a page looks like it doesn't belong (different UI, raw HTML), investigate it thoroughly. It likely lacks the security controls of the main application.
- Context Matters: The vulnerability wasn't just "Missing Verification"; it was "Missing Verification on a specific legacy endpoint."
- Don't Give Up: Even if the direct path (Change Password) is blocked, look for side channels (Add Email -> Make Primary -> Reset).
Recommendation
- Asset Management: Audit and remove legacy or unused endpoints (
/accounts/,/test/, etc.). - Global Security Controls: Ensure that critical security logic (like Email Verification) is enforced at the API/Backend level, not just on the frontend or specific modern pages.
Let's Connect! 🌐
If you enjoyed this writeup or learned something new, let's stay in touch! I regularly share bug bounty tips, writeups, and security insights.
- LinkedIn: Connect with me here 👔
- X (Twitter): Follow me here 🐦
Don't forget to clap 👏 50 times if you liked the article!
Happy Hacking! 🕵️♂️🔥