Linux is a family of open-source, Unix-like operating systems built on the Linux kernel, created by Linus Torvalds in 1991. It is known for its stability, security, and versatility, powering everything from servers and supercomputers to smartphones and embedded devices. Unlike other operating systems, its open-source nature means users can view, modify, and distribute the source code freely.
1. Linux Architecture
Here, I showed the simple architecture of linux system.

Hardware
The Hardware is the physical stuff you can actually touch. This includes the computer's brain, which is the CPU, the short-term memory called RAM, and the storage devices like hard drives. It also includes things you use to interact with the computer, like your keyboard and printer. Essentially, the hardware is the basic physical equipment that makes the entire system function.
Kernel
The Kernel is the most important program in Linux, acting as the heart of the operating system. It is the manager or traffic cop that sits directly between the software and the hardware. Its main job is to manage resources: it decides which programs get to use the CPU and for how long (this is called process scheduling), it makes sure programs have enough memory, and it handles all the requests that go to the hardware. The Kernel's goal is to make sure all programs run smoothly and don't interfere with each other.
Shell
The Shell is the way you, the user, talk to the Kernel. It is often a command line where you type in text commands like 'ls' to list files, but it can also be a graphical screen, like the desktop interface you click on. The Shell's job is crucial: it takes your commands (such as "open a file" or "start this app") and translates them into a precise language that the Kernel can understand and then execute. Accessing Shell can be used to control a computer by hacker.
System Utilities
The System Utilities are a collection of useful programs and tools that help you perform tasks on the computer. These are the helper apps, and they include programs for copying and managing files, tools for setting up the internet connection, and the software you use to install new applications. These utilities take your requests from the Shell and prepare them, acting as a bridge before the Kernel executes the final action.
Linux Distributions
Linux is not just one operating system. It is a group of open-source operating systems that are all based on the Linux kernel. These different versions are called "distributions". Each distro gives a different version of Linux made for different users, devices, or needs. This part explains what Linux distributions are, why they are important, and gives examples of popular ones. A Linux distribution is a complete operating system built around the Linux kernel. It includes the kernel, a wide array of software applications, libraries, and optionally a graphical user interface (GUI). Some examples of popular distros are Ubuntu, Fedora, CentOS, Kali Linux, Debian, Arch Linux.
2. Linux File System
The Linux file system is hierarchically organized, starting with the root directory '/'. All the directories of the system is located under this root directory. The other essential directories are given below:
/: The root directory, the base of the file system.

/bin, /sbin: Contains essential user and system binaries.

/etc: Contains system configuration files.

/home: Contains personal directories for users.

/var: Contains variable files like logs and databases.

/usr: Secondary hierarchy for user data; contains most user programs and utilities.
You can watch the video to understand the Linux system hierarchy standard in detail.
3. Linux Command Line
Command line is used to control your computer by typing text commands instead of using a mouse or clicking icons. It is a powerful way to work with Linux because you can do almost everything like managing files, running programs, and changing system settings just by typing commands.
Terminal: The terminal is the program window that you open to type commands. It is just the tool that lets you interact with the system through text.
Command Line: The command line is the place inside the terminal where you type your commands. It's the text interface you see.
Shell: The shell is the program that reads and runs the commands you type on the command line. For example, Bash is the most common shell in Linux.
Bash (Bourne Again Shell): It is the most common program used in the Linux terminal. It reads the commands you type and tells the system what to do. Bash is called a "shell" because it acts as a layer between the user and the Linux system.
4. Navigation in Linux
let's start with the practical part. first, let's see some simple navigations using linux shell
# displaying pressent working directory
-------------------------------------
$ pwd
/home/sam


# listing the directories and files
-----------------------------------
$ ls
Desktop  Documents  Downloads  Music  Pictures  Videos  notes.txt


# see details of each file and directories such as permissions, ownership, and modification times.
--------------------------------------------------------------------------------------------------
$ ls -l
total 8
drwxr-xr-x 2 user users 4096 Jul 29 08:24 Desktop
drwxr-xr-x 2 user users 4096 Jul 29 08:24 Documents
drwxr-xr-x 2 user users 4096 Jul 29 08:24 Downloads
drwxr-xr-x 2 user users 4096 Jul 29 08:24 Pictures
drwxr-xr-x 2 user users 4096 Jul 29 08:24 Videos


# see the hidden files using -a
-------------------------------
$ ls -a
Desktop  Documents  Downloads  Music  Pictures  Videos  notes.txt  .bashrc
//files that start with dot(.) are mainly hidden

$ ls -la
total 12
drwxr-xr-x 3 user user 4096 Aug  1 10:00 .
drwxr-xr-x 4 user user 4096 Aug  1 09:58 ..
drwxr-xr-x 2 user users 4096 Jul 29 08:24 Desktop
drwxr-xr-x 2 user users 4096 Jul 29 08:24 Documents
drwxr-xr-x 2 user users 4096 Jul 29 08:24 Downloads
drwxr-xr-x 2 user users 4096 Jul 29 08:24 Pictures
drwxr-xr-x 2 user users 4096 Jul 29 08:24 Videos
rwxr--rw- 2 sam hackers 4096 Jul  29 12:34 notes.txt
-rw---X---- 1 user users  220 Jul 29 09:58 .bashrc


# listing files of other directories
-------------------------------------
$ ls -l /var/log
total 20445
drwxr-x--- 2 root root 4096 Aug  1 06:25 apache2


# changing directory
--------------------
$ cd /temp
Here, you can watch the video to learn all the basic command needed for the navigation and basic command line usage
5. Finding Files by CLI
We can easily find any file by using find, locate, and which command.
# finding by name under directory
---------------------------------
$ find / -name "notes.txt"


# Search by Type: Use the -type option to search by file type (regular files f, directories d)
----------------------------------------------------------------------------------------------
$ find /home/user -type d -name "Project*"


# finding by file size
------------------------
$ find / -size +50M


# Search by Modification Time: Use -mtime, -atime, or -ctime
------------------------------------------------------------
$ find / -mtime -7


# Searching with the locate and which Command
---------------------------------------------
$ updatedb
$ locate notes.txt
$ which python
6. Filtering data from a file
# filtering out first 10 lines from access.log file
---------------------------------------------------
$ head -n 10 /var/log/apache2/access.log


# filtering out last 10 lines from access.log file
--------------------------------------------------
$ tail -n 10 /var/log/apache2/access.log


# let's play with employees.txt file
-------------------------------------
$ cat employees.txt
bobby
Alex
Charls
Alex


# sorting the names alphabetically
----------------------------------
$ sort employees.txt
Alex
Alex
Bobby
Charls


# sorting with getting just unique names
----------------------------------------
$ sort employees.txt | uniq
Alex
Bobby
Charls


# using "grep" to filterout the lines of specific things
--------------------------------------------------------
$ grep '192.168.1.1' /var/log/apache2/access.log


# using "awk command to filterout from 2 or more columns


# displaying the lines, words and characters of any file
--------------------------------------------------------
$ wc -l /etc/passwd
23
// -l: Displays only the number of lines.
// -w: Displays only the number of words.
// -c: Displays only the number of bytes.
// -m: Displays only the number of characters (useful for multi-byte character sets)
In this video, I showed filtering, manipulating and editing the file contents practically.
7. package management
package managers are used for tasks such as software installation, updating, removal, dependency resolution, update, upgrade, configuration. The most used package manager is apt which is debian based.
# searching in package list
---------------------------
$ sudo apt search htop


# searching a package starting with htop
----------------------------------------
$ sudo apt search ^htop


# searching for package whose name contains htop
------------------------------------------------
$ sudo apt search --names-only htop


# installing package
--------------------
$ sudo apt install sqlmap nmap curl git


# Reinstalling a package if something is broken
-----------------------------------------------
$ sudo apt install --reinstall nmap


# displaying installed packages
--------------------------------
$ sudo apt list --installed


# updating the package list
---------------------------
$ sudo apt update


# Upgrading all installed packages to the newest versions available
-------------------------------------------------------------------
$ sudo apt upgrade //does not remove old packages or install new dependencies that weren't already installed.
$ sudo apt full-upgrade //can add/remove packages as needed to fulfill dependencies.


# update/upgrade specific software
----------------------------------
$ sudo apt update/upgrade sqlmap


# Removing a package but leaves its configuration files in place
----------------------------------------------------------------
$ sudo apt remove nmap //Useful if reinstall later and want to keep custom configs safe


# Removing all the things of a software
---------------------------------------
$ sudo apt purge nmap


# Removing old unnecessary dependencies
---------------------------------------
$ sudo apt autoremove
$ sudo apt autoclean
You can watch the video where I showed the service and package management practically.
8. User management
By learning user management we will be able to create, manage, and delete users in Linux system. In Linux systems, users are defined as individuals or entities performing various tasks by logging into the system. User management is needed for controlling access, resource allocation, and system administration tasks
a user is associated with a user account. It has several components defining their identity and privileges within the system. These components are username, UID (User ID), GID (Group ID), home directory, default shell, and password.
Types of User
Linux supports two types of users:
- System users: created by the system during installation and are used to run system services and applications.
- Regular users: created by an administrator and can access the system and resources based on their permissions.
# creating a user name "sam"
----------------------------
$ sudo useradd -u 1002 -d /home/sam -s /bin/bash sam //-u (uid), -d (directory), -s (default shell)


# checking the user
-------------------
$ id sam
uid=1002(sam) gid=1002(sam) groups=1002(sam) //(gid = group id)


# registered users are stored in the /etc/passwd file
-----------------------------------------------------
$cat /etc/passwd
root:x:0:0:System Administrator:/root:/bin/bash
sam:x:1002:1002:Sam Duke:/home/samduke:/bin/bash
// x = password. it is stored in /etc/shadow. so that filed is replaced by x


# changing user password
------------------------
$ sudo passwd sam


# remove a user named 'sam' and their associated files
------------------------------------------------------
$ sudo userdel sam
9. Group management
Groups are used to collectively assign the same access rights and permissions to multiple users. This enables system administrators to easily control resources and access
# creating a group named "hackers"
----------------------------------
$ sudo groupadd hackers


# see group info
----------------
$ cat /etc/group
root:x:0:
daemon:x:1:
bin:x:2:
sys:x:3:
adm:x:4:
tty:x:5:
disk:x:6:
...
hackers:x:1004:


# checking the group
--------------------
$ cat /etc/group | grep hackers
hackers:x:1004:


# adding a user named 'sam' in the group 'hackers'
--------------------------------------------------
$ sudo usermod -aG hackers sam


# deleting the group
--------------------
$ sudo groupdel hackers
10. Permission management
when different users share the same system, then maintaining privacy is so important. One user don't want others to view, edit, or delete their files. So, we have to manage permissions for our files.
Permission type:
user permissions: concern only the owner of the file or directory. Group permissions: concern only the users who belong to the group assigned to the file or directory. Other permissions: concern all other users and groups on the system.
# see permission of files in a directory
----------------------------------------
$ ls -l
drwxr--r-- 2 sam hackers 4096 Jul  29 12:34 notes.txt
// -d (represent directory), rwxr--r-- (file permission)


# breaking the drwxr--r--
--------------------------
rwx                      r--                r--
user_permission         group_permission   others
// Members of the hackers group, to which the file is assigned, have only read permission for this file.


# using chmod for changing permissions
--------------------------------------
$ sudo chmod u+w notes.txt //I permitted others the write permission to notes.txt
// u (user) - Owner user permissions
// g (group) - Group permissions
// o (others) - Other permissions

$ ls -l
drwxr--rw- 2 sam hackers 4096 Jul  29 12:34 notes.txt
// r = read, w = write, x = execute


# giving all permission to both user, group and others
------------------------------------------------------
$ chmod ugo+rwx notes.txt
$ ls -l notes.txt
drwxrwxrwx 2 sam hackers 4096 Jul  29 12:34 notes.txt
11. Process Management
process can be defined as a program loaded into memory and executing in the processor (CPU)
There are two types of processes
- Foreground process: By default, all processes run in the foreground. They take input from the keyboard and display output on the screen. Running the ping command and see the process
# foreground process
--------------------
$ pwd
/home/sam

$ ping 127.0.0.1
64 bytes from 127.0.0.1: icmp_seq=100 ttl=64 time=0.081 ms
64 bytes from 127.0.0.1: icmp_seq=101 ttl=64 time=0.164 ms
64 bytes from 127.0.0.1: icmp_seq=102 ttl=64 time=0.075 ms- Background process: To run a command in the background, append the '&' character to it. For example, run the pwd command in the backgroundSome commands run continuously until you send a signal. We can see it for ping command
We will ping 127.0.0.1 loopback address and run it in the background. This will allow us to send ping requests to 127.0.0.1 for as long as our terminal or the running process remains open, while still allowing us to use our terminal for other tasks.
# using & for running process in the background
------------------------------------------------
$ ping 127.0.0.1 &
[1] 54017
//[1] indicated the job number 1


# using $ sign we can see it
----------------------------
$
64 bytes from 127.0.0.1: icmp_seq=100 ttl=64 time=0.081 ms
64 bytes from 127.0.0.1: icmp_seq=101 ttl=64 time=0.164 ms
64 bytes from 127.0.0.1: icmp_seq=102 ttl=64 time=0.075 ms


# To see the running jobs in the background, use jobs command
-------------------------------------------------------------
$ jobs
[1]    running    ping 127.0.0.1
To bring this background command back to the foreground, we can use the fg (foreground) command. We type the job number of the process with a % sign next to the fg command.
# displaying job 1 in the foreground
------------------------------------
$ fg %1
[1]  - running    ping 127.0.0.1
64 bytes from 127.0.0.1: icmp_seq=645 ttl=64 time=1.448 ms
64 bytes from 127.0.0.1: icmp_seq=646 ttl=64 time=0.161 ms
64 bytes from 127.0.0.1: icmp_seq=647 ttl=64 time=0.219 ms
64 bytes from 127.0.0.1: icmp_seq=648 ttl=64 time=0.130 ms
managing system-wide process
System-wide processes used by the operating system, the terminal, service providers, or programs that continuously run in the background.
# view system-wide process
--------------------------
$ ps

PID       TTY      TIME        CMD
19        pts/1    00:00:00    sh
24        pts/1    00:00:00    ps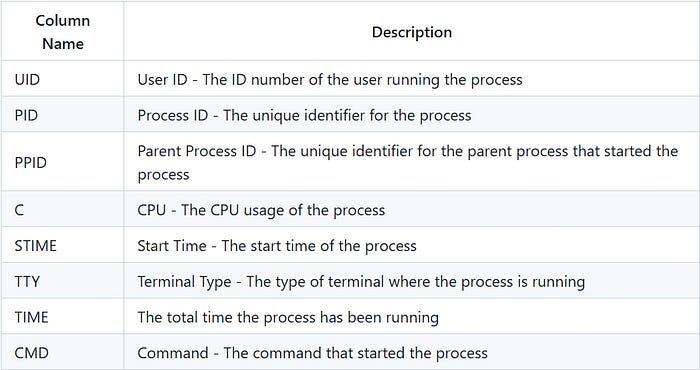
# kill a process
----------------
$ kill <pid>
$ kill 19


# if not work, forcefully stop it with -9
-----------------------------------------
$ kill -9 19
12. Network Management
Network Interface Configuration
Ifconfig tool is used to perform various network configuration tasks such as assigning IP addresses, setting netmasks, and activating or deactivating network interfaces.
# listing available network devices
-----------------------------------
$ ifconfig

eth0: flags=4163<UP,BROADCAST,RUNNING,MULTICAST>  mtu 1500
        inet 172.20.1.109  netmask 255.255.255.0  broadcast 172.20.1.255
        inet6 fe80::5054:ff:fe10:72c3  prefixlen 64  scopeid 0x20<link>
        ether 52:54:00:10:72:c3  txqueuelen 1000  (Ethernet)
        RX packets 4542  bytes 352144 (343.8 KiB)
        RX errors 2  dropped 0  overruns 0  frame 2
        TX packets 1475  bytes 6213607 (5.9 MiB)
        TX errors 0  dropped 0 overruns 0  carrier 0  collisions 0
        device interrupt 11  memory 0xfc840000-fc860000

lo: flags=73<UP,LOOPBACK,RUNNING>  mtu 65536
        inet 127.0.0.1  netmask 255.0.0.0
        inet6 ::1  prefixlen 128  scopeid 0x10<host>
        loop  txqueuelen 1000  (Local Loopback)
        RX packets 16  bytes 1888 (1.8 KiB)
        RX errors 0  dropped 0  overruns 0  frame 0
        TX packets 16  bytes 1888 (1.8 KiB)
        TX errors 0  dropped 0 overruns 0  carrier 0  collisions 0
Here, eth0: This is the Ethernet card interface. The UP flag indicates it is active. The IP address is 172.20.1.109. The MAC address is 52:54:00:10:72:c3. lo: Loopback interface. It is a virtual interface created to allow local networking, pointing to the 127.0.0.1 IP address.
# view specific network interface eth0
--------------------------------------
$ ifconfig eth0


# view interfaces that are DOWN or inactive by using the -a parameter.
---------------------------------------------------------------------
$ ifconfig -a


# activating specific interface eth0
------------------------------------
$ ifconfig eth0 up


# deactivation specific interface eth0
--------------------------------------
$ ifconfig eth0 down


# assigning ip address to an interface or changeing the existing ip
-------------------------------------------------------------------
$ ifconfig eth0 173.20.1.20


# assigning a netmask
---------------------
$ ifconfig eth0 netmask 255.255.255.0


# changing mac address
----------------------
$ ifconfig eth0 hw ether AA:BB:CC:DD:EE:FF


# enabling promiscuous mode
---------------------------
$ ifconfig eth0 promisc


# disabling promiscuous mode
----------------------------
$ ifconfig eth0 -promiscnote: Promiscuous mode is a special setting that allows an Ethernet card or network interface controller (NIC) to work beyond its normal function.
Normally, an Ethernet card only receives and processes data packets that are meant for its own MAC address, or ones that are broadcast (sent to everyone on the network). It ignores packets meant for other devices.
In promiscuous mode, when this mode is turned on, the card starts receiving all data packets passing through the network cable, no matter who the packets are for, even if they are meant for other devices. It is used for monitoring packets from different devices on the network.
DNS settings
In Linux, DNS settings are located in the /etc/resolv.conf file.
# editing resolve.conf
----------------------
$ nano /etc/resolv.conf
nameserver 172.20.1.1


# present file content is like
------------------------------
nameserver 172.20.1.1


# adding new dns server
# adding cloudflare dns, just add the dns server address
--------------------------------------------------------
nameserver 1.1.1.1
nameserver 1.0.0.1
SSH (Secure Shell)
A protocol used to securely connect to another computer over a network and execute commands.
# installing ssh service
------------------------
$ sudo apt-get update
$ sudo apt-get install openssh-server


# starting the service
----------------------
$ sudo systemctl start ssh


# starting automaticallt every time of boots
--------------------------------------------
$ sudo systemctl enable ssh


# connecting with a remote server with ssh
------------------------------------------
formate: ssh user@ip_address
$ ssh root@192.168.1.10


# you can connect without a password (and more securely) by using an SSH key pair

# creating ssh key
------------------
$ ssh-keygen


# you have to copy the generated public key to the remote server
----------------------------------------------------------------
$ ssh-copy-id root@192.168.1.10


# ssh config file location: /etc/ssh/sshd_config
------------------------------------------------
$ sudo nano /etc/ssh/sshd_config


# can edit port setting
-----------------------
port 2222


# after changing restart ssh service
------------------------------------
$ sudo systemctl restart ssh
In a part this video, I showed how we can use ssh practically. Check it out.
Thats are the essential things need to know to use and working with linux system. I showed the basic commands and technique for doing some basic task. Keep exploring.