
How to automate Brute Force protection and Security Headers in a Dockerized Keycloak environment using Realm Import.
Following a recent penetration test, our infrastructure team was tasked with a critical mission: hardening our Identity and Access Management (IAM) layer. Specifically, we needed to update three Keycloak instances (DEV, INT, and Infra) to meet modern security standards.
While clicking buttons in the Admin Console is easy for a one-off change, it doesn't scale. In a world of Infrastructure as Code (IaC), we wanted a solution that was repeatable, version-controlled, and automated.
Here is how we moved from manual configuration to a fully automated Docker-based deployment.
The Challenge: The Pentest Findings
The security audit highlighted three specific areas for improvement:
- Brute Force Detection: Protecting user accounts from credential stuffing by implementing lockout policies.
- X-XSS-Protection: Explicitly setting this header to
0to comply with modern browser standards (moving security logic to the CSP). - Referrer Policy: Tightening information leakage by setting it to
strict-origin.
The Strategy: Configuration as Code
Our Keycloak setup isn't standard; it uses an Oracle Database, custom themes for localized languages (zh-TW), and third-party 2FA providers (Futurae).
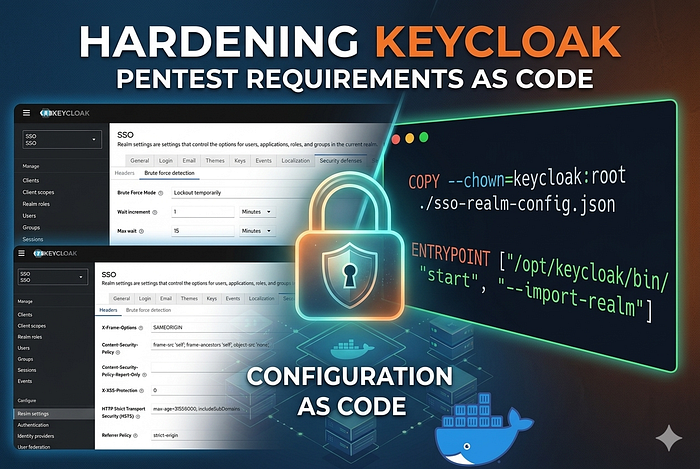
Instead of manual intervention, we decided to leverage the Keycloak Realm Import feature. This allows us to define the "State of the World" in a JSON file and have Keycloak apply it automatically upon container startup.
Step 1: Defining the Security Policy (JSON)
We created a partial realm configuration file. This file tells Keycloak exactly how to behave regarding security defenses without needing to define every single user or client.
JSON
{
  "realm": "SSO",
  "bruteForceProtected": true,
  "maxLoginFailures": 30,
  "waitIncrementSeconds": 60,
  "maxFailureWaitSeconds": 900,
  "failureResetTimeSeconds": 43200,
  "browserSecurityHeaders": {
    "xXSSProtection": "0",
    "referrerPolicy": "strict-origin",
    "contentSecurityPolicy": "frame-src 'self'; frame-ancestors 'self'; object-src 'none';",
    "xFrameOptions": "SAMEORIGIN",
    "xContentTypeOptions": "nosniff",
    "strictTransportSecurity": "max-age=31536000; includeSubDomains"
  }
}
Step 2: Baking Security into the Dockerfile
To ensure every environment (DEV, INT, Infra) is identical, we modified our Dockerfile. We moved away from generic tags to pinned versions and added the import logic.
The key additions were:
- COPY the JSON config into the image.
- Updating the ENTRYPOINT to include the
--import-realmflag.
Dockerfile
# ... existing build stages (Oracle drivers, Theme patching) ...
# Copy the security configuration
COPY --chown=keycloak:root ./sso-realm-config.json /opt/keycloak/data/import/sso-realm-config.json
# Pre-build the optimized Keycloak image
RUN /opt/keycloak/bin/kc.sh build
# Start Keycloak with the auto-import flag
ENTRYPOINT ["/opt/keycloak/bin/kc.sh", "start", "--import-realm"]
Step 3: Validation and Verification
Once deployed, the verification process is two-fold:
- Functional: Log into integrated apps like Jira or Confluence to ensure the SSO flow remains unbroken.
- Technical: Use browser developer tools to inspect the network headers. You should see
Referrer-Policy: strict-originandX-XSS-Protection: 0appearing on every response from the SSO domain.
Key Takeaways
- Stop Manual Tweaks: If you have more than one environment, manual configuration is a debt you'll eventually have to pay.
- Layer Your Security: Brute force protection at the IAM level is your second line of defense behind the WAF.
- Immutable Infrastructure: By baking the configuration into the Docker image, we ensure that a container restart doesn't revert our security posture.
Hardening Keycloak doesn't have to be a chore of endless menus. By using the tools Keycloak provides — like the CLI and Realm Import — you can turn security requirements into a seamless part of your CI/CD pipeline.