Day 3 was theory — OSI layers, IPs, ports, how networks work on paper.
Day 4 was making all of that real.
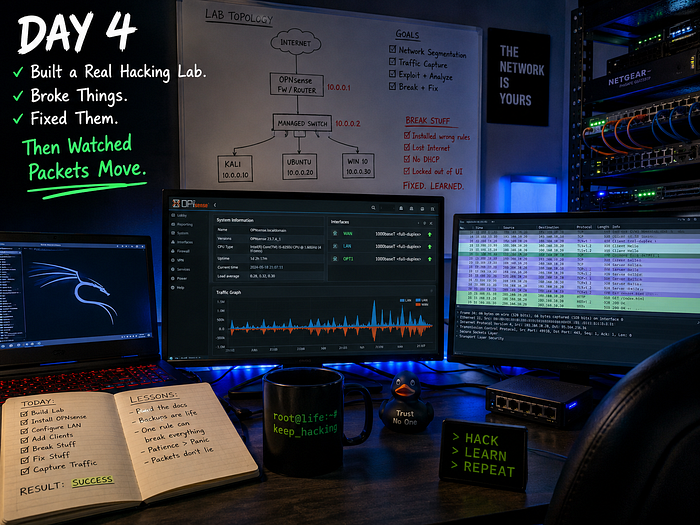
Today I built an actual penetration testing lab from scratch: Kali Linux as the attacker, Windows Server 2012 as a target, Metasploitable2 as a deliberately vulnerable machine. Then I plugged Gemini into my Kali terminal. Then I opened Wireshark and watched real packets move across my own network.
The gap between reading about networking and watching a TCP handshake happen live — that gap is enormous.
The Lab Setup — Why This Architecture
Before I explain what I set up, here's why this specific combination:
[ Kali Linux ]          ← Attacker machine. Every tool pre-installed.
      ↕
[ Windows Server 2012 ] ← Real-world target. Outdated = more vulnerabilities.
      ↕
[ Metasploitable2 ]     ← Intentionally broken Linux. Built to be exploited.
All three run as virtual machines on the same host. They can see each other, but they're isolated from the real internet. This is the standard beginner pentest lab setup — and there's a reason every course uses it.
Why Windows Server 2012 specifically? It's old. End of life. No more security patches. In the real world, you'll encounter legacy Windows servers constantly — enterprises don't upgrade until forced. Practicing on 2012 means practicing on something realistic, not a hardened modern system.
Why Metasploitable2? It's a Linux machine deliberately configured with known vulnerabilities — weak credentials, outdated services, open ports that shouldn't be open. It's a controlled environment where you can't accidentally cause damage, because damage is the point.
Why Kali? It comes with every tool already installed: Nmap, Metasploit, Wireshark, Burp Suite, Hydra. You don't set up tools — you start learning them.
Configuring the Three Machines
Network Configuration — the critical part
All three machines need to be on the same virtual network to talk to each other, but isolated from your real network.
The setup I used: Host-Only Adapter in VirtualBox for all three.
This creates a private network that exists only between your VMs and your host machine. Nothing leaks out. Nothing from outside gets in.
Host Machine (your PC)
     |
     ├── Kali Linux       10.0.2.x  (or 192.168.56.x depending on VirtualBox)
     ├── Windows Server   10.0.2.x
     └── Metasploitable2  10.0.2.x
First thing I did after booting each machine: run ifconfig (Linux) or ipconfig (Windows) to confirm the IP assignments. Then ping between machines to verify they can actually talk.
If ping fails — check the network adapter settings in VirtualBox. Both machines need to be on the same adapter type and the same network name.
Windows Server 2012 — things that tripped me up
- Default installation doesn't allow ping. You have to enable ICMP inbound rules in Windows Firewall manually.
- Remote Desktop is disabled by default. Enable it through System Properties if you want RDP access.
- The password complexity requirements are strict by default — set a strong password during setup or you'll hit a wall.
Metasploitable2 — almost too easy
Default credentials: msfadmin / msfadmin
Boot it up, log in, run ifconfig, note the IP. That's it. The machine is already broken by design — your job later is to find how many ways it's broken.
Gemini Integration in Kali Terminal
This was something I added today as an experiment — a way to query Gemini directly from the command line while working.
Why bother?
When you're deep in a terminal session, switching to a browser to ask a question breaks your flow. Having an AI accessible from the terminal means you can ask "what does this Nmap flag do" or "explain this error" without leaving the environment.
How it works (simplified):
- Get a Gemini API key from Google AI Studio (free tier available)
- Store it as an environment variable in your
.bashrcor.zshrc:
export GEMINI_API_KEY="your_key_here"
3. Write a simple bash function or use a lightweight CLI wrapper that hits the Gemini API endpoint and prints the response
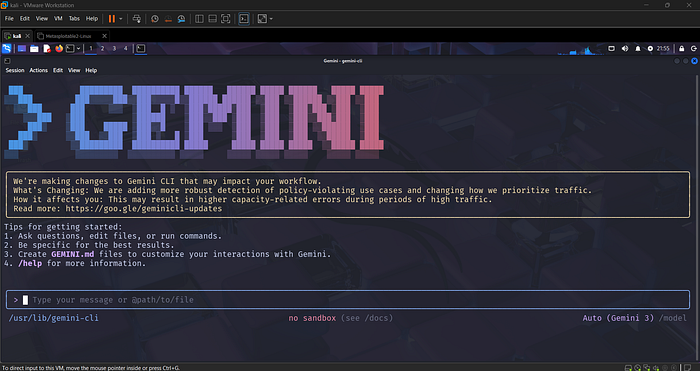
The function takes your input, sends it as a POST request to the Gemini API, and pipes the response back to your terminal.
Honest assessment of it:
Useful for quick lookups. Not a replacement for actually understanding what you're doing. The risk is using it as a crutch — asking it to explain everything instead of figuring things out. I'm treating it as a fast reference tool, not a thinking replacement.
Wireshark — Where the Theory Became Real
This is the part that actually made Day 2's theory land.
Wireshark is a packet analyzer. It captures every packet moving through your network interface and shows you what's inside — protocols, source/destination IPs, ports, raw data.
I ran three filters today. Here's what I learned from each.
Filter 1: tcp
What it does: Shows only TCP packets. Filters out UDP, ICMP, ARP — everything else.
What I saw:
The moment I applied this filter and opened a browser or pinged a machine, I could see the three-way handshake happening live:
SYN     →   [Source IP]  →  [Destination IP]   (I want to connect)
SYN-ACK ←   [Destination] →  [Source]           (OK, I'm here)
ACK     →   [Source IP]  →  [Destination IP]   (Connection established)
This is the TCP handshake I read about on Day 2. Seeing it in a packet capture is completely different from reading about it. The sequence numbers, the flags, the timing — it's all visible.
Why attackers care: A SYN flood attack works by sending thousands of SYN packets without completing the handshake. The server keeps waiting for ACKs that never arrive, exhausting its connection table. Now that I've seen what a normal handshake looks like, I understand why that attack works.
Filter 2: http
What it does: Shows only HTTP traffic — unencrypted web traffic on port 80.
What I saw:
When I made an HTTP request (not HTTPS) to a test server, Wireshark showed me the actual request — readable in plain text. The method, the URL, the headers, even form data if you submit a form over HTTP.
GET /index.html HTTP/1.1
Host: 192.168.x.x
User-Agent: Mozilla/5.0...
Why this matters: This is exactly what a man-in-the-middle attack captures. If you're on an unsecured network and someone is running Wireshark, they can read your HTTP traffic. HTTPS exists specifically to prevent this. Seeing it live makes the "use HTTPS" advice feel less abstract.
Filter 3: ip.addr == [target IP]
What it does: Shows all traffic to or from a specific IP address. Everything — TCP, UDP, ICMP, ARP.
What I saw:
When I ran this filter with my Metasploitable2 IP and then pinged it from Kali, I could watch the ICMP echo requests going out and echo replies coming back. Every ping, timestamped, with the exact bytes.
Then I ran a basic Nmap scan:
nmap -sV [Metasploitable2 IP]And watched Wireshark capture hundreds of packets — Nmap probing each port, the target responding (or not), the whole scan visible in real time.
What the scan is actually doing: For each port, Nmap sends a packet and waits. If the port is open, it gets a SYN-ACK back. Closed port: RST (reset). Filtered: silence (or ICMP unreachable). Watching this in Wireshark makes Nmap feel less like a magic black box.
What Connecting Today to Yesterday Actually Looks Like
Watching Wireshark made the OSI model stop being a list to memorize. It became a way to read what was on screen.
What I Still Don't Have Clean
- Metasploitable2 exploitation — I've confirmed the machine is up and reachable. Haven't run any actual exploits yet. That's tomorrow.
- Wireshark display filter syntax — I used basic filters today. The full filter language is deep. I need to spend more time with it.
- Windows Server attack surface — I haven't mapped it properly yet. Need to run Nmap against it and understand what's exposed.
Honest Reflection
Lab setup is boring. Configuring network adapters, troubleshooting why two VMs can't ping each other, figuring out why Windows firewall is silently blocking everything — none of this feels like hacking.
But this is the actual work. Every professional pentest starts with: can I reach the target? Getting the lab to the point where all three machines can talk to each other is the skill — it's just not the glamorous part.
The Wireshark session was the payoff. Watching my own Nmap scan happen at the packet level — seeing exactly what the tool does under the hood — that's what makes you understand the tool instead of just running it.
Tomorrow's Target
- Footprinting and Reconnaissance — the first real phase of any pentest
- Passive recon: gathering information without touching the target
- Active recon: tools like Nmap, Whois, DNS enumeration
- Understanding what an attacker knows about you before they ever send a single packet
Today's Quick Reference
Lab Architecture:
- Kali Linux — attacker
- Windows Server 2012 — legacy Windows target
- Metasploitable2 — intentionally vulnerable Linux target
- Network: Host-Only Adapter, all on same virtual subnet
Gemini in terminal:
- API key via environment variable
- Bash function hitting Gemini API endpoint
- Use case: quick reference, not thinking replacement
Wireshark filters used:
tcp— isolate TCP traffic, see handshakeshttp— see plaintext web trafficip.addr == x.x.x.x— filter by specific host
Key insight from Wireshark:
- Nmap is sending packets and reading responses — nothing magic
- HTTP traffic is fully readable without encryption
- TCP three-way handshake: SYN → SYN-ACK → ACK, visible in real captures
Day 5 tomorrow. Footprinting. Reconnaissance. Finding everything about a target before touching it.
Setup is underrated. You can't attack what you can't reach.
Tags: #EthicalHacking #Kali #Wireshark #Metasploitable #PenetrationTesting #NetworkSecurity #CyberSecurity #LearningInPublic #30DaysOfHacking #InfoSec #Beginner #LabSetup #Metasploit #PacketAnalysis