
Almost every modern web application uses JSON Web Tokens. Login to a site, get a JWT. Call an API, include your JWT. Change your role, check the JWT. They are everywhere.
And yet, a surprising number of JWT implementations are broken in ways that let you completely bypass authentication, impersonate other users, or escalate your privileges to admin.
The problem is that testing JWTs manually is painful. You have to decode Base64, modify JSON, re-encode, forge signatures, and inject the modified token back into the request. Doing that by hand in Burp is slow and error-prone.
JWT Editor handles all of that for you. It sits inside Burp's message editor, automatically detects JWTs in your traffic, and gives you a clean interface to decode, modify, sign, and attack them without ever leaving Burp.
This is a full breakdown of what JWT Editor is, how to install it, how to use it, two real attack scenarios, a custom extension you can build on top of it, and where to practice legally.
What Is JWT Editor?
JWT Editor is a free Burp Suite extension built by PortSwigger. It is a comprehensive tool for analyzing and manipulating JSON Web Tokens inside Burp Suite.
Before we get into the tool itself, a quick recap of JWTs so everything makes sense.
A JWT has three parts separated by dots:
header.payload.signatureEach part is Base64URL encoded. The header says which algorithm was used to sign the token. The payload carries claims like your user ID, role, and expiry time. The signature proves the token has not been tampered with.
A typical JWT header looks like this:
{
  "alg": "RS256",
  "typ": "JWT"
}
A typical payload looks like this:
{
  "sub": "user_1042",
  "role": "user",
  "exp": 1780000000
}
The signature is generated by the server using a secret key. If you modify the payload without updating the signature, the server should reject the token. The word "should" is doing a lot of work in that sentence.
JWT Editor lets you:
- Automatically detect and highlight JWTs in all Burp traffic
- Decode and edit the header and payload with a clean JSON editor
- Generate, import, and manage cryptographic keys
- Re-sign modified tokens with your own keys
- Automate well-known JWT attacks: none algorithm bypass, algorithm confusion, embedded JWK injection, and more
How to Install JWT Editor

Same as every other extension in this series:
- Open Burp Suite Community or Professional Edition.
- Click the Extensions tab.
- Click BApp Store.
- Search for JWT Editor.
- Click Install.
Once installed, two things happen:
First, a new JWT Editor Keys tab appears in Burp's main toolbar. This is where you manage the cryptographic keys used for signing and verifying tokens.
Second, JWT Editor adds a new JSON Web Token tab inside Burp's HTTP message editor. Whenever you open a request that contains a JWT, this tab shows you the decoded token with a clean editor for the header, payload, and signature.
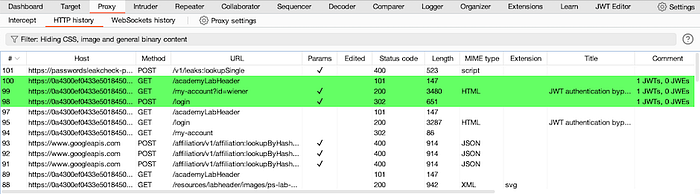
JWT Editor also automatically highlights requests containing JWTs in Burp's Proxy HTTP history, so you can spot them immediately as you browse.
One note: JWT Editor uses the newer Montoya API. Make sure your Burp Suite is up to date before installing. If you run into issues, update Burp first.
How to Use JWT Editor Step by Step
Step 1: Browse and spot JWTs automatically
Start Burp's built-in browser and log in to your target application. JWT Editor automatically highlights any request containing a JWT in Burp's HTTP history. Look for the highlighted rows.
Step 2: Open the JSON Web Token tab
Right-click a highlighted request and send it to Repeater. In the Repeater panel, click the JSON Web Token tab at the bottom of the request editor.
You will see the JWT decoded into three sections: Header, Payload, and Signature. Each section is editable directly in the panel.
Step 3: Modify the payload
Click into the Payload section. You can directly edit any claim. For example, change:
{
  "role": "user"
}
to:
{
  "role": "admin"
}
Step 4: Sign the modified token
Click the Sign button at the bottom of the JWT tab. A dialog appears asking which key to use. If you have a key loaded in the JWT Editor Keys tab, select it. If you are testing the none algorithm attack (covered below), you skip this step entirely.
Step 5: Send the modified request
Click Send in Repeater. Check the response. If the application accepts your modified token, you have a vulnerability.
Real-World Attack Scenario 1: The None Algorithm Bypass

This is one of the most famous JWT vulnerabilities and it still appears in real applications.
The JWT specification defines "none" as a valid algorithm. It was intended for situations where integrity has already been verified through other means. In practice, some libraries and frameworks accept tokens signed with the "none" algorithm, which means they accept tokens with no signature at all.
If you can change the algorithm to "none" and strip the signature, the server accepts your forged token as valid.
How to do it with JWT Editor:
- Intercept an authenticated request and send it to Repeater.
- Click the JSON Web Token tab.
- Change the alg value in the header from RS256 (or whatever algorithm is being used) to none.
- Modify the payload however you want. Change your role to admin. Change your user ID to someone else's.
- Click the Attack button at the bottom of the JWT tab.
- Select None Signing Algorithm from the attack options.
- JWT Editor strips the signature and sends the token with no signing.
- Click Send and check the response.
If the server returns a valid authenticated response, the application is vulnerable to the none algorithm bypass.
Impact: Complete authentication bypass. You can forge a token for any user, including admins, with no knowledge of the signing key.
Real-World Attack Scenario 2: Algorithm Confusion (RS256 to HS256)
This is a more advanced attack but one of the highest-impact JWT vulnerabilities in production applications.
Here is the background. Some algorithms are asymmetric, like RS256. The server signs tokens with a private key and verifies them with a public key. The public key is often openly accessible at endpoints like /jwks.json or /.well-known/jwks.json.
Some JWT libraries are vulnerable to algorithm confusion. If you change the algorithm in the token header from RS256 to HS256 (a symmetric algorithm), a vulnerable library will try to verify the token using the public key as the HS256 secret. Since you also know the public key, you can sign the modified token yourself with that same public key. The server verifies it and accepts it.
How to do it with JWT Editor:
- Find the server's public key. Check /jwks.json on the target.
- In the JWT Editor Keys tab, click New RSA Key and paste the JWK you found.
- Select the key, choose PEM format, and copy it.
- Go to Burp's Decoder tab and Base64-encode the PEM.
- Back in JWT Editor Keys, click New Symmetric Key, click Generate, and replace the k value with the Base64-encoded PEM you just copied. Save the key.
- Send your target request to Repeater and open the JSON Web Token tab.
- Change alg in the header from RS256 to HS256.
- Modify the payload as needed, for example change role to admin.
- Click Sign and select the symmetric key you just created.
- Send the request.
If the server accepts it, you have successfully forged a token using the server's own public key as the signing secret.
Impact: Full authentication bypass. You can become any user on the platform with no knowledge of the private key.
Custom Extension: Auto-Flag JWT Requests for Review
This Python extension monitors all traffic passing through Burp and automatically tags any request containing a JWT in the Authorization header for manual review. Useful when testing large applications where you do not want to manually scan every request for tokens.
from burp import IBurpExtender, IHttpListener, IParameter
import re

class BurpExtender(IBurpExtender, IHttpListener):
    def registerExtenderCallbacks(self, callbacks):
        self._callbacks = callbacks
        self._helpers = callbacks.getHelpers()
        # Name shown in the Extensions tab
        callbacks.setExtensionName("JWT Request Flagger")
        # Register to receive all HTTP messages
        callbacks.registerHttpListener(self)
        # Open a log file to record JWT-bearing endpoints
        self._log = open("jwt_endpoints.txt", "a")
        print("[*] JWT Request Flagger is running.")
    def processHttpMessage(self, toolFlag, messageIsRequest, messageInfo):
        # Only process requests, not responses
        if not messageIsRequest:
            return
        request = messageInfo.getRequest()
        analyzed = self._helpers.analyzeRequest(
            messageInfo.getHttpService(), request
        )
        headers = analyzed.getHeaders()
        url = str(analyzed.getUrl())
        # Look for Authorization header containing a Bearer JWT
        for header in headers:
            if header.lower().startswith("authorization: bearer "):
                token = header.split(" ", 2)[2]
                # Basic check: JWTs have three Base64 parts separated by dots
                if token.count('.') == 2:
                    # Highlight this request in Burp's HTTP history (orange)
                    messageInfo.setHighlight("orange")
                    messageInfo.setComment("JWT detected - review for vulnerabilities")
                    # Log the endpoint
                    self._log.write("[JWT] {}\n".format(url))
                    self._log.flush()
                    print("[JWT Found] {}".format(url))
How to load this in Burp:
- Go to Extensions and click Add.
- Set Extension Type to Python.
- Select this file and click Next.
- Browse normally. Every request with a JWT Bearer token gets highlighted orange in Burp's HTTP history and logged to jwt_endpoints.txt.
After your session, the log file gives you a complete list of every JWT-protected endpoint on the application. That is your testing checklist for JWT attacks.
Where to Practice Legally

Never test JWT attacks on applications you do not own or have written permission to test. Forging authentication tokens on a live application you do not have permission to test is unauthorized access under the IT Act 2000 in India.
Here is where to practice legally:
PortSwigger Web Security Academy at portswigger.net/web-security/jwt has the best JWT labs available anywhere. Free labs covering unverified signatures, none algorithm bypass, algorithm confusion, JWK header injection, JKU header injection, and more. Every lab is designed to be solved using JWT Editor in Burp Suite. Work through all of them.
DVWA (Damn Vulnerable Web Application) does not cover JWTs specifically, but setting it up locally and adding JWT-based authentication manually is a good exercise for understanding the full flow.
HackTheBox and TryHackMe both have machines and rooms where JWT vulnerabilities are part of the exploitation path. Once you are confident with the PortSwigger labs, these give you a more realistic challenge without the guided hints.
Start with PortSwigger's JWT labs. There are around 8 of them at the time of writing, going from beginner to advanced. The algorithm confusion lab is the most technically involved but also the most satisfying when it works.
Final Thoughts
JWTs are everywhere. Most developers implement them correctly. But the ones that do not create some of the most exploitable vulnerabilities in modern web applications because authentication itself is broken.
JWT Editor removes the friction from testing these vulnerabilities. Instead of manually decoding, editing, re-encoding, and signing tokens across multiple tools, you do everything in one place inside Burp.
Install it, open the PortSwigger JWT labs, and work through the none algorithm bypass first. It is the simplest attack and a good way to get comfortable with the tool before moving on to algorithm confusion.
Next in this series: Active Scan++, the extension that extends Burp's built-in scanner to find vulnerabilities it normally misses, including SSRF, XXE, template injection, and more.