June 2, 2026
Structuring a Google Cloud Armor Policy: A Rule-Ordering Playbook
Cloud Armor provides a large set of controls to protect your workloads from malicious traffic: IP allowlists and denylists, geo rules…

Mike Hansen
12 min read
Cloud Armor provides a large set of controls to protect your workloads from malicious traffic: IP allowlists and denylists, geo rules, Threat Intelligence feeds, OWASP signatures, custom rules, Adaptive Protection, reCAPTCHA, rate limiting, and more.
But the most important design decision is often not which controls you enable. It's the order they execute in.
A policy that allows trusted IPs at the top will never run a lower priority SQL injection check against those same IPs. A rate limit placed above your WAF rules can potentially let attacks through. A policy with rule priorities set to 1, 2, 3, 4 leaves you renumbering everything the next time you need to insert a new rule.
This post walks through how to structure a service-level Cloud Armor security policy attached to a backend service behind the global external Application Load Balancer for a typical web application. (Note: This guidance does not apply to a regional load balancer or Media CDN due to feature variability.)
Where Cloud Armor policies attach
Cloud Armor security policies attach at a few different points in the request path.
At the very top, Hierarchical Security Policies (HSPs) attach at the organization, folder, or project level. They are evaluated before any service-level policy and cascade down to every backend service inside their scope. HSPs are the right tool when you have controls that should apply broadly across many projects, like a corporate geo-block or an org-wide Threat Intelligence deny list. My previous post on Defense in Depth with Cloud Armor Hierarchical Security Policies covers them in depth.
Below the HSP layer are service-level policies. These come in two flavors: edge security policies and backend security policies, both of which can be associated with a global external Application Load Balancer.
An edge security policy is evaluated at the outermost perimeter of Google's network, at the Google Front End, before backend selection and before any Cloud CDN cache lookup. For policies attached to a global external Application Load Balancer, edge policies support a narrow set of match conditions: source IP and source country code. An edge policy stops unwanted traffic before it consumes any further resources downstream, which makes it ideal for blunt geographic and IP-based filtering.
A backend security policy is attached to a backend service and runs after the load balancer has selected a backend. It supports the full Cloud Armor feature set: OWASP rules, Adaptive Protection, rate limiting, reCAPTCHA integration, Threat Intelligence, custom CEL expressions, Address Groups, and more.
When both are attached to the same backend service, the edge policy is evaluated first. If no rule triggers in the edge policy, evaluation continues into the backend policy.
The rest of this post focuses on the service-level layer, with most of the attention on the backend security policy.
tl;dr
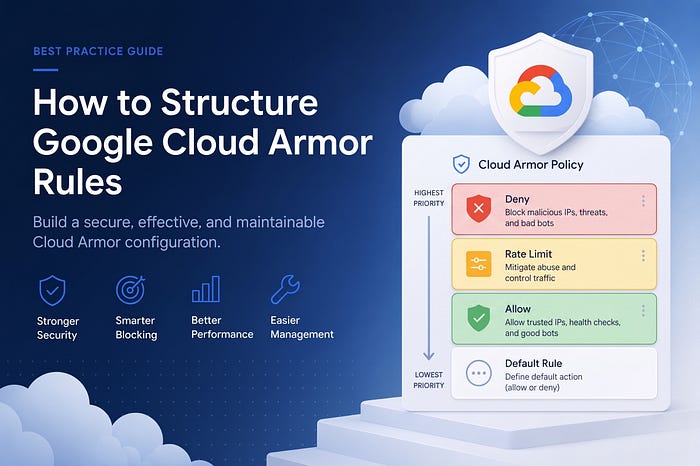
For readers who want the answer before the reasoning, a service-level Cloud Armor policy with a default allow rule generally flows from top to bottom like this for a typical web application:
Edge Security Policy:
- IP and geo denies at the edge (in no particular order)
Backend Security Policy
- IP, Address Group, geo, and ASN deny rules
- Threat Intelligence (requires Cloud Armor Enterprise)
- Custom deny rules (paths, user agents, header matches)
- Preconfigured WAF rules (OWASP CRS)
- reCAPTCHA challenges
- Adaptive Protection auto-deploy (requires Cloud Armor Enterprise)
- Rate limiting rules
- Default
allow
It's worth mentioning that different workloads may call for reordering the rule types based on their threat model. For example, a customer with an API workload may want to prioritize rate limiting rules higher in the configuration. A financial services customer may want to move reCAPTCHA higher up the list to mitigate ATO and credential stuffing attacks earlier. The example above, and this post overall, focuses primarily on generic best practices.
First rule match wins
One concept drives everything that follows: the first rule that matches wins. When a request matches a rule's match condition, Cloud Armor applies that rule's action and stops evaluating all other rules in the policy. Rules with lower priorities (higher numbers) are not evaluated.
This is intuitive for the deny action. The non-intuitive part is allow. If a rule at priority 1000 allows traffic from 1.2.3.4 and a SQL injection rule sits at priority 5000, that SQL injection rule will never trigger for traffic from 1.2.3.4.
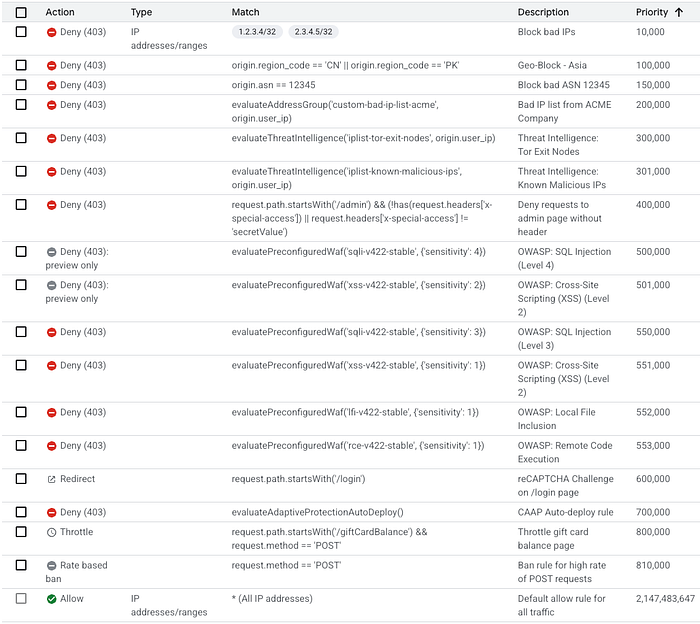
A call out worth mentioning: rules running in preview mode are monitored but not enforced. A preview rule that matches logs the rule trigger and lets evaluation continue to the next rule, so the rule that actually "wins" is the first non-preview rule that matches. Preview mode is how you safely test new rules before enforcement, covered later in the post. Keep these rules at higher priorities (lower numbers) to ensure traffic is evaluated against them.
The rule ordering playbook
Each section below covers a specific rule type, where it belongs in the policy, why it belongs there, and what the gcloud looks like. The assumption throughout is that the default rule is allow, so traffic that passes every check above reaches the backend.
1. IP and geo denies first, ideally at the edge
The simplest request to handle is one that never reaches your application. IP-based and geo-based denies are the first thing Cloud Armor should evaluate, and they belong in an edge security policy when possible.
gcloud compute security-policies create my-edge-policy \
    --type=CLOUD_ARMOR_EDGE
gcloud compute security-policies create my-edge-policy \
--type=CLOUD_ARMOR_EDGEA typical edge policy might include a country-level block for regions you do not serve or a deny for a small set of known-bad source ranges. These are blunt rules, but they are quick to evaluate and they keep unwanted traffic from consuming downstream capacity.
gcloud compute security-policies rules create 10000 \
    --security-policy=my-edge-policy \
    --src-ip-ranges="203.0.113.0/24,198.51.100.0/24" \
    --action=deny-403 \
    --description="Block known-bad source ranges reported by SOC ticket #4521"
gcloud compute security-policies rules create 10000 \
--security-policy=my-edge-policy \
--src-ip-ranges="203.0.113.0/24,198.51.100.0/24" \
--action=deny-403 \
--description="Block known-bad source ranges reported by SOC ticket #4521"There is a system limit of 10 IP addresses or CIDR ranges per rule in basic mode. To block more than that, spread them across multiple rules at adjacent priorities, or move the IP/geo logic into the backend policy and use Address Groups, which is covered in the next section.
2. Backend IP, geo, and Address Group denies
Some IP and geo logic belongs in the backend policy instead of the edge. The biggest reason is scale. Backend policies are constrained to the same 10-IP-per-rule limit, which gets overwhelming with hundreds or thousands of IPs to manage. Address Groups solve this, and they can only be referenced from backend policies (specifically globally scoped backend security policies, or by hierarchical policies).
An Address Group can hold up to 150,000 IPv4 ranges or 50,000 IPv6 ranges. You create the group once, reference it from a rule, and update the membership independently of the rule. Every policy that references the group picks up the changes automatically.
gcloud network-security address-groups create blocklist-soc \
    --location=global \
    --type=IPv4 \
    --capacity=10000 \
    --purpose=CLOUD_ARMOR \
    --description="SOC-maintained block list, synced daily"
gcloud compute security-policies rules create 10000 \
    --security-policy=my-backend-policy \
    --expression="evaluateAddressGroup('blocklist-soc', origin.ip)" \
    --action=deny-403 \
    --description="Block IPs from SOC-maintained address group"
gcloud network-security address-groups create blocklist-soc \
--location=global \
--type=IPv4 \
--capacity=10000 \
--purpose=CLOUD_ARMOR \
--description="SOC-maintained block list, synced daily"
gcloud compute security-policies rules create 10000 \
--security-policy=my-backend-policy \
--expression="evaluateAddressGroup('blocklist-soc', origin.ip)" \
--action=deny-403 \
--description="Block IPs from SOC-maintained address group"Address Groups require Cloud Armor Enterprise enrollment. On the Standard tier, you are limited to inline IP ranges in your rules.
One thing worth calling out: by default, Cloud Armor evaluates the connecting IP via origin.ip. For direct traffic, that is the client. For traffic arriving through an upstream proxy (a third-party CDN, a corporate egress proxy, or a WAF-as-a-service sitting in front of GCP), origin.ip is the proxy, not the client. Blocking on origin.ip in that scenario will block the proxy. The fix is origin.user_ip, which Cloud Armor populates from a user-configured client-IP header. You dictate the headers to look for by running the gcloud command below, or via the UI (Cloud Armor Config > Edit Policy).
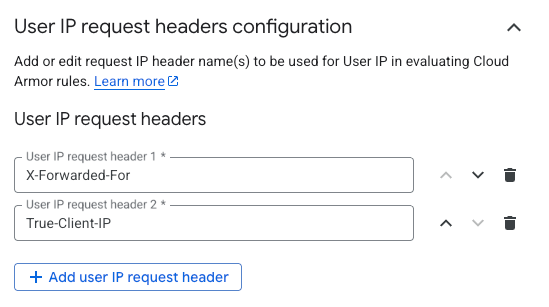
gcloud compute security-policies update my-backend-policy \
    --user-ip-request-headers=X-Forwarded-For,True-Client-IP
gcloud compute security-policies update my-backend-policy \
--user-ip-request-headers=X-Forwarded-For,True-Client-IPCloud Armor does not read forwarded-IP headers by default, since that would let any client spoof their source IP, so the trust is something you have to explicitly establish. Once configured, origin.user_ip should be used in place of origin.ip across all downstream IP-based evaluation, including Address Groups, Threat Intelligence, and custom rules.
gcloud compute security-policies rules create 10000 \
    --security-policy=my-backend-policy \
    --expression="evaluateAddressGroup('blocklist-soc', origin.user_ip)" \
    --action=deny-403 \
    --description="Block IPs from SOC-maintained address group"
gcloud compute security-policies rules create 10000 \
--security-policy=my-backend-policy \
--expression="evaluateAddressGroup('blocklist-soc', origin.user_ip)" \
--action=deny-403 \
--description="Block IPs from SOC-maintained address group"3. Threat Intelligence
After the obvious bad traffic has been blocked, the next layer is Threat Intelligence. These are Google-curated lists of IPs that match a specific function: known malicious IPs, Tor exit nodes, anonymous proxies, public cloud egress ranges, low-reputation VPN providers, and a few others. Google maintains and updates these lists continuously.
Threat Intelligence rules sit early in the policy because they are IP-based and quick to evaluate. They also require Cloud Armor Enterprise.
gcloud compute security-policies rules create 20000 \
    --security-policy=my-backend-policy \
    --expression="evaluateThreatIntelligence('iplist-known-malicious-ips')" \
    --action=deny-403 \
    --description="Block IPs on Google Threat Intelligence known-malicious feed"
gcloud compute security-policies rules create 20100 \
    --security-policy=my-backend-policy \
    --expression="evaluateThreatIntelligence('iplist-tor-exit-nodes')" \
    --action=deny-403 \
    --description="Block Tor exit nodes"
gcloud compute security-policies rules create 20000 \
--security-policy=my-backend-policy \
--expression="evaluateThreatIntelligence('iplist-known-malicious-ips')" \
--action=deny-403 \
--description="Block IPs on Google Threat Intelligence known-malicious feed"
gcloud compute security-policies rules create 20100 \
--security-policy=my-backend-policy \
--expression="evaluateThreatIntelligence('iplist-tor-exit-nodes')" \
--action=deny-403 \
--description="Block Tor exit nodes"Which feeds to enable depends on the workload. A privacy-focused service that genuinely serves Tor users should not block iplist-tor-exit-nodes. A business application that has no reason to receive traffic from a VPN provider can deny iplist-vpn-providers. The categories are workload-neutral. The decision to deny on them is not.
4. Custom deny rules
After IP-class denies, the next layer is custom deny rules for application-specific patterns. This is where you put rules like "deny anything trying to reach /admin that doesn't carry our special access header" or "deny requests to deprecated API paths that should no longer be in use."
CEL expressions can combine up to five subexpressions in a single rule, which makes it easy to build precise matches. An example pattern below combines a path match with a header check so the deny only fires when the sensitive path is accessed without the expected credential.
gcloud compute security-policies rules create 40000 \
    --security-policy=my-backend-policy \
    --expression="request.path.startsWith('/admin') && (!has(request.headers['x-special-access']) || request.headers['x-special-access'] != 'secretValue')" \
    --action=deny-403 \
    --description="Block /admin access without valid special access header"
gcloud compute security-policies rules create 40000 \
--security-policy=my-backend-policy \
--expression="request.path.startsWith('/admin') && (!has(request.headers['x-special-access']) || request.headers['x-special-access'] != 'secretValue')" \
--action=deny-403 \
--description="Block /admin access without valid special access header"Since these rules are workload-specific, they should fire before the evaluation layers below.
5. Preconfigured WAF rules (OWASP)
Preconfigured WAF rules apply OWASP protection to detect SQL injection, cross-site scripting, local and remote file inclusion, remote code execution, protocol abuse, and other application-layer attack patterns. Because they parse and inspect the request itself, they do more work per request than IP lookups.
gcloud compute security-policies rules create 50000 \
    --security-policy=my-backend-policy \
    --expression="evaluatePreconfiguredWaf('sqli-v422-stable', {'sensitivity': 2})" \
    --action=deny-403 \
    --description="OWASP CRS 4.22 SQL injection, sensitivity 2"
gcloud compute security-policies rules create 50000 \
--security-policy=my-backend-policy \
--expression="evaluatePreconfiguredWaf('sqli-v422-stable', {'sensitivity': 2})" \
--action=deny-403 \
--description="OWASP CRS 4.22 SQL injection, sensitivity 2"If you are on CRS v3.x and planning to move to v4.22, the CRS v4.22 migration guide walks through the upgrade in detail.
Which attack groups to enable depends on the application's technology stack. A static site probably does not need PHP rules, for example. A site that does not accept file uploads can generally run LFI/RFI rules at a higher sensitivity, assuming a lower false positive risk.
In practice, new WAF rules are often deployed in preview mode first to measure false positives before enforcement is enabled.
6. reCAPTCHA challenges
If your policy includes reCAPTCHA-based rules (rebranded to Google Fraud Defense), this is a reasonable place for them. reCAPTCHA is a graduated response, not a confident deny. You are not certain the traffic is malicious, but you want to verify the client is a real browser controlled by a real user before letting the request proceed. By the time evaluation reaches this layer, anything matching a high-confidence deny pattern is already blocked, so reCAPTCHA is reserved for the genuinely ambiguous traffic. Traffic that passes the challenge continues through the rest of the policy.
7. Adaptive Protection auto-deploy
Cloud Armor Adaptive Protection (CAAP) uses machine learning to identify volumetric Layer 7 attacks against your application and offers suggested rules when it detects one. With auto-deploy enabled, CAAP can place a deny rule in your policy automatically when its confidence exceeds a user-configured threshold.
The auto-deploy match expression is evaluateAdaptiveProtectionAutoDeploy(), which matches requests from payloads that fit the attack signature of an ongoing attack. By the time evaluation reaches this layer, WAF and reCAPTCHA have already filtered the obvious application-layer attacks and challenged the ambiguous bot-like traffic. What's left for CAAP to catch is the volumetric attack pattern that does not trip any of the static signatures above.
gcloud compute security-policies rules create 70000 \
--security-policy=my-backend-policy \
--expression="evaluateAdaptiveProtectionAutoDeploy()" \
--action=deny-403 \
--description="Adaptive Protection auto-deployed signature"gcloud compute security-policies rules create 70000 \
--security-policy=my-backend-policy \
--expression="evaluateAdaptiveProtectionAutoDeploy()" \
--action=deny-403 \
--description="Adaptive Protection auto-deployed signature"Adaptive Protection is configured on the backend security policy itself, not in hierarchical policies, and requires Cloud Armor Enterprise.
8. Rate limiting and rate-based bans last
Unless you are running a traffic-sensitive workload, throttle and rate-based ban rules generally belong at the bottom of the policy, just above the default rule. The reason is the "conform" action. When a client's traffic rate is at or below the configured threshold and the CEL criteria matches, the conform action fires, and the conform action is always allow. It is not configurable.
A rate limit rule sitting high in the policy will therefore allow any traffic that is under the threshold, short-circuiting every rule below it. Putting the rate limit last means only traffic that has already passed every other check is subject to the rate limit. If that traffic also exceeds the rate, it is throttled or banned. Otherwise it falls through to the default allow.
gcloud compute security-policies rules create 80000 \
--security-policy=my-backend-policy \
--src-ip-ranges="*" \
--action=throttle \
--rate-limit-threshold-count=100 \
--rate-limit-threshold-interval-sec=60 \
--conform-action=allow \
--exceed-action=deny-429 \
--enforce-on-key=IP \
--description="Per-IP rate limit: 100 req/min, deny 429 on exceed"gcloud compute security-policies rules create 80000 \
--security-policy=my-backend-policy \
--src-ip-ranges="*" \
--action=throttle \
--rate-limit-threshold-count=100 \
--rate-limit-threshold-interval-sec=60 \
--conform-action=allow \
--exceed-action=deny-429 \
--enforce-on-key=IP \
--description="Per-IP rate limit: 100 req/min, deny 429 on exceed"9. Default rule
The default rule sits at priority 2147483647 and cannot be deleted. With the structure above, this rule is set to allow so that a request passing every other check reaches the backend.
An alternate philosophy is to set the default to deny and explicitly allow everything that should be permitted. This works for highly locked-down workloads (a private API with a known small client population), but it is uncommon for general web applications and inverts most of the reasoning above. This post assumes the default-allow model.
Priority spacing as a configuration habit
Cloud Armor priorities range from 0 to 2147483646, with the default rule occupying 2147483647. That is roughly 2.1 billion usable values, and the policy will function identically whether your rules are numbered 1, 2, 3, 4 or 10000, 20000, 30000, 40000.
The difference is what happens when you need to add a rule. Priority numbers must be unique within a policy, so if your rules are sequentially numbered and you need to insert a new rule between 2 and 3, you have to renumber every rule from that point down. With spaced priorities, you just pick a value in the gap.
A practical scheme is to assign priority ranges to rule classes. For example:
10000–19999— Backend IP and Address Group denies20000–29999— Threat Intelligence30000–39999— Geo and ASN denies40000–49999— Custom deny rules (paths, user agents, bot patterns)50000–59999— Preconfigured WAF (OWASP)60000–69999— reCAPTCHA challenges70000–79999— Adaptive Protection auto-deploy80000–89999— Rate limiting
The exact ranges are not important. What matters is that the priority number tells you at a glance what class of rule it is. A teammate seeing a rule at priority 52500 knows without looking that it is a WAF rule.
Preview Mode before enforcement
Cloud Armor rules can run in preview mode, which evaluates the rule and logs every match without applying the action. A preview deny doesn't block. A preview allow doesn't bypass downstream rules. The match is recorded in Cloud Logging under the previewSecurityPolicy field, so you can see exactly what the rule would have done if it were enforced.
This is a best practice to deploy any new rule, especially OWASP rules and broad denies. A rule tuned against a sample of production traffic in preview mode for a week or two will surface false positives, unexpected matches, and traffic patterns you did not anticipate. Once the logs show the rule is behaving the way you want, flip it to enforcement.
Important: Make sure the rules you place in preview mode have a higher priorty than the enforced, non-preview rules to ensure they are evaluated. See the screenshot above for example placement.
Preview mode is set with --preview on rule create or update, and cleared with --no-preview:
Enable preview mode:
gcloud compute security-policies rules create 50000 \
    --security-policy=my-backend-policy \
    --expression="evaluatePreconfiguredWaf('sqli-v422-stable', {'sensitivity': 2})" \
    --action=deny-403 \
--description="OWASP CRS 4.22 SQL injection, sensitivity 2" \
--previewgcloud compute security-policies rules create 50000 \
--security-policy=my-backend-policy \
--expression="evaluatePreconfiguredWaf('sqli-v422-stable', {'sensitivity': 2})" \
--action=deny-403 \
--description="OWASP CRS 4.22 SQL injection, sensitivity 2" \
--previewDisable preview mode:
gcloud compute security-policies rules update 50000 \
    --security-policy=my-backend-policy \
    --no-preview
gcloud compute security-policies rules update 50000 \
--security-policy=my-backend-policy \
--no-previewDescriptions on every rule
Cloud Armor rules support a description field. As a best practice: Use it. Always.
Six months after a rule was created, there's a chance nobody on the team will remember why it exists. The IP block at priority 10000 could be a permanent SOC-driven block list, or a temporary mitigation that someone added during an incident and never removed. The custom deny at priority 40000 could be blocking a specific bot, or blocking a legitimate partner who changed user agents. Without descriptions, the only way to know is to ask the person who wrote it, and that person may no longer work there.
A ticket number, a date, or a one-line rationale are all useful. Something is always better than nothing.
--description="Block range reported in SOC ticket #4521, 2026-02-14, review 2026-08"--description="Block range reported in SOC ticket #4521, 2026-02-14, review 2026-08"Closing thoughts
As mentioned earlier, the ordering and guidance above is a default for a typical web application, not a prescription. Different workloads will have reasons to reorder the rule types based on their threat model.
What stays consistent is the shape. Lighter, more decisive checks go first. Heavier evaluative checks go later. Rate limits go last. Allowlists are used sparingly because they short-circuit everything below them. Priorities are spaced so the policy can grow, and descriptions explain why every rule exists. When a rule fires, it should be the rule you intended to fire, and not an allow at the top of the policy quietly disabling everything underneath.