
This is not a tutorial about theory. This is a walkthrough of a live demo I ran for a room full of young cybersecurity enthusiasts, where they watched a simulated attacker get caught, identified, and reported to Slack in under 10 seconds. Here is exactly how it works and why it matters.
It Started With a Question Nobody Could Answer
I was running a cybersecurity demo for a group of young enthusiastic students, career changers, and people who had decided they wanted to work in security but were not sure where to start.
I asked them a simple question.
"Right now, at this moment, how many servers around the world are being attacked?"
Silence.
"Millions," I told them. "And the vast majority of those attacks are happening while the security team is asleep."
A brute-force SSH attack generates dozens of failed login entries in an authentication log. Those entries sit there, patient, invisible, and unread until a human analyst comes in at 9am, opens their SIEM, and finds a threat that happened six hours ago.
Six hours is a long time in security.
Then I said, "Let me show you what happens when you automate the detection."
I opened two terminal windows. I started a Python script in the first one. I launched an attack simulator in the second.
Within 10 seconds, a Slack alert arrived on my phone with the attacker's IP address, their country of origin, their internet service provider, and a confidence score of 100% from a global threat intelligence database.
The room went very quiet.
Then they started asking questions.
The Problem With Humans
Before we talk about the solution, let us be honest about the problem.
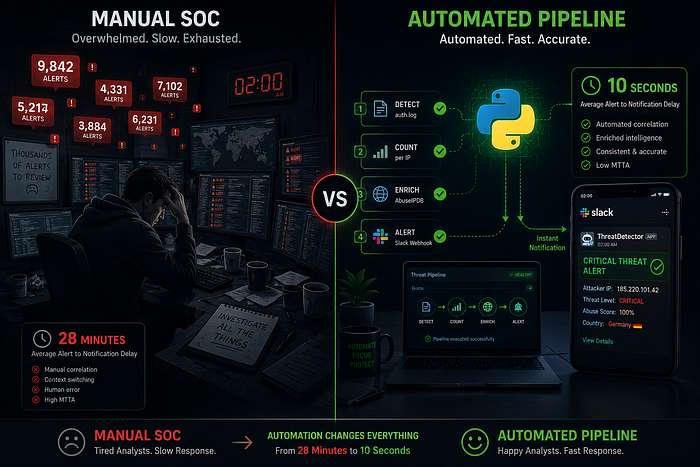
A typical Security Operations Centre processes between 10,000 and 100,000 security alerts per day. Studies consistently show that the average time to detect a threat, even with a trained team watching screens, is around 28 minutes.
Twenty-eight minutes.
In 28 minutes, a determined attacker can:
- Brute-force weak credentials
- Establish persistence on a compromised system
- Begin lateral movement across the network
- Exfiltrate data
The human brain is not designed for this scale. Fatigue is real. Alert fatigue is worse. When analysts see thousands of the same pattern every day, they start tuning it out, and that is exactly when the real attack lands.
Automation does not get tired. It does not have a Monday morning. It checks every single event with the same diligence at 3am on a bank holiday as it does at 9am on a Tuesday.
This is why SOAR, Security Orchestration Automation and Response, has become one of the most important disciplines in modern cybersecurity.
What I Built
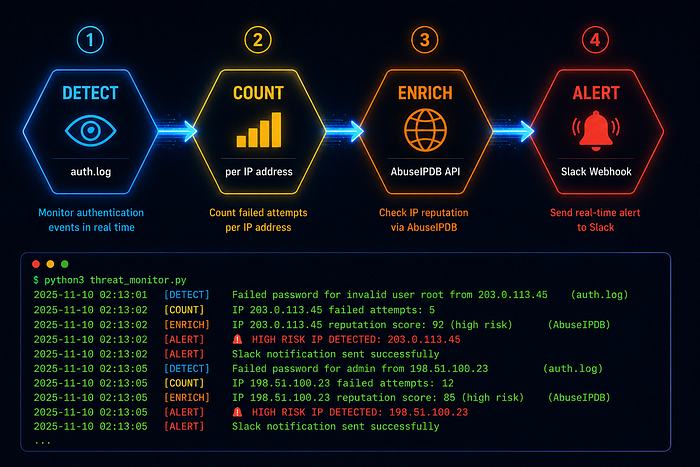
The pipeline has four stages. They sound simple because they are.
Stage 1: Detect. Python tails the authentication log in real time; the same way tail -f works in Linux. Every new line that appears in the file is processed immediately.
Stage 2: Count. A regex pattern extracts the source IP address from failed login entries. A dictionary keeps a running count of failed attempts per IP.
Stage 3: Enrich. When the count for any IP reaches the threshold (three attempts by default), the pipeline queries AbuseIPDB. AbuseIPDB is a community-driven threat intelligence database where security researchers and organisations around the world report malicious IP addresses. One API call returns an abuse confidence score between 0 and 100%, along with the country, ISP, total reports, and last reported date.
Stage 4: Alert. If the abuse score crosses the minimum threshold or the attempt count is high enough, the pipeline fires a formatted Slack alert with everything the analyst needs to take action.
No human in the loop. No manual lookup. No 28-minute delay.
The Code And What It Actually Does
Here is the core of the detection loop. The entire intelligence of the system lives in about 30 lines:
SSH_FAIL_PATTERN = re.compile(
    r'Failed password for .+ from (\d+\.\d+\.\d+\.\d+) port'
)

def process_log_line(line):
    match = SSH_FAIL_PATTERN.search(line)
    if not match:
        return

    ip = match.group(1)
    failed_attempts[ip] += 1
    count = failed_attempts[ip]

    if count >= ALERT_THRESHOLD and ip not in alerted_ips:
        intel = check_abuseipdb(ip)
        send_slack_alert(ip, count, intel)
        alerted_ips.add(ip)
One function. One regex. One dictionary. One API call. One alert.
The regex pattern matches the exact format of a failed SSH login entry in Linux auth logs:
May 22 02:13:07 server sshd[12345]: Failed password for root from 185.220.101.42 port 22 ssh2From that single line, the pipeline extracts 185.220.101.42 and starts building a picture.
The alerted_ips set is the memory; once an IP has triggered an alert, it does not trigger another one in the same session. This prevents Slack from being flooded during a sustained attack.
The Threat Intelligence Layer
This is where the demo becomes genuinely compelling.
AbuseIPDB maintains a database of IP addresses that have been reported by security researchers, organisations, and individuals around the world. When you query their API with an IP address, you get back context that would take a human analyst minutes to gather manually.
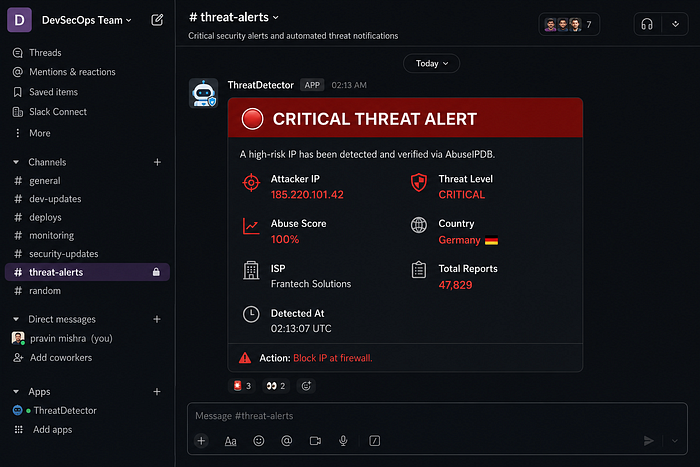
The IP I used in the demo 185.220.101.42 is a known Tor exit node. It scored 100% on AbuseIPDB with over 47,000 reports. In seconds, the pipeline told us:
- Country: Germany
- ISP: Frantech Solutions
- Abuse Score: 100%
- Total Reports: 47,829
- Last Reported: Within the last 24 hours
That is not just a detection. That is intelligence. The difference between knowing that an attack happened and knowing who is likely behind it.
The Live Demo Moment
Here is what the audience saw in real time, on screen.
Terminal 1 showed the detector running silently. Waiting. Watching.
Terminal 2 showed the simulator firing attack entries one by one, a new failed login every 0.8 seconds. root... admin... ubuntu...
After the third attempt, Terminal 1 lit up:
[WARNING] THRESHOLD REACHED for 185.220.101.42 — querying AbuseIPDB...
[INFO]    AbuseIPDB score for 185.220.101.42: 100%
[INFO]    Slack alert sent — Level: CRITICAL
And then before anyone in the room had time to read the second line, a phone notification appeared on the presentation screen.
Slack. Channel: #threat-alerts. CRITICAL.
That moment the gap between the attack and the alert being measured in seconds rather than minutes is what made the room go quiet.
What This Has to Do With Your Career
If you are learning cybersecurity and you have not started learning to code, this is your sign.
The tools that enterprise security teams use every day, Splunk SOAR, Microsoft Sentinel Playbooks, and Palo Alto XSOAR, are all built on this same pattern. Detect. Enrich. Alert. Respond.
The difference between what I built and what a Splunk SOAR deployment costs is roughly £100,000 per year in licensing. The underlying logic is the same.
Understanding how to write a detection rule is one skill. Understanding how to automate the response and how to make the system act on that detection without human intervention is the skill that separates a reactive security analyst from a proactive security engineer.
This is what DevNet automation in cybersecurity actually means. Not theory. Not slides. A Python script that catches an attacker at 2am while you are asleep.
Build It Yourself Tonight
The entire project is on GitHub. Free. Open source. Runs on a VMware Ubuntu VM on your laptop.
You need:
- Python 3
- A free AbuseIPDB account abuseipdb.com/register
- A free Slack workspace with an incoming webhook
- 30 minutes
git clone https://github.com/Herculis411/threat-detection-demo.git
cd threat-detection-demo
python3 -m venv venv
source venv/bin/activate
pip install -r requirements.txt
cp config.example.py config.py
# Add your API keys to config.py
python3 test_slack.py
When the test alert arrives in Slack, you are ready.
Open two terminals. Start the detector in one. Run the simulator in the other one. Watch what happens.
The Bigger Picture
Every tool in this demo is free. The knowledge to build it is free. The barrier is not money; it is knowing that this is something you can build.
The most dangerous assumption a young security professional can make is that automation is something that happens at enterprise scale, that it requires a six-figure budget, and that it requires a dedicated SOAR engineering team.
It does not.
It requires curiosity, a Python interpreter, and the willingness to read a few API docs on a Sunday afternoon.
The pipeline I demo'd in that room was running on a VMware virtual machine on my laptop. The same logic runs inside security operations at banks, hospitals, and government departments worldwide, just with more data, more integrations, and considerably more expensive licences.
The fundamentals are identical.
Start small. Build the thing. Understand every line of it. Then make it bigger.
That is how security engineers are made.
What Came Next
After the demo I asked the room, "How many of you have Python installed on your machine?"
Most hands went up.
"How many of you have built something with it this year?"
Two hands.
The gap between knowing a tool exists and using it to build something real is the gap that separates people who learn about security from people who do security.
This demo exists to close that gap.
The GitHub repo is live. The README walks you through every step. The architecture document explains exactly how each component connects. Everything you need is there.
The attacker is already running their script.
The question is whether yours is running too.
This post is part of my DevNet Automation in Cybersecurity series in partnership with iConnect Global Partners: real builds, real lessons, real code. If you found this useful, the GitHub repo is at github.com/Herculis411/threat-detection-demo. Follow me on LinkedIn for the next demo.
Tags: Cybersecurity Python DevOps SOAR Automation AbuseIPDB Slack DevNet CloudAdvisory Security Engineering