

"Manual testing finds what you know to look for. Intruder finds what you didn't know was there."
Quick Recap
In Blog #1, we installed Burp Suite. In Blog #2 we configured the proxy and intercepted our first HTTPS request. In Blog #3 we mastered the Repeater for deep manual testing — SQL Injection, IDOR, JSON API manipulation, and baseline methodology.
Now we level up. The Repeater is powerful, but it requires you to manually send one request at a time. What if you need to test 500 different usernames? Or fuzz every parameter in a request with a wordlist of 10,000 injection strings? Or brute-force a PIN with all possible 4-digit combinations? That is where Burp Intruder comes in.
Intruder is Burp Suite's automated payload injection engine. You define where in a request the payloads go, you define what the payloads are, and Intruder does the rest — sending hundreds or thousands of requests automatically and collecting every response for you to analyse.
How Intruder Works — The Core Concept
The fundamental idea behind Intruder is simple and elegant.
You take an HTTP request. You mark certain positions within it — these are called attack positions or payload positions. You then provide a list of values — these are your payloads. Intruder cycles through your payloads, substitutes them into the marked positions, sends each modified request to the server, and records every response.
The result is a table of requests and responses that you can sort, filter, and analyze to find anomalies — the responses that differ from the baseline, indicating something interesting happened on the server.
This workflow powers some of the most common and effective attack techniques in web application penetration testing: credential brute-forcing, parameter fuzzing, enumeration of hidden endpoints, injection testing at scale, and bypassing rate limiting on certain inputs.
The Intruder Interface

Sending a Request to Intruder
The workflow is identical to Repeater. From HTTP History, right-click any request and select "Send to Intruder". You can also do this from the Intercept panel. Once sent, click the Intruder tab.
The Four Sub-Tabs
Intruder has four sub-tabs, each serving a distinct purpose. You will work through them in order for every attack.
Positions tab is where you define your attack positions — the parts of the request that will be replaced with payloads. This is your first stop every time.
Payloads tab is where you define what gets inserted into those positions. You choose the payload type (a simple list, numbers, dates, brute-force combinations, and more) and configure the specific values.
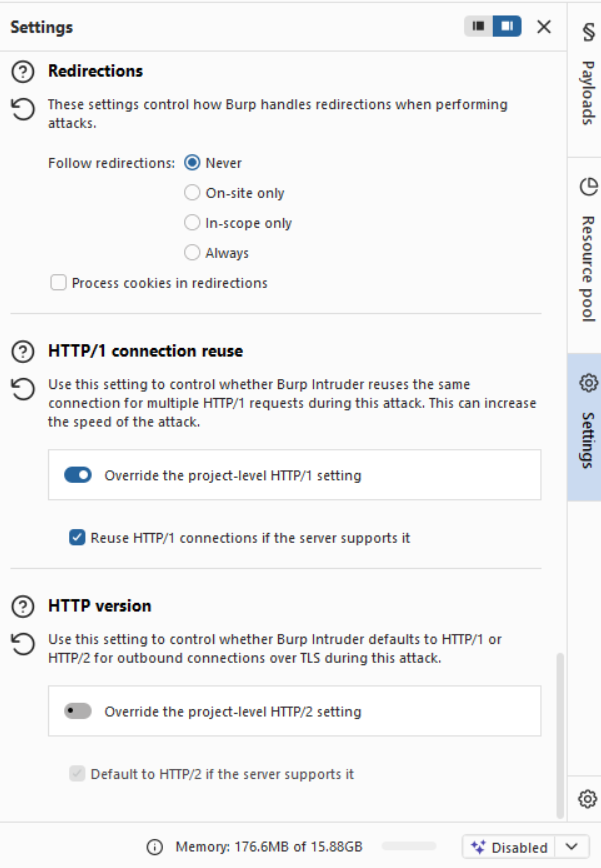
Settings tab (called Options in older versions) controls Intruder's behavior — how many threads to use, what to grep for in responses, whether to follow redirects, and more.
Results tab is where you watch the attack run and analyze the collected responses in a table.
Attack Positions — Marking Your Targets
When you first open the Positions tab after sending a request, Burp automatically highlights sections of the request in orange. These are Burp's guesses at where payloads should go — typically, parameter values and cookie values.
The highlighted sections are wrapped in section markers that look like this in the raw view: §value§. The content between the markers is what gets replaced.
You will almost always want to clear Burp's automatic selections first and define your own manually. Click the "Clear §" button on the right side to remove all markers.
Then, to add your own position:
- Highlight the specific value you want to replace (e.g., the password value in a POST body)
- Click "Add §"
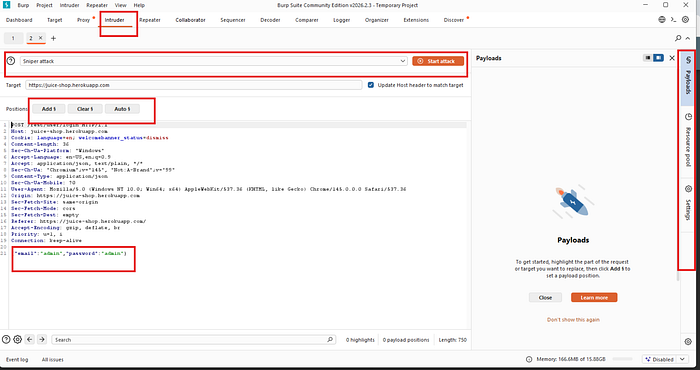
The selected text is now wrapped in markers and will be replaced with your payloads during the attack.
You can add multiple positions — and how they interact depends on the attack type you choose, which brings us to the most important concept in Intruder.
The Four Attack Types
This is the most critical thing to understand in Intruder. The attack type determines how multiple payload positions are filled when you have more than one marker in a request.
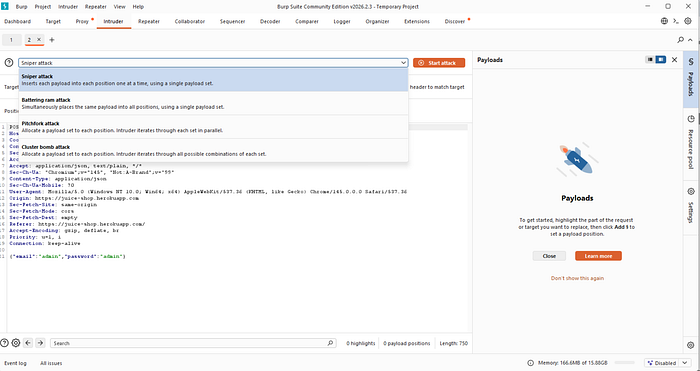
Attack Type 1 — Sniper
Sniper is the most commonly used attack type. It uses a single payload list and tests each position one at a time while keeping the other positions set to their original values.
If your request has two positions — say username and password — and your payload list has 100 values, Sniper will:
- First cycle through all 100 payloads in the
usernameposition (whilepasswordstays as the original value) - Then cycle through all 100 payloads in the
passwordposition (whileusernamestays as the original value)
Total requests: 100 × 2 positions = 200 requests.
Sniper is ideal for fuzzing a single parameter, testing one injection point at a time, or probing individual fields for vulnerabilities.
Attack Type 2 — Battering Ram
Battering Ram uses a single payload list but inserts the same payload into all positions simultaneously.
If your request has two positions and your list has 100 values, every request has the same value in both positions. Request 1 sends payload-1 in both username and password. Request 2 sends payload-2 in both. And so on.
Total requests: 100 (same as the payload list length, regardless of the number of positions).
Battering Ram is useful when you need to insert the same value in multiple places — for example, testing whether a session token appears in both a cookie and a header, or when the same value must be consistent across multiple parameters for the request to be valid.
Attack Type 3 — Pitchfork
Pitchfork uses multiple payload lists — one per position — and iterates through them in parallel. Position 1 gets values from List 1, Position 2 gets values from List 2, both advancing simultaneously.
If Position 1 has a list of 100 usernames and Position 2 has a list of 100 corresponding passwords, Pitchfork pairs them: request 1 sends username[1] with password[1], request 2 sends username[2] with password[2], and so on.
Total requests: equal to the length of the shortest payload list.
Pitchfork is essential for credential stuffing — testing a list of known username-password pairs harvested from data breaches. You have a list of usernames and a corresponding list of passwords, and you want to test each pair without mixing them.
Attack Type 4 — Cluster Bomb
Cluster Bomb uses multiple payload lists and tests every possible combination.
If Position 1 has 10 usernames and Position 2 has 10 passwords, Cluster Bomb sends 10 × 10 = 100 requests — every username paired with every password.
Total requests: the product of all payload list lengths.
Cluster Bomb is used for true brute-force attacks where you want exhaustive combination testing. It can generate a huge number of requests quickly, so use it carefully and only on authorized targets.
Here is a clear comparison:
Attack Type Payload Lists How Positions Are Filled Best Used For Sniper 1 One position at a time Single parameter fuzzing Battering Ram 1 All positions simultaneously Same value in multiple places Pitchfork Multiple In parallel (paired) Credential stuffing Cluster Bomb Multiple Every combination Full brute force
Payload Types — What Gets Injected
Once your positions are set and your attack type is chosen, you configure the payloads in the Payloads tab. The payload type dropdown offers many options. These are the ones you will use most:
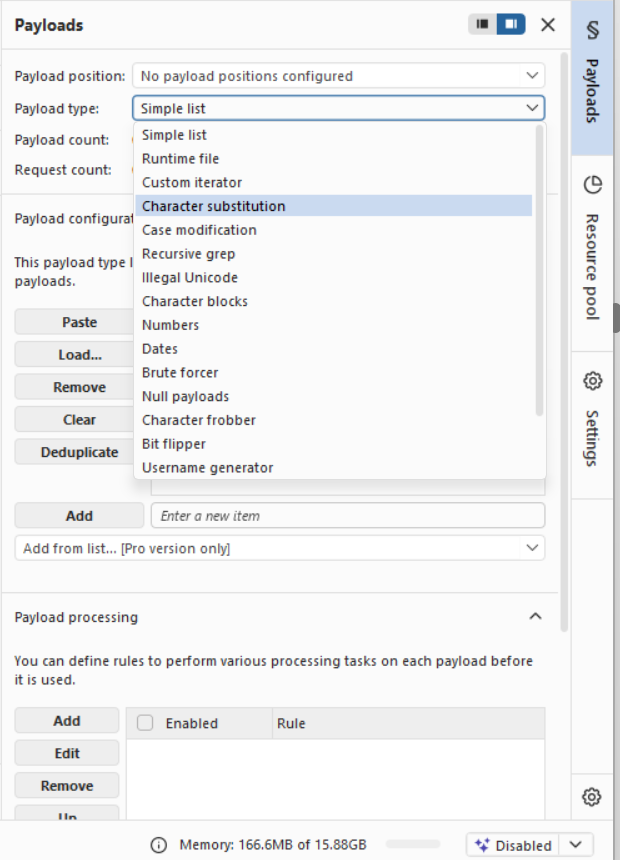
Simple List
The most used payload type. You provide a list of values — either by typing them manually or loading from a file. Every value in the list gets tested in your marked position.
You can type values one by one, paste a list, or click "Load" to import a text file where each line is one payload. Burp Suite ships with a collection of wordlists in its installation directory, and you can find excellent open-source wordlists in projects like SecLists on GitHub.
Numbers
Generates a sequential or custom range of numbers. You configure the start, end, and step values. Useful for enumerating user IDs, order numbers, invoice IDs, and any other numeric reference.
For example, to enumerate all user IDs from 1 to 1000, set from 1 to 1000 with step 1. Intruder sends exactly 1000 requests, each with a different ID.
Dates
Generates date values across a range you define. Useful for testing date-based parameters or session token patterns.
Brute Forcer
Generates every possible combination of characters up to a specified length. You define the character set (letters, numbers, special characters) and the minimum and maximum length. This is for true brute-force scenarios like PIN codes or short passwords.
A 4-digit numeric PIN requires 10,000 combinations (0000 to 9999). Set the character set to 0123456789 with min and max length both set to 4.
Runtime File
Reads payloads from a file at runtime. Useful for very large wordlists that would slow down Burp if loaded entirely into memory.
Null Payloads
Sends the request repeatedly without changing the marked position. This is used for session-related testing — for example, repeatedly requesting a token endpoint to see if tokens are predictable, or testing for race conditions by sending many identical requests simultaneously.
Intruder Settings — The Options That Matter
Grep — Match
This is one of Intruder's most powerful analysis features. Under Settings → Grep — Match, you can provide a list of strings. After the attack, Intruder adds a column to the results table for each string, with a checkbox indicating whether that string appeared in the response body.
For a brute-force login attack, add the string "Invalid password" to the Grep Match list. Every failed login will have that string checked. The one successful login — the one that returns "Welcome, admin" or redirects to a dashboard — will not have it checked, making it immediately visible in the results table.

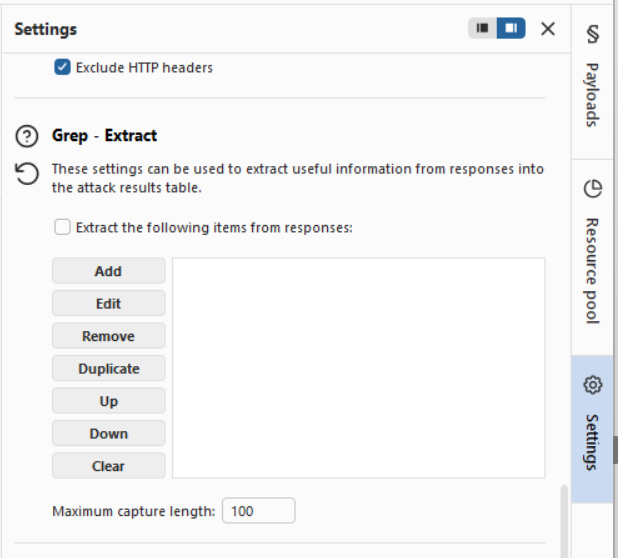
Grep — Extract
This feature extracts specific text from responses. You define a region by specifying a start and end delimiter, and Intruder captures whatever text appears between those delimiters in every response. This is useful for harvesting tokens, IDs, or any dynamic value from responses at scale.
Redirections
Configure whether Intruder follows HTTP redirects. For login brute-forcing, set this to "Always" so you see the final page after login, not just the redirect instruction.
Request Engine — Threads
This controls how many requests are sent concurrently. The Community Edition throttles Intruder heavily — by default it sends requests with delays, making large attacks very slow. The Professional edition removes this limitation. We will discuss working within the Community Edition's constraints shortly.
Practical Attack 1 — Brute-Forcing a Login Form
This is the classic Intruder use case. We will walk through it step by step.
Setup
Use the PortSwigger Web Security Academy lab: https://portswigger.net/web-security/authentication/password-based/lab-username-enumeration-via-different-responses
This lab gives you a login form and a list of candidate usernames and passwords to test.
Step 1 — Capture the Login Request
With Burp running and the Burp Browser open, navigate to the login page. Enter any username and password and submit the form. Intercept the POST request and send it to Intruder.
Step 2 — Set the Attack Position
Go to the Positions tab. Click "Clear §" to remove Burp's automatic markers. Now highlight the username value and click "Add §". Leave the password as-is.
Your request body should look like:
username=§admin§&password=test123Set the attack type to Sniper.
Step 3 — Configure the Payload
Go to the Payloads tab. Select Simple List. Load the username wordlist provided by the lab (or use a common usernames list from SecLists). You should have around 100 candidate usernames.
Step 4 — Configure Grep Match
Go to Settings. Under Grep — Match, clear any existing entries and add: Invalid username
Step 5 — Run the Attack
Click "Start attack". A results window opens. Watch the requests come in.
Sort the results by the "Invalid username" column. The one request where this string is NOT present in the response has a different error message — likely "Incorrect password" — which tells you the username exists. You have just enumerated a valid username.
Step 6 — Brute-Force the Password
Go back to Intruder. Change the attack position to the password field instead of the username. Set the username to the one you just found. Load a password wordlist. Update your Grep Match to Incorrect password. Run the attack again.
The one response that does not contain "Incorrect password" — or that has a significantly different response length — is your successful login. You have brute-forced the credentials.
Practical Attack 2 — Fuzzing for Hidden Endpoints
Web applications often have undocumented or hidden endpoints — admin panels, debug routes, backup files, and configuration pages. Fuzzing with Intruder is one way to discover them.
The Request
Set up a GET request like this in Intruder:
GET /§test§ HTTP/1.1
Host: target.com
The position marker is on the path segment. Your payload list is a directory and file wordlist — try common.txt or directory-list-2.3-medium.txt from SecLists.
Analyzing Results
After the attack, sort results by Status code or Length. Most responses will be 404 (Not Found) with similar lengths. Look for:
- Status
200responses — the path exists and returned content - Status
301or302— the path exists and redirects somewhere - Status
403— the path exists but you are forbidden (interesting — something is there) - Status
500— the path exists and caused a server error
Any response that deviates from the 404 baseline is worth investigating manually in the Repeater.
Practical Attack 3 — Fuzzing for SQL Injection at Scale
Rather than manually trying one payload at a time in Repeater, you can use Intruder to test an injection point against a comprehensive list of SQLi payloads.
Setup
Send a request with a parameter you want to test to Intruder. Mark the parameter value as the attack position. Use Sniper attack type.
For the payload list, use a SQLi-specific wordlist. Good sources include the PayloadsAllTheThings GitHub repository, which has organized lists by injection type — error-based, time-based, boolean-based, and more.
Analysis
In Settings, under Grep — Match, add common SQL error strings:
SQL syntax
mysql_fetch
ORA-01756
Unclosed quotation
syntax error
Warning: mysql
After the attack, any response containing one of these strings is a confirmed SQL error triggered by your payload — a strong indicator of SQL Injection vulnerability. You can then take that specific payload to Repeater for deeper manual exploitation.
Working Within Community Edition Limitations
Burp Suite Community Edition throttles Intruder, inserting artificial delays between requests. This makes large attacks slow — a wordlist of 10,000 entries that would take 30 seconds in Professional might take 30 minutes in Community.
Here are practical ways to work within this constraint:
Use smaller, smarter wordlists. Instead of a generic 50,000-entry list, use targeted lists. For usernames, try a list of 100 most common usernames. For passwords, try the top 100 most commonly used passwords. Quality beats quantity for learning purposes.
Use Intruder for smaller targeted attacks. Reserve Intruder for lists under 1,000 entries during practice. For larger attacks, command-line tools like ffuf, hydra, and wfuzz have no such throttling and integrate well into a testing workflow alongside Burp.
Focus on analysis over speed. The Community Edition is intentionally limited on attack throughput, but its analysis and UI features work identically to Professional. Use it to learn the workflow; upgrade when speed becomes a bottleneck in real assessments.
Reading the Results Table
The Intruder results table is where you find your signal in the noise. Here is how to read it efficiently:
Every row represents one request. The columns include the request number, the payload that was used, the HTTP status code, the response length in bytes, the response time, and any Grep Match columns you configured.
Sorting by Length is often the fastest way to find anomalies. If 999 out of 1000 responses are 2,340 bytes long and one is 4,200 bytes long — that one is different. Click on it. Read the response. The server returned significantly more content for that particular payload, which almost always means something meaningful happened.
Sorting by Status Code separates failures from successes when they return different codes. A successful login returning a 302 redirect stands out immediately among hundreds of 200 responses with error messages.
The Grep Match columns give you binary yes/no signals. The response that does not have your error string checked is the one that succeeded.
To read the full request and response for any row, click on it. The request and response panels at the bottom of the results window populate with the complete details, exactly like the Repeater view.
Payload Processing — Transforming Payloads Before Sending
Intruder has a Payload Processing section in the Payloads tab that lets you transform each payload before it is sent. This is critical for real-world attacks where values must be encoded.
Common processing rules include:
URL encode — applies URL encoding to the payload. Essential when injecting into URL parameters where special characters like &, =, and spaces have reserved meanings.
Base64 encode — encodes the payload as Base64. Useful when testing parameters that expect Base64 input, or when trying to bypass simple input filters.
Hash — applies MD5, SHA1, or other hashes to the payload. Useful when a parameter expects a hashed value rather than a plain string.
Add prefix / Add suffix — prepends or appends a static string to every payload. For example, you could add a suffix of @company.com to a list of usernames to automatically test email addresses.
Rules are applied in the order they are listed, so you can chain multiple transformations.
Coming Up in Blog #5
You can now intercept traffic, manually probe requests in Repeater, and automate attacks with Intruder. The next step is understanding the full attack surface of an application before you start exploiting it.
In Blog #5, we cover the Target tab and Spider — how to map the complete structure of a web application, discover hidden content, and build a systematic picture of everything the application exposes before you write a single payload.
We will cover the Site Map in depth, active and passive spidering, defining and managing scope, content discovery techniques, and how professional pen testers approach reconnaissance before exploitation.
Summary
In Blog #4, you learned:
- What Burp Intruder is and the core concept of payload positions and payload lists
- The complete Intruder interface including all four sub-tabs
- How to set attack positions manually using the Positions tab
- All four attack types — Sniper, Battering Ram, Pitchfork, and Cluster Bomb — and exactly when to use each
- All major payload types — Simple List, Numbers, Dates, Brute Forcer, Null Payloads, and Runtime File
- The Settings tab options that matter — Grep Match, Grep Extract, redirections, and threads
- A complete step-by-step brute-force login attack using username enumeration
- Fuzzing for hidden endpoints using directory wordlists
- Running SQL Injection payloads at scale and analyzing results with Grep Match
- Working within Community Edition rate limiting constraints
- How to read and analyze the Intruder results table efficiently
- Payload Processing — encoding and transforming payloads before sending
Intruder is where Burp Suite begins to feel like a real offensive tool. The ability to take a single request and hammer it with thousands of carefully chosen payloads — and then analyze every response for anomalies — is a core skill that powers credential attacks, enumeration, injection testing, and fuzzing across the entire surface of a web application.
But Intruder is only as good as the payloads you give it and the methodology you apply to reading results. A lazy tester with a massive wordlist finds nothing. A methodical tester with a focused 200-entry list and a clear hypothesis finds critical vulnerabilities.
Build the habit of thinking before you attack: what am I testing, what response would indicate success, and how will I recognize it in the results table? Answer those three questions before every Intruder run.
See you in Blog #5. 🚀
Follow the series for Blog #5 — mapping the full attack surface of a web application with the Target tab and Spider.
Tags: #BurpSuite #BurpIntruder #EthicalHacking #PenTesting #BruteForce #Fuzzing #WebSecurity #BugBounty #CyberSecurity #PortSwigger #CredentialStuffing #SQLInjection
Part of the Burp Suite Learning Series — Zero to Professional Web Application Penetration Testing.
← Blog #3: Mastering the Repeater — Your Manual Hacking Weapon → Blog #5: Target Tab and Spider — Mapping the Full Attack Surface (Coming Soon)