
Budget KVM options and Security concerns.
Greetings folks, welcome to part 10 and beyond of my homelab series. This blogpost is both a cautionary tale of Amazon marketing and a how-to for building a useful and well-known hardware management tool on a budget. We'll also be investigating a suspiciously cheap HDMI transmitter.
Chapter guide:
1. Planning Hardware, Location & HVAC.
2. Server Migration & Scaling Considerations.
3. Exclusive Migration Tools for Homelab Users.
4. ESXi Vendor Integrations, DPU & GPU with Nvidia DOCA.
5. AI & LLM's to Aid in Homelab: Knowledge base & troubleshooting.
6. Managed Routing & Switching Software/Vendor Integration.
7. Wazuh SIEM Log Management & Configuration.
8. FreePBX VoIP configuration.
9. Mikrotik IoT, Wireless configuration.
10. Where to next? (Failover planning, Dial-up VLAN separation, cloud integration, etc.)
KVM — a Three Letter Acronym (TLA) with Multiple Different Meanings (MDM)
While computers in 2026 have gotten much more expensive due to chip shortages and AI, those who manage multi-device desktop clusters may need a solution to hardwire their fleet for maintenance. To save the legwork of multiple logins to systems, sysadmins would consider using a Keyboard, Video & Mouse solution (KVM). Of course there's other in and out of band management options like VPN's and Virtual Network Connections (VNC), On-premises network controllers, the list goes on! Using a dedicated KVM server rack shelf, which looks a lot like a laptop, can also cost hundreds of dollars. Instead of forking over big cash for all-in-one kits, we'll look at a thrifty way to DIY your own KVM.
KVM's are offered from time to time on places like Kickstarter. There's a few bigger players on the market, but there's a wonderful writeup from Runzero with some examples. The problem with KVM's is that they can be prohibitively expensive and insecure. KVM's are falling more under scrutiny of enterprises due to widespread IT fraud in the workplace. I'll link a great video from Jeff Geerling for more information on this . There are cheaper and more efficient ways to set up these capabilities for first time homelab admins. But there are also important areas to consider if security is top priority.
The Logitech Options:
For using wireless keyboards and mice, Bluetooth is an easy and universal option. It sets up on a PC and works without connecting any wires. Going back before the days of Bluetooth, we had dongles. PC accessory maker Logitech is one of the early names in this space. Some Logitech devices also use Bluetooth. The problem with using Bluetooth in a system administration setting is that you need a computer already configured to use it, and that typically means starting from scratch or using a wired keyboard or mouse before setting up a wireless one. Logitech's standard dongle is plug-and-play for many of its mice and keyboard products. It can be paired to existing devices from a friendly web interface on their website. Once configured the unifying receiver dongle works even when you need to make low level system BIOS changes.
The Logitech unifying receiver is different from utilizing a Bluetooth dongle. Bluetooth dongles don't remember the devices which connect to them without a machine in between. Logitech's dongles come in a handful of varieties and can be used between devices. The unifying receiver for standard wireless communication, but there are proprietary dongles for single device use. Variants such as the Bolt are not backwards compatible. You'll need to keep that in mind when using a keyboard & mouse pairing with this solution.
Logitech also pairs software with their dongles, even the older unifying receiver ones. Let's go over the easy options starting with Logitech Options. This is not to be confused with Options + or their gaming integration software, as those clients have a more robust set of features for personal computers rather than system customizations.
Logitech options features the Keyboard and Mouse solution with their Flow software. Flow connects devices to one mouse or keyboard to be used between all receiver-paired devices. Logitech Flow within Options include cross-device copy and paste. This makes it the ideal candidate to manage a larger fleet if you need to deploy a script by hand with no cloud options available. If you have multiple dongles, you can hook them each up and use the Logitech Options control panel to independently switch between them.
Dongles can typically be had for cheap from popular liquidation stores or big budget retailers. The caveat here is the security of using wireless peripherals and protocols in your home network. Flow also integrates copy-paste and file sharing between devices. Some enterprises require approval for all software in use. Additionally, an account needs to be made and logged into in order to use Flow. It can also be hard to keep track of which pc's have which dongle is active or paired to which mouse. Of course you can simply use one dongle and remove it when you're done making changes to a system.
Video Capture Cards and You:
Now that we've picked a keyboard and mouse, let's look at capturing video. Capture cards display & record video from HDMI and send footage to your laptop or smartphone device over USB. These are a typical choice for those who want to record video footage for streaming. Capabilities and features of capture cards vary, but the entry level ones tend to be cheap on places like Amazon, Walmart and Aliexpress. The devices are usually USB 2.0 which handles up to 480 MBPS. This limits the card at 1080P to 30 FPS, but setting it to 720P lets you squeeze out 60 FPS just fine. Thunderbolt and USB 3 and above capture cards work at higher speeds, 5gbps ideally, to deliver more robust video content.
SPONSOR === This blogpost is brought to you by Genki. Genki products are made for gamers. They are a trusted brand which delivers quality products. Their capture cards handle 4K60 content with HDMI passthrough. Check out their capture cards today at this link. Use my affiliate code 'Masq31' for 10% off your order. Thanks to Genki for sponsoring this blogpost. === END SPONSOR
There is a big issue with the marketing for many capture cards and video capture equipment on popular storefronts. I've recently purchased a device which was removed from the Amazon store only a month later. I suspect this is due to misleading claims, but let's take a look. Before we do however, I'd like to cover another technology known as Wireless HDMI.
Wireless HDMI Knockoffs, Insecure and Deceptive:
Wireless HDMI is a convenient option for a KVM, but how does it work? According to my device's built-in QR code manual, the firmware is a copy of the iEZcast wireless HDMI receiver. These are reputable wireless HDMI products on amazon. Unlike other Wireless HDMI products which rely on 5.8 GHZ spectrum space, these use a wireless network and streaming to broadcast the signal over a network. This drawback is drastic and isn't listed in the advertising.
That brings me to the listed product which I bought. Capture devices and wireless HDMI devices often claim to support "4K 60 fps transmitter with over 100 ft of range". Additionally, the price was a 4th of any commercial offerings. Despite my suspicion, I figured it might be hackable somewhere down the line. Curiosity in tow, I clicked the purchase button on Amazon and waited. After receiving the device, the Amazon store page was taken down. A quick google search shows these devices being sold and resold on other pages at the time of writing.

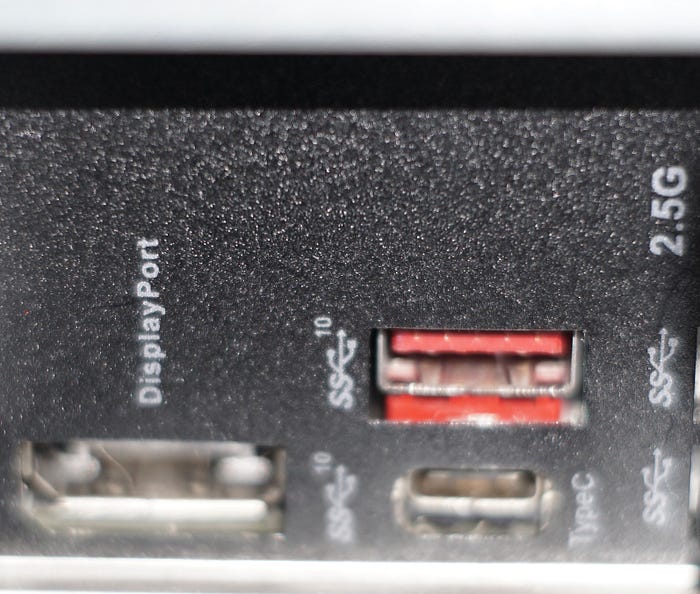
I received the device after a week. It was basically plug and play with no configuration required. However, I noticed the device could only handle 30 FPS. Networking is handled both on the transmitter and receiver with a 5 Ghz chip. It creates a host network connection at 192.168.203.1 and the receivers connect starting from 192.168.203.88 and upward according to their DHCP assignment. I would assume it defaults to an 802.11N signal which supports up to 600 MBPS. It also needed to transfer the upgrade of the signal to the transmitter.
The wireless HDMI receiver can be hooked up via USB-C for power from the HDMI transmitter. This doesn't get a better video signal, but it does provide power to the device, allowing it to operate just fine. Making the device wired again is quite the chuckle. File this under the "what's the point?" department.
With how cheap these knockoff transmitters are, it wouldn't be too hard to purchase a number of them for each device in a homelab at relatively low cost. But Wait! Considering these work off a common wireless protocol, I wouldn't be surprised if you can hook up a networked video stream directly to the transmitted IP and skip the receiver altogether. We'll take a look at this possibility later.

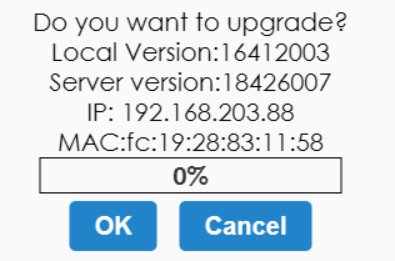
I had an issue connecting it to my 4K camera, so I looked into options for updating the firmware. The IP address is accessible by any computer and gives you a basic HTTP dashboard to manage updates. I connected the device to my IoT Wi-Fi to upgrade it, thinking I could fix my camera issue or get 60fps capture once updated. As a word of warning, I strongly recommend not providing the device your wi-fi password without understanding that your personal data might be sent to an unknown party. The unofficial device may also be part of a botnet if connected to a wifi router. YMMV.
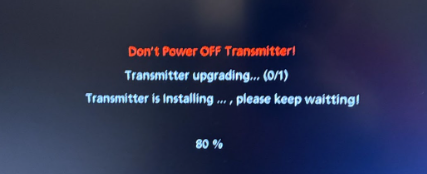
The update process seemed to do something. It showed a hardware MAC address at the bottom of the page along with the version Firmware.After updating, I tested the settings for 60 FPS video. I was not able to get 60 FPs out of the display no matter what settings I had configured. I was also not able to fix the 4k camera capture issue.
To conclude, I could only achieve 30 FPS for 1080P, 720P and 480P video. It has the option for older interlaced 1080i video, meaning that it technically does that at 60 FPS in a very old standard. False advertising over framerates, resolutions and more is sadly common in this space. Another unusual example is a Vizio lawsuit which took place in 2018. The lawsuit was settled, but it alleged that 120 hz refresh of the backlight did not equate to a 120 FPS experience, instead giving consumes a 60 FPS device. Regardless, I've relegated this device to be a cheap KVM display output. It can be very capable for this purpose despite the drama.
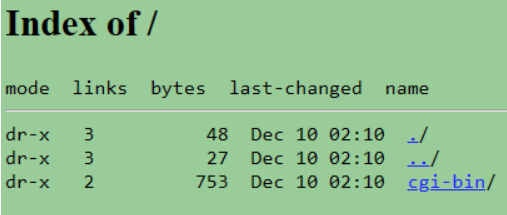
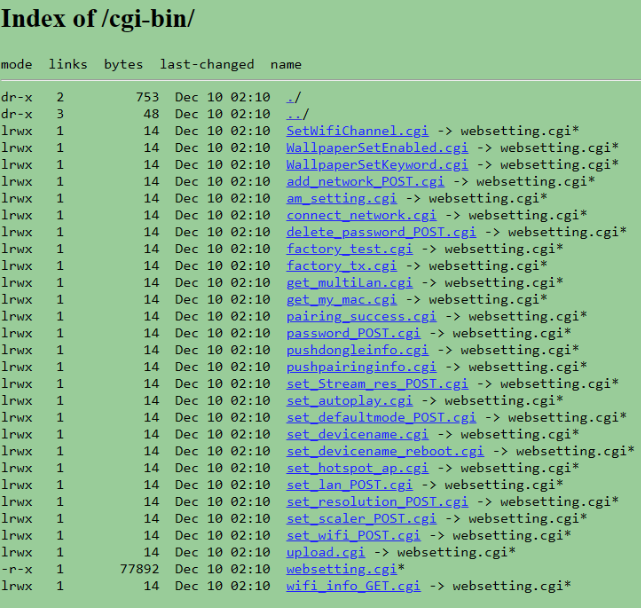
What about security?! Do you even need to ask about how bad this Security is! I'm not going to hook this up to Wireshark, but I will say I observed a WebDAV on the receiver IP using CGI files. This suggests a POST command can update the receiver settings. It also suggests that there's a common encoding format at use here, meaning any device can snoop on the communications. You could make a false AP or copy of the network packets sent to the Wireless HDMI transmitter to any other device. I'll say that this may be as bad as a wireless IoT camera. If you want to know about issues with these, check out my previous blogpost.
Do it yourself? Do It Because!
So with that we have a cheap USB capture card, a cheap wireless or wired HDMI device and a low-cost Logitech Mouse and keyboard combo. First, if the wireless HDMI is too much, you can stick to the cable or many other video options out there. As mentioned before, exploring VPN, VNC, Remote system access or Ansible connections may be best for your environment. The flexibility here is really what works best for your lab and KVM is yet another tool to pick from.
Homelab Part 11? Maybe someday!
I wanted to conclude with a message to blog readers. I'll be switching away from the current weekly format for future posts. My priorities have shifted a bit and I'll need to spend less time writing blogs for now. We'll still be posting here and there and I'll make sure to keep all links and information up to date as needed. I want to thank my followers, sponsors, friends and family for their help over the past few months. You've made writing these segments and keeping my homelab in check. You make it worth it, thank you so much.
Until next time. Stay Safe.