Static Application Security Testing (SAST) plays a critical role in modern secure SDLC practices. SonarQube, combined with SonarScanner, provides a powerful platform for identifying code quality issues, bugs, and security vulnerabilities early in the development lifecycle.
In this blog, we'll walk through setting up SonarScanner and SonarQube Community Edition locally, and running a scan against a sample project using Maven.
Prerequisites
Before starting, ensure you have:
- Java installed
- Maven installed
Step 1: Install SonarScanner
Download the SonarScanner CLI package:
wget https://binaries.sonarsource.com/Distribution/sonar-scanner-cli/sonar-scanner-cli-7.3.0.5189-linux-aarch64.zipUnzip and move it to a standard location:
unzip sonar-scanner-cli-7.3.0.5189-linux-aarch64.zip
mv sonar-scanner-cli-7.3.0.5189-linux-aarch64 /opt/sonar-scanner
Step 2: Configure SonarScanner
Edit the SonarScanner configuration file:
sudo nano /opt/sonar-scanner/conf/sonar-scanner.propertiesAdd or update the following lines (replace the URL if your SonarQube server is remote):
sonar.host.url=http://localhost:9000
sonar.sourceEncoding=UTF-8
Step 3: Add SonarScanner to PATH
Create a profile script so SonarScanner is accessible system-wide:
sudo nano /etc/profile.d/sonar-scanner.sh

#!/bin/bash
export PATH="$PATH:/opt/sonar-scanner/bin"
Apply changes:
source /etc/profile.d/sonar-scanner.sh
env | grep PATH

#reboot the system to ensure persistence
reboot
Step 4: Install SonarQube Community Edition
Download the latest SonarQube Community Edition from the official website.
#Move and extract it
mv sonarqube-25.11.0.114957.zip /home/kali/SonarQube
unzip sonarqube-25.11.0.114957.zip

#Navigate to the Linux binaries directory to access it:
cd sonarqube-10.4.1.88267/bin/linux-x86-64

#Start the SonarQube server:
./sonar.sh start
Step 5: Verify SonarQube Is Running
Open your browser and navigate to:
http://127.0.0.1:9000Login using default credentials:
Username: admin
Password: admin
You'll be prompted to set a new password — complete this step to proceed.
Tip: If you need to restart SonarQube and encounter issues, remove the PID file:
rm SonarQube.pidStep 6: Clone a Test Project
Clone a sample Maven project to test the setup:
git clone https://github.com/akannan1087/myJuly2023Weekday/Step 7: Create a Project in SonarQube
- Go to Projects → Create a Local Project
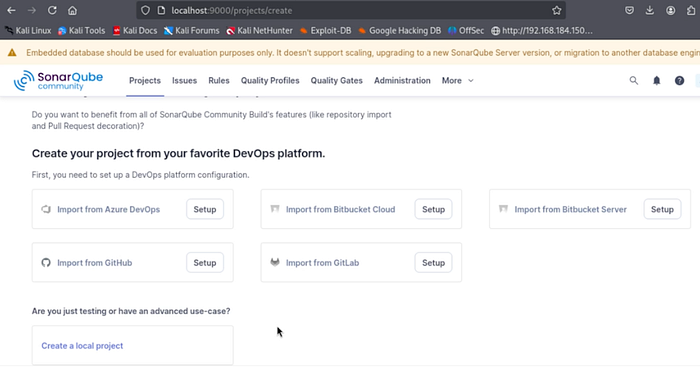
2. To create project set:
- Project Name: TestProject
- Project Key: testProject
- Main Branch: main
3. Choose "Follows the instance's default" for new code definition
4. Select Locally as the analysis method
Step 8: Generate a SonarQube Token
SonarQube will prompt you to generate a token:
- Provide a name
- Set expiration (e.g., 90 days)
- Click on Generate
- Copy and store the token securely
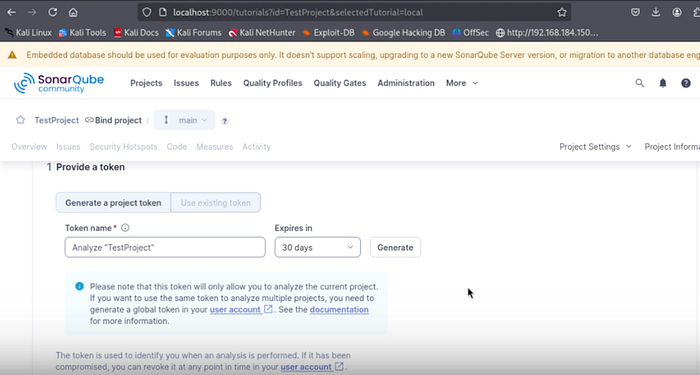
Example token format:
sqp_f50fd57d2ee0bcf40c8c4047890e4724fa150a26eStep 9: Run SonarScanner Using Maven
SonarQube requires a scanner to analyze source code. Multiple scanners are available depending on the build tool and language used. For this demonstration, we use the Maven scanner to run the analysis.
For "what option best describe your project?" select Maven and for "what is your OS?" select Linux (I used kali)
It will generate following command to execute the scanner. Open a terminal, move to the project's source code directory, and run the copied command to start the SonarScanner analysis.
mvn clean verify sonar:sonar \
  -Dsonar.projectKey=testProject \
  -Dsonar.projectName='testProject' \
  -Dsonar.host.url=http://127.0.0.1:9000 \
  -Dsonar.token=<YOUR_TOKEN>
Once executed, Maven will analyze the project and send results to SonarQube.
Step 10: Review Results in SonarQube
Return to the SonarQube dashboard to review:
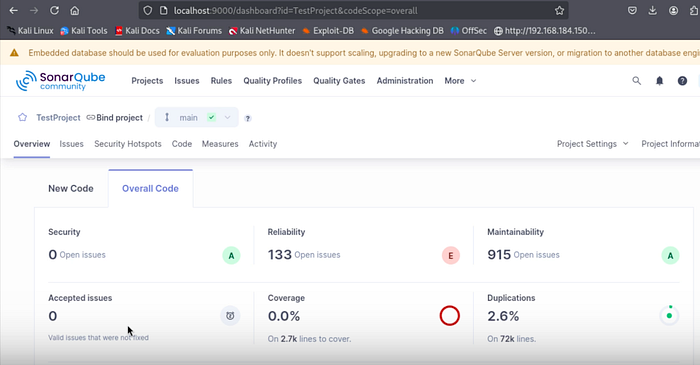
- Code smells
- Bugs
- Security hotspots
- Vulnerabilities
- Technical debt metrics
This visibility helps teams shift security left and improve code quality before production.
Final Thoughts
Setting up SonarQube with SonarScanner locally is a powerful way to:
- Introduce SAST into your development workflow
- Improve code quality and maintainability
- Identify security risks early
This setup can later be extended into CI/CD pipelines, PR checks, and enterprise DevSecOps workflows.