

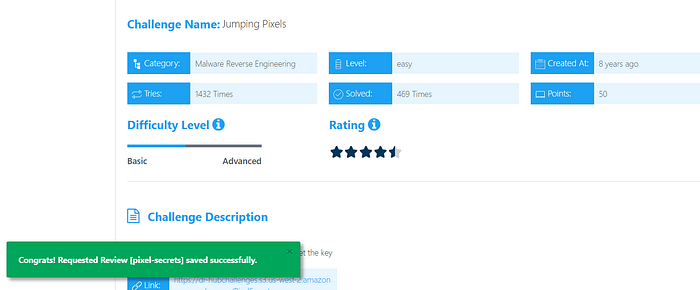
🚩 Challenge 7: "Jumping Pixels"
1. Overview
The PixelSecrets challenge is a Windows Forms reverse engineering task. The goal is to discover a hidden flag by interacting with an image or by analyzing the underlying cryptographic logic.
2. Technical Analysis
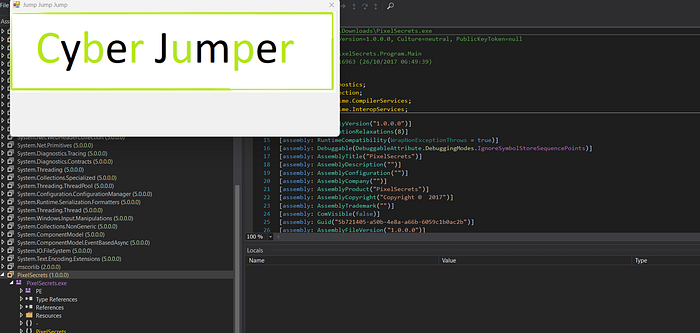
Upon decompressing the binary and analyzing the source code (using tools like dnSpy or ILSpy), two main components were identified:
A. The Input Red Herring
The Form1 class tracks mouse clicks on a PictureBox. It expects three specific coordinates. Based on the ValidateJumps method:
- P1 (Base): (30, 50)
- Text (Fixed): (62, 74)
- Text2 (Calculated): (30+15, 50–12) $\rightarrow$ (45, 38)
The code constructs a target string using a confusing array index logic. However, while solving the coordinate puzzle is the "intended" UI path, the cryptographic implementation reveals a shortcut.
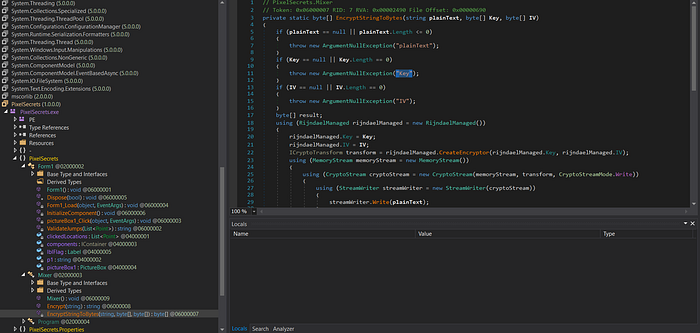
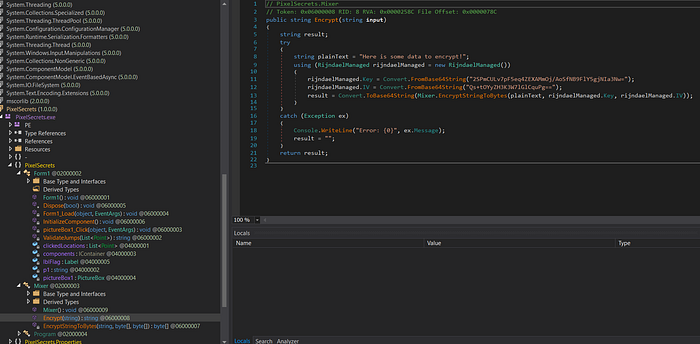
B. Cryptographic Logic
The Mixer class handles the encryption. A critical flaw was found in the Encrypt method:
C#
public string Encrypt(string input) {
    string plainText = "Here is some data to encrypt!";
    // Key and IV are hardcoded Base64 strings
    // 'input' (coordinates) is completely ignored
}
The program ignores the user's input coordinates and encrypts a static hardcoded string using AES (Rijndael) in CBC mode.
3. The Solution
Since the Plaintext, Key, and IV are all constants, we can replicate the encryption outside the environment using Python.
Replicating the Encryption (Python)
We use the cryptography library to simulate the .NET RijndaelManaged behavior:
Python
import base64
from cryptography.hazmat.primitives.ciphers import Cipher, algorithms, modes
from cryptography.hazmat.primitives import padding
# Extracted Constants
KEY = base64.b64decode("2SPmCULv7pF5eq4ZEXAMmOj/AoSfNB9FlY5gjNIa3Nw=")
IV = base64.b64decode("Qs+tOYyZH3K3W7lGlCquPg==")
PLAINTEXT = b"Here is some data to encrypt!"
# AES-CBC with PKCS7 Padding
padder = padding.PKCS7(128).padder()
padded_data = padder.update(PLAINTEXT) + padder.finalize()
cipher = Cipher(algorithms.AES(KEY), modes.CBC(IV))
encryptor = cipher.encryptor()
flag_bytes = encryptor.update(padded_data) + encryptor.finalize()
print(base64.b64encode(flag_bytes).decode())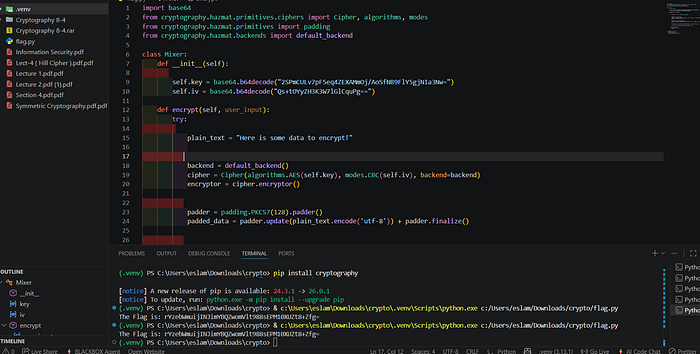
4. Conclusion
The challenge was a mix of a logical decoy (the pixel coordinates) and static cryptographic analysis. By identifying that the input was ignored in favor of a hardcoded string, the flag was easily retrieved by reconstructing the AES-CBC encryption routine.
Flag: rYzebWmuijINJimYBQZwomVlt988sEPM10XUZt8+Zfg=

🚩Challenge 8: "PowerShell"
Overview
In this challenge, we are given a PowerShell script that validates an input string (the flag) using a series of bitwise operations and a hash check.
At first glance, the script looks confusing due to the heavy use of XOR operations and array manipulations, but once we break it down, the logic becomes very clear.
🔍 Initial Analysis
The script starts by handling input:
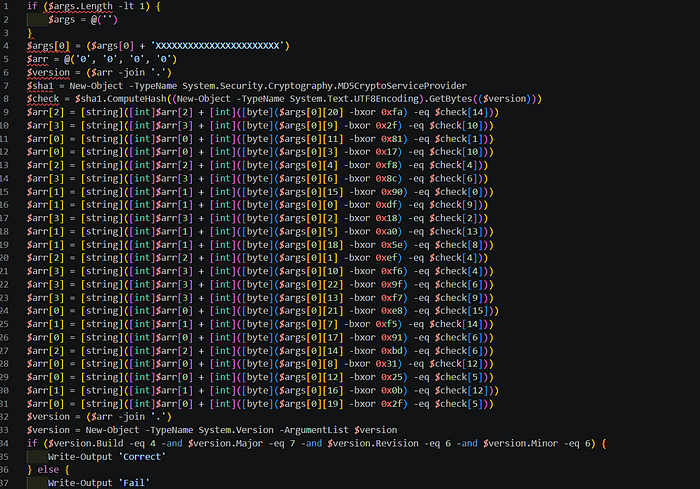
if ($args.Length -lt 1) {
    $args = @('')
}
$args[0] = ($args[0] + 'XXXXXXXXXXXXXXXXXXXXXXX')
This ensures the input string is at least 23 characters long.
🔑 Key Observation
The script defines a version string:
$arr = @('0', '0', '0', '0')
$version = ($arr -join '.')
Then it computes an MD5 hash:
$sha1 = New-Object -TypeName System.Security.Cryptography.MD5CryptoServiceProvider
$check = $sha1.ComputeHash((New-Object -TypeName System.Text.UTF8Encoding).GetBytes(($version)))
🧩 Core Logic
The script performs multiple checks like this:
[byte]($args[0][20] -bxor 0xfa) -eq $check[14]This means:
flag_char ^ constant = hash_byteWe can reverse it easily:
flag_char = constant ^ hash_byte⚙️ Reversing the Logic
Instead of guessing the flag, we reconstruct it directly using Python:
import hashlib
def solve():
    version_base = "0.0.0.0"
    check = hashlib.md5(version_base.encode('utf-8')).digest()
    flag = [''] * 23
    flag[20] = chr(0xfa ^ check[14])
    flag[9]  = chr(0x2f ^ check[10])
    flag[11] = chr(0x81 ^ check[1])
    flag[3]  = chr(0x17 ^ check[10])
    flag[4]  = chr(0xf8 ^ check[4])
    flag[6]  = chr(0x8c ^ check[6])
    flag[15] = chr(0x90 ^ check[0])
    flag[0]  = chr(0xdf ^ check[9])
    flag[2]  = chr(0x18 ^ check[2])
    flag[5]  = chr(0xa0 ^ check[13])
    flag[18] = chr(0x5e ^ check[8])
    flag[1]  = chr(0xef ^ check[4])
    flag[10] = chr(0xf6 ^ check[4])
    flag[22] = chr(0x9f ^ check[6])
    flag[13] = chr(0xf7 ^ check[9])
    flag[21] = chr(0xe8 ^ check[15])
    flag[7]  = chr(0xf5 ^ check[14])
    flag[17] = chr(0x91 ^ check[6])
    flag[14] = chr(0xbd ^ check[6])
    flag[8]  = chr(0x31 ^ check[12])
    flag[12] = chr(0x25 ^ check[5])
    flag[16] = chr(0x0b ^ check[12])
    flag[19] = chr(0x2f ^ check[5])
    print("Flag:", "".join(flag))
solve()
🎯 Final Check
The script counts correct conditions and builds a version:
$version = ($arr -join '.')Then verifies:
if ($version.Build -eq 4 -and $version.Major -eq 7 -and $version.Revision -eq 6 -and $version.Minor -eq 6)
💡 Key Takeaways
- XOR operations are reversible → perfect for reverse engineering.
- Hash values can be used as constants when inputs are known.
- PowerShell malware often uses similar obfuscation techniques.

🚩Challenge 9: "bronze ASM"
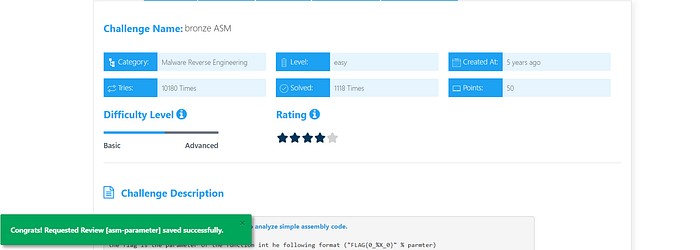
Challenge Overview
The goal of this challenge was to reverse-engineer a snippet of x64 Assembly code to determine the correct input value that satisfies a specific condition and retrieves the flag.
1. Initial Observation & Deobfuscation
The challenge presented data in a dq (Data Quadword) format, which appeared to be raw hex values. Upon closer inspection of the ASCII equivalents:
68737570htranslates topush66783A0Ahtranslates tofx:\n
By reconstructing these bytes, the actual executable Assembly logic was revealed.
2. Assembly Logic Breakdown
The core function follows these steps:
- Input Handling: Takes the user input and stores it in the
eaxregister. - The Operation: Executes
sal eax, 3. In Assembly, a Shift Arithmetic Left (SAL) by 3 bits is mathematically equivalent to multiplying the value by $2^3$ (or $8$). - The Comparison: Compares the result (
input * 8) against the constant value5744. - The Condition: Uses
setle(Set if Less or Equal), meaning the function returnstrue(1) only if the result is less than or equal to5744.
3. Mathematical Solution
To find the required input, we solve the following inequality:
$$input \times 8 \le 5744$$
$$input \le \frac{5744}{8}$$
$$input \le 718$$
The maximum integer satisfying this condition is 718.
4. Final Flag Construction
Converting the decimal value 718 to Hexadecimal:
- $718_{10} = 2CE_{16}$
Following the challenge format, the final flag is:
FLAG{0_2CE_0}
Key Takeaways
- Endianness Matters: Always account for Little-Endian storage when reading raw hex.
- Bitwise Shifts: Recognizing that
shl/salare optimized multiplication operations is crucial in reverse engineering. - De-obfuscation: Sometimes, the hardest part isn't the code itself, but translating raw data back into a readable format.

🚩Challenge 10: "l0st k3y"
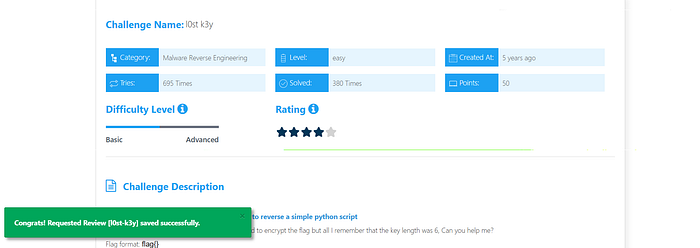
We're given a Python snippet and a hex-encoded ciphertext. The encryption is a classic repeating-key XOR cipher — every character of the plaintext is XOR'd with a cycling key. Our job: recover the key, then recover the flag.
The Challenge Code
Here's the full cipher implementation we were given:
pythondef enc(st, key):
    dat = ''
    for i in range(len(st)):
        dat += chr(ord(st[i]) ^ ord(key[i % len(key)]))
    return dat
# key and flag redacted
encrypted_flag = enc(flag, key)
print(''.join(['%02x' % ord(i) for i in encrypted_flag]))
And the output we need to crack:
hex output2300081348071a3a5a064a6c095c07136c70375f5a044a6c
03205d136c59301f1d2b47031a580d106c4075015a2b5546
2b330f44416c3c5c1c55124e
What we know going inThe ciphertext is 60 bytes long. The flag format is flag{...} — so we know the first 5 bytes of plaintext (flag{) and the last byte (}). That's 6 known plaintext positions, which is all we need.
Understanding the Cipher
The enc() function is a Vigenère-style XOR cipher. For each character at position i, it XORs the plaintext byte with key[i % len(key)]. The key repeats cyclically over the entire message.
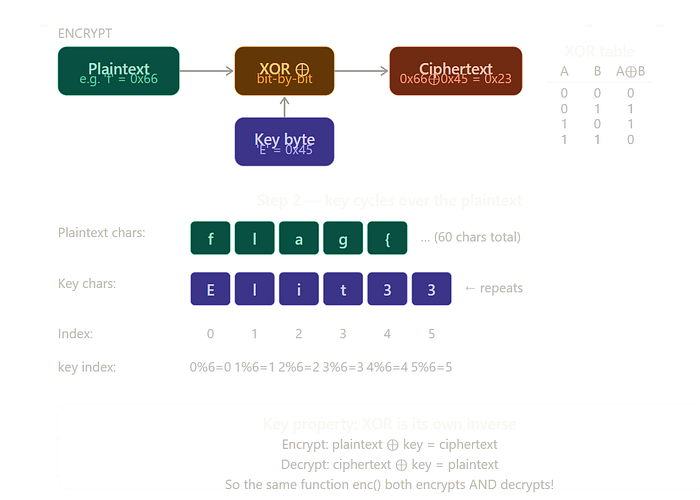
XOR has one elegant property: it is its own inverse. Apply the same key twice and you return to the original. So
enc()both encrypts and decrypts.
Written as a formula:
mathEncrypt:  C[i]  =  P[i]  ⊕  K[i % keylen]
Decrypt:  P[i]  =  C[i]  ⊕  K[i % keylen]
Therefore: K[i % keylen]  =  C[i]  ⊕  P[i]
That last line is the key insight. If we know both the ciphertext byte and the plaintext byte at any position, we can recover the key byte at that slot directly — no brute force needed.
The Attack: Known-Plaintext Key Recovery
CTF flags follow a predictable format. We exploit this as our known plaintext.
1 Establish known positionsPositions 0–4 must be f, l, a, g, {. Position 59 (last byte) must be }. That gives us 6 equations of the form K[i % keylen] = C[i] ⊕ P[i].
2 Brute-force the key lengthWe try every candidate key length from 4 to 19. For each length, we check whether the 6 known positions map to consistent, non-contradictory key slots — and whether every recovered key byte is printable ASCII.
3 Identify the unique valid lengthOnly one key length satisfies all constraints with fully printable, consistent key bytes:length 6.
4 DecryptCall enc(encrypted_bytes, "Elit33") — same function, same logic — and read the flag.

Key Length Analysis
Here's what we see when we test each candidate length:
Key lengthSlot for pos 59All printable?Consistent?Result559 % 5 = 4✓✓Garbage output659 % 6 = 5✓✓✓ Flag recovered!7–19variouspartialunknown slotsAmbiguous
Key length 5 is printable and consistent but produces garbage — because with 5 positions, positions 0 and 5 map to the same key slot, and we only have 5 known bytes to cover 5 slots completely. The resulting partial key decrypts flag{ correctly but scrambles everything after. Length 6 gives us all six key slots from our six known bytes — a perfect fit.
The Recovered Key
Each key byte was recovered by a single XOR:
python# pos 0: 'f' = 0x66, encrypted = 0x23
0x23 ^ 0x66 = 0x45  →  'E'   # key[0]
# pos 1: 'l' = 0x6c, encrypted = 0x00
0x00 ^ 0x6c = 0x6c  →  'l'   # key[1]
# pos 59: '}' = 0x7d, encrypted = 0x4e
0x4e ^ 0x7d = 0x33  →  '3'   # key[5]
Full Solver Script
Here's the complete, self-contained Python solver:
pythondef enc(st, key):
    dat = ''
    for i in range(len(st)):
        dat += chr(ord(st[i]) ^ ord(key[i % len(key)]))
    return dat
encrypted_hex = (
    "2300081348071a3a5a064a6c095c07136c70375f"
    "5a044a6c03205d136c59301f1d2b47031a580d10"
    "6c4075015a2b55462b330f44416c3c5c1c55124e"
)
encrypted = bytes.fromhex(encrypted_hex)
# Known plaintext positions
known = {i: ord(c) for i, c in enumerate("flag{")}
known[len(encrypted) - 1] = ord('}')
for keylen in range(4, 20):
    key = [None] * keylen
    conflict = False
    for pos, pb in known.items():
        ki = pos % keylen
        kb = encrypted[pos] ^ pb
        if key[ki] is not None and key[ki] != kb:
            conflict = True; break
        key[ki] = kb
    if conflict: continue
    if not all(32 <= (k or 0) < 127 for k in key): continue
    if None in key: continue
    key_str = ''.join(chr(k) for k in key)
    result  = enc(''.join(chr(b) for b in encrypted), key_str)
    print(f"Key length {keylen}: key={key_str!r}")
    print(f"Flag: {result}")
The Flag
Recovered flag
flag{4_V3ry_L0ng_Cr33py_FL4g_just_t0_4dd_s0m3_fun_f0r_y0u!!}
🚩Challenge 11: "Sh1F77y"
In this article, I will walk you through my solution for the Sh1F77y challenge from CyberTalents. This is an "Easy" level Malware Reverse Engineering challenge designed to test your ability to analyze simple C code and understand assembly instructions during runtime.
1. Initial Analysis (Static Analysis)
We were provided with a C source code for a password checker. The core logic resides in the Password_Checker function:
int Password_Checker(char* password, char* correct, char* shift_array) {
    int i = 0;
    do {
        char shift_arrayed_char = correct[i] + shift_array[i];
        if (shift_arrayed_char != password[i]) {
            return 0;
        }
        i++;
    } while (correct[i] != 0 && password[i] != 0);
    return 1;
}
The Logic:
The program doesn't compare the input to a plain string. Instead, it takes a hardcoded string (correct), adds a specific value to each character from another array (shift_array), and compares the result with our input.
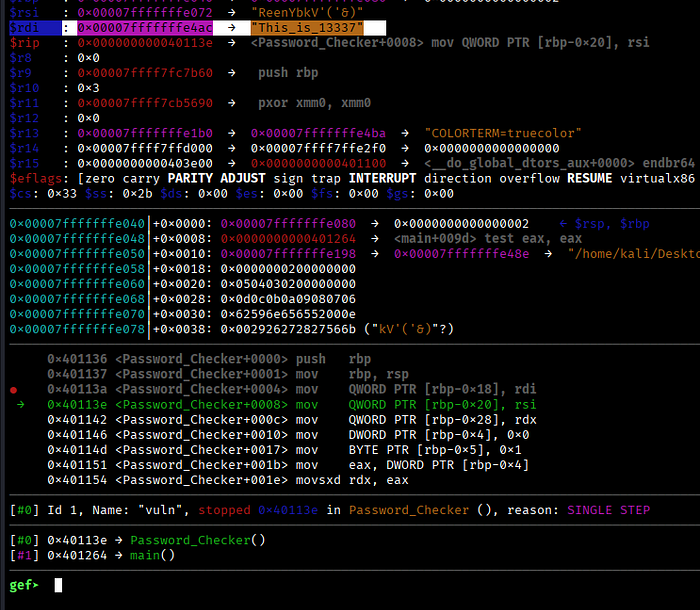
2. Deep Dive with GDB & GEF (Dynamic Analysis)
To find the actual password, I used GDB with the GEF (GDB Enhanced Features) extension to inspect the memory during execution.
Step 1: Locating the Data
By disassembling the main function, I identified where the encrypted data and the shift values were stored in the stack.
Step 2: Extracting Values
Using GDB, I inspected the registers and memory locations right before the call to Password_Checker:
- Encrypted String (
correct):"ReenYbkV'('&)" - Shift Array:
[2, 3, 4, 5, 6, 7, 8, 9, 10, 11, 12, 13, 14]
3. The Decoding Process
By applying the logic: $\text{Result} = \text{Char} + \text{Shift}$, I performed the calculation for each character based on the ASCII table:
Original CharASCIIShiftResult ASCIIFinal CharR82+284Te101+3104he101+4105in110+5115sY89+695_……………
Following this pattern for all 13 characters, the password revealed itself as: This_is_13337.
This challenge was a great exercise in understanding how compilers store local arrays and how simple arithmetic can be used as a basic obfuscation technique.
Tools Used:
GCC(Compiler)GDB+GEF(Debugger)Python(For quick ASCII calculations)

#CyberSecurity #ReverseEngineering #CTF #CyberTalents #MalwareAnalysis
اللهم انصر اخواننا في عزة