
Index:
- Bug Bounty — HackerOne Program Analysis
- Apache Web Server — Host HTML Page
- Custom Port Configuration
- MySQL + Flask Web App + Custom Domain
- HTTPS Traffic Capture — TLS Handshake
In this blog post, I will walk through a series of Linux server and cybersecurity practicals that I completed on Kali Linux. These practicals cover web server setup, database configuration, full-stack web application development, custom domain mapping, HTTPS traffic analysis using Wireshark, and getting started with bug bounty hunting on HackerOne. Each section includes the exact commands I ran, what I observed, and what I learned.
Practical 1 — Bug Bounty: Getting Started with HackerOne
What is Exactly a Bug Bounty Program is: It is an arrangement where organizations invite security researchers to find and responsibly report vulnerabilities in their systems. In return, researchers may receive money, recognition, or both.
Creating a HackerOne Account: I visited https://hackerone.com and created a free hacker account. After logging in, I navigated to the Programs section and filtered for Public programs — these are programs open to all researchers without requiring an invitation.
Chosen Program: Meesho
I selected Meesho bug bounty program as my study target. It is a well-documented public program with clear scope definitions, making it ideal for understanding how bug bounty programs are structured.
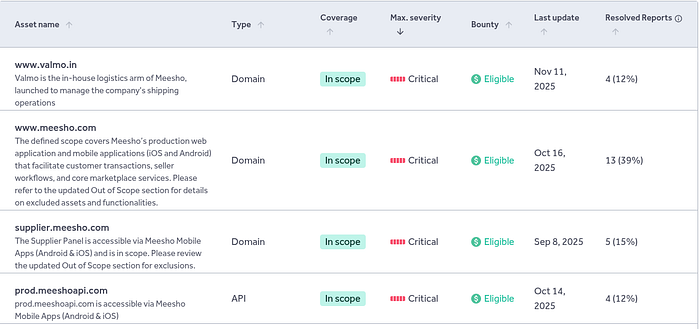
In-Scope Domains
In-scope assets are the specific systems and domains that the company explicitly allows researchers to test. For Meesho's program, the in-scope assets include:
Allowed Vulnerabilities
The program accepts reports for the following types of vulnerabilities:
- Cross-Site Scripting (XSS)
- SQL Injection
- Authentication bypass
- Remote Code Execution (RCE)
- Privilege escalation
- Sensitive data exposure
- Business logic flaws
- Server-side vulnerabilities affecting application security
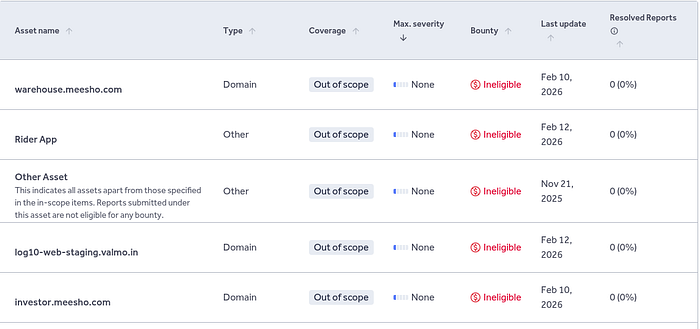
Out-of-Scope Items
The following are explicitly not allowed and should never be tested:
Responsible Disclosure Policy
Meesho follows a strict responsible disclosure model. As a researcher participating in the program, I must adhere to these rules:
- Test only assets listed within the program scope.
- Use test accounts only when performing security testing.
- Do not access, modify, or download real user data.
- Do not perform real financial transactions.
- Do not disrupt services or production systems.
- Report vulnerabilities privately through the HackerOne platform.
- Keep vulnerability details confidential until the issue is fixed.
What I Learned
Studying a bug bounty program scope before testing is as important as the testing itself. Understanding what is in scope, what vulnerability types are accepted, and what rules govern disclosure is the foundation of ethical security research. It also protects the researcher legally testing out-of-scope assets without permission is illegal, regardless of intent.
Practical 2 — Installing Apache & Hosting an HTML Page
What is Apache?
Apache HTTP Server is one of the most widely used open-source web server software in the world. It listens for incoming HTTP requests on a configured port and serves files from a specified directory. On Kali Linux, it is available directly through the package manager.
Installation
I updated the system packages and installed Apache2 using the following commands:
sudo apt update && sudo apt upgrade -y
sudo apt install apache2 -y
sudo systemctl start apache2
sudo systemctl enable apache2
After installation, I checked the status to confirm it was running:
sudo systemctl status apache2The output showed active (running) in green, confirming Apache was live.
Creating a Custom HTML Page
Apache serves files from /var/www/html/ by default. I replaced the default page with a custom HTML file:
sudo gedit /var/www/html/index.htmlVerification
I found my machine IP address using:
ip a
# or u can use hostname -I
Then opened Firefox and navigated to http://localhost — the custom HTML page loaded successfully in the browser, confirming Apache was serving the file correctly.
Practical 3 — Configuring Apache on a Custom Port (8081)
Why Change the Default Port?
By default, Apache listens on port 80 for HTTP traffic. However, there are several reasons to change this: port 80 may already be in use by another service, you may want to run multiple web servers on the same machine, or security policies may require non-standard ports. For this practical, I changed Apache to run on port 8081.
Modifying the Configuration
Step 1 — Edit the ports configuration file:
sudo nano /etc/apache2/ports.conf

# Changed:  Listen 80
# To:       Listen 8081
Step 2 — Update the Virtual Host configuration:
sudo nano /etc/apache2/sites-available/000-default.conf

# Changed:  <VirtualHost *:80>
# To:       <VirtualHost *:8081>
Step 3 — Test the configuration for syntax errors and restart:
sudo apache2ctl configtest
sudo systemctl restart apache2
Verification
I opened Firefox and navigated to http://localhost:8081. The custom HTML page loaded correctly, with the port number visible in the browser URL bar — confirming Apache was now running on the custom port 8081 instead of the default port 80.
Practical 4 — MySQL Database + Flask Web App + Custom Domain
Part A — Setting Up MySQL and Creating the Database
MySQL is a popular open-source relational database management system. I installed it on Kali Linux and created a database called studentdb with a users table containing student records.
When I tried to install MySQL on Kali Linux, I got this error: Package 'mysql-server' has no installation candidate However the following packages replace it: mariadb-server
# This failed first:
sudo apt install mysql-server -y
# Error: Package 'mysql-server' has no installation candidate
# Suggested replacement: mariadb-server

# So i installed MariaDB instead:
sudo apt install mariadb-server -y
sudo systemctl start mariadb
sudo systemctl enable mariadb
sudo mariadb
SQL Commands Executed
CREATE DATABASE studentdb;
USE studentdb;

CREATE TABLE users (
    id INT AUTO_INCREMENT PRIMARY KEY,
    name VARCHAR(100) NOT NULL,
    email VARCHAR(100) NOT NULL,
    age INT,
    course VARCHAR(100),
    created_at TIMESTAMP DEFAULT CURRENT_TIMESTAMP
);

INSERT INTO users (name, email, age, course) VALUES
('Alice Johnson', 'alice@example.com', 20, 'Computer Science'),
('Bob Smith', 'bob@example.com', 22, 'Information Technology'),
('Charlie Brown', 'charlie@example.com', 21, 'Cybersecurity'),
('Diana Prince', 'diana@example.com', 23, 'Data Science'),
('Ethan Hunt', 'ethan@example.com', 20, 'Network Engineering'),
('Fiona Green', 'fiona@example.com', 24, 'Cloud Computing');

SELECT * FROM users;
The SELECT query returned all 6 records with id, name, email, age, course, and created_at columns. This confirmed the database and table were correctly set up.
Part B — Building the Flask Web Application
Flask is a lightweight Python web framework. I built a web application that connects to the MySQL studentdb database, fetches all records from the users table, and displays them in a styled HTML table in the browser.
Project Setup
mkdir ~/studentapp && cd ~/studentapp
python3 -m venv venv
source venv/bin/activate
pip install flask mysql-connector-python
Running the App
python3 app.py
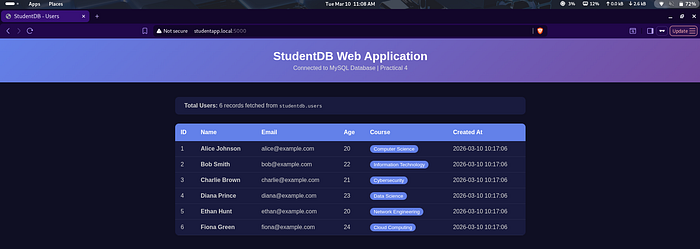
# Running on http://0.0.0.0:5000
# Access at: http://localhost:5000The browser displayed the StudentDB Web Application page with all 6 student records fetched live from MySQL — confirming the full backend-to-frontend data flow was working correctly.
Part C — Configuring a Custom Domain
Instead of typing an IP address, I configured a custom local domain called studentapp.local to point to my Flask application. This was done by editing the system hosts file, which acts as a local DNS resolver.
udo nano /etc/hosts

# Added this line at the bottom:
X0.XX.4.XXX    studentapp.local
After saving the file, I opened Firefox and navigated to http://studentapp.local:5000. The StudentDB application loaded with the domain name visible in the URL bar instead of the raw IP address.
Practical 6 — Capturing HTTPS Traffic & Analyzing the TLS Handshake
Capturing & Analyzing the TLS Handshake using Wireshark and Burp Suite
What is HTTPS and TLS?
HTTPS (HyperText Transfer Protocol Secure) is HTTP with an added encryption layer called TLS (Transport Layer Security). Before any encrypted data is exchanged, a TLS handshake takes place between the browser and server. This handshake establishes which encryption algorithms to use and creates the shared session keys.
Every time you visit an https:// website, your browser and the server go through a secret negotiation before a single byte of real data is exchanged. This negotiation is called the TLS handshake. For this practical I had to capture it live using Wireshark, intercept and decrypt it using Burp Suite, and explain what was happening at each stage.
Capture Setup
I opened Wireshark on Kali Linux, selected the wlan0 network interface, and started capturing packets. I then opened Firefox and visited https://google.com to generate HTTPS traffic. In the Wireshark filter bar, I typed:
tls.handshakeThis filtered the capture to show only TLS handshake packets, making it easy to identify the specific stages of the handshake.
The 4 Stages of the TLS Handshake
Stage 1 — Client Hello
Filter used: tls.handshake.type == 1
The Client Hello is the very first message in the TLS handshake. My browser sends this to the server to say — here is what I support, let us figure out how to communicate securely.
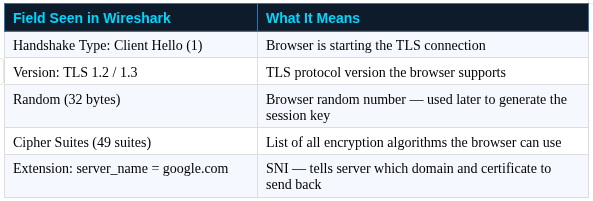
The SNI (Server Name Indication) extension was something I had not thought about before. A single server can host hundreds of domains. Without SNI, the server would not know which SSL certificate to present. This small extension in the Client Hello solves that problem elegantly.
Stage 2 — Server Hello
Filter used: tls.handshake.type == 2
The Server Hello is the server responding to the browser. It selects the strongest mutually supported cipher suite from the list the browser sent and replies with its own random number.

At this point both sides have agreed on an encryption algorithm and both have contributed a random number. These two random numbers will be combined with a secret from the next step to generate the final symmetric encryption key.
Stage 3 — Certificate Exchange
Filter used: tls.handshake.type == 11
The server now needs to prove it is actually google.com and not an impostor. It does this by sending a digital certificate — a document signed by a trusted Certificate Authority (CA).
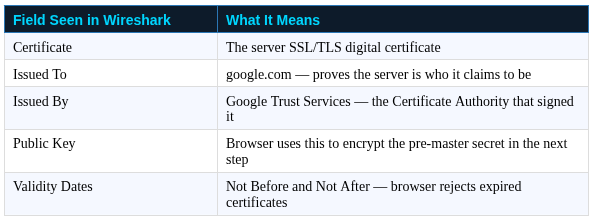
Firefox has a built-in list of trusted Certificate Authorities. If the server certificate is signed by one of them, the browser trusts it. This is the entire foundation of trust on HTTPS. Without CAs, anyone could impersonate any website.
Stage 4 — Key Exchange and Change Cipher Spec
Filter used: tls.handshake.type == 16
This is the final step of the handshake — and the most cryptographically interesting one. The session encryption key is derived here.
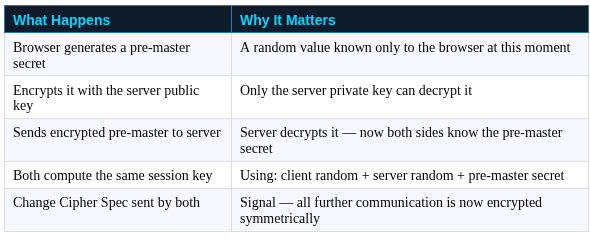
What I found fascinating is that the session key is never actually transmitted over the network. Both sides compute it independently using the same three inputs and arrive at the identical result. Even if someone recorded every packet of the entire handshake, they could not derive the session key without the server private key. This is why HTTPS works.
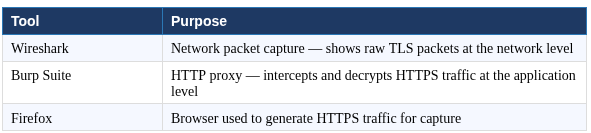
Part 2 — Intercepting HTTPS with Burp Suite
While Wireshark shows encrypted packets at the network level, Burp Suite works at the application layer. It sits between the browser and the internet as a man-in-the-middle proxy — decrypting and showing the actual HTTP content that Wireshark cannot read. Setting it up required several steps.
Step 1 — Open Burp Suite
burpsuiteSelected Temporary Project → Use Burp Defaults → Start Burp.
Step 2 — Verify Proxy Listener
Went to Proxy tab → Proxy Settings → Proxy Listeners. Confirmed it was active on:
1XX.0.X.X:8080Step 3 — Configure Firefox Proxy
Routed Firefox traffic through Burp:
Firefox → Settings → Search 'proxy' → Settings
→ Manual proxy configuration
→ HTTP Proxy: 1XX.X.X.X    Port: 8080
→ Checked: Also use this proxy for HTTPS
→ Click OK
Step 4 — Download Burp CA Certificate
This step is critical. Without installing Burp's certificate, Firefox blocks every HTTPS site because it detects the interception and does not trust Burp's certificate by default. In Firefox I visited:
http://burpsuite
# or
http://1XX.0.X.X:8080
Clicked CA Certificate button → downloaded cacert.der file to the Downloads folder.
Step 5 — Import Certificate into Firefox
Firefox → Settings → Search 'certificates'
→ View Certificates
→ Authorities tab
→ Import → selected cacert.der
→ Checked: Trust this CA to identify websites
→ Click OK
Step 6 — Capture Decrypted HTTPS Traffic
In Burp Suite I made sure Intercept was turned OFF so traffic flowed freely without stopping at each request. Then in Firefox I visited:
Went to Burp Suite → Proxy → HTTP History. All HTTPS requests appeared fully decrypted — I could read the actual HTTP headers, cookies, request paths, and response content that were completely hidden as encrypted bytes in Wireshark.
Understanding how HTTPS works at this level is not just academic — it directly applies to how security researchers test web applications, how attackers perform man-in-the-middle attacks, and how defenders design systems that are genuinely secure. This practical gave me a real foundation in all three.