

In Part 1, we covered the foundation: a sudo user, SSH key auth, application-specific users, and a basic firewall rule set. Your server is already in better shape than most. But port 22 is still open to the internet, and anyone on the planet can knock on it.
This article closes that door and then builds two more walls in front of it.
The Strategy: Defense in Depth
A single layer of defense is a single point of failure. We're going to layer three:
- UFW (host firewall): the first filter on the server itself
- DigitalOcean Cloud Firewall: a network-level firewall that blocks traffic before it even reaches the droplet
- Fail2Ban: an intrusion prevention system that bans IPs after repeated failed attempts
Each layer is independent. If one is misconfigured, the others hold.
1. Configuring UFW (Uncomplicated Firewall)
UFW is already installed from Part 1. Let's configure it properly.
Reset and Start Clean
sudo ufw resetThis clears all existing rules. Start fresh.
Set Default Policies
sudo ufw default deny incoming
sudo ufw default allow outgoing
Deny everything in. Allow everything out. This is your baseline.
Allow Only What You Need
# SSH — rate-limited. Blocks IPs after 6 connection attempts in 30 seconds.
# Required until we set up Cloudflare Tunnel in Part 3.
sudo ufw limit ssh

# Web traffic
sudo ufw allow 80/tcp       # HTTP
sudo ufw allow 443/tcp      # HTTPS

# If you're running PostgreSQL and need remote access (use sparingly)
sudo ufw allow from YOUR_TRUSTED_IP to any port 5432
Why
limitinstead ofallowfor SSH?ufw limit sshallows SSH connections but rate-limits them — any IP that attempts more than 6 connections in 30 seconds gets blocked. This isn't a replacement for Fail2Ban, but it's a first-line speed bump.
Don't use both
allow sshandlimit ssh. UFW processes rules in order. Ifallowcomes first, it matches every SSH connection before thelimitrule ever fires. The rate limiting becomes useless. Use one or the other —limitis the better choice.
Enable and Verify
sudo ufw enable
sudo ufw status verbose
You should see something like:
Status: active
Logging: on (low)
Default: deny (incoming), allow (outgoing), disabled (routed)
To                         Action      From
--                         ------      ----
22/tcp                     LIMIT IN    Anywhere
80/tcp                     ALLOW IN    Anywhere
443/tcp                    ALLOW IN    Anywhere
2. DigitalOcean Cloud Firewall
UFW runs on the server. The cloud firewall runs at DigitalOcean's network edge — traffic blocked here never touches your droplet at all.
This matters because even if a bug or misconfiguration on the server bypasses UFW, the cloud firewall is a separate, independent system.
Set It Up in the Control Panel
- In the DigitalOcean dashboard, go to Networking → Firewalls
- Click Create Firewall
- Give it a name (e.g.,
droplet-main-fw)
Inbound Rules
Configure inbound rules to mirror your UFW setup. At a minimum:
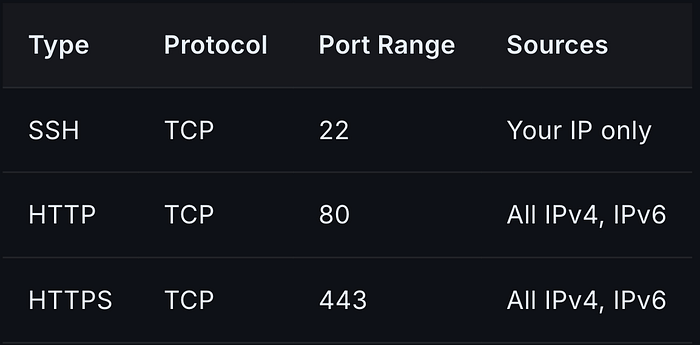
Key difference from UFW: Restrict SSH here to your specific IP address, not all sources. Attackers can't even attempt a connection if the cloud firewall drops their packets silently.
Outbound Rules
Leave outbound rules open for now. We'll tighten this in Part 3.
Apply to Your Droplet
In the Apply to Droplets section, add your droplet by name or tag, then click Create Firewall.
Changes apply within seconds, with no downtime or restart.
Verify the Layers Are Working
From your local machine, try connecting from a different IP (a phone on LTE works):
ssh myusername@your_server_ipIf the cloud firewall is configured correctly, this connection should time out — not refuse, not error. A timeout means the packet never arrived. That's what you want.
3. Fail2Ban
UFW and the cloud firewall handle network traffic. Fail2Ban handles brute-force attempts on services that are legitimately exposed — in our case, SSH.
Fail2Ban watches log files, detects repeated failures, and automatically adds firewall rules to ban the offending IP for a configurable duration.
Verify It's Installed
sudo systemctl status fail2banIf it's not running, install it:
sudo apt install -y fail2ban
sudo systemctl enable fail2ban
sudo systemctl start fail2ban
Configure a Jail
Fail2Ban uses "jails" — per-service configuration blocks that define what to watch and when to ban.
Never edit /etc/fail2ban/jail.conf directly. Create a local override:
sudo nano /etc/fail2ban/jail.localAdd the following:
[DEFAULT]
# Ban IPs for 1 hour
bantime = 3600

# Look back 10 minutes for failures
findtime = 600

# Ban after 5 failures
maxretry = 5

# Send email alerts (optional - requires mail setup)
# destemail = you@example.com
# action = %(action_mwl)s

[sshd]
enabled = true
port = ssh
filter = sshd
logpath = /var/log/auth.log
maxretry = 3
backend = systemd
Why
backend = systemd? On Ubuntu 24.x, some minimal server images don't includersyslog, which means/var/log/auth.logdoesn't exist. Settingbackend = systemdtells Fail2Ban to read from the systemd journal instead, which always exists. If your server does haveauth.log, thelogpathline is ignored when using the systemd backend — Fail2Ban reads the journal directly.
The [sshd] jail monitors SSH authentication failures via the systemd journal. After 3 failed attempts in 10 minutes, the IP is banned for an hour.
Restart Fail2Ban
sudo systemctl restart fail2banVerify Jails Are Active
sudo fail2ban-client statusYou should see:
Status
|- Number of jail:      1
`- Jail list:           sshd
Check the SSH jail specifically:
sudo fail2ban-client status sshdThis shows currently banned IPs, the total number of bans since startup, and tracked failed attempts.
4. Verify Zero Open Ports
With UFW and the cloud firewall active, let's confirm what's actually reachable from the outside.
From Your Server
Check what's listening locally:
sudo ss -tlnpThis shows all listening TCP sockets. Common output:
State   Recv-Q  Send-Q  Local Address:Port  Peer Address:Port  Process
LISTEN  0       128     0.0.0.0:22          0.0.0.0:*          sshd
LISTEN  0       128     0.0.0.0:80          0.0.0.0:*          nginx
LISTEN  0       511     0.0.0.0:443         0.0.0.0:*          nginx
Notice that PostgreSQL (5432), Redis (6379), and other internal services are not in this list because they bind to 127.0.0.1 only. If they appear bound to 0.0.0.0, that's a problem — fix those service configs immediately.
From the Outside
Use a port scanner from an external machine or service. nmap. online or a quick nmap from a different machine:
nmap -sV your_server_ipWith both firewall layers active, the only ports that should return are these These open are the ones you explicitly allowed. Everything else should show filtered — meaning the cloud firewall silently dropped the packet.
5. Monitoring Fail2Ban
Watch Bans in Real Time
sudo tail -f /var/log/fail2ban.logYou'll see lines like:
2026-05-07 03:21:44 INFO [sshd] Ban 185.234.218.42That's an IP that failed three times and got cut off for an hour. On an internet-exposed SSH port, you'll typically see dozens of these per day from automated scanners.
Manually Ban an IP
If you spot suspicious behavior before Fail2Ban catches it:
sudo fail2ban-client set sshd banip 1.2.3.4Manually Unban an IP
If you accidentally ban yourself:
sudo fail2ban-client set sshd unbanip YOUR_IP6. Additional Hardening
Disable IPv6 (Optional)
If you're not using IPv6, reduce your attack surface by disabling it at the kernel level. Add to /etc/sysctl.conf:
net.ipv6.conf.all.disable_ipv6 = 1
net.ipv6.conf.default.disable_ipv6 = 1
Apply:
sudo sysctl -pRestrict SSH to Specific Users
In /etc/ssh/sshd_config, add:
AllowUsers myusernameEven if another user exists on the system, they cannot log in via SSH. This is worth adding alongside the SSH hardening from Part 1.
Restart sshd after any changes:
sudo systemctl restart sshdCurrent Security Posture
Here's where we stand after Part 2:
- ✅ UFW configured — deny all ingress except specific ports
- ✅ DigitalOcean cloud firewall — network-level layer with SSH restricted to your IP
- ✅ Fail2Ban — automatic IP banning on repeated SSH failures
- ✅ Zero unintended open ports verified
- ✅ Internal services bound to localhost only
The server is genuinely hardened. An attacker scanning the internet sees filtered ports, gets silently dropped by the cloud firewall before touching the server, and if they somehow reach SSH, gets three attempts before Fail2Ban locks them out for an hour.
But SSH is still open. Port 22 still exists. That is still an attack surface.
What's Next?
In Part 3, we'll eliminate port 22:
- Install and configure Cloudflare Tunnel to route all traffic through Cloudflare's network
- Remove the SSH UFW rule entirely — no more exposed port 22
- Remove SSH from the cloud firewall inbound rules
- Access your server via SSH over the Cloudflare Tunnel without any publicly exposed ports
- Implement Zero Trust access policies with Cloudflare Access
A server with zero open ports that is still fully manageable. That's the goal.
A message from our Founder
Hey, Sunil here. I wanted to take a moment to thank you for reading until the end and for being a part of this community. Did you know that our team run these publications as a volunteer effort to over 3.5m monthly readers? We don't receive any funding, we do this to support the community.
If you want to show some love, please take a moment to follow me on LinkedIn, TikTok, Instagram. You can also subscribe to our weekly newsletter. And before you go, don't forget to clap and follow the writer️!