

Series: curl — The Request Engine You Never Learned Properly Article: 6A of 16 Status: Draft
Authentication is the first wall on almost every target. How you approach it with curl depends entirely on which scheme the server is using — and identifying that scheme before picking a flag is a skill most tutorials skip entirely.
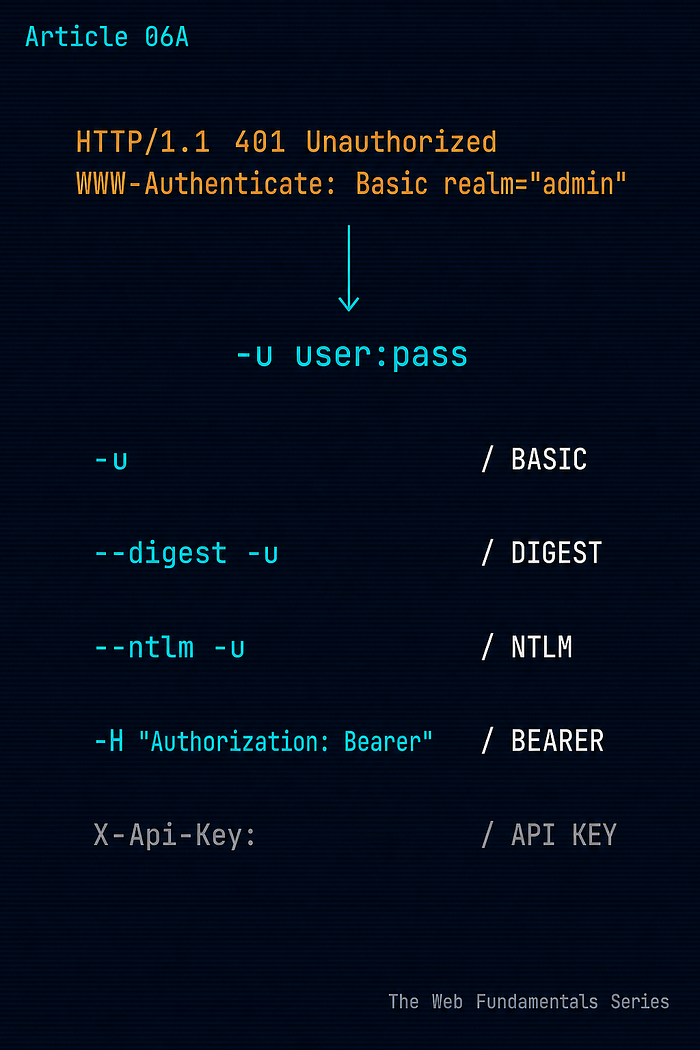
This article covers the main authentication mechanisms curl handles: Basic, Digest, NTLM, Bearer tokens, and API keys. It explains how each scheme works at the protocol level, the curl flag that invokes it, and how to read the server's challenge to know which one you are dealing with.
Article 6B covers what happens after you authenticate: session persistence, cookie jars, CSRF token handling, and maintaining stateful access across multi-step workflows.
Identifying Which Auth Scheme You Are Dealing With
Before choosing a curl flag, read what the server is asking for.
An unauthenticated request to a protected resource returns a 401 Unauthorized response. The WWW-Authenticate header in that response tells you exactly which scheme to use.
curl -sI https://httpbin.org/basic-auth/admin/password
HTTP/2 401
date: Sat, 25 Apr 2026 12:06:18 GMT
content-length: 0
server: gunicorn/19.9.0
www-authenticate: Basic realm="Fake Realm"
access-control-allow-origin: *
access-control-allow-credentials: true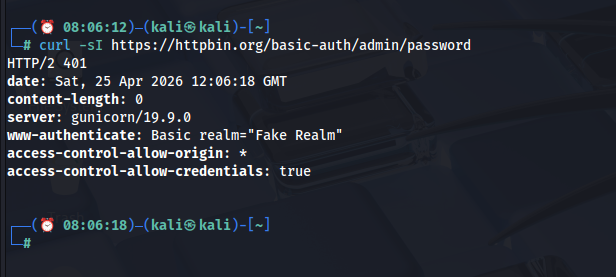
www-authenticate header tell you the scheme before you've sent a single credentialThe www-authenticate: Basic realm="Fake Realm" header is what you are reading. One line tells you everything: the scheme is Basic, and the realm is the name the server gives to this protected area. That is your cue to reach for -u.
Reading the header:
WWW-Authenticate value          Scheme          curl flag
------------------------------  --------------  ----------------------------------
Basic realm="..."               HTTP Basic      -u user:pass
Digest realm="...", nonce="..."  HTTP Digest     --digest -u user:pass
NTLM                            Windows NTLM    --ntlm -u user:pass
Bearer realm="..."              Bearer token    -H "Authorization: Bearer <token>"
This is the identification workflow: request unauthenticated, read the challenge, match it to the right flag. Skipping this step and guessing the scheme wastes time and often produces confusing errors. Note that some endpoints present multiple schemes in the WWW-Authenticate header — choose one that the server actually lists as supported.
Basic Auth
The oldest and simplest HTTP authentication scheme. The client sends credentials in a Base64-encoded Authorization header on each request.
curl -u admin:password http://localhost:8080/protected
==================================================
  curl Lab Echo Server
==================================================
METHOD       : GET
PATH         : /protected
FULL URL     : /protected
--- REQUEST HEADERS ---
  Host: localhost:8080
  Authorization: Basic YWRtaW46cGFzc3dvcmQ=
  User-Agent: curl/7.68.0
  Accept: */*
--- QUERY STRING PARAMS ---
  (none)
--- RAW BODY ---
  (empty)
--- PARSED BODY PARAMS ---
  (none)
==================================================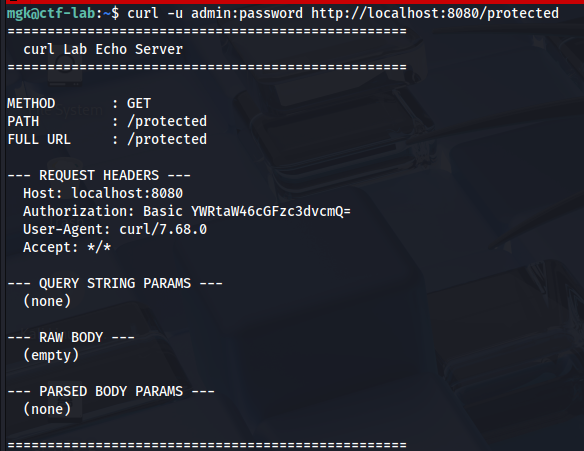
Authorization: Basic header automatically from the -u flag — that encoded string is admin:password in base64The Authorization: Basic YWRtaW46cGFzc3dvcmQ= header is visible in the REQUEST HEADERS — curl added it automatically from the -u flag. That encoded string is the credentials.
What curl actually sends:
Authorization: Basic YWRtaW46cGFzc3dvcmQ=YWRtaW46cGFzc3dvcmQ= is the base64 encoding of admin:password. To decode it in the terminal:
echo "YWRtaW46cGFzc3dvcmQ=" | base64 -d
# Output: admin:password
This means Basic Auth credentials are trivially readable by anyone who can intercept the traffic. They are not encrypted — they are only encoded. Basic Auth over plain HTTP is a vulnerability finding. Over HTTPS, the credentials are protected in transit by TLS, but they can still be exposed to systems that terminate TLS or log request headers — such as reverse proxies, load balancers, and application logging middleware.
Why Basic Auth is still everywhere:
Despite its age, Basic Auth appears constantly in internal admin panels and network devices, simple API authentication, development and staging environments, and legacy applications that predate modern auth frameworks.
When you encounter it in a test, note it. Basic Auth without HTTPS is a finding. Basic Auth with weak or default credentials is a finding.
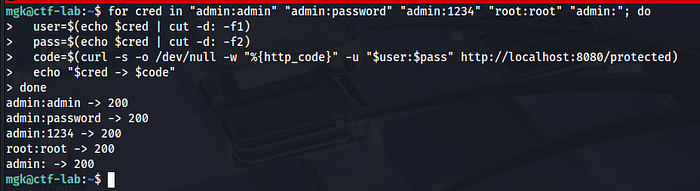
Testing default credentials:
for cred in "admin:admin" "admin:password" "admin:1234" "root:root" "admin:"; do
  user=$(echo $cred | cut -d: -f1)
  pass=$(echo $cred | cut -d: -f2)
  code=$(curl -s -o /dev/null -w "%{http_code}" -u "$user:$pass" http://localhost:8080/protected)
  echo "$cred -> $code"
done
admin:admin -> 200
admin:password -> 200
admin:1234 -> 200
root:root -> 200
admin: -> 200
The lab echo server returns 200 for every request, regardless of credentials — it does not implement authentication logic. On a real target, only the correct credential pair would return 200, and the rest would return 401. The pattern is identical; the outcome depends on the target. Against httpbin with the correct credentials:
curl -s -o /dev/null -w "%{http_code}\n" -u admin:password https://httpbin.org/basic-auth/admin/password
# 200
curl -s -o /dev/null -w "%{http_code}\n" -u admin:wrongpass https://httpbin.org/basic-auth/admin/password
# 401
On a real target, a 200 where the correct credentials return success and wrong ones return 401 means the valid credential pair is a finding worth reporting.

Digest Auth
Digest authentication is a challenge-response scheme designed to address Basic Auth's credential exposure problem. Instead of sending the password, the client computes a response using the password, a server-provided nonce, the request URI, and other values — then sends that computed response rather than the credential itself. curl handles the entire challenge-response calculation automatically when you pass --digest -u user:pass.
The flow is as follows:
- Client requests a protected resource without credentials
- Server returns 401 with a
WWW-Authenticate: Digestheader containing anonce— a one-time server-generated value - Client computes a response using the password, nonce, request URI, and other values
- Client sends the computed response in the
Authorizationheader - Server performs the same calculation independently and compares
curl -v --digest -u admin:password http://target.com/protectedThe -v output shows both requests: the initial unauthenticated request returning a 401 Digest challenge, and then the authenticated request with the computed MD5 hash in the Authorization header. The hash includes the server's nonce value, which is why captured Digest hashes cannot simply be replayed — the nonce changes with each challenge.
On a real Digest target, the verbose output looks like this:
> GET /protected HTTP/1.1
< HTTP/1.1 401 Unauthorized
< WWW-Authenticate: Digest realm="protected", nonce="abc123..."
> GET /protected HTTP/1.1
> Authorization: Digest username="admin", realm="protected",
>   nonce="abc123...", uri="/protected", response="d41d8cd98f..."
< HTTP/1.1 200 OK
The two-request pattern is the distinguishing mark of any challenge-response scheme — you will see it clearly in -v output whenever Digest is in play.
Digest's weaknesses at a surface level:
Digest prevents straightforward credential replay — the computed response includes the nonce, so captured responses cannot simply be replayed since the nonce changes with each challenge. That said, Digest still relies on MD5, which is considered weak by modern standards, and some implementation details can introduce subtler weaknesses. Digest is more secure than Basic but has been largely superseded by token-based authentication in modern applications.
Where you encounter Digest in the wild: older network devices such as routers and cameras, legacy internal applications, and HTTP APIs designed before token-based auth became standard.
NTLM Auth
NTLM (NT LAN Manager) is Microsoft's challenge-response authentication protocol. It was designed for Windows network authentication and appears in web contexts when applications are integrated with Windows or Active Directory infrastructure.
curl -v --ntlm -u "DOMAIN\\username:password" http://target.com/protectedThe -v output for NTLM shows a multi-step handshake with negotiate, challenge, and authenticate messages:
> GET /protected HTTP/1.1
< HTTP/1.1 401 Unauthorized
< WWW-Authenticate: NTLM
> GET /protected HTTP/1.1
> Authorization: NTLM TlRMTVNTUAABAAAA...   (NEGOTIATE message)
< HTTP/1.1 401 Unauthorized
< WWW-Authenticate: NTLM TlRMTVNTUAACAAAA... (CHALLENGE message)
> GET /protected HTTP/1.1
> Authorization: NTLM TlRMTVNTUAADAAAA...   (AUTHENTICATE message)
< HTTP/1.1 200 OK
Multiple round-trip, multiple Authorization headers, each containing a different NTLM message type. This exchange is unmistakable in verbose output and is direct evidence that Windows authentication is in play.
Note the double backslash in the shell — it escapes the single backslash that separates the domain from the username. On a target that does not require a domain prefix:
curl --ntlm -u "username:password" http://target.com/protectedWhere NTLM appears as a web attack surface:
NTLM in HTTP shows up in SharePoint installations, Microsoft Exchange OWA, IIS-hosted applications with Windows Authentication enabled, internal intranet applications in corporate environments, and older ASP.NET applications.
On THM and HTB machines, NTLM authentication can indicate Windows-integrated services — the kind of target where credential relay attacks become relevant in later phases, though NTLM alone does not confirm Active Directory is in use.
Bearer Tokens
Bearer tokens are the dominant authentication mechanism in modern REST APIs. The client sends a token in the Authorization header, and the server validates it to identify and authorize the request.
curl -H "Authorization: Bearer eyJhbGciOiJIUzI1NiIsInR5cCI6IkpXVCJ9.eyJ1c2VyIjoiYWRtaW4ifQ.test" \
  http://localhost:8080/api/data
==================================================
  curl Lab Echo Server
==================================================
METHOD       : GET
PATH         : /api/data
FULL URL     : /api/data
--- REQUEST HEADERS ---
  Host: localhost:8080
  User-Agent: curl/7.68.0
  Accept: */*
  Authorization: Bearer eyJhbGciOiJIUzI1NiIsInR5cCI6IkpXVCJ9.eyJ1c2VyIjoiYWRtaW4ifQ.test
--- QUERY STRING PARAMS ---
  (none)
--- RAW BODY ---
  (empty)
--- PARSED BODY PARAMS ---
  (none)
==================================================
The full token is visible in the Authorization header exactly as sent. If the token is a JWT, its three-dot structure — header, payload, signature — is clear even in the raw header value. Not every bearer token is a JWT; some are opaque strings or other formats. The format depends entirely on the application.
The token is typically obtained by making a login request first:
# Step 1: Get the token
TOKEN=$(curl -s \
  -X POST \
  -H "Content-Type: application/json" \
  -d '{"username":"admin","password":"password"}' \
  http://target.com/api/login | python3 -c "import sys,json; print(json.load(sys.stdin)['token'])")
echo "Token: $TOKEN"
# Step 2: Use the token
curl -s \
  -H "Authorization: Bearer $TOKEN" \
  http://target.com/api/users
The token extraction pattern above uses a real API login that returns JSON. The python3 -c command extracts the token field from the response and stores it in the shell variable $TOKEN. On a target that returns a token differently — in a header, in a cookie, or under a different JSON key — adjust the extraction accordingly.
JWT tokens:
Many bearer tokens are JWTs (JSON Web Tokens). A JWT has three parts separated by dots:
eyJhbGciOiJIUzI1NiJ9.eyJ1c2VyIjoiYWRtaW4ifQ.signatureThe first two parts are base64url-encoded JSON. JWT uses base64url encoding rather than standard base64; padding may be missing, which can cause base64 -d to fail on some payloads. For well-formed JWT parts like the examples below, it works cleanly, but on real tokens, you may need to add = padding or use a dedicated JWT decoder:
echo "eyJhbGciOiJIUzI1NiJ9" | base64 -d 2>/dev/null
{"alg":"HS256"}
echo "eyJ1c2VyIjoiYWRtaW4ifQ" | base64 -d 2>/dev/null
{"user":"admin"}

{"user":"admin"}Reading the JWT payload tells you what claims it carries — username, role, expiry, and any other fields the application uses for authorization decisions. This is reconnaissance without touching any application logic. Look for role, admin, scope, or permissions fields — understanding what the token asserts is the first step before any token manipulation testing.
API Key Authentication
API keys are often operationally simpler than tokens — a static secret string the client sends with every request, with no expiry or refresh mechanism to manage. Their security properties vary widely depending on how they are issued, scoped, and rotated. They appear in three locations.
In a custom header:
curl -H "X-Api-Key: your-api-key-here" http://target.com/api/data
curl -H "X-API-KEY: your-api-key-here" http://target.com/api/data
curl -H "api-key: your-api-key-here" http://target.com/api/data
The header name varies by application. Check the API documentation or intercept a legitimate request to confirm the correct name.
As a query parameter:
curl "http://target.com/api/data?api_key=your-api-key-here"
curl "http://target.com/api/data?key=your-api-key-here"
curl "http://target.com/api/data?apikey=your-api-key-here"
API keys in query strings appear in server logs, browser history, and referrer headers. Finding an API key in a URL during testing is a finding — it should be in a header, not the URL.
In the request body:
curl -H "Content-Type: application/json" \
  -d '{"api_key":"your-key","data":"value"}' \
  http://target.com/api/endpoint
Testing for API key exposure:
When you encounter a web application with an API, check the JavaScript files loaded by the frontend:
# Download the main JS bundle
curl -s http://target.com/static/app.js | grep -iE "api[_-]?key|apikey|secret|token" | head -20
API keys hardcoded in frontend JavaScript are a common finding. The frontend should not hold secrets — but many do.
The Complete Identification Workflow
Put it together. When you land on a new target and need to authenticate:
# Step 1: Request protected resource unauthenticated
curl -sI https://httpbin.org/basic-auth/admin/password
HTTP/2 401
www-authenticate: Basic realm="Fake Realm"
server: gunicorn/19.9.0
# Step 2: Scheme identified as Basic — use -u
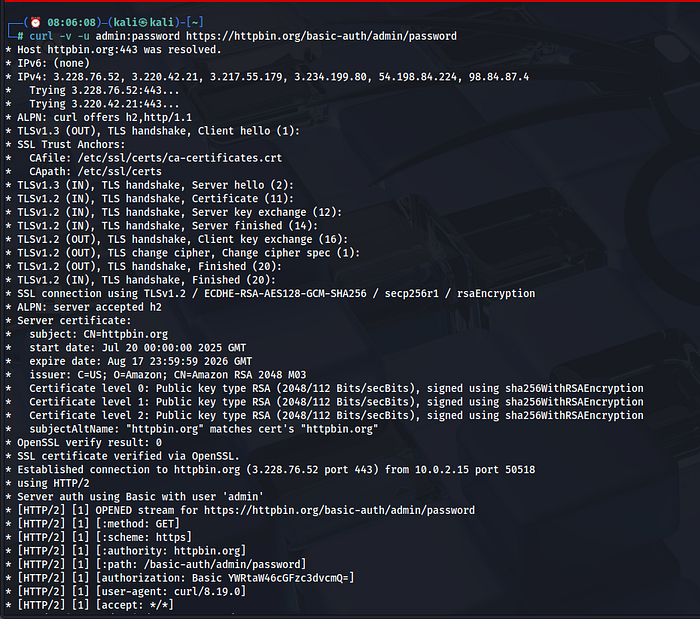
curl -v -u admin:password https://httpbin.org/basic-auth/admin/password
> Authorization: Basic YWRtaW46cGFzc3dvcmQ=
< HTTP/2 200
< content-type: application/json
{
"authenticated": true,
"user": "admin"
}
# Step 3: Confirm with status code only
curl -s -o /dev/null -w "%{http_code}\n" -u admin:password https://httpbin.org/basic-auth/admin/password
# 200
curl -s -o /dev/null -w "%{http_code}\n" -u admin:wrongpass https://httpbin.org/basic-auth/admin/password
# 401Three commands. The 401 told you the scheme. The scheme told you the flag. The 200 confirmed it worked. That is the complete identification workflow — it is the same pattern regardless of which auth scheme you encounter.
Real Walkthrough: Identifying and Authenticating on a New Target
The following walkthrough uses httpbin.org — a public HTTP testing service with a built-in Basic Auth endpoint at /basic-auth/{user}/{password}. The workflow is identical against any real target.
Step 1 — Initial unauthenticated request, read the 401 challenge:
curl -sI https://httpbin.org/basic-auth/admin/password
HTTP/2 401
date: Sat, 25 Apr 2026 12:06:18 GMT
content-length: 0
server: gunicorn/19.9.0
www-authenticate: Basic realm="Fake Realm"
access-control-allow-origin: *
access-control-allow-credentials: true
www-authenticate: Basic realm="Fake Realm" — scheme identified. Reach for -u.
Step 2 — Authenticate with correct credentials:
curl -v -u admin:password https://httpbin.org/basic-auth/admin/password
> GET /basic-auth/admin/password HTTP/2
> Authorization: Basic YWRtaW46cGFzc3dvcmQ=
> User-Agent: curl/7.68.0
> Accept: */*
< HTTP/2 200
< content-type: application/json
< server: gunicorn/19.9.0
{
  "authenticated": true,
  "user": "admin"
}
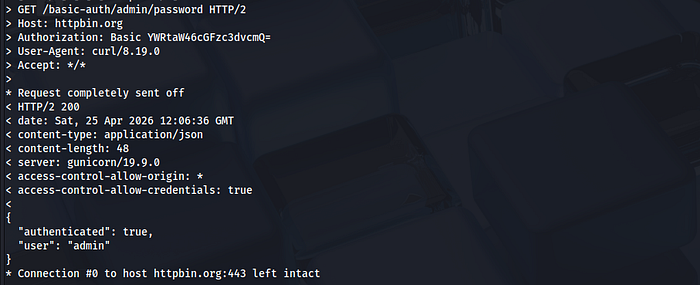
The Authorization: Basic YWRtaW46cGFzc3dvcmQ= header was sent automatically. The server returned 200 with "authenticated": true — confirmed.
Step 3 — Verify the 401 vs 200 boundary with wrong credentials:
curl -s -o /dev/null -w "%{http_code}\n" -u admin:password https://httpbin.org/basic-auth/admin/password
# 200
curl -s -o /dev/null -w "%{http_code}\n" -u admin:wrongpass https://httpbin.org/basic-auth/admin/password
# 401
Correct credentials return 200. Wrong credentials return 401. That boundary is the signal in default credential testing — run the loop, watch for the status code that breaks the pattern.
Quick Reference — Article 6A
# Identify auth scheme
curl -sI http://target.com/protected
# Read: www-authenticate header
# Basic Auth
curl -u username:password http://target.com/protected
# Digest Auth
curl --digest -u username:password http://target.com/protected
# NTLM Auth
curl --ntlm -u "DOMAIN\\username:password" http://target.com/protected
# Bearer token
curl -H "Authorization: Bearer <token>" http://target.com/api/endpoint
# API key in header
curl -H "X-Api-Key: <key>" http://target.com/api/endpoint
# API key in query string (check logs — this is a finding)
curl "http://target.com/api/endpoint?api_key=<key>"
# Default credential loop
for cred in "admin:admin" "admin:password" "admin:1234" "root:root"; do
  code=$(curl -s -o /dev/null -w "%{http_code}" -u "$cred" http://target.com/protected)
  echo "$cred -> $code"
done
# Decode Basic Auth header
echo "YWRtaW46cGFzc3dvcmQ=" | base64 -d
# Decode JWT payload parts
echo "<header_part>" | base64 -d 2>/dev/null
echo "<payload_part>" | base64 -d 2>/dev/null
# Extract API key from JS bundle
curl -s http://target.com/static/app.js | grep -iE "api[_-]?key|apikey|secret|token" | head -20
AUTH SCHEME IDENTIFICATION
---------------------------
www-authenticate: Basic ...          ->  -u user:pass
www-authenticate: Digest ...         ->  --digest -u user:pass
www-authenticate: NTLM               ->  --ntlm -u "DOMAIN\\user:pass"
www-authenticate: Bearer ...         ->  -H "Authorization: Bearer <token>"
No WWW-Authenticate, custom header   ->  -H "X-Api-Key: <key>"
No WWW-Authenticate, query param     ->  ?api_key=<key> (finding if so)
The core discipline this article builds: read the server's challenge before picking a curl flag. The server tells you which authentication scheme it uses — you just have to know where to look.
Next: Article 6B — Auth Mastery Part 2: Sessions, Cookies, and Staying Authenticated