
I am Bhautik Patel from India, Here i am writing a blog on one of my finding reported to "Bugcrowd" platform. In this writeup i will discuss about Taking over Amazon S3 bucket.
The Format of my write-up will be like a Report Template. So that you can also use it for while reporting bug.
What is an Amazon S3 Bucket?
Amazon S3 (Simple Storage Service) is a cloud-based storage solution offered by AWS. It allows users to store, retrieve, access, and back up unlimited amounts of data from anywhere, at any time. Since S3 uses an object-based storage model, all data is saved in the form of objects rather than files or blocks.
As part of my reconnaissance process, I typically begin by collecting the subdomains associated with the target website. Once I have the list, I proceed to visit each subdomain individually to explore further.
Lets, Takeover the Amazon S3 Bucket now……
- When I visit this subdomain "sub.target.com" I got the Following error saying "No Such Bucket". This gives a hint that our target is vulnerable to Amazon S3 Bucket Takeover.

This happens when the developer delete s3 bucket but forgot to delete the CName record pointing to that S3 bucket.
2. Go to the Amazon S3 Bucket panel and create the S3 Bucket with the same name of the vulnerable subdomain.
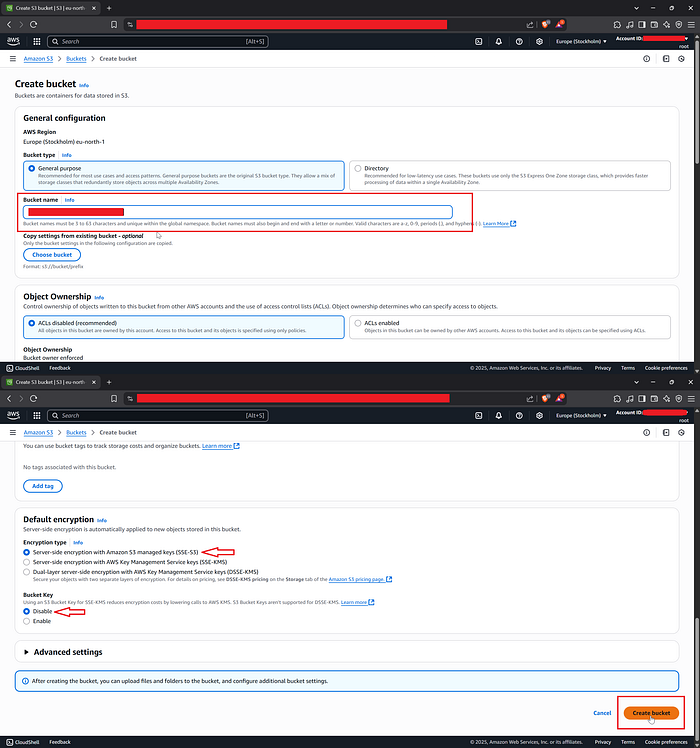
3. Open the S3 Bucket and go to Objects Section, Save and upload the below html code to the S3 Bucket.
<!DOCTYPE html>
<html lang="en">
<head>
 <meta charset="UTF-8">
 <meta name="viewport" content="width=device-width, initial-scale=1.0">
 <meta http-equiv="X-UA-Compatible" content="ie=edge">
 <link rel="stylesheet" href="style.css">
 <title>S3 Bucket Takeover</title>
</head>
<body>
<center>
<h1>This bucket has been taken over by "Your Name"</h1>
</center>
</body>
</html>
4. Go to properties section and enable "Static website Hosting".
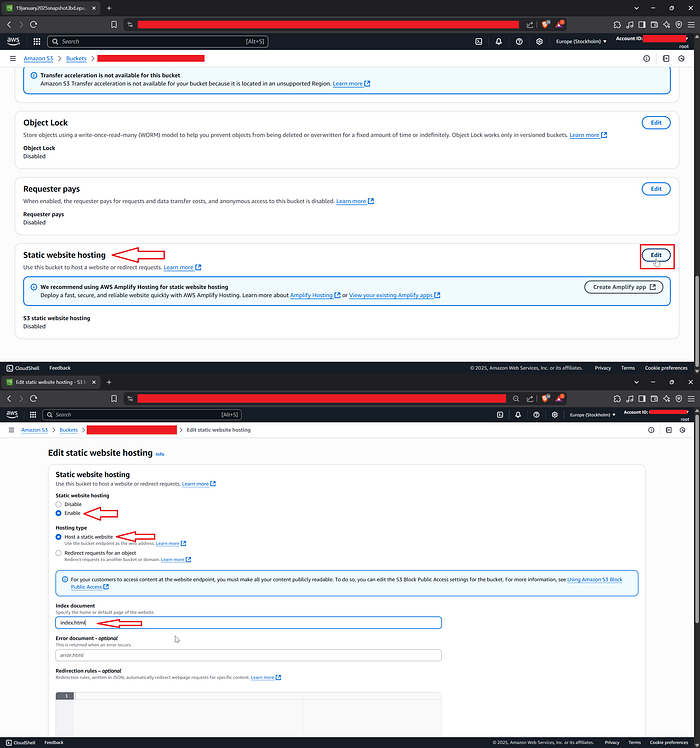
5. Go to "Permission" tab and click on "Edit" button to update Block public access settings. Uncheck all checkbox and click on "Save Changes" button.

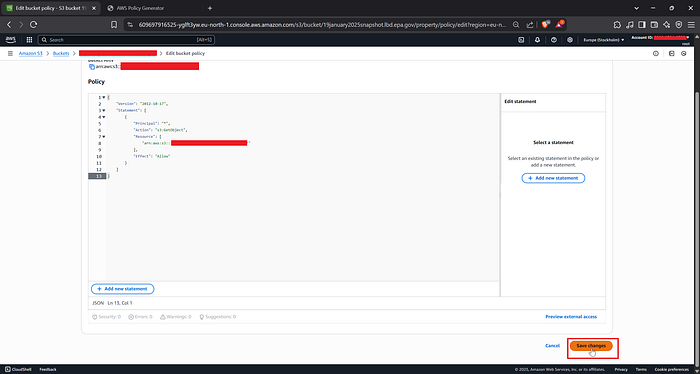
6. After that, Edit the Bucket Policy and enter the below policy, The below policy Grant Read-Only Permission to any Anonymous User.
{
    "Version": "2012-10-17",
    "Statement": [
        {
            "Principal": "*",
            "Action": "s3:GetObject",
            "Resource": [
                "arn:aws:s3:::/*"
            ],
            "Effect": "Allow"
        }
    ]
}
NOTE: Make sure to change the resource ARN with your Bucket ARN and click on Save Button (See the below image)
If you followed the above process correctly, then we are good to go…..
7. When you visit you target subdomain, and you'll see the modified html page like below.

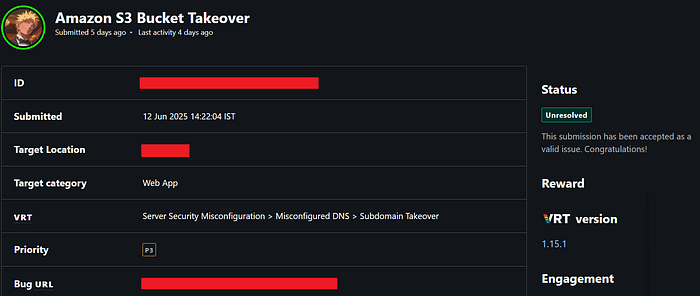
Boooom…!!!, Here I Successfully Taken over the Amazon S3 Bucket of target application…
References Links :
Thanks for reading, Hope you find this useful.
Please do like and comment. Ping me if you have any doubt or difficulties in the understanding this POC.
LinkedIn : https://www.linkedin.com/in/bhautik-patel-4024b1253/
medium : https://medium.com/@bhautikXploit
Twitter: https://x.com/bhautikXploit
Website: https://bhautikxploit.online