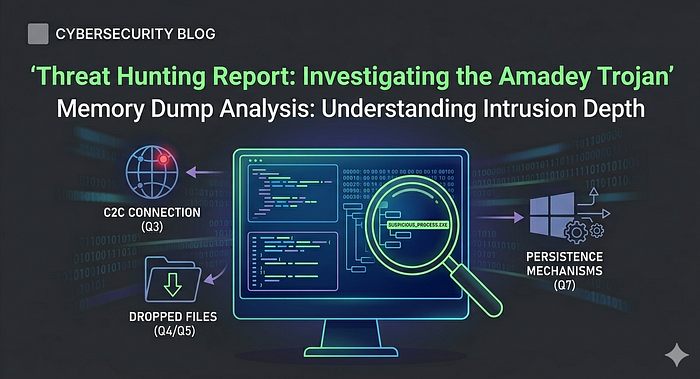

Overview
This lab focuses on the memory forensics of a Windows 7 workstation targeted by the Amadey Trojan Stealer. Following an EDR alert for suspicious after-hours activity, the investigation utilizes Volatility 3 to dissect a memory dump, revealing how the malware attempts to blend into the operating system. By examining process lineages and memory artifacts, the analysis exposes a malicious process masquerading as a core system service to execute its payload and maintain a foothold on the endpoint.
The investigation transitions from high-level process enumeration to granular artifact recovery. Key milestones include identifying illegitimate parent-child relationships, specifically a rogue lssass.exe, tracing command-line arguments to uncover hidden directories, and mapping network connections to a known Command and Control (C2) server. The walkthrough concludes by extracting the malicious binaries for further static and dynamic analysis, providing a comprehensive view of the infection lifecycle from initial execution to persistent presence via scheduled tasks.
Lab Scenario
An after-hours alert from the Endpoint Detection and Response (EDR) system flags suspicious activity on a Windows workstation. The flagged malware aligns with the Amadey Trojan Stealer. Your job is to analyze the presented memory dump and create a detailed report for actions taken by the malware.
Reference: Blue team CTF Challenges | Amadey — APT-C-36 — CyberDefenders
Forensic Analysis
Q1 In the memory dump analysis, determining the root of the malicious activity is essential for comprehending the extent of the intrusion. What is the name of the parent process that triggered this malicious behavior?
Start by running windows.info to gather information about the provided image.
python3 vol.py -f memdump.dmp windows.info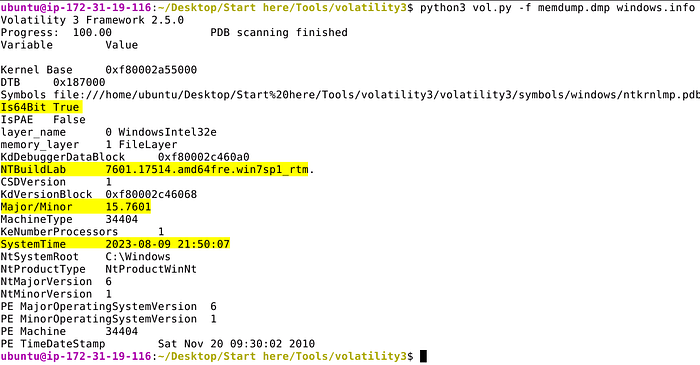
We can conclude that we're dealing with a Windows 7 SP1 memory capture taken on 2023–08–09 21:50:07.
To start things off I like to run a few plugins to enumerate processes and compare them against each other; mainly pslist psscan and pstree.
python3 vol.py -f memdump.dmp windows.pslist > pslist.txt
python3 vol.py -f memdump.dmp windows.psscan > psscan.txt
python3 vol.py -f memdump.dmp windows.pstree > pstree.txt
My standard methodology prioritizes efficiency by piping plugin results into text files. This allows for rapid filtering with grep and eliminates the need to re-execute time consuming plugins.
- Process Enumeration: I begin by visually inspecting the output of
pslistto identify suspicious or anomalous running processes. - Deep Scanning: I follow this with
psscanto cross-reference the initial findings. - Cross-Analysis: It is important to note that
psscanoften reveals additional entries not found inpslist. Whilepslistrelies on the standard Windows API to enumerate the active process list,psscanbypasses these linked structures by searching for pool tags directly in memory. This helps identify hidden or terminated processes that malware might attempt to hide. - Process Genealogy: Lastly, inspect the output from
pstreeto identify any abnormal parent-child process relationships, i.e., Winword.exe spawning Powershell.exe.
Applying this methodology reveals two concurrent instances of lsass.exe. In a standard Windows environment, this is a primary indicator of compromise, as there should only ever be a single instance of the Local Security Authority Subsystem Service (lsass) running.
A closer inspection of the process lineage highlights the disparity:
- Legitimate Instance: The authentic process (PID 400) is correctly nested under
wininit.exeas its parent. - Malicious Instance: The rogue process (PID 2748) originates from an unknown parent (PID 2524).
- Masquerading: The
lssass.exeprocess confirmed to be malicious is incorrectly spelled.
Furthermore, the malicious lssass.exe has spawned a child process, rundll32.exe. This behavior is highly atypical for a core system process and suggests the malware is attempting to mask its execution within a trusted name.

Answer: lssass.exe
Q2 Once the rogue process is identified, its exact location on the device can reveal more about its nature and source. Where is this process housed on the workstation?
The location where the malicious process was written to disk can be identified by using the windows.cmdline plugin and specifying the process ID with --pid.
python3 vol.py -f memdump.dmp windows.cmdline --pid 2748
Answer: C:\Users\0XSH3R~1\AppData\Local\Temp\925e7e99c5\lssass.exe
Q3 Persistent external communications suggest the malware's attempts to reach out C2C server. Can you identify the Command and Control (C2C) server IP that the process interacts with?
Run the windows.netscan plugin and dump the output to a file for analysis. Filter for entries containing IOCs identified, i.e., lssass.exe rundll32.exe 2748 3064.
python3 vol.py -f memdump.dmp windows.netscan > netscan.txt

cat netscan.txt | grep -iE '2748|3064|lssass|rundll32'
The output confirms that lsass.exe connected to 41.75.84.12 over HTTP (80).

Answer: 41.75.84.12
Q4 Following the malware link with the C2C, the malware is likely fetching additional tools or modules. How many distinct files is it trying to bring onto the compromised workstation?
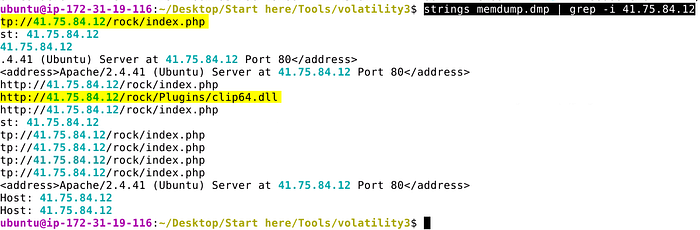
While there's likely a few ways to solve this one, using strings against the entire memory capture provides us with the ability to quickly match against known IOCs. Filter for the C2 address discovered in the previous question.
strings memdump.dmp | grep -i 41.75.84.12Several matches are found, among them are two unique findings — clip64.dll and several hits for index.php.
Answer: 2
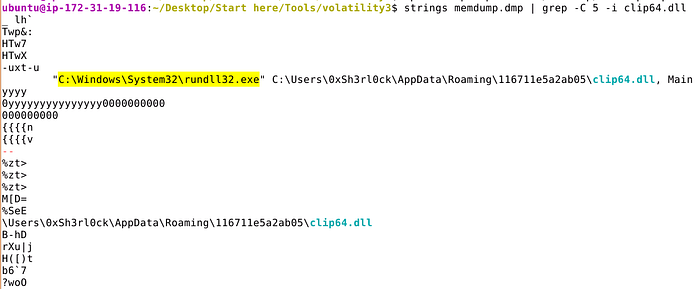
Q5 Identifying the storage points of these additional components is critical for containment and cleanup. What is the full path of the file downloaded and used by the malware in its malicious activity?
Much like we did for the previous question, use strings to identify matches for clip64.dll.
strings memdump.dmp | grep -C 5 -i clip64.dll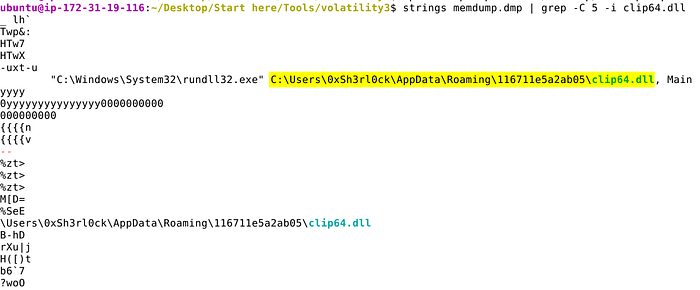
Answer: C:\Users\0xSh3rl0ck\AppData\Roaming\116711e5a2ab05\clip64.dll
Q6 Once retrieved, the malware aims to activate its additional components. Which child process is initiated by the malware to execute these files?
In the output produced from using strings in the previous question, we can confirm that rundll32.exe was the child process used to to execute clip64.dll.
Answer: rundll32.exe
Q7 Understanding the full range of Amadey's persistence mechanisms can help in an effective mitigation. Apart from the locations already spotlighted, where else might the malware be ensuring its consistent presence?
Let's use windows.filescan and output the results to a file for easier analysis. This plugin scans for file objects present in memory and can be helpful when trying to identify other locations malware might have been written to.
python3 vol.py -f memdump.dmp windows.filescan > filescan.txt

cat filescan.txt | grep -iE 'lssass.exe|rundll32.exe|clip64.dll'
Use grep to filter for previously identified files. By doing this a few entries are returned, one of which shows lssass.exe under C:\WIndows\System32\Tasks confirming scheduled task persistence.

Answer: C:\Windows\System32\Tasks\lssass.exe
Extra Content
To transition from memory forensics to deeper inspection, we must extract the suspicious binary from the sample. Dumping the malware allows for both static analysis (string extraction, header inspection) and dynamic analysis (sandboxing).
Extract the Process: Use the windows.dumpfiles plugin in Volatility 3 to carve the files associated with the malicious lssass.exe (PID 2748).
python3 vol.py -f memdump.dmp windows.dumpfiles --pid 2748Quite a few files are dumped, among them is the lssass.exe.img, i.e., the original executable.
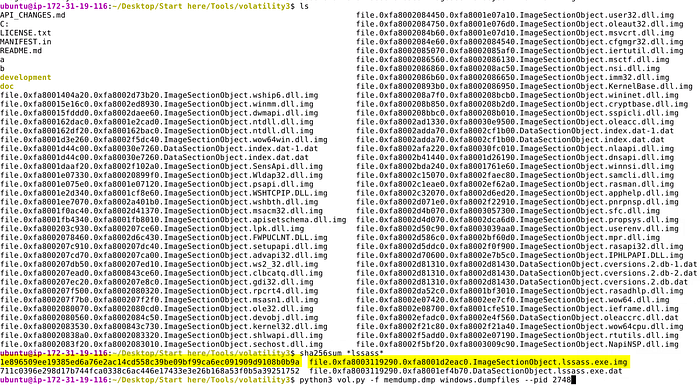
Verify the Executable: Locate the original executable, typically dumped as lssass.exe.img. You can then generate a SHA256 hash to pivot into threat intelligence platforms.
sha256sum *lssass*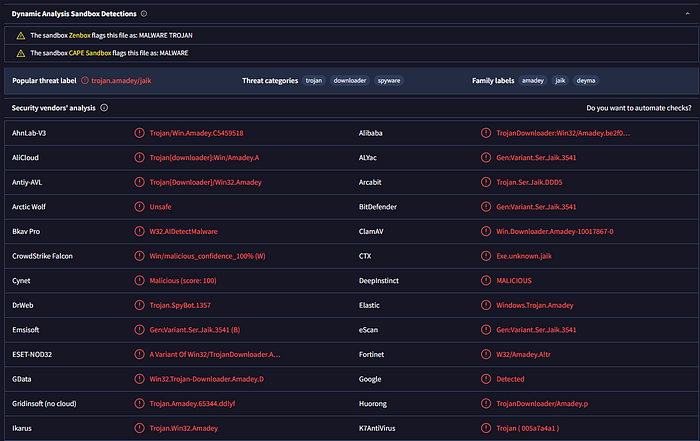
Threat Intelligence & Sandboxing: Search the resulting hash on VirusTotal to check for existing detections. If the environment allows, rename the .img file back to its original .exe extension for further analysis:
- Static Analysis: Examine imports, exports, and embedded strings.
- Dynamic Analysis: Upload the file to a sandbox like Any.Run or Hybrid Analysis. This provides visibility into the malware's behavior, including network callbacks, domain interaction, and file system persistence.
Summary
The analysis successfully identifies the Amadey Trojan through the detection of a misspelled lssass.exe process (PID 2748) originating from an unconventional temp directory. Network forensics confirmed an active connection to a C2 server at 41.75.84.12, which was used to pull down additional modules, including a persistent DLL. The malware ensured its longevity on the system by placing a copy of itself within the Windows Scheduled Tasks directory, a classic technique for bypassing standard reboot-based volatility.
Ultimately, the recovery of the lssass.exe.img binary allowed for the generation of SHA256 hashes, enabling threat intelligence pivoting via platforms like VirusTotal. By documenting the move from memory resident structures to disk-based persistence, this writeup highlights the importance of cross-referencing pslist and psscan to find hidden threats. The findings emphasize that while Amadey uses masquerading to hide in plain sight, systematic memory analysis can effectively reconstruct its activity and facilitate full remediation.
Follow for More
If you found this deep dive helpful, follow me for more technical writeups and home lab adventures. Upcoming content includes:
- The Home Lab Build Series: Documentation on building my personal virtualization and security infrastructure. I will be adding new sections to this ongoing series to expand on the capabilities of what we have already built.
- DFIR & Security Deep Dives: Future writeups on advanced memory forensics, malware analysis, and incident response methodologies.
- Infrastructure as Code (IaC): Exploring how to automate, deploy, and scale your home lab environment using industry-standard tools.
Stay tuned for more updates!
Table of Contents: Building a Cybersecurity Home Lab
Phase 1: Foundations & Planning
Phase 2: The Virtual Environment
- Part 3: Building the Virtual Environment
- Part 3.1: Configuring Networking with pfSense
- Part 3.2: Deploying and Configuring Windows VMs
- Part 3.3: Deploying and Configuring Linux VMs
- Part 3.4: Lab Milestone & Critical Considerations
Phase 3: Core Security Tooling
- Part 4: Installing Core Security Applications
- Part 4.1: Splunk Installation & Configuration
- Part 4.2: Wazuh Installation & Configuration
- Part 4.3: Velociraptor Installation & Configuration
- Part 4.4: Caldera Installation & Configuration