
How two scans, one unauthenticated and one credentialed exposed eleven vulnerabilities across Nginx, ImageMagick, and Python Brotli, and how Ansible automated the path to remediation.
Every organisation running Linux infrastructure faces the same uncomfortable question: do we actually know what vulnerabilities are sitting on our servers right now?
When I was tasked with carrying out a vulnerability assessment at CyberTech Solutions, a company specialising in managing client networks and ensuring their security posture, I set out to answer that question as thoroughly as possible.
My target was an internal Linux web server running Nginx 1.15.5, a version released in 2018 that I deliberately installed from source because it carries multiple known and publicly exploitable weaknesses. The goal was to simulate a realistic vulnerable environment and see exactly what a proper assessment would uncover.
I ran two scans against the target at IP address 192.168.87.128:
- An unauthenticated web application scan; simulating an external attacker with no credentials
- A credentialed SSH scan; giving Nessus full authenticated access to the system from the inside
What I found surprised even me. The difference between those two scan types was not marginal, it was dramatic. And then I automated the remediation using Ansible, resolving five Nginx CVEs in a single playbook execution.
Here is the full breakdown of everything I did, what I found, and what I learned.
My Environment: Target IP: 192.168.87.128 · OS: Kali Linux (VMware VM) · Web server: Nginx 1.15.5 · Scanner: Tenable Nessus Essentials Plus
Section 1: Setting Up the Lab
Installing OpenSSH
The first thing I needed was SSH access on the target machine so that Nessus could authenticate to it for the credentialed scan. I also enabled the root account to allow privileged inspection.
# Update package list and install SSH
sudo apt update
sudo apt install openssh-server -y

# Start and enable SSH service
sudo systemctl start ssh
sudo systemctl enable ssh
sudo systemctl status ssh

# Verify OpenSSH version (I needed this for Nessus credential config)
ssh -V

# Enable root account
sudo passwd root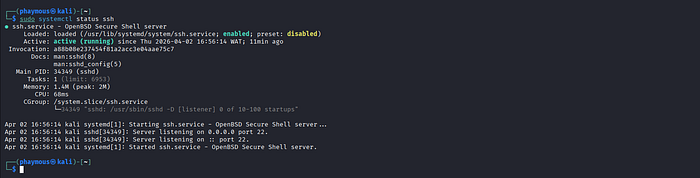

Installing the Vulnerable Nginx Version
I deliberately compiled and installed Nginx 1.15.5 from source. This 2018 release contains multiple known CVEs which was exactly the point. I wanted a realistic vulnerable target, not a hardened one.
# Download the vulnerable version
wget http://nginx.org/download/nginx-1.15.5.tar.gz
# Install build dependencies
sudo apt install build-essential libpcre3 libpcre3-dev \
zlib1g zlib1g-dev libssl-dev -y
# Extract, compile and install
tar -zxvf nginx-1.15.5.tar.gz
cd nginx-1.15.5
./configure && make && sudo make install
# Start Nginx and verify it's running
sudo /usr/local/nginx/sbin/nginx
sudo /usr/local/nginx/sbin/nginx -t
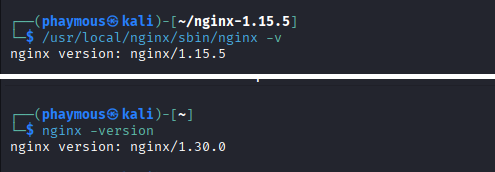
/usr/local/nginx/sbin/nginx -v # I recorded this version BEFORE patching

Installing Nessus
# Install from the downloaded .deb package
sudo dpkg -i Nessus-10.12.0-ubuntu1604_amd64.deb

# Start the Nessus daemon
sudo systemctl start nessusd
sudo systemctl status nessusd

# I accessed the UI at https://localhost:8834
One thing I learned the hard way: After installation, Nessus downloads and compiles thousands of plugins in the background. The New Scan button stays greyed out until this completes which took almost 45 minutes for me. Do not restart the service during this window, Just wait.
Section 2, Task 1: The Credentialed SSH Scan
A credentialed scan gives Nessus direct SSH access to the target, letting it inspect installed packages, configuration files, kernel version, and running services from the inside. Think of it like the difference between a doctor looking at you through a window versus actually examining you in the room.
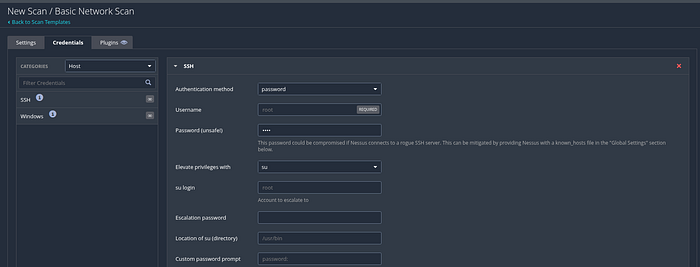
How I Configured the Scan
- Scan Type: Basic Network Scan
- Credential Type: SSH
- Authentication Method: Password
- Username: root
- Password: My root account password
- Elevate Privileges With: su
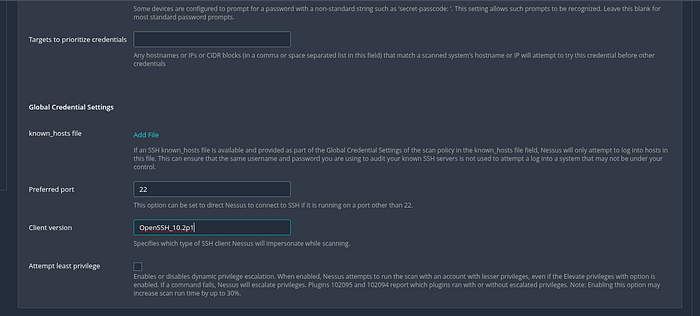
- Custom Password Prompt: password:
- SSH Client Version: Taken from
ssh -Voutput on my machine - Target: 192.168.87.128
How I Confirmed It Actually Worked
Once the scan completed, I clicked into the host IP in the results and searched for the Nessus Scan Information plugin. The plugin output showed:
Credentialed checks : yesThose three words confirmed that Nessus had successfully logged into my system with root-level access and performed a deep, authenticated inspection, not just surface-level network probing.
"Credentialed checks: yes, three words that separate a surface-level scan from a thorough security audit."
My credentialed scan ran for 41 minutes (8:14 PM — 8:55 PM) and returned 116 total findings: 5 high-severity, 6 medium-severity, and 105 informational results.
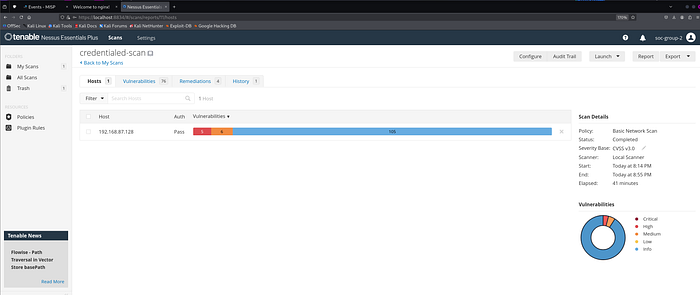
To put that in perspective: my unauthenticated scan found only 29. I will come back to that comparison later, because it is the most important takeaway from this entire project.
Section 3 — Task 2: The Web Application Scan
I configured the unauthenticated web application scan against http://127.0.0.1 using Nessus's Web Application Tests template with default settings and no authentication. This simulates exactly what an external attacker would see — someone who has no credentials and is probing from the outside.
What I Found
- Critical: 0
- High: 2
- Medium: 3
- Low: 0
- Informational: 24
- Total: 29
All five real vulnerabilities were in Nginx. Here is what each one means.
High-Severity Nginx Vulnerabilities
1. 1-Byte Memory Overwrite — Remote Code Execution
Severity: HIGH | CVSS v3.0: 7.7 | CVE: CVE-2021–23017
This was the most dangerous finding on my machine, and honestly the one that caught my attention the most. The vulnerability lives in Nginx's DNS resolver; the internal component responsible for translating domain names into IP addresses.
By sending a specially crafted DNS response, an unauthenticated attacker can overwrite a single byte of the server's memory in an unintended location. This is known as an off-by-one memory error (CWE-193).
At best, this crashes the Nginx worker process. At worst, it allows an attacker to execute arbitrary commands on the server, the equivalent of handing over administrative control to a hostile third party.
- My installed version: 1.15.5
- Fixed version: Nginx 1.20.1 or 1.21.0+
- Exploit available: Yes
2. HTTP/2 Multiple Denial of Service
Severity: HIGH | CVSS v3.0: 7.5 | CVEs: CVE-2019–9511, CVE-2019–9513, CVE-2019–9516
My Nginx version had three separate weaknesses in how it handles HTTP/2. Any one of them allows an unauthenticated attacker to bring the server to its knees without needing a single credential.
CVE-2019–9511 (Data Dribble): An attacker manipulates window size and stream priority to force the server into an exhausting bandwidth management loop.
CVE-2019–9513 (Resource Loop): An attacker creates many simultaneous streams then continuously shuffles their priority, consuming all available processing power.
CVE-2019–9516 (0-Length Headers Leak): An attacker sends HTTP headers with zero-length names and values — an edge case the server simply cannot handle gracefully.
- My installed version: 1.15.5
- Fixed version: Nginx 1.16.1 or 1.17.3+
- Exploit available: Yes
Medium-Severity Nginx Vulnerabilities
3. Memory Exhaustion, CPU Exhaustion and Memory Disclosure
Severity: MEDIUM | CVSS v3.0: 6.1 | CVEs: CVE-2018–16843, CVE-2018–16844, CVE-2018–16845
CVE-2018–16843: An error in ngx_http_v2_module allows excessive memory consumption, causing the server to slow or crash.
CVE-2018–16844: A separate error in the same module allows excessive CPU consumption, preventing the server from handling legitimate requests.
CVE-2018–16845: An error in ngx_http_mp4_module can cause worker crashes or memory disclosure, potentially exposing session tokens or configuration data from memory.
- Fixed version: Nginx 1.14.1 or 1.15.6+
4. SSL Upstream Injection
Severity: MEDIUM | CVSS v3.0: 5.9 | CVE: CVE-2026–1642
This one was published in April 2026 and affects Nginx when configured as a reverse proxy. An attacker positioned between Nginx and the internal backend server can potentially inject plain, unencrypted text into the encrypted response meaning a user receives tampered content with no visible indication that anything is wrong.
- Fixed version: Nginx 1.28.2 or 1.29.5+
5. Information Disclosure via Server Header
Severity: MEDIUM | CVSS v3.0: 5.3 | CVE: CVE-2019–20372
My server's response headers were broadcasting the exact Nginx version (1.15.5) to every single client that connected. On its own this does not break anything but it hands attackers a direct map to every applicable CVE without any further effort on their part.
I like to think of it this way: it is like wearing a name badge that also lists your home address and daily schedule. You have not been robbed yet, but you have made it much easier for someone to plan it.
- Fixed version: Nginx 1.17.7+ | Also add
server_tokens off;to nginx.conf
Section 4 — What the Credentialed Scan Revealed That the Web App Scan Missed
This is where things got really interesting. The credentialed scan uncovered five additional vulnerabilities that were completely invisible to the unauthenticated scan, each one requiring authenticated OS access to detect.
ImageMagick — Eight CVEs Across Three Patch Groups
I had ImageMagick installed on the target in multiple outdated versions. I had not even considered it as a target during the web app scan. The credentialed scan found it immediately.
Group A: Symlink Bypass, Heap Over-read, PNG Heap Overflow
Severity: HIGH | CVSS v3.0: 7.8 | CVEs: CVE-2026–28689, CVE-2026–28692, CVE-2026–30883
CVE-2026–28689 (Symlink Swap — TOCTOU Race Condition): ImageMagick checks whether a file path is authorised before opening it. An attacker can swap the legitimate file for a symbolic link in the window between the authorisation check and the file open bypassing the policy entirely.
CVE-2026–28692 (Heap Over-read in MAT Decoder): Incorrect operator precedence causes the decoder to read memory beyond its allocated buffer, potentially exposing credentials or session tokens sitting in adjacent memory.
CVE-2026–30883 (Heap Overflow in PNG Encoder): When encoding an image with an extremely large embedded profile, the encoder writes beyond its buffer. Heap overflows can be exploited to enable remote code execution.
- Fixed version: ImageMagick 6.9.13–41 or 7.1.2–16+
Group B: MVG Heap Overflow, XML Stack Exhaustion, JP2 OOB Write
Severity: HIGH | CVSS v3.0: 7.1 | CVEs: CVE-2026–33901, CVE-2026–33908, CVE-2026–40310
CVE-2026–33901 (Heap Buffer Overflow in MVG Decoder): A malicious MVG file triggers a write beyond the allocated heap buffer, enabling arbitrary code execution.
CVE-2026–33908 (Unbounded Recursive XML Parsing): The XML parser imposes no limit on recursion depth. A deeply nested XML image file exhausts all stack memory and crashes the process.
CVE-2026–40310 (Out-of-Bounds Write in JP2 Encoder): An invalid sampling index causes data to be written outside its intended memory bounds, corrupting adjacent memory.
- Fixed version: ImageMagick 6.9.13–44 or 7.1.2–19+
Group C: X11 OOB Write and Stack Buffer Overrun
Severity: MEDIUM | CVSS v3.0: 5.5 | CVEs: CVE-2026–33535, CVE-2026–33536
CVE-2026–33535: A zero byte is written to a memory location beyond the end of an allocated buffer in the X11 display path causing reliable Denial of Service.
CVE-2026–33536: An incorrect return value causes a pointer to advance past the end of a stack buffer, corrupting the stack frame with potential for redirected execution.
- Fixed version: ImageMagick 6.9.13–43 or 7.1.2–18+
Python Brotli — A Hidden Denial of Service
Severity: HIGH | CVSS v3.0: 7.5 | CVE: CVE-2025–6176
I had Python Brotli 1.1.0 installed, a data compression library used in web servers. Its decompression logic fails to handle specially crafted malicious data, entering a resource-exhaustion loop that crashes the process. No authentication required whatsoever.
- Fixed version: Brotli 1.2.0+
- My fix command:
pip install --upgrade brotli
SSL Certificate Cannot Be Trusted
Severity: MEDIUM | CVSS v3.0: 6.5 | No CVE assigned
My SSL certificate was self-signed and not issued by a recognised Certificate Authority. This makes Man-in-the-Middle attacks significantly easier and causes every modern browser to show a security warning to users, not a great look for any production system.
- Fix: Obtain and install a valid certificate from Let's Encrypt or DigiCert
Section 5 — The Number That Shocked Me: 29 vs 116
I want to spend a moment on this comparison because I think it is the most important thing I can share from this entire project.
My unauthenticated scan found:
- Total findings: 29
- High: 2 | Medium: 3 | Informational: 24
- ImageMagick vulnerabilities: Not detected
- Python Brotli vulnerability: Not detected
- Full software inventory: Not available
My credentialed scan found:
- Total findings: 116
- High: 5 | Medium: 6 | Informational: 105
- ImageMagick vulnerabilities: Yes — 8 CVEs
- Python Brotli vulnerability: Yes — CVE-2025–6176
- Full software inventory: Complete
Eight ImageMagick CVEs including heap overflows capable of enabling remote code execution were completely invisible to my unauthenticated scan. If I had stopped at the web application scan and called it done, I would have had a dangerously incomplete picture of my system's security. Running only unauthenticated scans is not thorough security assessment. It is a false sense of security with a Nessus logo on it.
Section 6 — Task 3: Setting Up Automated Email Reporting
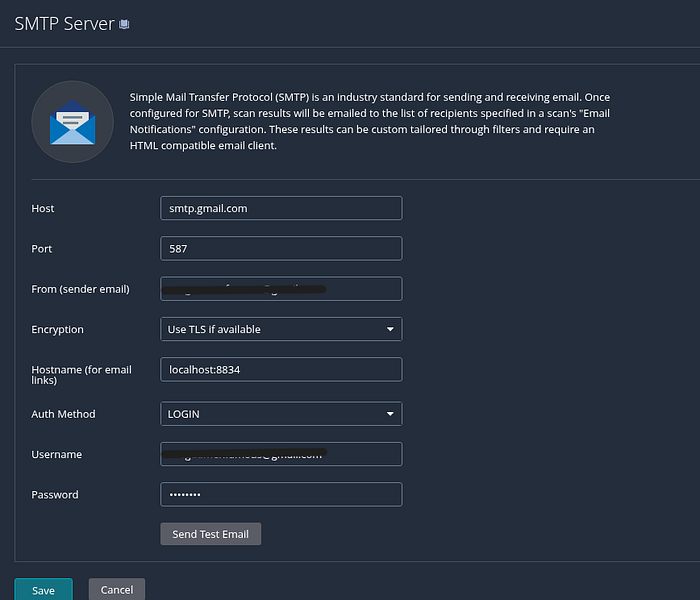
I configured Nessus to automatically email scan results using Gmail's SMTP server. This means every time a scan completes, the report goes straight to my inbox without any manual steps.
My SMTP Configuration
- Host: smtp.gmail.com
- Port: 587
- Encryption: TLS (STARTTLS)
- Auth Method: LOGIN
- Username: My Gmail address
- Password: Gmail App Password (16-character)
Generating the Gmail App Password
- Log into your Google Account at myaccount.google.com
- Go to Security and confirm 2-Step Verification is enabled
- Search for App Passwords and click it
- Enter "Nessus" as the app name and click Generate
- Copy the 16-character password into the Nessus SMTP password field
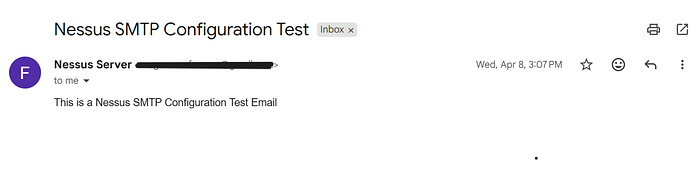
I used an App Password rather than my actual Gmail password because it is scoped specifically to Nessus. If it were ever compromised, I can revoke it without touching my main account or affecting anything else. Least privilege applied to email authentication.
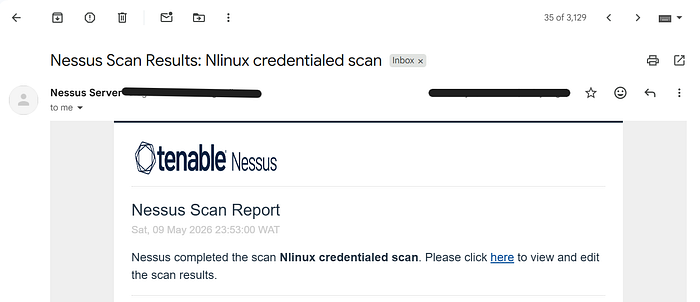
I confirmed everything worked by clicking Send Test Email in Settings → SMTP Server. The test email hit my inbox within seconds. I then added my email address to the Notifications tab inside each scan's configuration so reports are automatically delivered after every run.
Section 7 — Task 4: Patching with Ansible
Once I had documented all my findings, it was time to fix them. For Nginx specifically, I chose to use Ansible rather than running manual upgrade commands. Here is why that matters: the same playbook I wrote can be run against ten servers, a hundred servers, or a thousand servers with a single command. That is the difference between patch management and patch chaos.
Step 1 — Install Ansible:
sudo apt update && sudo apt install ansible -y
ansible --version   # I confirmed version 13.4 was installed
Step 2 — Create the Playbook:
nano update_nginx.ymlI wrote the following playbook to handle the entire Nginx patch cycle:
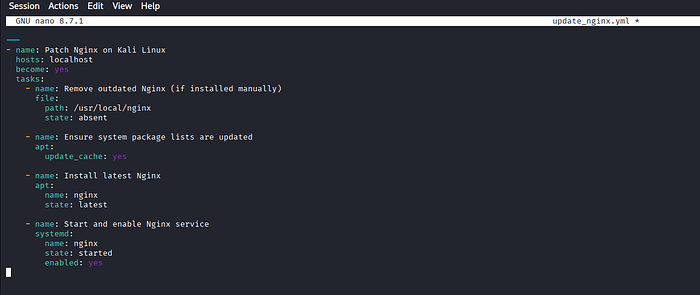
---
- name: Patch Nginx on Kali Linux
  hosts: localhost
  become: yes
  tasks:

    - name: Remove outdated Nginx (manually installed)
      file:
        path: /usr/local/nginx
        state: absent

    - name: Ensure system package lists are updated
      apt:
        update_cache: yes

    - name: Install latest Nginx
      apt:
        name: nginx
        state: latest

    - name: Start and enable Nginx service
      systemd:
        name: nginx
        state: started
        enabled: yes
The playbook does four things in sequence: removes the old manually-compiled Nginx I installed from source, refreshes the package cache, installs the latest stable Nginx from the official repository, then starts and enables the service so it survives reboots.
Step 3 — Run the Playbook:
# Kali password required when prompted for BECOME password
ansible-playbook update_nginx.yml --ask-become-pass
Step 4 — Verify the Result:
nginx -versionThe result: Nginx went from version 1.15.5 — a 2018 release carrying five CVEs — to the latest stable version in a single automated operation. CVE-2021–23017, CVE-2019–9511, CVE-2019–9513, CVE-2019–9516, CVE-2026–1642, CVE-2018–16843/44/45, and CVE-2019–20372 were all resolved by this one upgrade.
Fixing ImageMagick and Python Brotli
# Upgrade ImageMagick to 7.1.2-19 or later (resolves all 8 CVEs)
sudo apt update && sudo apt install imagemagick -y

# Upgrade Python Brotli to 1.2.0 or later
pip install --upgrade brotli

# Install a trusted SSL certificate via Let's Encrypt
sudo apt install certbot -y
sudo certbot --nginx
Section 8 — My Remediation Priority List
Immediate, Within 24–48 Hours:
- Nginx 1.15.5 → Upgrade to 1.30.0+ One upgrade resolves CVE-2021–23017, CVE-2019–9511/9513/9516, CVE-2026–1642, CVE-2018–16843/44/45, and CVE-2019–20372
- ImageMagick → Upgrade to 7.1.2–19+ Resolves all three vulnerability groups (8 CVEs total)
- Python Brotli → Upgrade to 1.2.0+ Resolves CVE-2025–6176
- SSL Certificate → Install valid CA-signed certificate Eliminates MitM risk immediately
Short-Term — Within 1 Week:
- Run a post-remediation Nessus scan to confirm all vulnerabilities are resolved
- Enforce rate limiting and connection limits per client in my Nginx config
- Apply secure headers and best-practice Nginx hardening configuration
- Review all other installed packages for outdated versions
Long-Term:
- Schedule weekly credentialed Nessus scans as a baseline
- Implement continuous monitoring for new CVEs affecting my stack
- Deploy a Web Application Firewall in front of Nginx
- Enable automatic security updates for all critical packages
- Maintain a hardened configuration baseline for web servers
Section 9 — Security Posture Assessment
Overall Risk Level: Medium-High
No critical-severity vulnerabilities were found on my target but that is not the same as saying the system was safe. The combination of remotely exploitable high-severity issues in an internet-facing web server, image processing library, and decompression library is a serious problem. Every single Nginx vulnerability I found requires no authentication to exploit. An attacker on the network needs nothing but time and motivation.
What the system had going for it:
- No critical-severity vulnerabilities detected
- SSH accessible and manageable, supporting future credentialed assessments
- Credentialed scanning confirmed full privileged access (
Credentialed checks: yes) - Ansible automation successfully deployed for repeatable, scalable patch management
What needed fixing:
- Nginx 1.15.5 seven years out of date with multiple exploitable CVEs
- ImageMagick in multiple outdated versions with eight publicly known CVEs
- An untrusted self-signed SSL certificate facilitating Man-in-the-Middle attacks
- Python Brotli 1.1.0 with a network-exploitable Denial of Service vulnerability.
"A vulnerability scanner is only as useful as the access you give it. Credentialed scanning is not a nice-to-have — it is the difference between seeing the surface and seeing the truth."
I started this project thinking I knew what I would find. I had installed a vulnerable Nginx version on purpose, so I expected the web application scan to surface those issues and that would be that.
What I did not expect was what the credentialed scan uncovered. Eight ImageMagick CVEs. A Python Brotli DoS vulnerability. An untrusted SSL certificate. None of it visible from the outside. All of it sitting quietly on a system I thought I understood.
The single most important lesson I am taking away from this project is that unauthenticated scanning gives you a partial picture and a false confidence. Credentialed scanning gives you the truth. And the Ansible playbook taught me that remediation, done right, does not have to be a manual slog through server after server — it can be one command that scales to your entire infrastructure.
If you are running Linux servers in any environment and you are not running regular credentialed scans, you do not know what is on your systems. And not knowing is its own kind of vulnerability.