
In cybersecurity, teams are often overwhelmed by a constant flood of alerts, leading to "alert fatigue" and the risk of missing a critical threat. The key to staying ahead isn't just about collecting more data; it's about building a smart, automated system to triage and act on that data efficiently.
This blog post will walk you through a powerful automation project designed to do exactly that. We'll show you how to transform a reactive, manual security process into a proactive, automated, and auditable system by linking three essential tools: Wazuh for threat detection, n8n for workflow automation, and Jira for incident management.
You'll learn how we set up a robust, automated workflow that ensures every security alert is automatically logged, tracked, and addressed, freeing up your security team to focus on what truly matters: staying one step ahead of the threats.
DELIVERABLES
- Wazuh-docker installation
- Integrate N8N
- Integrate Jira
- Integrate automatic email alerts from Jira
PHASE 1: WAZUH INSTALLATION
Requirements
Linux machine with at least 6GB RAM
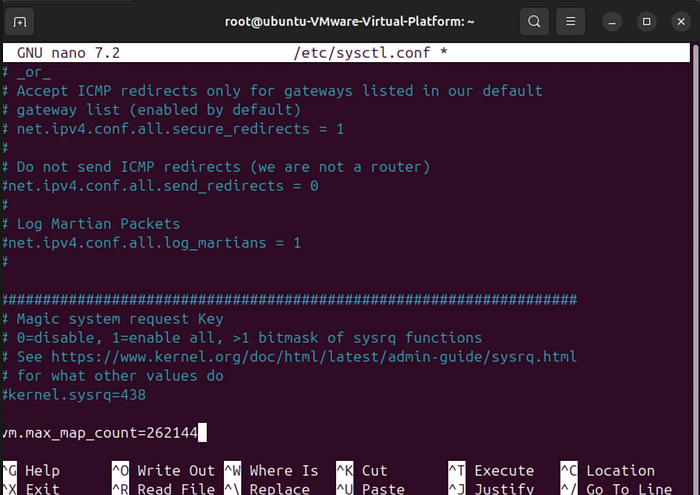
Increase max_map_count on host Why? Wazuh-Indexer often create a large number of memory-mapped files or areas to efficiently manage their data and indices. If the vm.max_map_count value is too low, these applications can encounter errors, most commonly an OutOfMemoryError or java.lang.RuntimeException: can not create write map for field... even if there's plenty of physical RAM available.
- Increase
max_map_counton your Docker host: open terminal and enter the command below.
sysctl -w vm.max_map_count=262144
- Update the
vm.max_map_countsetting in/etc/sysctl.confto set this value permanently. To verify after rebooting, run "sysctl vm.max_map_count".
Add the set count at the end of the line and save. Apply changes by using command : sysctl -p
N.b all commands must be run using root privileges.
Install Docker
Confirm the linux machine is running on a kernel higher than 3.0
Update and Install Prerequisites
Run the following commands to update the package index and install packages needed for accessing HTTPS repositories:
sudo apt-get update sudo apt-get install ca-certificates curl gnupg
Add Docker's Official GPG Key
Docker provides a security key to verify the integrity of the packages you download.
sudo install -m 0755 -d /etc/apt/keyrings curl -fsSL <https://download.docker.com/linux/ubuntu/gpg> | sudo gpg --dearmor -o /etc/apt/keyrings/docker.gpg sudo chmod a+r /etc/apt/keyrings/docker.gpg
Set up the Repository
Add the Docker repository to your system's apt sources. The $(. /etc/os-release && echo "$VERSION_CODENAME") part automatically detects your Ubuntu version codename (e.g., jammy, focal).
echo \\ "deb [arch="$(dpkg --print-architecture)" signed-by=/etc/apt/keyrings/docker.gpg] <https://download.docker.com/linux/ubuntu> \\ "$(. /etc/os-release && echo "$VERSION_CODENAME")" stable" | \\ sudo tee /etc/apt/sources.list.d/docker.list > /dev/null
Install Docker Engine
Now that the official repository is configured, update the package index again and run the installation command:
sudo apt-get update sudo apt-get install docker-ce docker-ce-cli containerd.io docker-buildx-plugin docker-compose-plugin
This final step should successfully install all the packages you were trying to install initially.
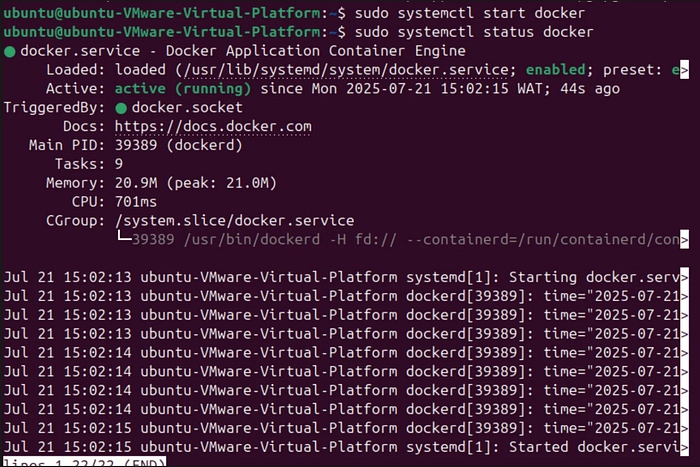
Start the docker service with:
sudo systemctl start docker
Confirm status with:
sudo systemctl status docker
N.b: Docker compose comes pre-installed with docker. Docker Compose is a tool for defining and running multi-container Docker applications. With Compose, you use a YAML file to configure your application's services. Then, with a single command, you create and start all the services from your configuration. For a single-node Wazuh deployment, your docker-compose.yml file would define services for the Wazuh manager, Filebeat (to send logs to Elasticsearch/OpenSearch), and the Wazuh dashboard (and likely Elasticsearch/OpenSearch as well, as Wazuh depends on it for data storage and analysis).
Wazuh Docker Deployment
For an entreprise system, the multi-node deployment is best but seeing as this is for a home lab we'd be doing the single node deployment.
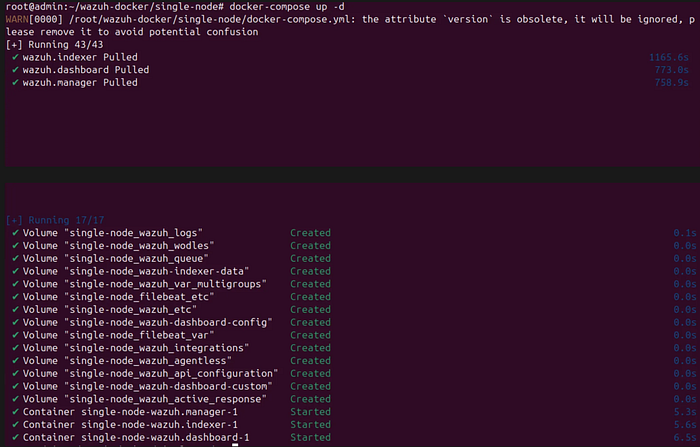
Single-node Deployment
Clone the Wazuh repository to your system: git clone <https://github.com/wazuh/wazuh-docker.git> -b v4.12.0
Then enter into the single-node directory to execute all the commands described below within this directory.

Execute the following command to get the desired certificates:
docker-compose -f generate-indexer-certs.yml run --rm generator

Start the Wazuh single-node deployment using docker-compose:
- Foreground:
docker-compose up
Foreground (docker-compose up): Starts Docker Compose services with their logs displayed directly in your terminal, blocking further commands until stopped manually with Ctrl+C. Useful for debugging and initial setup to observe real-time output.
- Background:
docker-compose up -dBackground (docker-compose up -d): Starts Docker Compose services in a detached mode, freeing up your terminal immediately after startup. Ideal for production environments where services need to run continuously without occupying the console.
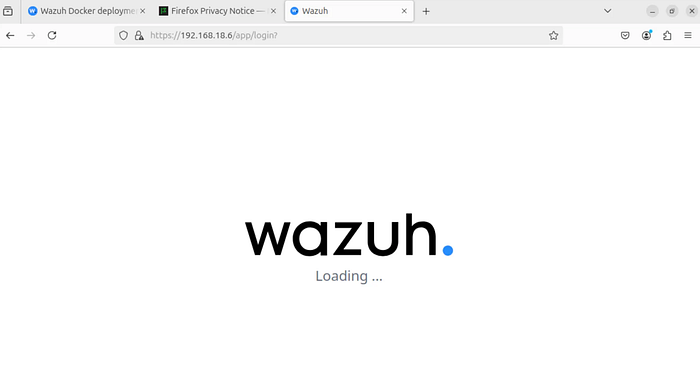
Confirm that your wazuh dashboard is reachable via your local IP using a browser.
Change your IP address allocation to a static IP
`sudo nano /etc/netplan/50-cloud-init.yaml`There are usually 3 options that might be available in the recent versions of ubuntu:
00-installer-config.yaml01-netcfg.yaml.50-cloud-init.yaml file
For the last option, edit configuration to look like this:
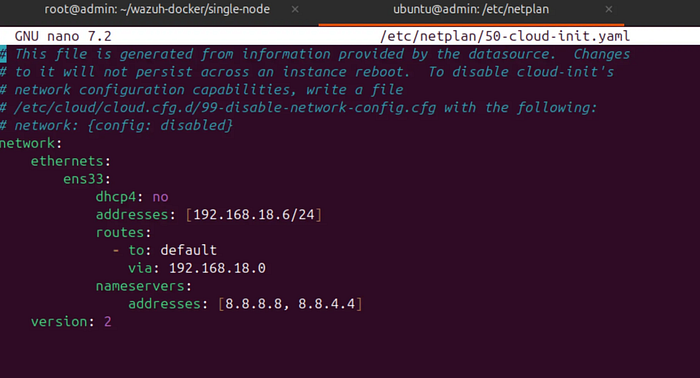
use sudo netplan apply to apply changes and ip a to confirm new static IP. Try accessing the dashboard again.
PHASE 2: WAZUH INTEGRATION WITH n8n
Setup n8n.io cloud account: https://n8n.io/
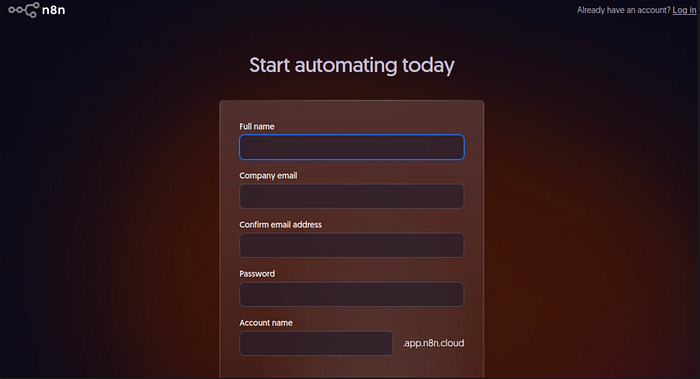
Once login is successful, you're presented with a dashboard.

- Click "Create Workflow": In the top right corner of your n8n dashboard, you'll see a red button labeled "Create Workflow". Click this button.
- Start from Scratch: After clicking "Create Workflow," you'll be presented with options. Choose "Start from scratch". This will open a new, blank workflow canvas. ***
- Add the Webhook Node:
- Once on the blank canvas, click the "+" button (usually in the center or bottom right) to add a new node.
- In the node search bar, type "Webhook" and select the "Webhook" node from the results.

Configure the Webhook Node:
- The Webhook node will appear on your canvas. Click on it to open its configuration panel.
- Ensure the "HTTP Method" is set to "POST". This is crucial because Wazuh will send data using a POST request.
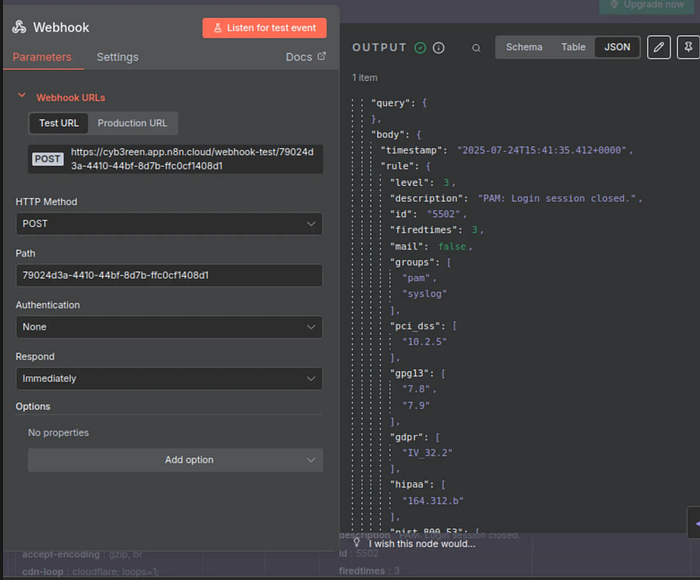
- In the "Webhook URLs" section, you'll see two tabs: "Test URL" and "Production URL".
- For now, we'll use the "Test URL". Copy the URL displayed under the "Test URL" tab. It starts with
https://cyb3reen.app.n8n.cloud/webhook-test/.... - Action: Click the copy icon next to the "Test URL" or manually select and copy it.
- Copy this URL. This is the URL you'll configure in Wazuh to send alerts to.
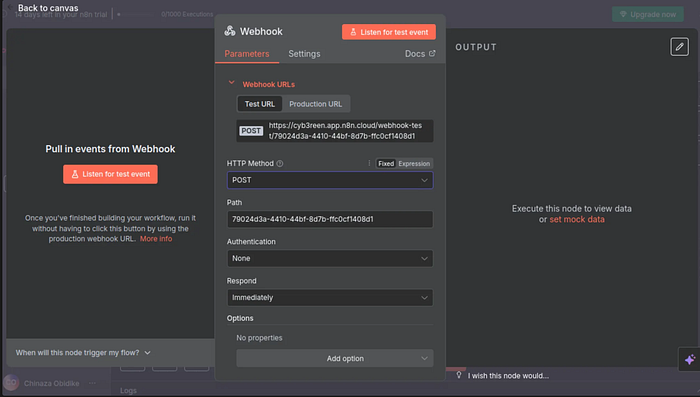
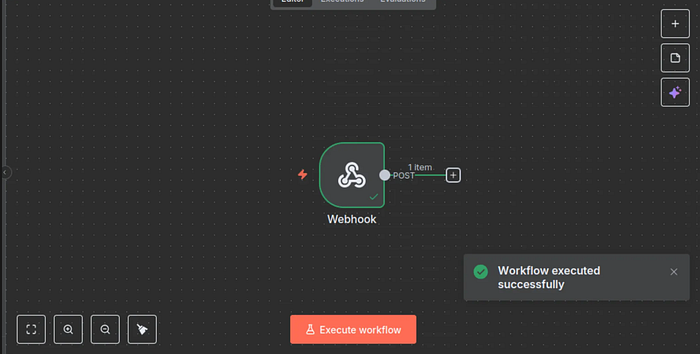
- Action: Click the red "Listen for test event" button. This will put the webhook node in a waiting state, ready to receive an incoming request. You'll see a small "listening" indicator, and the "OUTPUT" panel on the right will be empty, waiting for data.
Send a Test Request to the Copied URL
Now that your n8n webhook is listening, open a new terminal window or use a tool like Postman.
- Create a JSON file: JSON
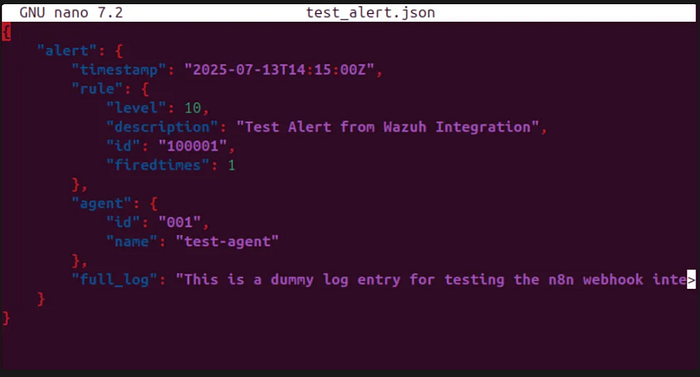
- Open a text editor (like
nanoorvion your Linux machine). - Save the following content as
test_alert.json(or any name you prefer) in your current directory: { "alert": { "timestamp": "2025-07-13T14:15:00Z", "rule": { "level": 10, "description": "Test Alert from Wazuh Integration", "id": "100001", "firedtimes": 1 }, "agent": { "id": "001", "name": "test-agent" }, "full_log": "This is a dummy log entry for testing the n8n webhook integration." } }- Run
curlwith the file: Bash curl -X POST -H "Content-Type: application/json" -d @test_alert.json <https://cyb3reen.app.n8n.cloud/webhook-test/79024d3a-4410-44bf-8d7b-ffc0cf1408d1>

- Explanation:
d @test_alert.json: Tellscurlto read the data from the specified file.- Go back to your n8n workflow. If the
curlcommand was successful, you should see the JSON data you sent appear in the "OUTPUT" panel of the Webhook node. This confirms your n8n webhook is correctly receiving data.
Once you've confirmed the test event, you're ready to move on to configuring Wazuh to send its actual alerts to this URL!
Step-by-Step: Configure Dockerized Wazuh to Send Alerts to n8n
You'll need to interact with your Wazuh Manager Docker container.
Part 1: Create the Custom Python Script Inside the Container
This script will reside within the Wazuh Manager container.
Step 1.1: Identify Your Wazuh Manager Container ID or Name
First, find the running Wazuh Manager container.
docker ps
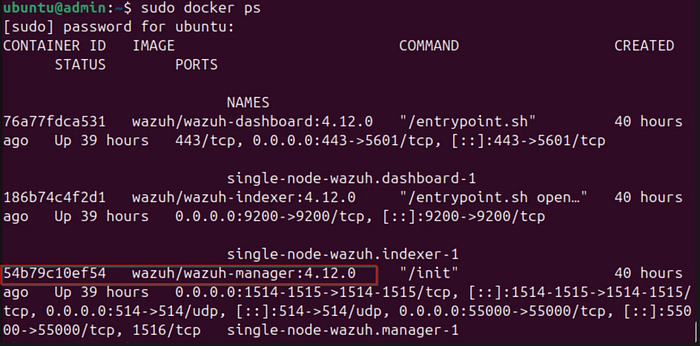
Look for a container image named something like wazuh/wazuh-manager or wazuh/wazuh with a tag like 4.x.x. Note down its CONTAINER ID or NAMES (e.g., wazuh-manager).
Step 1.2: Access the Wazuh Manager Container's Shell
Execute a shell inside the running container. Replace <WAZUH_MANAGER_CONTAINER_ID_OR_NAME> with the actual ID or name you found.
docker exec -it <WAZUH_MANAGER_CONTAINER_ID_OR_NAME> /bin/bash
You should now be inside the container's command line, usually indicated by a change in the prompt (e.g., root@<container_id>:/#).
Step 1.3: Navigate to the Integrations Directory Inside the Container
cd /var/ossec/integrations/
Step 1.5: Paste the Python Code
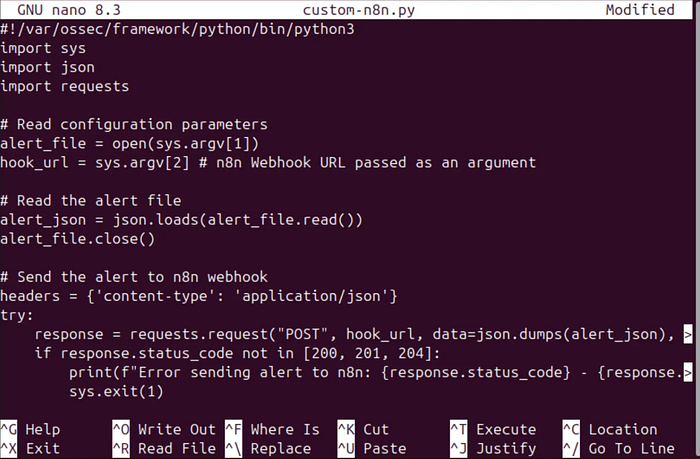
Paste the following Python code into the empty file opened by nano.
`#!/var/ossec/framework/python/bin/python3 import sys import json import requests
#Read configuration parameters
alert_file = open(sys.argv[1]) hook_url = sys.argv[2] # n8n Webhook URL passed as an argument
#Read the alert file
alert_json = json.loads(alert_file.read()) alert_file.close()
#Send the alert to n8n webhook
headers = {'content-type': 'application/json'} try: response = requests.request("POST", hook_url, data=json.dumps(alert_json), headers=headers) if response.status_code not in [200, 201, 204]: print(f"Error sending alert to n8n: {response.status_code} — {response.text}") sys.exit(1) sys.exit(0) except requests.exceptions.RequestException as e: print(f"Error connecting to n8n webhook: {e}") sys.exit(1)`
Step 1.6: Save and Exit the File
- In
nano, pressCtrl + O(to Write Out/Save). - Press
Enterto confirm the filename. - Press
Ctrl + X(to Exit).
Step 1.7: Set Permissions for the Script (Inside Container)
These permissions ensure the Wazuh user can execute the script.
chmod 750 /var/ossec/integrations/custom-n8n.py chown root:wazuh /var/ossec/integrations/custom-n8n.py
Part 2: Configure Wazuh's ossec.conf Inside the Container
This tells Wazuh to use your new script.
Step 2.1: Open ossec.conf for Editing (Inside Container)
nano /var/ossec/etc/ossec.conf
Step 2.2: Add the <integration> Block
Scroll through the ossec.conf file until you find the main <ossec_config> section. Add the <integration> block inside this section.
Important: Replace YOUR_N8N_WEBHOOK_URL with the actual "Test URL" you copied from your n8n Webhook node (e.g., https://cyb3reen.app.n8n.cloud/webhook-test/79024d3a-4410-44bf-8d7b-ffc0cf1408d1).
`<integration> <name>custom-n8n.py</name> <hook_url>YOUR_N8N_WEBHOOK_URL</hook_url> <alert_format>json</alert_format> <level>7</level> </integration>
</ossec_config>`

Part 3: Restart the Wazuh Manager Container
Changes inside ossec.conf require a restart of the Wazuh Manager service or container to take effect. Since you're using Docker, restarting the container is the most straightforward method.
Step 3.1: Exit the Container's Shell
exit
You should now be back on your host machine's command line.
Step 3.2: Restart the Wazuh Manager Container
Replace <WAZUH_MANAGER_CONTAINER_ID_OR_NAME> with the actual ID or name.
docker restart <WAZUH_MANAGER_CONTAINER_ID_OR_NAME>
Generate a Wazuh Alert and Check n8n
After restarting the container, Wazuh should now be configured to send alerts to n8n.
- Go to your n8n workflow in your browser.
- Ensure the Webhook node is actively "Listening for test event". If it's not, click the red "Listen for test event" button.
- Generate a Test Alert on a Wazuh Agent:
- Access one of your Wazuh Agents (e.g., SSH into a machine with a Wazuh agent installed). Deploy an agent if none has been previously setup (I did this)
- Run a command that should trigger a Wazuh alert with a level of 7 or higher. A simple way to do this for a test is to write a message to the system log that Wazuh is configured to monitor:Bash
logger -t "WazuhTest" "This is a test alert for n8n integration. Critical incident detected!"
This often triggers rule 100002 (User-defined debug messages) or other higher-level rules if your local_rules.xml is configured to elevate its severity. If it doesn't immediately send, try commands that typically generate high-level alerts like multiple failed SSH login attempts or modifying sensitive files.
Check n8n Webhook Output:
- Go back to your n8n workflow in the browser.
Understanding and Resolving the "Invalid URL: No scheme supplied" Error in Wazuh-n8n Integration
When the test alert was executed, i encountered an error.

Introduction to the Problem
When integrating Wazuh with external tools like n8n using custom Python scripts, a common challenge involves correctly passing configuration parameters from Wazuh's ossec.conf to the Python script. In this scenario, the Wazuh Manager's integratord process was attempting to execute the custom Python script (custom-n8n.py) designed to forward security alerts to an n8n webhook. However, the ossec.log displayed a persistent error: "Invalid URL '': No scheme supplied. Perhaps you meant https://?".
This error, originating from the requests Python library within the script, indicated that the hook_url variable, which should contain the n8n webhook URL (e.g., https://cyb3reen.app.n8n.cloud/...), was an empty string when the script tried to use it. This was particularly perplexing because the hook_url was visibly correctly configured in the ossec.conf file.
Upon deeper investigation by modifying the Python script to log its received arguments, it was discovered that Wazuh's integratord was passing arguments to the script in an unexpected order. The hook_url was not sys.argv[2] (the second command-line argument as initially assumed), but rather sys.argv[3] (the third command-line argument), with an empty string '' occupying the sys.argv[2] position. This meant the Python script was attempting to use the empty string as its target URL, leading to the "Invalid URL" error.
Resolution Path: Step-by-Step
The resolution involved precisely identifying and correcting the index from which the Python script read the webhook URL.
Phase 1: Initial Setup & Problem Identification
- Wazuh Manager Docker Container Setup: The Wazuh Manager was running as a Docker container (ID:
54b79c10ef54). - n8n Webhook Configuration: An n8n workflow was set up with a Webhook node configured to accept POST requests and listening for test events via a specific URL (e.g.,
https://cyb3reen.app.n8n.cloud/webhook-test/79024d3a-4410-44bf-8d7b-ffc0cf1408d1). - Custom Python Script Creation: A Python script (
custom-n8n.py) was created inside the Wazuh Manager container at/var/ossec/integrations/. This script was designed to read the alert file path fromsys.argv[1]and thehook_urlfromsys.argv[2]. - Wazuh
ossec.confIntegration: Theossec.conffile inside the Wazuh Manager container was modified to include an<integration>block, pointing tocustom-n8n.py, specifying thehook_url,alert_formatasjson, and alevel(e.g.,7or3). - Initial Testing and Observation:
- Direct
curltests to n8n initially failed due to incorrect HTTP method (GET instead of POST) or malformed JSON payloads, but later confirmed network connectivity between the Wazuh container and n8n. - After full Wazuh configuration, generating alerts on an agent (e.g., Kali Linux) did not produce output in n8n.
- Wazuh Manager logs (
/var/ossec/logs/ossec.log) showed the recurring "Invalid URL '': No scheme supplied" error, indicating thehook_urlwas empty during script execution.
Phase 2: Debugging the Argument Passing
- Modify Python Script for Argument Logging: To definitively ascertain what arguments Wazuh was passing, the
custom-n8n.pyscript was temporarily modified to log all receivedsys.argvarguments to a debug file (/tmp/n8n_integrator_debug.log).Python
`# Inside custom-n8n.py, after imports: import os debug_log_path = "/tmp/n8n_integrator_debug.log" with open(debug_log_path, "a") as f: f.write(f"[{os.stat(file).st_mtime}] Script started. Arguments received: {sys.argv}\n")
#After hook_url = sys.argv[2]
with open(debug_log_path, "a") as f: f.write(f"Hook URL parsed: '{hook_url}'\n")`
2. Restart Wazuh Manager: After modifying the script, the Docker container running the Wazuh Manager was restarted.
3. Trigger Alert and Review Debug Log: A test alert was generated on a Wazuh agent, and the /tmp/n8n_integrator_debug.log file was inspected. The log revealed: Arguments received: ['integrations/custom-n8n.py', '/tmp/...alert', '', '<https://cyb3reen.app.n8n.cloud/>...', '', '10', '3', '>/dev/null 2>&1']. This conclusively showed that the actual hook_url was at sys.argv[3], not sys.argv[2].
Phase 3: Implementing the Solution
- Adjust Python Script's Argument Index:
- Access the Wazuh Manager Container's Shell.
- Edit
/var/ossec/integrations/custom-n8n.py. - Change the line
hook_url = sys.argv[2]tohook_url = sys.argv[3]. - (Optional but recommended) Remove the temporary debug logging lines from the Python script to clean it up.
- Save and exit the script.
2. Exit Container and Restart Wazuh Manager Container: This critical step ensures the changes to the Python script are loaded and executed by the integratord.
Phase 4: Final Verification
- Ensure n8n Webhook is Listening: Confirm the n8n Webhook node is in "Listen for test event" mode.
- Generate a Test Alert: Trigger a new alert on your Wazuh agent.
- Check n8n Webhook "OUTPUT" Panel: The JSON data from the Wazuh alert should now successfully appear in n8n's output panel, confirming the end-to-end integration is working correctly.

PHASE 3: INTEGRATION WITH JIRA
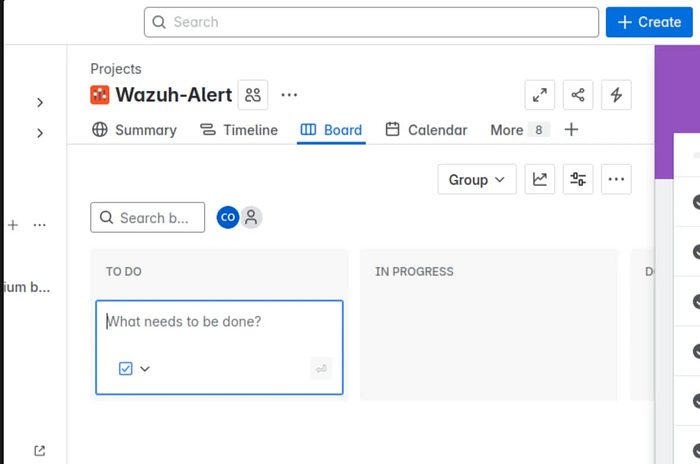
Create Jira account: https://jira.atlassian.com/. Select a template and get started.
Step 2: Generate a Jira API Token (Crucial for n8n Authentication)
For security reasons, it's best practice to use an API token instead of your actual password for programmatic access (like n8n).
- Log in to your Atlassian account: Go to https://id.atlassian.com/manage-profile/security/api-tokens.
- Make sure you are logged in with the same Atlassian ID you use for Jira.
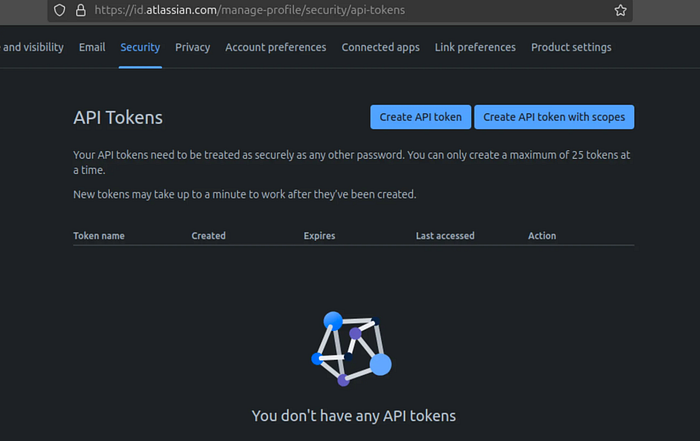
- Create API Token:
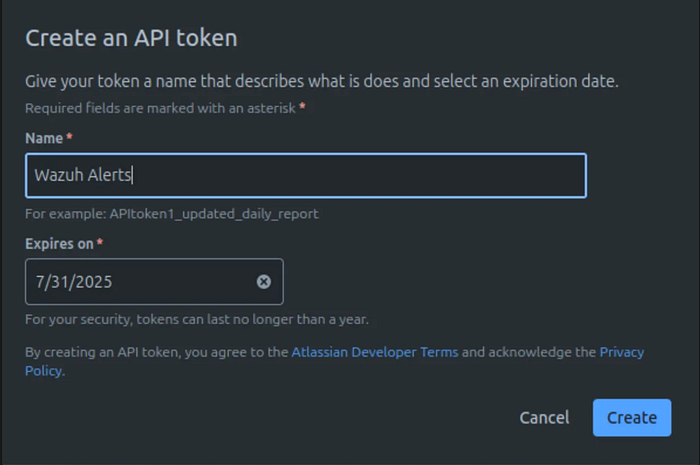
- Click "Create API token."
- Give it a descriptive "Label" (e.g., "n8n Integration," "Wazuh Alerts").
- Click "Create."
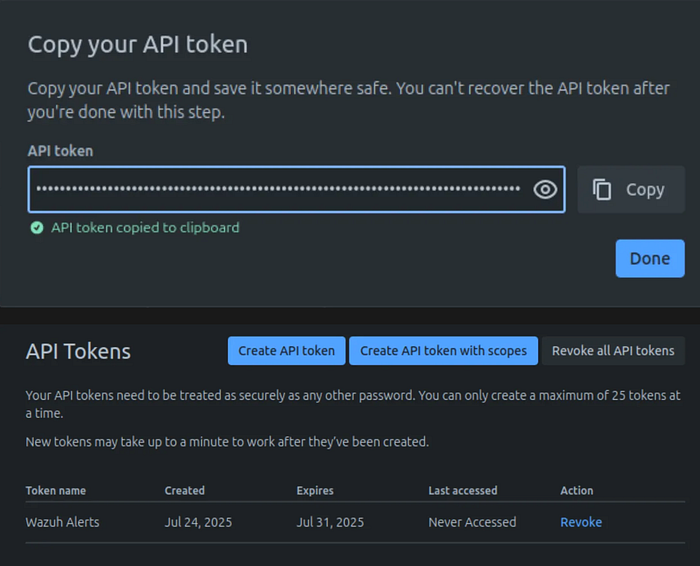
- Copy the API Token: A token will be displayed. Copy this token immediately and save it in a secure place (like a password manager). You will not be able to see it again after you close the dialog. This token will serve as your "password" for n8n.
Step 3: Get Your Jira Instance URL and Project Key
You'll need these two pieces of information for n8n.
Jira Instance URL: This is the base URL you use to access your Jira.
- For Jira Cloud, it's typically
https://your-site-name.atlassian.net. (e.g., if your site name ismycompany, the URL ishttps://mycompany.atlassian.net).
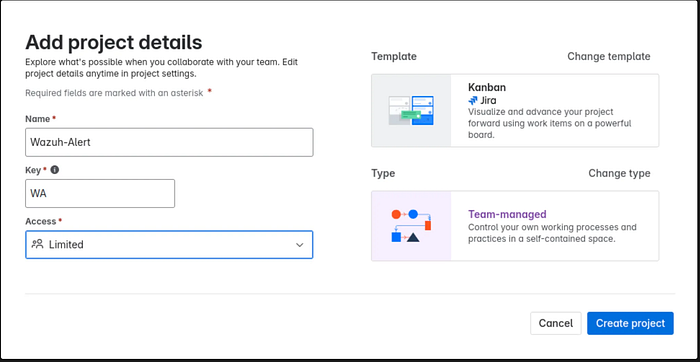
Jira Project Key: This is the short, unique identifier for your project.
- You can find this by navigating to your project in Jira. It's usually visible in the URL (e.g.,
https://your-site-name.atlassian.net/jira/software/projects/YOURKEY/board). It's also often displayed next to the project name in the Jira interface. (e.g., "Wazuh Alerts (WA)").
Step 4: Extend Your n8n Workflow with the Jira Node
Now, back to n8n to add the Jira integration.
- Open your n8n Workflow: Go back to your existing "My workflow" in n8n where you have the Webhook node that receives Wazuh alerts.
- Add a Jira Node:
- Click the plus button (
+) next to your Webhook node (or anywhere on the canvas and connect it later). - In the node search box, type "Jira" and select the "Jira" node.
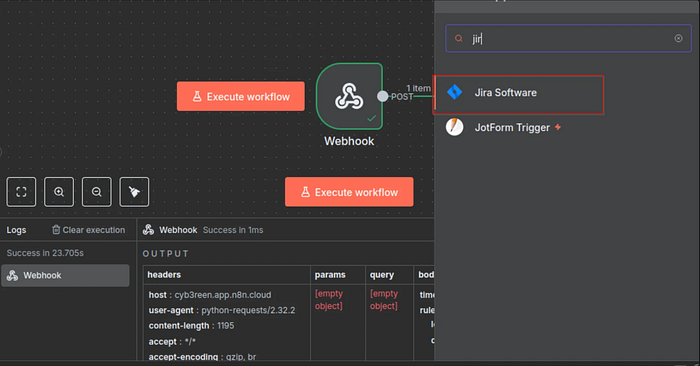
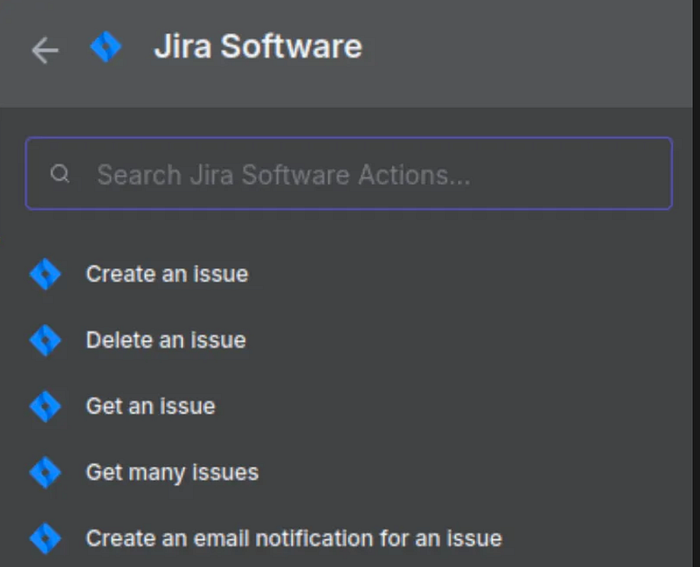
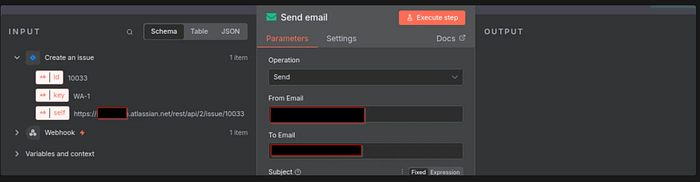
- Select the related to responses: Create an issue
Configure the Jira Node Credentials and Issue Details:
- Credentials: In the Jira node's parameters, click "New Credential." Select "Basic Auth." Enter your Jira Instance URL (e.g.,
https://yourcompany.atlassian.net), your Jira email, and the API Token you generated. Save the credential.

- Project: Select the Project Key of your Jira project (e.g., "Wazuh Alerts").
- Issue Type: Choose
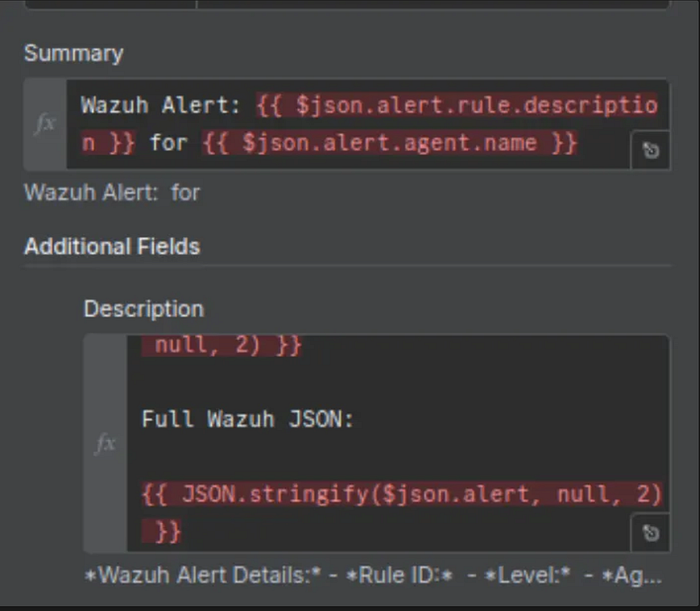
TaskorBugorIncident. - Summary: Click the "fx" button and add an expression like:
Wazuh Alert: {{ $json.alert.rule.description }} for {{ $json.alert.agent.name }} - Description: Click the "fx" button and add a more detailed expression (as provided in previous instructions) using Wazuh alert data (e.g.,
{{ $json.alert.full_log }}).

Perform a Test Run:
- Go back to your Webhook node in n8n.
- Click the "Listen for test event" button (the red one on the left of the Webhook node). It should turn grey and say "Waiting for webhook call…".
- On your Wazuh Agent machine, generate a test alert:Bash
logger -t "WazuhToJiraTest" "Simulated security event for Jira ticket creation."
Observe n8n:
- The Webhook node's "OUTPUT" panel should populate with the Wazuh alert JSON.
- The workflow will then pass this data to the Jira node.
- The Jira node will execute, and if successful, its "OUTPUT" panel will show the details of the created Jira issue, including its ID and URL.

- Verify in Jira: Log in to your Jira account and check the selected project for the new issue.
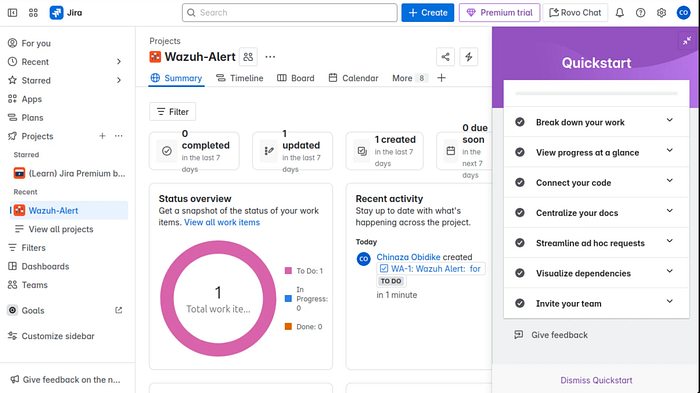
By following these steps, your n8n workflow will have the Webhook as its trigger, and the Jira node will process the incoming alerts.
PHASE 4: INTEGRATION WITH SMTP
Goal: Webhook (Receives Wazuh Alert) --> Jira (Create Issue) --> Email (SMTP) (Send Notification)
Step 1: Add the Email (SMTP) Node
- In your n8n workflow editor, click the plus button (
+) on the right side of your Jira node. - Search for "Email" and select the "Email (SMTP)" node.
Step 2: Find mail provider's SMTP Settings
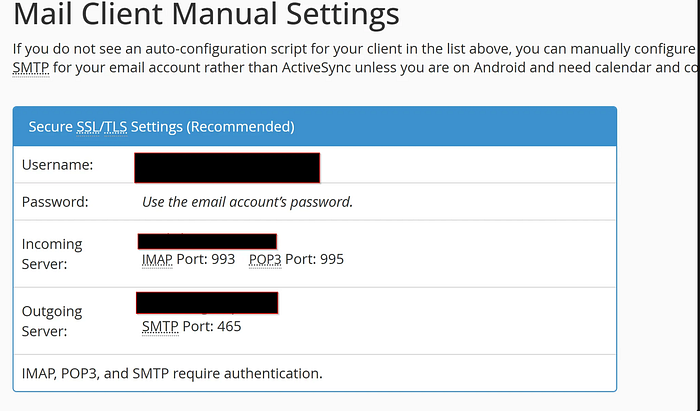
Here's how you'd typically approach it for a non-Gmail webmail provider:
- Find Your Webmail Provider's SMTP Settings:
- Go to your webmail provider's help documentation or search online for "[Your Webmail Provider Name] SMTP settings".
- Common details to look for:
- SMTP Host/Server: (e.g.,
smtp.outlook.comfor Outlook/Hotmail,smtp.mail.yahoo.comfor Yahoo) - SMTP Port: (usually
587with TLS/STARTTLS, or465with SSL/TLS) - Encryption/Security: (e.g., STARTTLS, SSL/TLS)
- Username: Your full webmail email address (e.g.,
yourname@outlook.com,yourname@yahoo.com) - Password: Your regular webmail password, or sometimes an App Password if the provider offers or requires it (similar to Gmail's system, especially if you have 2FA enabled on that webmail account).
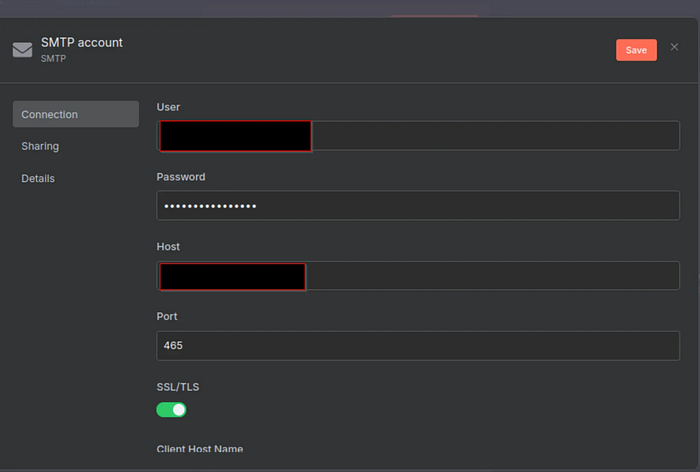
Step 3: Configure n8n's Email (SMTP) Node:
- In your n8n workflow, drag and drop the "Email (SMTP)" node after your Jira node.
- Click "New Credential."
- Host: Enter the SMTP host you found (e.g.,
smtp.outlook.com). - Port: Enter the SMTP port (e.g.,
587). - Secure: Select the appropriate option (e.g.,
STARTTLS). - Authentication: Usually
Login. - User: Your full webmail email address.
- Password: Your webmail password or the App Password you generated.
- Click "Save" or "Create."
Step 4: Configure the Email Content
This step is where you define what the email will look like and who it goes to, using dynamic data from both the incoming Wazuh alert and the newly created Jira issue.
Goal: To send an informative email containing details about the Wazuh alert and the corresponding Jira ticket.
Tools: The n8n "Email (SMTP)" node, specifically its "Parameters" section.
Concepts:
- Static Text: Plain text that will appear exactly as typed in the email.
- Expressions (
{{ }}): Dynamic placeholders that n8n replaces with actual data during workflow execution. These are critical for pulling data from previous nodes. - HTML Body: Using HTML allows for richer formatting (bolding, lists, links, code blocks) in the email, making it more readable than plain text.
$jsonvs.$node["Node Name"].json:$json: Refers to the output of the immediately preceding node. In the Email node's context, if the Jira node is directly before it,$jsonwill refer to the Jira node's output.$node["Node Name"].json: This is a more robust way to reference the output of any specific node in your workflow by its name (e.g., "Webhook", "Jira"). This is particularly useful when you need data from a node that isn't directly preceding the current one (e.g., pulling original Wazuh data from the Webhook node while you're in the Email node, which is after the Jira node).
Part 1: Defining Recipients and Sender
- To: Enter the recipient's email address (e.g.,
your_security_team@example.com). You can also use an expression if the recipient is dynamic (e.g.,{{ $json.alert.agent.ip }}if you map IPs to contacts, though this is less common for "To" field). - Purpose: This field specifies who will receive the email.
- Action: In the "To" field of the Email (SMTP) node, you will directly type the email address of the individual or distribution list that should be notified.
- Example:
security-team@yourcompany.com - Dynamic Option (Advanced): While less common for direct recipients, you could click the "fx" button and use an expression if, for instance, you have a lookup table that maps agent IDs or rule IDs to specific team members' emails. For simple notifications, a static email address is perfectly fine.
- From (Optional but Recommended): Enter the sender's email address.
- Purpose: This field sets the "From" address that recipients will see.
- Action: It's good practice to explicitly define this. Enter the email address that is configured in your SMTP credentials (e.g.,
wazuh-alerts@yourcompany.com). If left blank, the email server might default to the username used for authentication.
Part 2: Crafting the Email Subject
- Subject: This should be informative. You can combine static text with data from the Jira issue.
- Purpose: The subject line is the first thing recipients see, so it needs to clearly indicate what the email is about.
- Action: You'll use the n8n fixed editor for this.
- Go to your Email (SMTP) node in n8n.
- Locate the "Subject" field.
- Do NOT click the "fx" button next to the Subject field.
- Directly type your desired subject line.
Example Fixed Subject Line:Wazuh Security Alert Notification
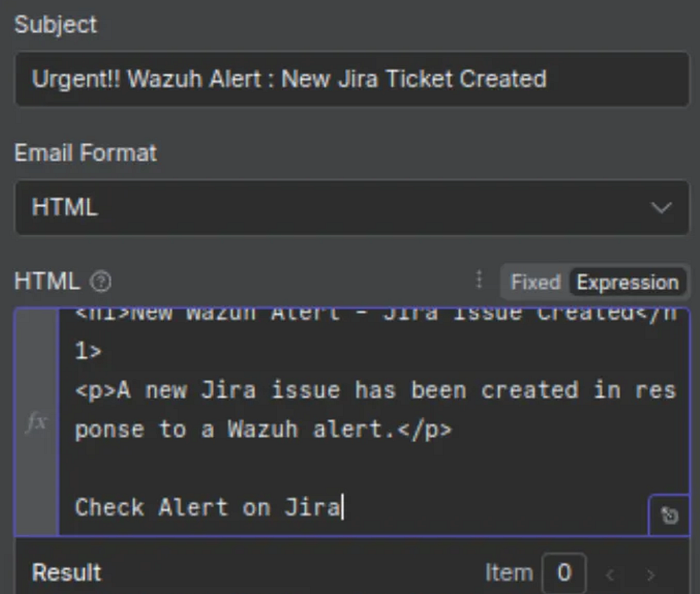
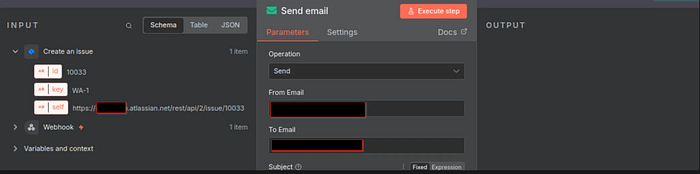
Create the email body using desired content, click Execute this node, and wait till you see an output.
Note: The output from a previous node is automatically used as the input for a new node.

Go to recipient's email and confirm email was sent to recipient.

Looking back at the canvas , we have a complete automated workflow:
Wazuh———n8n———-Jira————-Email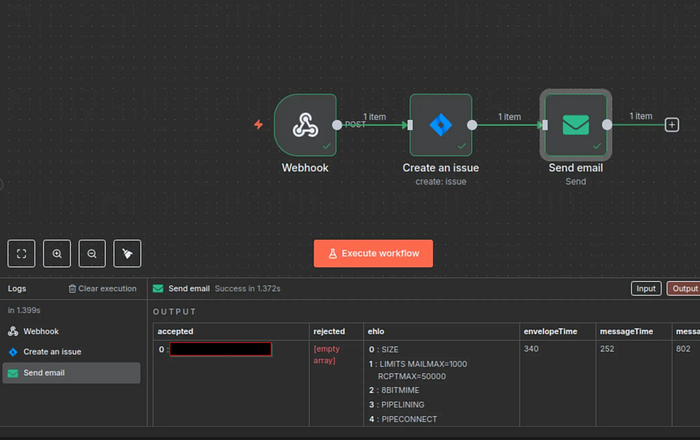
Setup is successful
Conclusion
In conclusion, I have successfully harnessed the power of automation to bridge the gap between your security monitoring and incident response. By integrating Wazuh alerts with Jira and email notifications via n8n, I have established a robust, streamlined workflow that brings significant advantages to my security operations.
This integration isn't just about connecting tools; it's about transforming raw security data into actionable intelligence. I have automated the creation of detailed Jira tickets, ensuring every critical Wazuh alert is tracked, assigned, and managed efficiently. Furthermore, by configuring automated email notifications, I have also guaranteed that the right team members are immediately informed, enabling swift response and reducing potential dwell time for threats.
No more manual ticket creation or sifting through logs to notify stakeholders. This solution centralizes incident management, improves communication, and frees up security analysts to focus on what truly matters: investigating and mitigating threats.
Final Note to Security Engineers
As you continue to mature your security operations, remember the flexibility of n8n. You can extend this foundation with conditional logic, integrate with other communication platforms like Slack or Microsoft Teams, or even automate initial response actions within your environment.
We've built a powerful, efficient, and intelligent incident management system. This is a significant step forward in bolstering your organization's security posture!
Link to Wazuh webpage: https://wazuh.com/?utm_source=ambassadors&utm_medium=referral&utm_campaign=ambassadors+program
Link to Ambassadors program landing page: https://wazuh.com/ambassadors-program/?utm_source=ambassadors&utm_medium=referral&utm_campaign=ambassadors+program