A 3rd-year cybersecurity student's honest, step-by-step guide to building a real Security Operations Center with Wazuh, Active Directory, Kali Linux, and AWS EC2.
"Theory without practice is just trivia."
That belief pushed me to stop reading about SOC environments and start building one. This post is the result — every command, every error, every fix, documented exactly as it happened.
Why I Built This
In my 6th semester of a cybersecurity specialization, I hit a wall every security student eventually hits: I understood the concepts — SIEM, MITRE ATT&CK, log correlation, lateral movement — but I had never seen them fire in a live environment. I had never watched an alert generate in real time from an attack I had just executed myself.
So instead of studying for another exam, I built a complete home SOC lab.
This is not a polished tutorial. It's a field report — including the failures.
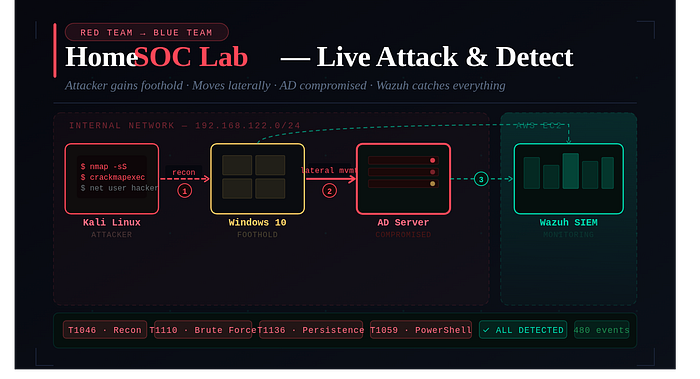
Lab Architecture
The lab simulates a small enterprise network: a domain controller, an endpoint, an attacker machine, and a centralized cloud SIEM watching everything.
Running the SIEM on AWS rather than locally is intentional — in real enterprises, the monitoring plane is isolated from the machines it monitors.
Machine Role Platform IP Fedora Linux Host / Hypervisor (QEMU/KVM) Physical Real Wi-Fi IP Windows Server 2019 Active Directory DC + DNS QEMU/KVM VM 192.168.122.10 Windows 10 Victim endpoint (Wazuh agent) QEMU/KVM VM 192.168.122.20 Kali Linux Red Team / Attacker QEMU/KVM VM 192.168.122.x (DHCP) AWS EC2 (Ubuntu) Wazuh SIEM Cloud Public IP (hidden)
Phase 1 — Setting Up the Fedora Host & Virtual Machines
Installing Virtualization on Fedora
I used Fedora Linux as the physical host running all VMs through QEMU/KVM, with Virtual Machine Manager (virt-manager) as the GUI frontend.
# Install the full virtualization group
sudo dnf install @virtualization
# Enable and start the libvirtd daemon
sudo systemctl enable --now libvirtd
# Add your user to the libvirt group
sudo usermod -aG libvirt $USER
# Reboot to apply group changes
reboot
⚠️ Important: After adding yourself to the
libvirtgroup, you must reboot — logging out and back in is not enough.
VM Specifications
Machine RAM CPU Cores Storage Windows Server 2019 4 GB 2 50 GB Windows 10 4 GB 2 40 GB Kali Linux 3 GB 2 30 GB
KVM Networking — An Important Discovery
I initially planned to use VMware-style Host-Only networking, but Fedora's KVM uses a default NAT network (virbr0) on the 192.168.122.0/24 subnet. Trying to force a custom subnet caused hours of confusion.
The fix: Stop fighting the defaults. All VMs went onto the same virbr0 network and everything worked.
Phase 2 — Active Directory & Domain Controller Setup
Assigning a Static IP to Windows Server
The server will become the domain's DNS authority, so it cannot have a changing DHCP address.
Field Value IP Address 192.168.122.10 Subnet Mask 255.255.255.0 Default Gateway 192.168.122.1 (KVM virtual gateway) Preferred DNS 192.168.122.10 (points to itself)
Setting DNS to its own IP isn't a mistake — once Active Directory is installed, the server becomes the DNS server. This is standard enterprise configuration.
Promoting the Server to Domain Controller
After installing the Active Directory Domain Services role via Server Manager, I clicked Promote this server to a domain controller and configured:
Forest:           yog.local
Domain:           yog.local
NetBIOS Name:     YOG
Functional Level: Windows Server 2016
DNS Server:       ✓ Enabled
Global Catalog:   ✓ Enabled
❌ Problem: Domain Login Failed After Promotion
After the server rebooted, logging in with Administrator failed with an invalid credentials error.
Root cause: Domain promotion changes the identity model. The Administrator account becomes domain-scoped: YOG\Administrator. Using the domain-prefixed format resolved it instantly.
This is a fundamental behavioral difference between domain and workgroup machines — and a classic gotcha.
Phase 3 — Joining Windows 10 to the Domain
DNS Configuration on Windows 10
Before joining, Windows 10 needs to know where the domain lives.
Field Value Reason IP Address 192.168.122.20 Static for stable identity Subnet Mask 255.255.255.0 Same subnet as server Default Gateway 192.168.122.1 KVM gateway for internet Preferred DNS 192.168.122.10 Domain controller for AD resolution Alternate DNS 8.8.8.8 Google DNS fallback
To join the domain: Win + R → sysdm.cpl → Computer Name → Change → Domain → enter yog.local.
❌ Problem: No Internet After Domain Join
Browser showed DNS_PROBE_FINISHED_BAD_CONFIG. Internet had completely stopped.
Root cause: The domain controller DNS only resolves internal domain names — it has no internet forwarding configured. Adding 8.8.8.8 as an alternate DNS server fixed internet access while keeping domain resolution intact.
Verifying Connectivity from Kali
# Initial result — 100% packet loss (Windows Firewall blocks ICMP by default)
ping 192.168.122.10
# After enabling "File and Printer Sharing (Echo Request - ICMPv4-In)" in Windows Firewall:
ping 192.168.122.10
# 64 bytes from 192.168.122.10: icmp_seq=1 ttl=128 time=1.2ms ✓
ping 192.168.122.20
# 64 bytes from 192.168.122.20: icmp_seq=1 ttl=128 time=1.5ms ✓
Phase 4 — Deploying Wazuh SIEM on AWS EC2
EC2 Instance Setup
I launched an Ubuntu 22.04 EC2 instance. Sizing matters — Wazuh's indexer is memory-intensive. Minimum: 4 GB RAM, 50 GB storage. An undersized instance causes the dashboard to hang continuously.
Installing Wazuh
# SSH into the EC2 instance
ssh -i key.pem ubuntu@<public-ip>
# Update system packages
sudo apt update && sudo apt upgrade -y
# Download Wazuh all-in-one installer
curl -sO https://packages.wazuh.com/4.7/wazuh-install.sh
chmod +x wazuh-install.sh
# -a installs Manager + Dashboard + Indexer together
sudo ./wazuh-install.sh -a
# Installation takes 15–30 minutes
# CRITICAL: Save the credentials printed at the end!
❌ Problem: Lost the Dashboard Password
The credentials are only displayed once during installation. I didn't save them.
Fix — reset via CLI:
sudo /usr/share/wazuh-indexer/plugins/opensearch-security/tools/wazuh-passwords-tool.sh \
  -u admin -p 'NewSecurePassword123!'
# Verify manager version
sudo /var/ossec/bin/wazuh-control info
# WAZUH_VERSION="v4.7.5"
Phase 5 — Installing & Connecting the Wazuh Agent (The Hardest Part)
This phase took the longest to get right.
The Version Mismatch Problem
This was the real culprit. Agent registration kept failing with:
ERROR: Agent version must be lower or equal to manager versionI had tried agent versions 4.14.5 and 4.13.0 — both failed. The manager was on v4.7.5. Any agent newer than the manager is rejected.
Fix: Install the exact matching version — 4.7.5. After that, the agent connected within seconds.
✅ Rule: Always run
sudo /var/ossec/bin/wazuh-control infoon the server first. Match that version exactly before downloading any agent installer.
Registering the Agent
# Verify network path is open
Test-NetConnection <wazuh-server-ip> -Port 1514
# TcpTestSucceeded: True
# Stop the agent service
Stop-Service Wazuh
# Remove stale key file (if re-registering)
Remove-Item "C:\Program Files (x86)\ossec-agent\client.keys"
# Register the agent
& "C:\Program Files (x86)\ossec-agent\agent-auth.exe" -m <wazuh-server-ip> -A Win10-Client
# INFO: Valid key received ✓
# Start the agent
Start-Service Wazuh
Once connected, the dashboard showed Active and Windows event logs started streaming in.
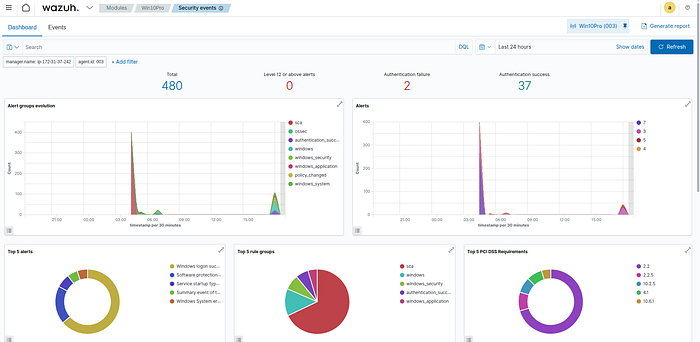
What the Wazuh Dashboard Actually Shows
After the agent connected and logs started flowing, the Security Events dashboard came alive. Here's what the data revealed from the first 24 hours:
Metric Value What It Means Total Events 480 Agent is actively shipping Windows event logs Level 12+ Critical Alerts 0 No critical threats before attack simulation (clean baseline) Authentication Failures 2 Windows Event ID 4625 — baseline failures from domain join testing Successful Authentications 37 Windows Event ID 4624 — domain auth, services, user sessions
The most telling detail: a sharp spike in alerts visible around 05:00–06:00 UTC. That spike corresponds exactly to when I started running attack simulations. That's precisely the kind of anomalous pattern a SOC analyst would investigate first.
Phase 6 — Attack Simulation from Kali Linux
⚠️ All of the following was performed inside an isolated virtual lab environment. These techniques are documented for educational purposes only. Never execute these against systems you don't own or have explicit authorization to test.
Attack 01 — Network Reconnaissance
MITRE ATT&CK: T1046 (Network Service Discovery), T1018 (Remote System Discovery)
# Host discovery — find all live machines on the subnet
nmap -sn 192.168.122.0/24
# Found: 192.168.122.1, 192.168.122.10 (DC), 192.168.122.20 (victim)
# Full port scan on the victim endpoint
nmap -sS 192.168.122.20
# Service version detection
nmap -sV -sC 192.168.122.20
Wazuh detection: Connection attempts and port sweep patterns appear in Security Events. Search for the victim IP to find scan-related entries.
Attack 02 — SMB Enumeration
MITRE ATT&CK: T1135 (Network Share Discovery), T1021.002 (SMB/Windows Admin Shares) Windows Event IDs: 4624, 4625
# List SMB shares anonymously
smbclient -L //192.168.122.20 -N
# SMB enumeration across the full subnet
crackmapexec smb 192.168.122.0/24
# SMB  192.168.122.10  445  DC01   [*] Windows Server 2019
# SMB  192.168.122.20  445  WIN10  [*] Windows 10.0 Build 19041
# Attempt SMB access with null session
crackmapexec smb 192.168.122.20 -u '' -p ''
Attack 03 — Brute Force / Failed Login Simulation
MITRE ATT&CK: T1110 (Brute Force), T1110.001 (Password Guessing) Windows Event ID: 4625 (Failed Logon)
# Simulate failed logins
crackmapexec smb 192.168.122.20 -u fakeuser -p fakepass
# SMB WIN10 [-] WIN10\fakeuser:fakepass STATUS_LOGON_FAILURE
# Multiple attempts to trigger brute-force detection pattern
crackmapexec smb 192.168.122.20 -u administrator -p wrongpass1
crackmapexec smb 192.168.122.20 -u administrator -p wrongpass2
crackmapexec smb 192.168.122.20 -u administrator -p wrongpass3
Wazuh detection: Navigate to Security Events, search 4625. Multiple rapid failures from the same source IP trigger brute-force detection rules with MITRE T1110 mapping.
Attack 04 — Unauthorized User Creation (Persistence)
MITRE ATT&CK: T1136.001 (Local Account Creation), T1078 (Valid Accounts) Windows Event IDs: 4720 (Account Created), 4732 (Added to Group)
# Create a backdoor account
net user hacker Password123! /add
# Escalate privileges
net localgroup administrators hacker /add
# Verify
net user hacker
Wazuh detection: Search 4720 for account creation and 4732 for group modification. Wazuh automatically tags these with MITRE T1136 (Persistence) and T1078 (Valid Accounts).
Attack 05 — PowerShell Abuse Detection
MITRE ATT&CK: T1059.001 (PowerShell), T1105 (Ingress Tool Transfer) Windows Event ID: 4104 (Script Block Logging)
# Enable Script Block Logging first
reg add "HKLM\Software\Policies\Microsoft\Windows\PowerShell\ScriptBlockLogging" `
  /v EnableScriptBlockLogging /t REG_DWORD /d 1
# Simulate suspicious behavior:
# Download from external URL (simulates payload retrieval)
Invoke-WebRequest http://example.com
# Enumerate running processes
Get-Process
# Disable Windows Defender (evasion)
Set-MpPreference -DisableRealtimeMonitoring $true
# Obfuscated encoded command (common attacker technique)
powershell -enc SQBFAFgA
Wazuh detection: Search powershell in Security Events. Every command — including obfuscated ones — is captured as Event ID 4104 and forwarded to Wazuh.
Detection Summary
Attack Tool Event ID Wazuh Alert MITRE Network host discovery nmap — Connection attempts T1046 SMB share enumeration crackmapexec, smbclient 4624 / 4625 SMB Authentication T1135, T1021.002 Brute force simulation crackmapexec 4625 ✅ DETECTED T1110 Backdoor account creation net user 4720 ✅ DETECTED T1136.001 Privilege escalation net localgroup 4732 ✅ DETECTED T1078 PowerShell abuse PowerShell 4104 ✅ DETECTED T1059.001 Defender disable attempt Set-MpPreference 5001 ✅ DETECTED T1562.001
Complete Troubleshooting Log
Every problem I hit, why it happened, and exactly how I fixed it:
Problem Root Cause Fix VM ping blocked (100% loss) Windows Firewall blocks ICMP by default Enable "File and Printer Sharing (Echo Request — ICMPv4-In)" inbound rule Domain login failed after promotion Account scope changed to YOG\Administrator Use domain-prefixed format at login No internet after domain join Domain controller DNS doesn't forward internet queries Add 8.8.8.8 as alternate DNS on Windows 10 Agent "Never Connected" Ports 1514/1515 closed on AWS Security Group Add inbound rules for TCP 1514, TCP 1515 in EC2 Security Group Agent version mismatch error Agent 4.13/4.14 newer than manager 4.7.5 Install exact matching agent version: 4.7.5 KVM network confusion Expected VMware-style networking; KVM uses virbr0 Work with the default KVM NAT network Lost Wazuh dashboard password Credentials only shown once during install Reset via wazuh-passwords-tool.sh CLI on EC2 agent-auth.exe PowerShell syntax error Quoted paths with parameters need & call operator Use & "path\agent-auth.exe" -m <ip> -A <name>
What This Project Really Taught Me
Domain authentication is fundamentally different. Promoting a server to a domain controller changes the entire identity model. This isn't a configuration detail — it's why Active Directory attacks are so effective in the real world.
DNS is everything in Active Directory. If DNS breaks, authentication breaks, internet access breaks, and domain joins fail silently. DNS forwarding is not optional knowledge — it's foundational.
Version compatibility is non-negotiable. SIEM tools enforce strict version matching. A mismatch of even one minor version silently breaks agent communication. Verify before you download anything.
Isolate your monitoring plane. Running Wazuh on AWS — separate from the monitored VMs — isn't just convenient. It reflects real architectural principle: a SIEM should never sit on the same network as the machines it watches.
Attacks are just logs. Every command I ran from Kali left traces in Windows Event Logs. Seeing my own commands appear as Wazuh alerts made abstract SOC concepts visceral in a way no textbook ever did.
Documentation is a security skill. Logging every error and its fix isn't just good practice — it's how SOC analysts build runbooks. Patience and systematic documentation matter as much as technical knowledge.
What's Next for This Lab
This is a foundation, not a finished product. Planned extensions:
- Sysmon integration for richer process telemetry
- Mimikatz credential dumping detection
- Custom Sigma rules in Wazuh
- SOAR playbooks for automated response
- Pass-the-Hash simulation
- BloodHound Active Directory enumeration
- OpenVAS vulnerability scanning
- Threat hunting dashboards
- Honeypot deployment (fake SMB share)
- Email alerting from Wazuh
For Students Thinking About Building This
Most cybersecurity content teaches you what a brute force attack is. This project taught me what a brute force attack looks like in a log. That gap — between knowing and seeing — is exactly what employers are measuring when they interview for SOC analyst roles.
A few things I'd tell myself before starting:
- Don't rush the networking phase. Get every VM talking before you move forward.
- Save your Wazuh credentials the moment they're generated.
- Always check your manager version before downloading any agent.
- Take screenshots of every working state — you'll need them for the report.
- The troubleshooting is the curriculum, not a distraction from it.
The moment the Wazuh dashboard showed Active and 480 Windows security events started streaming in — that made every hour of troubleshooting worth it.
Build the lab. Accept that things will break. Every error message is part of the education.
Written during Semester 6, B.Tech Cybersecurity Specialization. Lab environment: Fedora + QEMU/KVM + AWS EC2 · Wazuh v4.7.5 · Active Directory yog.local · Kali Linux · Windows Server 2019 · Windows 10
Tags: Cybersecurity, SOC, SIEM, Wazuh, Active Directory, Kali Linux, AWS, Ethical Hacking, Student Projects, Blue Team