
Background
Context
BloodHound was originally created by SpecterOps to assist with the analysis of Active Directory environments. The platform was later expanded to include Entra ID (Azure) resources.
The BloodHound OpenGraph further extends Attack Path Management analysis beyond Active Directory and Entra environments. OG provides a JSON schema to represent custom data and the ability to ingest it into BloodHound.
With some creativity, you can graph just about anything.
With this new capability, there is a need for new robust tooling to support custom data. DataHound was created to help bridge this gap, allowing developers and researchers to create OpenGraph extensions at scale. This post is the first in a series and will focus on the design of the collection components.


DataHound
Overview
The core of the project is a data processing engine that performs two operations:
- collect: Process and transform Pandas DataFrames into OpenGraph JSON.
- connect: Process two existing graph files and generate a JSON of hybrid edges between the two original data sets.
The collector modules in the project are proof-of-concept examples of how the engine can be used. There are currently 12 PoC collector modules with data sources ranging from HTTP to LDAP and PE parsing.
The flat file formats (CSV, JSON, XML, YAML) are the most versatile and powerful, as the original data source could be anything.
https://github.com/toneillcodes/DataHound/tree/main?tab=readme-ov-file#supported-collectors
Technology Stack
DataHound is built on Python and Pandas.
This stack was selected to leverage Python's robust data analysis capabilities and its support for high-performance processing of large datasets.
As a bonus, the extensive library ecosystem enables the development of a wide range of collector modules.
Collect Operation
BloodHound ETL Process
BloodHound uses an ETL pattern for data processing:
- Extract the data
- Transform the data
- Load the data
The utility that performs the Extract and Transform steps is typically referred to as the 'collector,' and the Load step of the E-T-L series is completed by uploading (ingesting) the data to BloodHound.
Examples of classic, well-known collectors are SharpHound, AzureHound, and bloodhound.py. These solutions extract data from AD and/or Azure environments and format it into a set of BloodHound-compliant JSON files.
Configuration File
Data sources are unique and cannot all be handled the same way. Even if sources use the same technology (i.e., HTTP), they may require different request parameters or different parsing logic.
- We don't want to reinvent the wheel every time we integrate another data source.
- We don't want to duplicate code across projects and repositories, creating sprawling technical debt.
How can we abstract the extraction and transformation logic and make it reusable?
The processing engine is driven by a 'collection definition' config file that has collection and transformation properties for each data element to be processed.
Each data element has a block of properties that specify details such as the item type (node or edge), data source information, transformation rules, and the data elements to be output in the OG graph.
Below is an example of the definition to retrieve the User nodes from a BloodHound instance by invoking the bloodhound-users HTTP API endpoint:
    {
        "item_type": "node",
        "item_name": "Users",
        "item_description": "Users found in the BloodHound instance",
        "source_type": "url",
        "source_url": "http://127.0.0.1:8080/api/v2/bloodhound-users",
        "source_auth_type": "bearer-token",
        "source_auth_token": "key.key.key",
        "data_root": "users",
        "column_mapping": {
            "id": "id",
            "principal_name": "name",
            "last_login": "last_login"
        },
        "output_columns": [
            "id",
            "name",
            "last_login"
        ],
        "id_location": "id",
        "item_kind": "BHUser",
        "source_name": "bloodhound-users"
    }
Below is an example of the definition to retrieve the edge between a User and an SSO Provider, which uses the same bloodhound-users HTTP API endpoint to process different data:
 {
        "item_type": "edge",
        "item_name": "User SSO Provider Edges",
        "item_description": "User-[ProviderFor]-> SSO Provider mappings in the BloodHound instance",
        "source_type": "url",
        "source_url": "http://127.0.0.1:8080/api/v2/bloodhound-users",
        "source_auth_type": "bearer-token",
        "source_auth_token": "key.key.key",
        "data_root": "users",
        "edge_type": "static",
        "edge_name": "ProviderFor",
        "source_column": "sso_provider_id",
        "target_column": "id",
        "source_node_type": "BHSSOProvider",
        "target_node_type": "BHUser",
        "source_name": "bloodhound-users"
    }
More detailed information about the formatting and options for the collection definitions can be found in the project documentation on:
https://github.com/toneillcodes/DataHound/blob/main/CollectorConfigurationGuide.md
Each item in the definitions file is processed by calling 'process_config_item' and passing the config properties and source_kind:
    operation = args.operation
    if operation == "collect":
        ...
        # parse through each item in the config file
        for config in config_list:
            # centralized processing logic moved to a dedicated method which parses the config and invokes the dispatcher
            # target_list should be either 'node' or 'edge' to indicate which part of the graph is being returned
            # data contains the processed and transformed graph data to be appended
            target_list, data = process_config_item(config, source_kind)
'process_config_item' is a dispatcher function that parses the definition properties and invokes the appropriate processing and transformation functions to complete the operation.
Extract
To decouple the collection activities from the data processing entirely, the extraction process was broken into two components:
(1) The 'process_' function that calls the 'collector module' and parses the result.
The 'process_' functions handle most of the error checking and configuration property parsing to ensure it has everything needed to invoke the 'collector module'.
Example: 'process_csv_source' from DataHound.py
def process_csv_source(config):
    """
    Docstring for process_csv_source

    :param config: data collection and transformation definition in JSON format
    """
    item_name = config.get('item_name', 'NA')
    # validation
    source_path = config.get('input_file')
    if not source_path:
        logging.error(f"'input_file' is required. Skipping item: {item_name}.")
        return False

    # invoke collector
    csv_data = collect_csv_data(config)
    if csv_data is None:
        logging.warning(f"Skipping item {item_name} due to failed parsing of input file.")
        return False

    # something was returned, point data_object to it for processing
    #print(f"csv_data: {csv_data}")
    logging.info(f"Successfully processed {item_name}")
    return csv_data
(2) The 'collector module' that interacts with the data source and parses raw data.
The collector modules themselves are kept simple and clean, performing the collection job and passing the data back to the 'process_' function.
Example: 'collect_csv_data' from collector_modules\csv_collector.py
def collect_csv_data(config: dict) -> Optional[pd.DataFrame]:
    """
    Loads a CSV file from a path specified in the configuration using pandas.
    Returns a pandas DataFrame if successful, otherwise None.
    Adds correlation_id for tracing.
    """
    # generate correlation ID
    correlation_id = str(uuid.uuid4())

    # retrieve the input_file configuration parameter
    csv_file_path = config.get('input_file')
...
    try:
        # load CSV file into a pandas dataframe
        df = pd.read_csv(
            csv_file_path,
            sep=sep,
            encoding=encoding,
            dtype=str
            # Add other common kwargs if needed, e.g., index_col, dtype, parse_dates
        )

        # structured info log for successful data load
        logging.info(json.dumps({
            "event": "CSV_LOAD_SUCCESS",
            "correlation_id": correlation_id,
            "file_path": csv_file_path,
            "rows": len(df),
            "columns": len(df.columns),
            "message": "CSV file loaded successfully into DataFrame."
        }))

        return df
Transform
With the Extract step done, the next stop in our ETL pipeline is Transform.
The 'process_' function prepared the DataFrame, and the goal at this point is to apply the transformation rules defined in the configuration properties.
At a high level, there are two types of transformations that DataHound must process: Nodes and Edges. What are the minimum requirements to build each?
The minimum data elements for a node are:
id, name, Kind, Base Kind
The minimum data elements for an edge are:
Edge Kind, Start node, End node
The configuration properties instruct the transformation function where to locate these data elements in the DataFrame and allow the code to build the OG graph elements.
The transformation step can perform additional data operations, such as remapping identified column names to new names, trimming the output data, and performing other activities.
How do we apply this to the DataFrame?
First, a dispatch map determines which transformation function should be invoked for the target data by keying off the 'item_type' property.
    TRANSFORMERS = {
        'node': transform_node,
        'edge': transform_edge,
        'static_edge': transform_edge,
        'hybrid_edge': transform_edge
    }

    transformer = TRANSFORMERS.get(item_type)
NOTE: The concept of a 'static edge' and 'hybrid edge' will be covered in another post.
The resolved transformer function is invoked and passed the DataFrame with config properties for processing:
    # Apply transformation logic
    try:
        if item_type == 'node':
            #print(f"Using tranformation function: {transformer}")
            transformed_data = transformer(df, config, source_kind)
        else:
            transformed_data = transformer(df, config)
The 'transform_node' and 'transform_edge' functions contain logic that parse the config properties, process the data, and return OG JSON.
For example, below is some of the edge processing logic that parses the source column (Start) and target column (End) properties and returns an OG edge_data object:
def transform_edge(input_object: pd.DataFrame, config: dict):
    df = input_object.copy()
    column_mapping = config.get('column_mapping', {})
    source_col = config['source_column']
    target_col = config['target_column']
...
    edge_data = []
    for row in df.to_dict('records'):
        target_val = row[target_col]
        source_val = row[source_col]

        # Resolve end_id
        if isinstance(target_val, dict) and target_column_id:
            end_id = target_val.get(target_column_id)
        else:
            end_id = target_val
...
        edge_data.append({
            "kind": str(kind or edge_name).strip(),
            "start": {"value": str(source_val).strip()},
            "end": {"value": str(end_id).strip()}
        })

    return edge_data
There is a 'graph_structure' object that represents an empty OG graph.
    graph_structure = {
        "metadata": { "source_kind": source_kind },
        "graph": {
            "nodes": [],
            "edges": []
        }
    }
The processing results for each data element are collected in either the 'nodes' or 'edges' objects of 'graph_structure'. When all config elements have been processed, graph_structure is written to the provided output file.
# parse through each item in the config file
for config in config_list:
    # centralized processing logic moved to a dedicated method which parses the config and invokes the dispatcher
    # target_list should be either 'node' or 'edge' to indicate which part of the graph is being returned
    # data contains the processed and transformed graph data to be appended
    target_list, data = process_config_item(config, source_kind)

    if target_list and data:
        graph_structure['graph'][target_list].extend(data)
        logging.info(f"Successfully added {len(data)} items to {target_list}.")

# done processing, output graph
# todo: add output controls
output_file = args.output
if output_file:
    logging.info(f"Writing graph to output file: {output_file}")
    try:
        with open(output_file, 'w') as f:
            json.dump(graph_structure, f, indent=4, default=str)
        logging.info(f"Successfully Wrote graph to {output_file}")
    except Exception as e:
        logging.error(f"Failed to write output file: {output_file}. Error: {e}")
Load
At this point, DataHound has done its job. The final step in the ETL process is to upload the JSON to BloodHound and explore the graph with Cypher queries. This is the shortest section, since DataHound doesn't have functionality to upload the graph.
- Login to BloodHound as a user with upload permissions
- Access 'Quick Upload' from the navigation panel
- Complete the upload process in the UI and wait click 'View File Ingest History' to monitor the progress
- Wait for the job to be flagged as 'Complete'
- Access 'Explore' from the navigation panel and use Cypher queries to interact with the data
Custom nodes will appear with a question mark unless Custom Icons are defined for the node types.
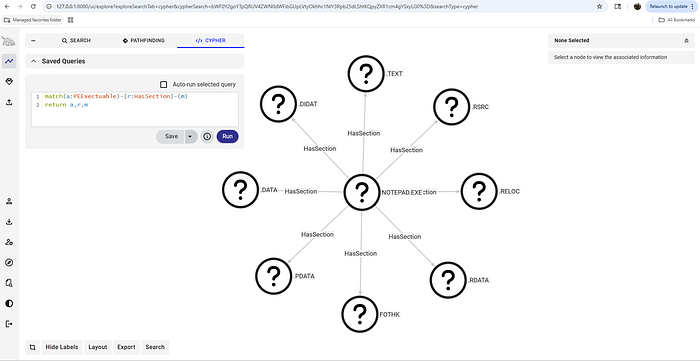
HoundTrainer is a complementary tool that can facilitate the creation and management of these custom icons to support a rich and vibrant graph with useful icons.
https://github.com/toneillcodes/HoundTrainer
Examples
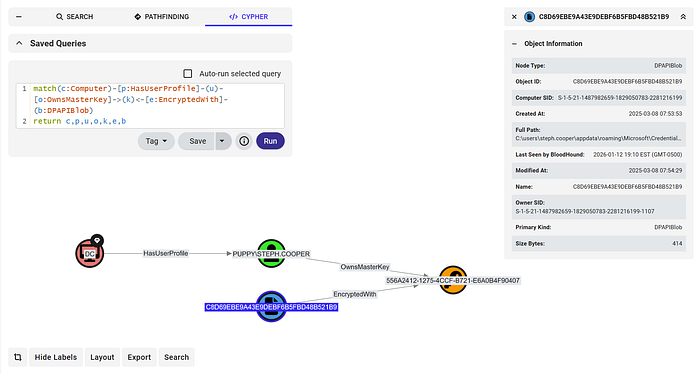
DPAPI: Mapping blobs to Profiles and Computers
NMap: Visualizing service distribution
PE Analysis: Analyzing Import Address Table
Connect Operation
Summary
The connect operation takes two JSON files (--graphA and --graphB) and creates new edges between nodes that share a common, correlatable property.
How it Works
- Performs an outer merge using Pandas DataFrames to match nodes based on a specified property (
--matchAand--matchB). - For successful matches, it generates a new edge object with the specified kind (
--edge-kind) connecting the matched nodes. - Outputs the generated edges into a new graph file
Example usage connecting a BHCE graph to the Azure sample data set.
python DataHound.py --operation connect \
--graphA dev\bhce-collection-20251204.json \
--rootA nodes --idA id --matchA properties.email \
--graphB entra_sampledata\azurehound_example.json \
--rootB data --idB data.id --matchB data.userPrincipalName \
--edge-kind MapsTo --output ..\bhce-connected-to-azure.json
Summary
- BloodHound OpenGraph is awesome
- DataHound is a powerful and flexible processing engine
- DataHound turns Pandas DataFrames into OpenGraph JSON
- DataHound can connect two graphs with hybrid edges
- When paired with a tool like HoundTrainer for icon and Cypher management, DataHound can help to rapidly turn an idea into a PoC.
Next Steps
Follow-up Posts
- The concept of static nodes and how to use them
- The concept of static and hybrid edges, and how to use them
- AI-assisted collector module prototyping
Development
- Refactor into a library
- Streamline and simplify configuration properties
- Documentation updates & examples
Resources
DataHound
- DataHound GitHub repo https://github.com/toneillcodes/DataHound/
HoundTrainer
- HoundTrainer GitHub repo https://github.com/toneillcodes/HoundTrainer
SpecterOps
- OpenGraph documentation https://bloodhound.specterops.io/opengraph/overview
- BloodHound Gang Slack has a bunch of channels, #bloodhound-chat and #opengraph