
June 2, 2026
OverTheWire Bandit Walkthrough — Level 12 → 13 | 30-Day Cybersecurity Learning Journey (Day 12)
Reversing a hexdump and peeling through nine layers of compression and why understanding file formats and decompression tools is essential…

William | Cybersecurity & SOC Analyst
6 min read
Reversing a hexdump and peeling through nine layers of compression and why understanding file formats and decompression tools is essential for forensic analysis.
Introduction
Day 12. Bandit Level 12 to Level 13. Every level up to this point had one problem to solve. This one has nine. The file is a hexdump of a binary that has been compressed over and over using different formats layered on top of each other. There is no single command that solves it. The approach is methodical: reverse the hexdump, check the file type, rename it correctly, decompress it and repeat until something readable comes out.
This level introduces xxd, gzip, bzip2 and tar working together in sequence. It also introduces a critical habit the official OverTheWire page explicitly recommends: creating a dedicated working directory in /tmp before starting so the original file stays untouched and the workspace stays organized.
By the end of this article you will understand the full decompression workflow, why file is called after every step and why this level is one of the most important in the series for building real forensic discipline.
Level Objective
The password for the next level is stored in the file data.txt, which is a hexdump of a file that has been repeatedly compressed. For this level it may be useful to create a directory under /tmp in which you can work. Use mkdir with a hard to guess directory name. The commands suggested by OverTheWire include grep, sort, uniq, strings, base64, tr, tar, gzip, bzip2, xxd, mkdir, cp, mv and file.
Approach
I logged in using the password retrieved from the previous level:
ssh bandit12@bandit.labs.overthewire.org -p 2220ssh bandit12@bandit.labs.overthewire.org -p 2220The banner loaded and ended with "Enjoy your stay!" and the prompt changed to bandit12@bandit:~$.
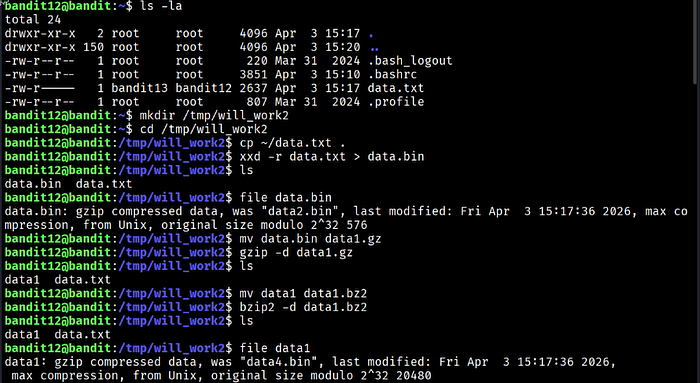
I ran ls -la and confirmed data.txt was present at 2637 bytes, owned by bandit13 with group bandit12. Following the official recommendation I created a working directory in /tmp, moved into it and copied the file there to keep the original untouched:
mkdir /tmp/will_work2
cd /tmp/will_work2
cp ~/data.txt .
mkdir /tmp/will_work2
cd /tmp/will_work2
cp ~/data.txt .The first step was reversing the hexdump back into binary using xxd -r:
xxd -r data.txt > data.binxxd -r data.txt > data.binFrom this point the workflow repeated the same three steps for every layer: run file to identify the format, rename the file with the correct extension and decompress it.
Layer 1: file data.bin returned gzip. Renamed to data1.gz and ran gzip -d data1.gz.
Layer 2: file data1 returned bzip2. Renamed to data1.bz2 and ran bzip2 -d data1.bz2.
Layer 3: file data1 returned gzip again. Renamed to data1.gz and ran gzip -d data1.gz.
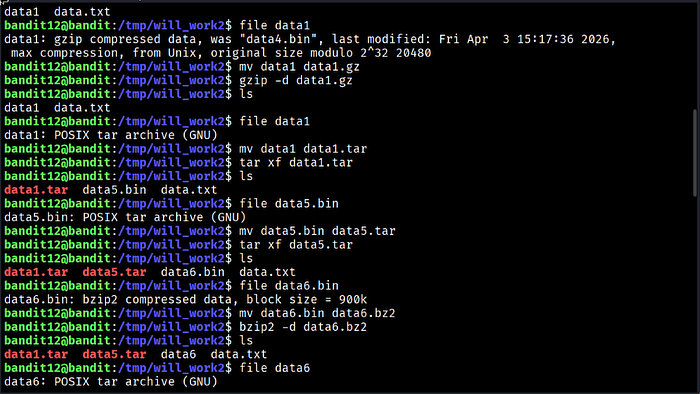
Layer 4: file data1 returned POSIX tar archive. Renamed to data1.tar and ran tar xf data1.tar. This extracted data5.bin.
Layer 5: file data5.bin returned POSIX tar archive. Renamed to data5.tar and ran tar xf data5.tar. This extracted data6.bin.
Layer 6: file data6.bin returned bzip2. Renamed to data6.bz2 and ran bzip2 -d data6.bz2.
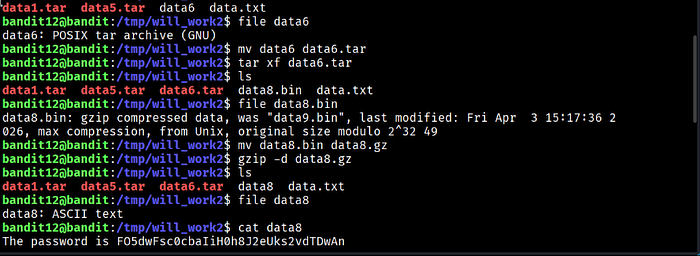
Layer 7: file data6 returned POSIX tar archive. Renamed to data6.tar and ran tar xf data6.tar. This extracted data8.bin.
Layer 8: file data8.bin returned gzip. Renamed to data8.gz and ran gzip -d data8.gz.
Layer 9: file data8 finally returned ASCII text. I ran cat data8 and the password printed to the terminal.
Commands Used
# Connect to the Bandit server as bandit12 using the Level 12 password
ssh bandit12@bandit.labs.overthewire.org -p 2220
# Create a working directory in /tmp to keep work organised
mkdir /tmp/will_work2
cd /tmp/will_work2
# Copy the original file into the working directory
cp ~/data.txt .
# Reverse the hexdump back to binary
xxd -r data.txt > data.bin
# Repeat for each layer: check type, rename, decompress
file data.bin          # gzip
mv data.bin data1.gz
gzip -d data1.gz
file data1             # bzip2
mv data1 data1.bz2
bzip2 -d data1.bz2
file data1             # gzip
mv data1 data1.gz
gzip -d data1.gz
file data1             # tar
mv data1 data1.tar
tar xf data1.tar
file data5.bin         # tar
mv data5.bin data5.tar
tar xf data5.tar
file data6.bin         # bzip2
mv data6.bin data6.bz2
bzip2 -d data6.bz2
file data6             # tar
mv data6 data6.tar
tar xf data6.tar
file data8.bin         # gzip
mv data8.bin data8.gz
gzip -d data8.gz
file data8             # ASCII text
cat data8
# Connect to the Bandit server as bandit12 using the Level 12 password
ssh bandit12@bandit.labs.overthewire.org -p 2220
# Create a working directory in /tmp to keep work organised
mkdir /tmp/will_work2
cd /tmp/will_work2
# Copy the original file into the working directory
cp ~/data.txt .
# Reverse the hexdump back to binary
xxd -r data.txt > data.bin
# Repeat for each layer: check type, rename, decompress
file data.bin # gzip
mv data.bin data1.gz
gzip -d data1.gz
file data1 # bzip2
mv data1 data1.bz2
bzip2 -d data1.bz2
file data1 # gzip
mv data1 data1.gz
gzip -d data1.gz
file data1 # tar
mv data1 data1.tar
tar xf data1.tar
file data5.bin # tar
mv data5.bin data5.tar
tar xf data5.tar
file data6.bin # bzip2
mv data6.bin data6.bz2
bzip2 -d data6.bz2
file data6 # tar
mv data6 data6.tar
tar xf data6.tar
file data8.bin # gzip
mv data8.bin data8.gz
gzip -d data8.gz
file data8 # ASCII text
cat data8Command Breakdown
xxd -r data.txt > data.bin Reverses a hexdump back into the original binary it represents. The -r flag means reverse. Without this step the file would remain a text representation of bytes rather than actual binary data that decompression tools can read.
file after every step This is the most important habit in this level. After each decompression the file has no extension and no obvious name. file reads the actual content and identifies the next format. Skipping this step and guessing would cause decompression commands to fail silently or produce errors.
mv before decompressing gzip, bzip2 and tar expect files with the correct extension before they will process them. Renaming the file with the right extension before running the decompression command is required every time.
gzip -d filename.gz Decompresses a gzip compressed file. The -d flag means decompress.
bzip2 -d filename.bz2 Decompresses a bzip2 compressed file. The -d flag means decompress.
tar xf filename.tar Extracts the contents of a tar archive. The x flag means extract and the f flag specifies the file to work with.
mkdir /tmp/will_work2 Creates a dedicated working directory in /tmp. This is explicitly recommended by OverTheWire for this level. It keeps the original file safe, keeps the working files organised and prevents clutter in the home directory.
Lesson Learned
The main technical takeaway is that the file command is not optional in this workflow. It is the entire workflow. Every single step was driven by what file reported. Without it there would be no way to know which decompression tool to reach for next. This level made that dependency completely explicit across nine separate uses.
What this level also built was patience and process. There was no shortcut. Each layer had to be identified, renamed and decompressed before the next one could be approached. That methodical loop of check, rename, decompress and check again is directly transferable to real forensic work where compressed or packed files with misleading names appear regularly.
The working directory habit is also worth keeping permanently. Creating a clean /tmp workspace before touching a complex file protects the original, gives you room to work and makes it easy to track progress as intermediate files accumulate.
xxd -r hexfile > binaryfile— reverse a hexdump back to binaryfile filename— always run this after every decompression step to identify the next formatgzip -d filename.gz— decompress a gzip filebzip2 -d filename.bz2— decompress a bzip2 filetar xf filename.tar— extract a tar archivemkdir /tmp/workdir— create a clean working directory before starting complex file work
🔴 SOC Analyst Insight
Layered compression and packing is a standard technique in malware distribution. Attackers wrap payloads in multiple layers of compression and encoding specifically to slow down automated analysis tools and increase the time it takes an analyst to reach the actual malicious content. Each layer is a speed bump. Knowing how to peel them quickly without losing track of where you are in the chain is a genuine investigative skill.
# Identify the true format of a suspicious packed file before attempting to unpack it
file suspicious_sample && binwalk suspicious_sample 2>/dev/null
# Identify the true format of a suspicious packed file before attempting to unpack it
file suspicious_sample && binwalk suspicious_sample 2>/dev/nullThe file command gives the outermost format. binwalk goes deeper and identifies embedded file signatures within the binary, which is useful when a sample contains multiple nested formats that are not obvious from a single file call. Together they give an analyst a roadmap of what they are dealing with before a single decompression command is run. That preparation is exactly what this Bandit level trains.
Key Takeaway
This level is not about knowing which compression tools exist. It is about building the discipline to check before acting at every single step. The file command drove every decision in this walkthrough. That habit of identifying before decompressing, and never assuming a file format from its name alone, is one of the most transferable skills in this entire series. In forensic work, every assumption about a file format that turns out to be wrong costs time. file makes assumptions unnecessary.
30-Day Cybersecurity Learning Journey — Progress
🟢 Open Day — Setup & Series Introduction  | OverTheWire Bandit
✅ Day 0.   — Bandit Level 0               | First Login
✅ Day 1.   — Bandit Level 1 → 2           | Special Characters
✅ Day 2.   — Bandit Level 2 → 3           | Spaces in Filenames
✅ Day 3.   — Bandit Level 3 → 4           | Hidden Files
✅ Day 4.   — Bandit Level 4 → 5           | File Types
✅ Day 5.   — Bandit Level 5 → 6           | find with Properties
✅ Day 6.   — Bandit Level 6 → 7           | find across Filesystem
✅ Day 7.   — Bandit Level 7 → 8           | grep
✅ Day 8.   — Bandit Level 8 → 9           | sort and uniq
✅ Day 9.   — Bandit Level 9 → 10          | strings and grep
✅ Day 10.  — Bandit Level 10 → 11         | base64
✅ Day 11.  — Bandit Level 11 → 12         | ROT13 and tr
✅ Day 12.  — Bandit Level 12 → 13         | hexdump and compression  ← today
⬜ Day 13.  — Bandit Level 13 → 14         | coming next
🟢 Open Day — Setup & Series Introduction | OverTheWire Bandit
✅ Day 0. — Bandit Level 0 | First Login
✅ Day 1. — Bandit Level 1 → 2 | Special Characters
✅ Day 2. — Bandit Level 2 → 3 | Spaces in Filenames
✅ Day 3. — Bandit Level 3 → 4 | Hidden Files
✅ Day 4. — Bandit Level 4 → 5 | File Types
✅ Day 5. — Bandit Level 5 → 6 | find with Properties
✅ Day 6. — Bandit Level 6 → 7 | find across Filesystem
✅ Day 7. — Bandit Level 7 → 8 | grep
✅ Day 8. — Bandit Level 8 → 9 | sort and uniq
✅ Day 9. — Bandit Level 9 → 10 | strings and grep
✅ Day 10. — Bandit Level 10 → 11 | base64
✅ Day 11. — Bandit Level 11 → 12 | ROT13 and tr
✅ Day 12. — Bandit Level 12 → 13 | hexdump and compression ← today
⬜ Day 13. — Bandit Level 13 → 14 | coming nextFollow along with the series as I document each level, command and lesson learned.
The file format is never what the name says it is. Always check before you decompress.