The previous blog was something that some of you really liked, I did say it was a series so reason enough to do a part two. In this blog I'll walk you through making an SSRF lab to add to our Github repo. How that is set up, you'll find in the first few lines over here.
The Vulnerability We Are Making
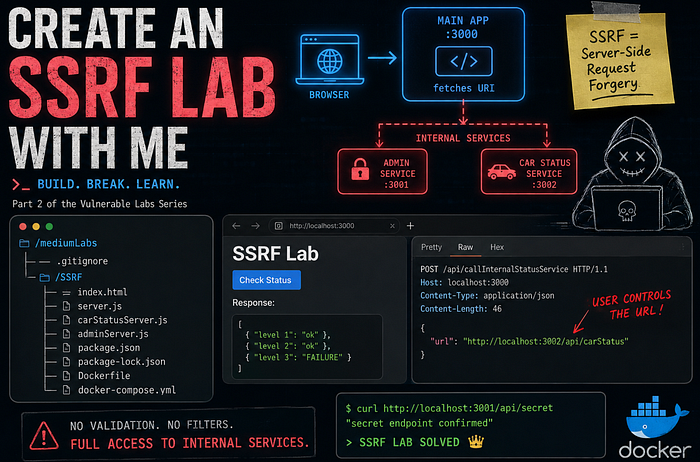
Before we start building, let's quickly talk about what SSRF actually is. SSRF stands for Server-Side Request Forgery. In simple terms, it means that an attacker can trick your server into making requests on their behalf. Normally, when a server makes a request, it's doing that for a legit reason. Think about things like:
- fetching data from another API
- loading an image from a URL
- calling an internal microservice
Now the problem starts when the user gets to control where the server is sending that request. Instead of just calling trusted services, the server might end up calling:
- internal services (like localhost or other ports)
- admin endpoints that were never meant to be public
- external systems you didn't intend to interact with
And here's the important part: that request is coming from the server itself, not the attacker. So even if something is not accessible from the outside, the server might still have access to it. That's exactly what we're going to simulate in this lab. We'll build a setup where:
- the frontend sends a URL to the backend
- the backend blindly fetches that URL
- as attackers, we start messing with it
If there's no proper validation (spoiler: there isn't), we'll be able to reach internal services that should have stayed hidden.
MicroServices For The Win.
Our SSRF lab today will be possible through the magic of microservices. A lot of websites use these kinds of services to pull data into their main app. These services are usually created by different teams and that's usually where things get interesting. Team X assumes something, team Y does the exact same thing but comes to a completely opposite conclusion and…
✨ vulnerability ✨.
In our app we'll make a status checker for cars that are being made. That way a manager can easily assign teams to a certain production area.
Make sure you're able to run Docker on your machine, we're gonna need this to run the app and prove some things. Like last time, we're hackers, so we do things in the terminal.
Lab Tree
In the end, the lab will have this structure:
/mediumLabs
├── .gitignore
└── /SSRF
    ├──/node_modules
    ├── index.html
    ├── server.js
    ├── carStatusServer.js
    ├── adminServer.js
    ├── package.json~
    ├── package-lock.json
    ├── Dockerfile
    └── docker-compose.yml
Concept
[Browser] → [Main App :3000] → (fetches URL)
                              ↓
                   [Internal Services]
                   - :3001 Admin
                   - :3002 Car Status
Installation Files And Dependencies
So first things first, cd into mediumLabs (which we made in the previous blog) with cd mediumLabs and make a new directory mkdir SSRF; cd SSRF. Once you're in the directory create a package.json with npm init. You'll have to install express and nodemon with npm i express nodemon. This will create the package-lock.json. Then I need you to make two files with touch Dockerfile docker-compose.yml.
Boilerplate
The next few code blocks are our boilerplate code, copy paste them in the right file and then we'll start building our vulnerability!
index.html
<!DOCTYPE html>
<html lang="en">
<head>
    <meta charset="UTF-8">
    <meta name="viewport" content="width=device-width, initial-scale=1.0">
    <title>SSRF Lab</title>
</head>
<body>
    <h1>SSRF Lab</h1>

    <button onclick="checkStatus()">Check Status</button>

    <h3>Response:</h3>
    <pre id="response"></pre>

    <script>
        async function checkStatus() {
            const res = await fetch('http://localhost:3000/api/callInternalStatusService', {
                method: 'POST',
                headers: { 'Content-Type': 'application/json' },
                body: JSON.stringify({ url: 'http://localhost:3002/api/carStatus' })
            });
            const data = await res.json();
            document.getElementById('response').textContent = JSON.stringify(data, null, 2);
        }
    </script>
</body>
</html>
server.js
const express = require('express');
const path = require('path');
require('./adminServer');
require('./carStatusServer');

const app = express();
app.use(express.json());
app.use(express.urlencoded({ extended: true }));

app.get('/', (req, res) => {
  res.redirect('/index');
});

app.get('/index', (req, res) => {
  res.sendFile(path.join(__dirname, 'index.html'));
});

app.listen(3000, () => console.log('Server running on http://localhost:3000'));
carStatusServer.js
const express = require('express');
const path = require('path');
const app = express();
app.use(express.json());
app.use(express.urlencoded({ extended: true }));
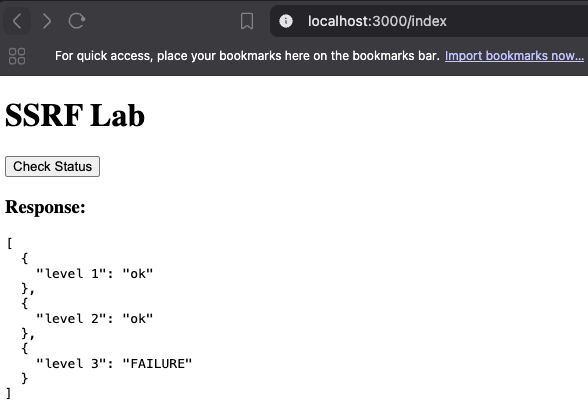
const statusArray = [{"level 1": "ok"}, {"level 2": "ok"}, {"level 3": "FAILURE"}]
app.get('/api/carStatus', (req, res) => {
res.json(statusArray);
});
app.listen(3002, () => console.log('carStatus Server running on http://localhost:3002'));adminServer.js
const express = require('express');
const path = require('path');

const app = express();
app.use(express.json());
app.use(express.urlencoded({ extended: true }));

const teamArray = [{"team 1": "Not available"}, {"team 2": "Not available"}, {"team 3": "available"}]

app.get('/', (req, res) => {
  res.json("internal admin service reached. Available endpoint: api/secret")
})

app.get('/api/secret', (req, res) => {
  res.json("secret endpoint confirmed")
});

app.listen(3001, () => console.log('Admin Server running on http://localhost:3001'));
docker-compose.yml
services:
  ssrf-lab:
    build: .
    ports:
      - "3000:3000"
Dockerfile
FROM node:18-alpine
WORKDIR /app
COPY package*.json ./
RUN npm install --omit=dev
COPY . .
EXPOSE 3000
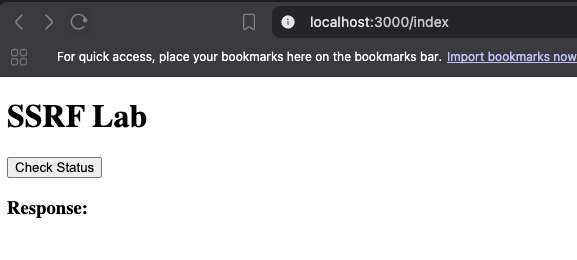
CMD ["node", "server.js"]Now that you have all the necessary files, you should be able to run sudo docker-compose up --build. It will pull all the necessary things and boot up the server locally. When you navigate to http://localhost:3000 you should land on the index page and see the SSRF Lab screen.
If you're on MacOS, you probably need to install something like
colimato get Docker up and running on your machine.
In index.html we see fetch('http://localhost:3000/api/callInternalStatusService'), which is an endpoint in server.js. We also see body: JSON.stringify({ url: 'http://localhost:3002/api/carStatus' }).
So what is going here?
When we click the button in our page, the function checkStatus() is called. This function performs a POST on the endpoint /api/callInternalStatusService. Inside this request there is another URL to a different port as our main application. For now, there is no /api/callInternalStatusService in server.js, so it won't do much. However the service on port 3002 is running.
Just for testing purposes, let's see if we can curl this url.
curl localhost:3002/api/carStatus
curl: (7) Failed to connect to localhost port 3002 after 0 ms:
Couldn't connect to server
So why is this failing? This port cannot be reached from the outside, because in our docker-compose.yml file we only expose port 3000, which is our main server.
If we however make that request from inside our Docker container, this will go through. So let's build that endpoint in our server.js. First turn off the Docker container with CTRL-C
server.js
// ADD THIS ENDPOINT - make sure it is just BEFORE the very last line
app.post('/api/callInternalStatusService', async (req, res) => {
  const { url } = req.body;
  const response = await fetch(url);
  const data = await response.json();
  res.json(data);
});
What we added here is nothing more than the endpoint we call in index.html where we take the url from the request body, do a fetch() on that url, and return the data in JSON.
Now let's fire Docker back up with sudo docker-compose up and see if that endpoint is working.
If we now navigate to the homepage, we are able to click the button and see the response.
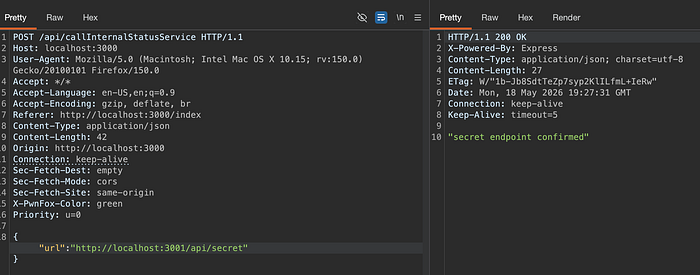
Now proxy that traffic through Burp, Caido or whatever you like to use. You'll see that clicking on that button generates this request. Whenever you see a request like this, you always need to check it for SSRF!

In this case, we're first going to fuzz on port numbers. I made it deliberately so that the main app is running on port 3000, and the carStatus service is running on port 3002. So for argument's sake, let's fuzz from 2999 to 3004.
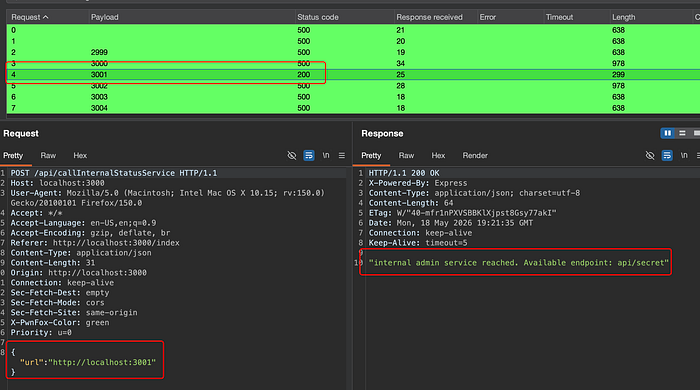
There is an obvious winner there, and it even comes with a map, so we don't have to fuzz anymore 😉. When we try to reach that endpoint, we solve our very own SSRF lab! Congrats!
What Is The Issue
So the fact that you can reach endpoints you shouldn't, isn't really the fault of the fact you fetch a URL that is provided in the request.
The main issue here is the complete absence of a sanitization of the URL. Developers do still think that stuff like this isn't a problem, because the intended path is hardcoded in javascript. Some of them do not even know that it's easily bypassable.
I deliberately didn't add extra logic to the vulnerable code to keep it clear, but in real applications, these issues often appear in URL previews, webhook integrations, or file importers.
The sanitization should be done on the client side as well as on the server side if the design principle we used is chosen for the application.
A different solution is using a different design pattern. Instead of sending the URL from the frontend to the backend, it might as well be just stored in the backend. For this particular case, that would be the best solution. In other use-cases you might need a final path or parameter to complete the URL you need. In that case you can opt for sending only the final part of the URL from the frontend to the backend and concat it with base URL in the backend
So if the user selects the particular endpoint carStatus the frontend will send carStatus to the backend where it's concatenated with http://localhost:3002/api/carStatus. Should the user need a different endpoint like supplyStatus, this could be arranged in the same way.
Of course you could tamper with this too, and you'd still be needing a whitelist of endpoints that are allowed in the backend, but this approach is, at least to me, the best solution.
Challenge
Write a filter of your own between const { url } = req.body; and const response = await fetch(url);. When creating that filter, don't forget to consider that the url https://www.google.com also works, you might want to avoid that too.
If you're up to it, you can also try to implement the second solution and see what works best for you.
Don't forget to tag me, send me a DM on LinkedIn or Discord and show off your solution.
What's Next
So this wraps up part two of the series where I teach you to make a vulnerable labs. The SSRF lab you now have on your Github is meant to be a blueprint for your own experiments and lab ideas.
If you expand on it, make your own version of it, or have a complete lab which you want me to try and break, contact me! I'm always excited to see what other people create and I like breaking apps, so that's a win-win kinda situation.
I break web apps for fun, make vulnerable labs to learn, and write about it so you can too. More writeups, vulnerable labs, and pentesting war stories on blog.forgesec.be. Come say hi on LinkedIn, no exploits required!