

Hi friends, I have developed 4 apps in just 4 months, and I am not lying — it is a fact. For that, I received many appreciations from my company. I want to let you know how you can do it too, because this era is completely about AI, and it's not a bad thing. Many developers say that they will not use AI for various reasons, but here is a fact: when the computer was introduced, if people had said they wouldn't use it — and the same goes for the internet — it would have been their loss. Everything that comes is meant to be used. If you don't use it, you are stepping back from the new generation. So without wasting your time, let's get started.
So here, we will use 3 things:
- ChatGPT Plus Subscription — For reading images and files, mostly.
- GitHub Copilot Pro— For generating code, creating files, and debugging errors.
- VS Code (Visual Studio Code) — We will use Copilot inside VS Code for a seamless development experience.
Note: If you prefer using another IDE, you can do that too. Just follow the pattern below to speed up your work by 90%.
We are using Flutter for app development, but you can use React Native or any other framework you're comfortable with.
1. Generate UI
So first of all, you all know that our first step is creating the UI from Figma, Adobe XD, or any other design tool. You can generate the UI by using ChatGPT — just take a screenshot and upload it on ChatGPT, and ask it to give you the UI. It will provide a very similar UI. You only need to update the font size, colors, or other small things. If you want, you can also ask it to create a single reusable component that can be used in all places for more optimized code.
2. Create Files and Folders
Now you can create your files and folders, but here's the catch — you can use GitHub Copilot to do this instead of creating them manually.
Install GitHub Copilot in VS Code and log in using your GitHub account. Now, press Cmd + Shift + I for MacOS Ctrl + Shift + I for Windows to open the GitHub Copilot window. In this window, you'll see two tabs: one for Copilot Edits and another for Chat.
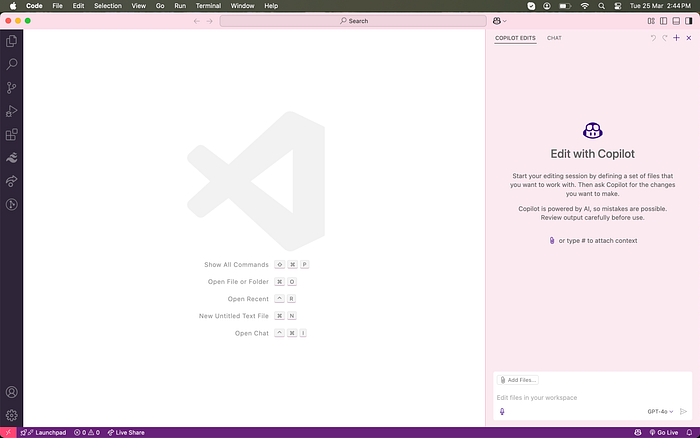
The first tab is used for editing code and creating files and folders. The second tab allows you to chat, similar to ChatGPT, but here it can reference the files you provide.
Don't worry if you're confused by this window — I'll show you how it works. Let's explore it together.
At the bottom, you'll see a text box, a mic icon for voice input, a model selection (by default, ChatGPT-4o is active), and an Add Files button.
Now you can create folders and files recursively just by entering a prompt.
For example, you can type:
"Make views, controllers, and models folders inside the lib folder, and create login_view.dart, login_controller.dart, and user_model.dart files in these folders."
GitHub Copilot will understand this and create the folders and files for you.
After you enter the prompt, Copilot will do its work. Once it's done, it will ask if you want to Keep the changes or Undo them.
Make sure to check the changes before adding them. If you're satisfied, click the Keep button. If not, press Undo, update your prompt, and try again. Repeat this process until Copilot gives you the correct result.
Now, click the + button at the top right — this will open a new window.
In this window, add the login_view.dart file and the main.dart file. You can either select them manually or simply drag and drop them into the Copilot window for a quicker setup.
Next, enter the code provided by ChatGPT from the first step into the input box. Then, ask Copilot to update login_view.dart and main.dart.
You can write a prompt like:
Your code
"Please update login_view.dart and main.dart. Remove all the default code from main.dart and use LoginView as the initial view."
In this way, you can follow these steps to update and add code files repeatedly.
So, everything is successfully set up — you can now run your app!
3. Making changes and debugging
After running your app, you might see some errors — but don't worry! Let Copilot handle them for you.
You can view the errors in the VS Code console. Open the file where the error is coming from, and copy-paste the error message into the Copilot Edits tab. Copilot will find a way to fix the error and update the file accordingly.
If you only want a solution without making changes directly in the file, you can use the Chat tab instead.
If you're not sure which file the error is coming from, you can add multiple files to Copilot. This will help it analyze all the files and find where the error might be coming from.
In this way, you can fix the error.
After a long time, you may notice that your files contain many lines — suppose 1000 lines of code. So, GitHub Copilot will take time to modify the file. But if you only want a particular section of code to be updated, here is another solution:
Select the section of code where you want to make changes, then hit Cmd + . or Ctrl + .. A window will pop up — select "Modify using Copilot" and enter the prompt for what you want to change. A magic will happen, and the changes will be done.
Source Code
Bonus Tips:
You can now generate UI code from images using the vision extension, which is currently in preview but will soon be available in stable release. It will require an OpenAI API key.