


Just to give you a context, this is the second article in the series, where we're focusing on creating Chatbots using DialogFlow(formerly API.AI). In the 1st Article, we created a NodeJS based Webhook. In this article, we'll leverage that Webhook to make our API.AI Agent smart. In the 3rd Article, we'll be leveraging this DialogFlow Agent to create an Angular 4 Chatbot App.
Chatbots are on trend these days. Clients are asking for them, users are getting used to them, and they are, for sure, a great way to engage with your users in a fun and personalized way.
There are a lot of services out there that lets you create bots or use existing bots. Entrepreneur and Hongkiat have written some amazingly enlightening articles on the same.
My Experience with Chatfuel:
I've used Chatfuel earlier. It's a UI Based Service that lets you create a Chatbot. It's fun and super easy. They also have some amazing tutorials on how to use it. Here's one to get you started.
Limitations of Chatfuel:
While Chatfuel could suit your requirements, it doesn't give you much flexibility. At the time I used it, we could only create bots for Facebook Messenger. They now also allow you to create a Chatbot for Telegram. But then, that's it. Plus it's also paid if you want to use it's pro services. Some restrictions right there.
Who wants their hands tied when it comes to creating bots, right?
DialogFlow comes to rescue:
That's where the Google acquired DialogFlow comes into the picture. It's a service that lets you create bots in minutes. It lets you integrate with almost every popular service out there, like Facebook Messenger, Slack, Twitter, Skype etc. Even with assistants like Microsoft Cortana, Amazon Alexa, Google Assistant etc. You can also use webhooks to make your bots smarter if the user queries require the intervention of some external data sources(a MovieDetails API for instance).
Whoa! That's a lot of services. But then, it would cost me a fortune to set up a Chatbot with DialogFlow, right?
Well, it's free. Don't believe me? Head over to their pricing page and see for yourself.

Now, I've got a chance to try my hands at just these two services as of now(Chatfuel and DialogFlow). Having said that, it should be pretty safe to say that DialogFlow is way ahead of its competitors in the game of creating bots. And as they say:
NOBODY… NOBODY… NOBODY… DOES IT BETTER!
Alright! Enough bragging about DialogFlow. Let's learn a thing or two about it now.
Why this article?
So the rationale behind this article is to get you, to know about DialogFlow Console, some terminologies related to it, and how exactly can you create a Chatbot using DialogFlow in minutes.
For the scope of this article, we'll create a Chatbot that gives you information about a specific movie. You ready? Let's roll!
Terminologies along with the steps:
- Console: This is a place where you manage everything about the bot, you're going to build. You can specify intents, entities, integrations, fulfillment etc. for your bot in here.
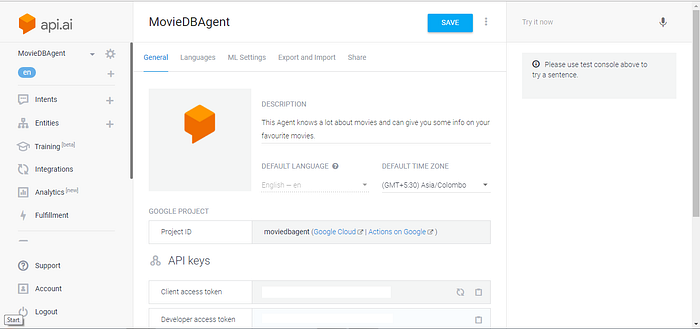

2. Agent: This is essentially your bot itself. You can configure a pre-existing agent. You can also create one through the console. We'll name our agent MovieDBAgent.
3. Intents: They capture the intention of a user who's interacting with our Agent. Whatever the user types/speaks to the Agent get's mapped to an intent. You can create one by clicking on the + icon next to the Intents or by clicking on the CREATE INTENT button.
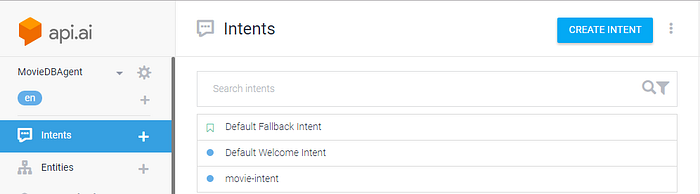
The service by default gives us two intents: Default Fallback Intent; Default Welcome Intent. And we've created a movie-intent.
4. User Expressions: These are the example phrases/sentences, the user can type/speak to the Agent while interacting with it. Each User Expression is mapped to a User Intent. A User Intent can have several User Expressions mapped to it. Think of it this way:
If I want to know about a movie(say The Wolf of Wallstreet), I can ask my Agent in the following ways: "Give me some info on The Wolf of Wallstreet." "I wanna know about The Wolf of Wallstreet." "Give me the synopsis on The Wolf of Wallstreet." "Fetch details on The Wolf of Wallstreet for me." And the list goes on and on and on…
Each of this User Expression will map to the User Intent: movie-intent that we've just created. You can add a User Expression to a User Intent by clicking on the intent. It will take you to a screen like this:
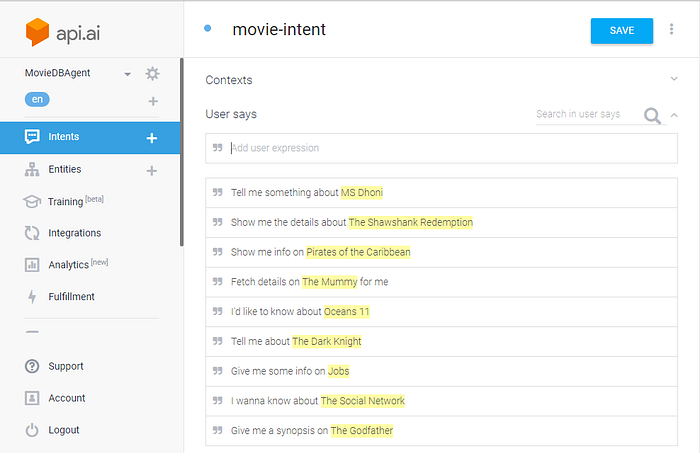
We've added a lot of User Expressions to the movie-intent.
PRO TIP: The more User Expressions you add to an intent, the better your Agent will be able in figuring out what you actually want.
5. Entity: Consider our MovieDBAgent. The user says: "Give me some info on Jobs". This should tell the Agent that I need some info on the movie: Jobs. How does it figure that out? Well, for each User Expression, mapped to an intent, our Agent has to figure out the thing, the user of the Agent wants info on. It figures that out with the help of Entities. Each User Expression in a User Intent can have an Entity that defines the thing, the user needs information on.
For our movie-intent, each user expression can contain a movie entity: the name of the movie. Now by default, the agent is not going to figure that out. We, the developer of the bot will have to explicitly tell the Agent about it. How do we do it? Through Annotations. Like this:
Of course, you'll have to create a new Entity first. But that can be done here by selecting the text that will be the resolved value of the entity. Do remember to click the SAVE button time and again.
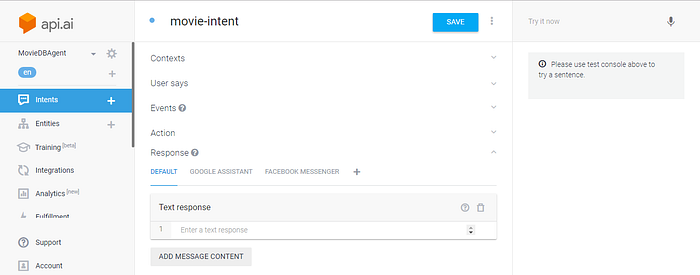
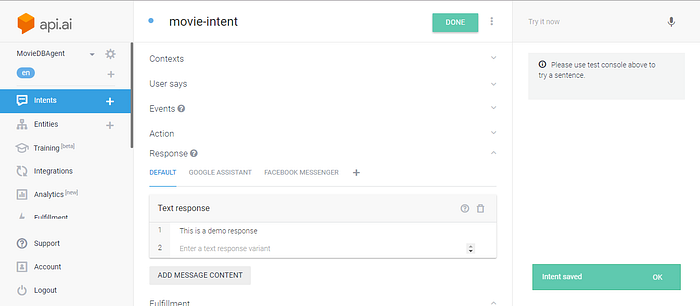
With all the setup we've done so far, you're now in a state to test your Agent. Just one thing before that. Our Agent needs to respond to us with something for this movie-intent. But we haven't specified that yet.
Now to test our agent, navigate to the RHS of the screen and type something relevant in the Try it now field.
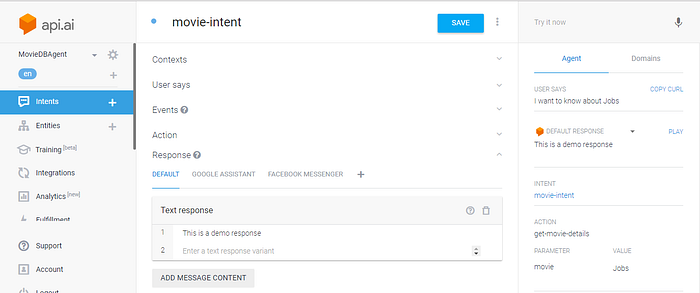
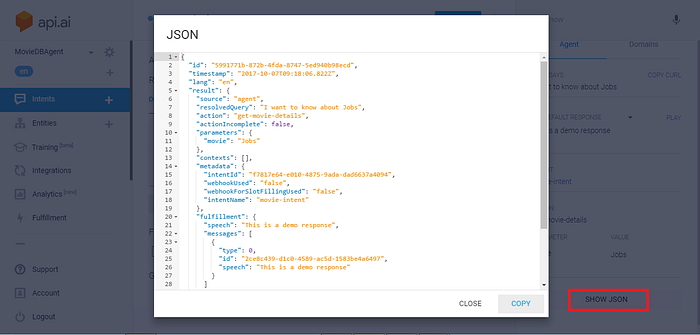
Notice how it automatically captured the intent as movie-intent, parameter as movie and value as Jobs. So our agent is now working fine and also responding to the query with the corresponding response by identifying the appropriate intent. Let's also have a look at the JSON request that was generated.
Alright, now we have an Agent with a movie-intent setup on it. We've also added a few User Expressions on that movie-intent. So now, whenever we query the Agent for the details of a movie, it does recognizes our query as a movie-intent. It also now identifies the movie name. But it's responding back with some static text. And that's not very helpful. Is it?
Wouldn't it be better if it could respond back with the details on the movie we asked it for? Yes! It would surely be. But how exactly are we going to get that information on the movie? Does DialogFlow provide any way of doing it?
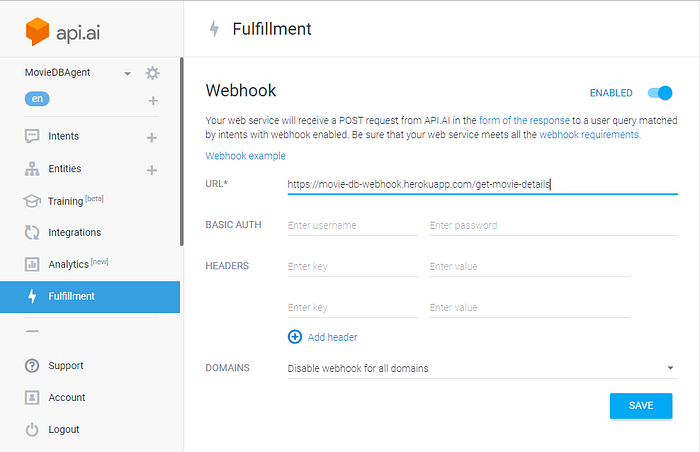
Yes, it does. DialogFlow lets us leverage Webhooks for getting data from external sources. And we already have a Webhook in place that we generated in this post.
So let's leverage this Webhook and hook it to our Agent. We'll use the Fulfillment section for that. Click on Fulfillment and enable it. Once you do, you'll be asked to specify the Webhook URL. Just specify that, don't touch the other options and hit save.
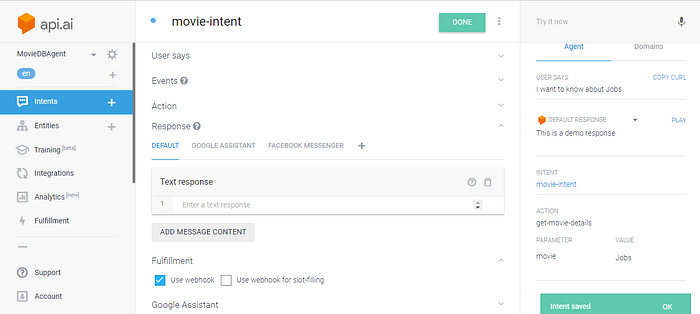
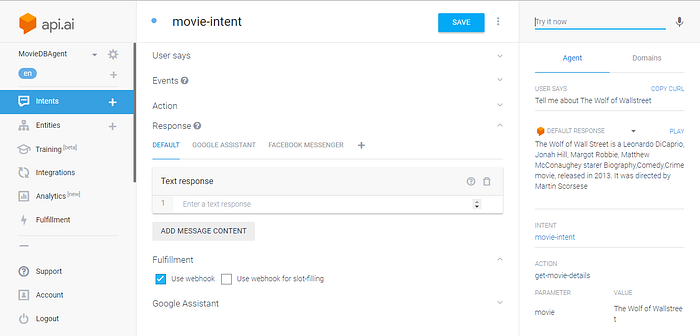
One last thing is to tell the movie-intent to use this webhook to respond with the data that was returned from it. To do that, navigate back to the movie-intent and in the Response section, delete the demo response that we initially had, and in the Fulfillment Section, check the Use webhook checkbox, and then hit save as shown below:
Once all this is done, let's now test if we're getting the expected response from our MovieDBAgent.
And that brings us to the end of this post. Please feel free to provide your suggestions in the comments section, on how to get this better. Please also press the clap icon and share it with your friends if you liked this.
Update:
Wanna make your ChatBots Emotionally Intelligent? I've written a three-article series on the topic. I'm adding links to the same below:
ONE LAST THING:
If you want to learn Angular 5 from the very basics, I have a course on Udemy. The course has about 14.5 hours of content where we have a look at each and every topic that you'll need to understand, in order to create a full-fledged Single Page Application. Check the course out here: