

Graphical User Interfaces (GUIs) using Python have gained a modern aesthetic. The combination of Tkinter and matplotlib can add dynamism and interactivity to plots in real time !
Why a GUI is not only cool but also rewarding ?
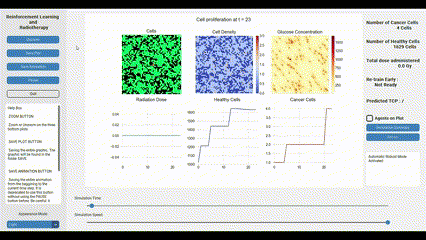
I embarked on the journey of creating such a GUI to provide real-time visualization of a cellular model. The plot situated in the top left corner is the graphical representation of a "tumor growth model." This model, through the use of diffusion equations and basic biological concepts, simulates the growth of a tumor. The green color signifies "healthy cells," the red denotes "tumor cells," and black represents empty spaces. It is exciting to see your coded project animate on the screen. Suppose you've been working on a project for hours, and when you execute your code, no visual feedback or movement appears. Despite understanding that a dynamic system is operational on your computer, the lack of visual representation can be disappointing.
This is why breathing life into code can be so thrilling! Now, let's delve into how to accomplish this. I will provide a fundamental understanding of a simple library: customtkinter.
Why tkinter ?
Firstly, why choose Tkinter? I'd often heard of the simplicity of Tkinter. However, my initial attempt at crafting a GUI with Tkinter was less than impressive, as its visual output resembled antiquated Windows applications from 20 years ago. To enhance my GUI, I began investigating how to upgrade my code easily to yield more desirable results. This is where customtkinter comes into play.
In essence, customtkinter is built on Tkinter and uses identical commands. The only modification required is to import customtkinter instead of Tkinter. Simple, isn't it?
First, we need a welcome page !

Essentially, my work involves applying reinforcement learning to radiotherapy treatment. If these terms seem unfamiliar, don't fret! They aren't central to our discussion. The main aspect to notice is the homepage layout: a sidebar on the left, a main panel in the center, and a small rectangular section on the right that houses a checkbox, the authors' information, and my university's logo.
The complete code for this project is accessible via the following link: https://github.com/martinflor/RL_for_radiotherapy_treatment/blob/main/application.py
The initial step in crafting this interface is to create a frame. This space is the canvas where we define the placement of various elements such as the sidebar and the main panel.
import customtkinter

customtkinter.set_appearance_mode("System")  # Modes: "System" (standard), "Dark", "Light"
customtkinter.set_default_color_theme("dark-blue")  # Themes: "blue" (standard), "green", "dark-blue"


class App(customtkinter.CTk):
    def __init__(self):
        super().__init__()

        # configure window
        self.title("RL and RT")

        screen_width = self.winfo_screenwidth() # Get the width of the screen
        screen_height = self.winfo_screenheight() # Get the height of the screen
        taskbar_height = screen_height - self.winfo_rooty() # Get the height of the sidebar

        self.geometry("%dx%d+0+0" % (screen_width, 760))

app = App()
app.mainloop()
In this step, we inherit from the "customtkinter.CTk" class. This class forms the core of our application. While we'll be enhancing our GUI with various features within this class, let's first take a look at its current state!
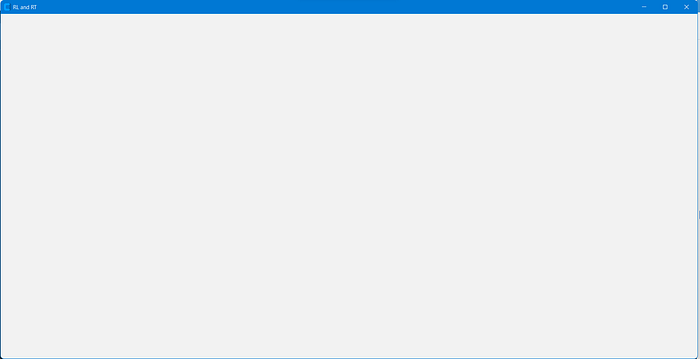
Impressive! You've just named a window and opened it, albeit with a very basic appearance. But don't worry, this is just the starting point. Next, let's add some structure and shapes to our GUI!
Placing images, text and tabview !
import customtkinter
from PIL import Image, ImageTk

customtkinter.set_appearance_mode("System")  # Modes: "System" (standard), "Dark", "Light"
customtkinter.set_default_color_theme("dark-blue")  # Themes: "blue" (standard), "green", "dark-blue"

class App(customtkinter.CTk):
    def __init__(self):
        super().__init__()

        # configure window
        self.title("RL and RT")

        screen_width = self.winfo_screenwidth() # Get the width of the screen
        screen_height = self.winfo_screenheight() # Get the height of the screen
        taskbar_height = screen_height - self.winfo_rooty() # Get the height of the sidebar

        self.geometry("%dx%d+0+0" % (screen_width, 760))

        # create Sidebar
        #self.sidebar = SidebarSettings(self, self.simulation, self.quit_page) # Come back on it later !

        # EPL LOGO
        epl = customtkinter.CTkImage(light_image=Image.open("images/EPL.jpg"),
                                  dark_image=Image.open("images/EPL.jpg"),
                                  size=(150, 80))
        button_epl = customtkinter.CTkButton(self, text= '',
                                                image=epl, fg_color='transparent')
        button_epl.place(relx=1, rely=1, anchor='se')


        # AUTHORS
        self.author_label = customtkinter.CTkLabel(self, text="Author: Florian Martin")
        self.author_label.place(relx=0.16, rely=.975, anchor='sw')

        self.supervisor_label = customtkinter.CTkLabel(self, text='Supervisors: Mélanie Ghislain, Manon Dausort, Damien Dasnoy-Sumell, Benoît Macq')
        self.supervisor_label.place(relx=0.16, rely=1.0, anchor='sw')


        # create tabview
        self.tabview = customtkinter.CTkTabview(self, width=550)
        self.tabview.place(relx= 0.17, rely=0.025, relwidth=0.82, relheight=0.8)

        self.grid_rowconfigure(0, weight=1)
        self.grid_columnconfigure(1, weight=1)
        self.tabview.add("Treatment")
        self.tabview.add("Nutrients")
        self.tabview.add("Cell cycle")
        self.tabview.add("Radiosensitivity")
        self.tabview.add("Classifier")
        self.tabview.tab("Treatment").grid_columnconfigure(0, weight=1)
        self.tabview.tab("Nutrients").grid_columnconfigure(0, weight=1)
        self.tabview.tab("Cell cycle").grid_columnconfigure(0, weight=1)


app = App()
app.mainloop()
There's quite a bit to unpack here! As you can observe, crafting the sidebar, as depicted earlier, is not a straightforward task. It even has its separate Python code for more manageable and readable implementation.
But now, we've grasped how to position elements within the frame. Consider the author's label (that's me!). First, you generate a label object using "CTKLabel". The first argument determines the frame to which you want to attach the label. In this case, we're attaching it to the frame we just created, hence we use the keyword "self". Then, we provide the label's text. Once the label object is created, it must be positioned within the frame it's attached to. There are several ways to accomplish this, but I always favor relative positioning, achieved with the "place" function. This function offers multiple arguments, such as "relx" and "rely", which are used here for relative positioning within the frame (with values between 0.0 and 1.0). The "anchor" argument is useful to specify which corner of the label will be positioned at (relx, rely).
As you can observe, the process is identical for other objects. Both the image and the tabview utilize the same positioning method!
Images !
Images in customtkinter are slightly unique. To position an image, you need to embed it in a button, which is then placed within the frame. Firstly, we import the image using the PIL library, followed by the creation of a button with an image inside it. It's important to set the "fg_color" argument to transparent to ensure a seamless image insertion.
Tabview ?
The Tabview functionality is extremely beneficial. It eliminates the need for creating multiple pages, avoiding confusion and clutter. Instead, you can maintain a single page (or frame, if you prefer) and switch between tabs. In my example, I have five tabs. This means that if we want to add an object to a specific tab, we need to refer to it directly (just like we did for the label using "self"). The simplicity of Tkinter lies in the fact that you can attach an object to another and position it within really intuitively.
What does it look like now ?
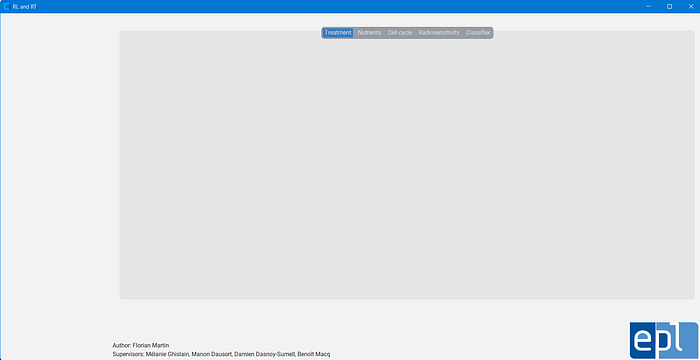
Okay, cool, this is not insane but actually it is still the beginning. Let's go for harder stuff !
The SIDEBAR !
Completing the sidebar is a significant milestone. This achievement will pave the way to understanding more advanced functionalities, such as invoking a function with a button, for example.
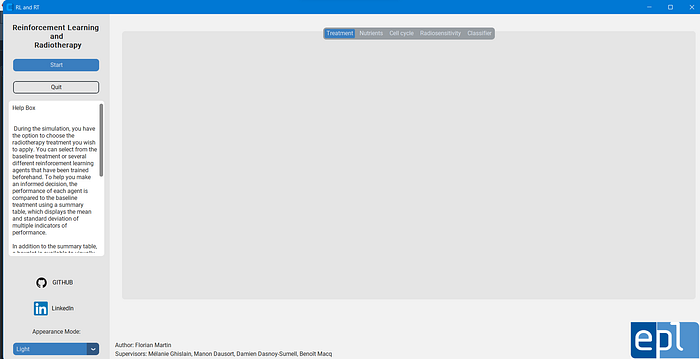
As mentioned earlier, the sidebar has its separate Python code for enhanced readability. Upon inspection, you'll find two buttons at the top. The first initiates the simulation, as demonstrated at the beginning of this discussion, and the second is used to exit the page. There's also a helpbox providing descriptions for each section of our previously implemented tabview. Naturally, as we switch between tabs, the content in the helpbox must be updated to reflect the current tab's information.
import customtkinter

class SidebarSettings(customtkinter.CTkFrame):
    def __init__(self, master, simulation, quit_page):
        self.master = master
        self.simulation = simulation
        self.quit_page = quit_page
        self.sidebar_frame = customtkinter.CTkFrame(self.master, width=140, corner_radius=0)
        self.sidebar_frame.grid(row=0, column=0, rowspan=4, sticky="nsew")
        self.sidebar_frame.grid_rowconfigure(6, weight=1)
        self.logo_label = customtkinter.CTkLabel(self.sidebar_frame, text="Reinforcement Learning \n and \n Radiotherapy", font=customtkinter.CTkFont(size=16, weight="bold"))
        self.logo_label.grid(row=0, column=0, padx=20, pady=(20, 10))
        self.sidebar_button_1 = customtkinter.CTkButton(self.sidebar_frame, text="Start", command=self.simulation, width=190)
        self.sidebar_button_1.grid(row=1, column=0, padx=10, pady=10)

        self.sidebar_button_4 = customtkinter.CTkButton(self.sidebar_frame, text="Quit", width=190, fg_color="transparent", text_color=("gray10", "#DCE4EE"), border_width=2, command=self.quit_page)
        self.sidebar_button_4.grid(row=2, column=0, padx=10, pady=10)

        # create textbox
        self.textbox = customtkinter.CTkTextbox(self.sidebar_frame)
        self.textbox.place(relx=0.05, rely=0.25, relwidth=0.9, relheigh=0.45)

        with open(dir_path + '\\misc\\treatment_help.txt', 'r') as file:
            treatment_file = file.readlines()

        with open(dir_path + '\\misc\\cell_cycle_help.txt', 'r') as file:
            cell_cycle_file = file.readlines()

        with open(dir_path + '\\misc\\nutrients_help.txt', 'r') as file:
            nutrients_file = file.readlines()

        with open(dir_path + '\\misc\\radiosensitivity_help.txt', 'r') as file:
            radio_file = file.readlines()

        treatment_file = ''.join(line for line in treatment_file)
        cell_cycle_file = ''.join(line for line in cell_cycle_file)
        nutrients_file = ''.join(line for line in nutrients_file)
        radio_file = ''.join(line for line in radio_file)


        self.texts = {"Nutrients" : "Help Box\n\n\n " + nutrients_file,
                      "Treatment" : "Help Box\n\n\n " + treatment_file,
                      "Cell cycle" : "Help Box\n\n\n " + cell_cycle_file,
                      "Radiosensitivity" : "Help Box\n\n\n " + radio_file,
                      "Classifier" : "Help Box\n\n\n "}
        self.textbox.insert('0.0', self.texts["Treatment"])
        self.textbox.configure(state="disabled", wrap="word")


        # GITHUB ICON

        github = customtkinter.CTkImage(light_image=Image.open("images/github.png"),
                                  dark_image=Image.open("images/github.png"),
                                  size=(30, 30))
        button_github = customtkinter.CTkButton(self.sidebar_frame, text= 'GITHUB',
                                                image=github, fg_color='transparent', text_color=('black', 'white'),
                                                command=self.open_github)

        button_github.place(relx=0.025, rely=0.75, relwidth=0.9, relheight=0.05)

        # LINKEDIN ICON

        linkedin = customtkinter.CTkImage(light_image=Image.open("images/linkedin.png"),
                                  dark_image=Image.open("images/linkedin.png"),
                                  size=(30, 30))
        button_linkedin = customtkinter.CTkButton(self.sidebar_frame, text= 'LinkedIn',
                                                image=linkedin, fg_color='transparent', text_color=('black', 'white'),
                                                command=self.open_linkedin)
        button_linkedin.place(relx=0.025, rely=0.825, relwidth=0.9, relheight=0.05)

        # APPEARANCE MODE

        self.appearance_mode_label = customtkinter.CTkLabel(self.sidebar_frame, text="Appearance Mode:", anchor="w")
        self.appearance_mode_label.grid(row=8, column=0, padx=20, pady=(10, 0))
        self.appearance_mode_optionemenu = customtkinter.CTkOptionMenu(self.sidebar_frame, values=["Light", "Dark", "System"], width=190,
                                                                       command=self.change_appearance_mode_event)
        self.appearance_mode_optionemenu.grid(row=9, column=0, padx=20, pady=(10, 10))

    def update_helpbox(self):
        self.textbox.configure(state="normal", wrap="word")
        tab = self.master.tabview.get()
        self.textbox.delete("0.0", "end")
        self.textbox.insert("0.0", self.texts[tab])
        self.textbox.configure(state="disabled", wrap="word")

    def open_github(self):
        webbrowser.open_new_tab('https://github.com/martinflor/master_thesis_RL')

    def open_linkedin(self):
        webbrowser.open_new_tab('https://www.linkedin.com/in/florian-martin-554350239/')

    def change_appearance_mode_event(self, new_appearance_mode: str):
        customtkinter.set_appearance_mode(new_appearance_mode)
I acknowledge that this segment appears quite complex, but don't worry, it's not as daunting as it seems. We will navigate through it together, and I'm confident you'll enjoy understanding how it works.
You'll note that the class inherits from customtkinter.CTkFrame because this class will serve as the frame for the sidebar. Three arguments are passed to the init function. The first is the frame to which the sidebar will attach. The second and third arguments are the functions of the two buttons mentioned earlier: one to run the simulation and the other to quit the page. To gain a better understanding, let's examine how we need to adjust our "Application" Python code:
import customtkinter
from PIL import Image, ImageTk
from pages.Sidebar import SidebarSettings

customtkinter.set_appearance_mode("System")  # Modes: "System" (standard), "Dark", "Light"
customtkinter.set_default_color_theme("dark-blue")  # Themes: "blue" (standard), "green", "dark-blue"

class App(customtkinter.CTk):
    def __init__(self):
        super().__init__()

        # configure window
        self.title("RL and RT")

        screen_width = self.winfo_screenwidth() # Get the width of the screen
        screen_height = self.winfo_screenheight() # Get the height of the screen
        taskbar_height = screen_height - self.winfo_rooty() # Get the height of the sidebar

        self.geometry("%dx%d+0+0" % (screen_width, 760))

        # create Sidebar
        self.sidebar = SidebarSettings(self, self.simulation, self.quit_page) # It's TIME !

        # EPL LOGO
        epl = customtkinter.CTkImage(light_image=Image.open("images/EPL.jpg"),
                                  dark_image=Image.open("images/EPL.jpg"),
                                  size=(150, 80))
        button_epl = customtkinter.CTkButton(self, text= '',
                                                image=epl, fg_color='transparent')
        button_epl.place(relx=1, rely=1, anchor='se')

        # AUTHORS
        self.author_label = customtkinter.CTkLabel(self, text="Author: Florian Martin")
        self.author_label.place(relx=0.16, rely=.975, anchor='sw')

        self.supervisor_label = customtkinter.CTkLabel(self, text='Supervisors: Mélanie Ghislain, Manon Dausort, Damien Dasnoy-Sumell, Benoît Macq')
        self.supervisor_label.place(relx=0.16, rely=1.0, anchor='sw')

        # create tabview
        self.tabview = customtkinter.CTkTabview(self, width=550)
        self.tabview.place(relx= 0.17, rely=0.025, relwidth=0.82, relheight=0.8)

        self.grid_rowconfigure(0, weight=1)
        self.grid_columnconfigure(1, weight=1)
        self.tabview.add("Treatment")
        self.tabview.add("Nutrients")
        self.tabview.add("Cell cycle")
        self.tabview.add("Radiosensitivity")
        self.tabview.add("Classifier")
        self.tabview.tab("Treatment").grid_columnconfigure(0, weight=1)
        self.tabview.tab("Nutrients").grid_columnconfigure(0, weight=1)
        self.tabview.tab("Cell cycle").grid_columnconfigure(0, weight=1)

    def simulation(self):
        print("It is a simulation !")

    def quit_page(self):
        self.quit()
        self.destroy()

app = App()
app.mainloop()
The structure is largely similar to what we've seen before, with the addition of two functions. The first function runs the simulation (in this case, it just prints), and the second function quits the page. As mentioned earlier, these functions are passed to our newly created class:
self.sidebar = SidebarSettings(self, self.simulation, self.quit_page)Comeback to the sidebar !
class SidebarSettings(customtkinter.CTkFrame):
    def __init__(self, master, simulation, quit_page):
        self.master = master
        self.simulation = simulation
        self.quit_page = quit_page
        self.sidebar_frame = customtkinter.CTkFrame(self.master, width=140, corner_radius=0)
        self.sidebar_frame.grid(row=0, column=0, rowspan=4, sticky="nsew")
        self.sidebar_frame.grid_rowconfigure(6, weight=1)
        self.logo_label = customtkinter.CTkLabel(self.sidebar_frame, text="Reinforcement Learning \n and \n Radiotherapy", font=customtkinter.CTkFont(size=16, weight="bold"))
        self.logo_label.grid(row=0, column=0, padx=20, pady=(20, 10))
        self.sidebar_button_1 = customtkinter.CTkButton(self.sidebar_frame, text="Start", command=self.simulation, width=190)
        self.sidebar_button_1.grid(row=1, column=0, padx=10, pady=10)

        self.sidebar_button_4 = customtkinter.CTkButton(self.sidebar_frame, text="Quit", width=190, fg_color="transparent", text_color=("gray10", "#DCE4EE"), border_width=2, command=self.quit_page)
        self.sidebar_button_4.grid(row=2, column=0, padx=10, pady=10)

        # create textbox
        self.textbox = customtkinter.CTkTextbox(self.sidebar_frame)
        self.textbox.place(relx=0.05, rely=0.25, relwidth=0.9, relheigh=0.45)
Let's break down this initial segment. We create a frame called "sidebar_frame" that will house all our elements, such as buttons and icons. Here, I employed a different method to position objects. Instead of the "place" function with relative positioning, I used the "grid" function. This essentially constructs a grid within our frame, making it easier to position objects without needing to specify relative coordinates. Though it offers less precision and it's harder to position objects exactly where you want, but it's ideal for vertically oriented objects.
In reality, it's not overly complicated. You can configure a grid with any number of rows and columns, creating an invisible grid within your frame. Objects can then be placed on the grid by referencing the indices, starting from 0. I recommend reading the documentation for a deeper understanding, as complex grid layouts can be challenging to comprehend initially. The grid configuration is incredibly flexible, allowing for a wide range of placements.
To be clear, the "padx" and "pady" arguments determine the space you leave on the border of your object.
Buttons with commands !
self.sidebar_button_1 = customtkinter.CTkButton(self.sidebar_frame, text="Start", command=self.simulation, width=190)
self.sidebar_button_1.grid(row=1, column=0, padx=10, pady=10)

self.sidebar_button_4 = customtkinter.CTkButton(self.sidebar_frame, text="Quit", width=190, fg_color="transparent", text_color=("gray10", "#DCE4EE"), border_width=2, command=self.quit_page)
self.sidebar_button_4.grid(row=2, column=0, padx=10, pady=10)
As you can observe, these two buttons feature an argument called "command". This argument allows you to assign a function that will be triggered when you click the button — a handy feature, isn't it?
Our first button, the "Start" button, initiates the simulation. When pressed, it calls the "simulation" function we defined in our Application, which then prints "It is a simulation!" in your terminal.
The second button, when clicked, will allow you to exit the page and terminate the application.
The HelpBox that updates itself !
# create textbox
self.textbox = customtkinter.CTkTextbox(self.sidebar_frame)
self.textbox.place(relx=0.05, rely=0.25, relwidth=0.9, relheigh=0.45)

with open(dir_path + '\\misc\\treatment_help.txt', 'r') as file:
    treatment_file = file.readlines()

with open(dir_path + '\\misc\\cell_cycle_help.txt', 'r') as file:
    cell_cycle_file = file.readlines()

with open(dir_path + '\\misc\\nutrients_help.txt', 'r') as file:
    nutrients_file = file.readlines()

with open(dir_path + '\\misc\\radiosensitivity_help.txt', 'r') as file:
    radio_file = file.readlines()

treatment_file = ''.join(line for line in treatment_file)
cell_cycle_file = ''.join(line for line in cell_cycle_file)
nutrients_file = ''.join(line for line in nutrients_file)
radio_file = ''.join(line for line in radio_file)


self.texts = {"Nutrients" : "Help Box\n\n\n " + nutrients_file,
              "Treatment" : "Help Box\n\n\n " + treatment_file,
              "Cell cycle" : "Help Box\n\n\n " + cell_cycle_file,
              "Radiosensitivity" : "Help Box\n\n\n " + radio_file,
              "Classifier" : "Help Box\n\n\n "}
self.textbox.insert('0.0', self.texts["Treatment"])
self.textbox.configure(state="disabled", wrap="word")
Alright, let's address the final aspect of our sidebar — an interactive help box that provides guidance to the user. However, it's important that this help box automatically updates itself whenever the user switches tabs in the tabview menu.
First, we create a TextBox object and attach it to the sidebar:
self.textbox = customtkinter.CTkTextbox(self.sidebar_frame)
self.textbox.place(relx=0.05, rely=0.25, relwidth=0.9, relheigh=0.45)
These lines of codes :
self.textbox.insert('0.0', self.texts["Treatment"])
self.textbox.configure(state="disabled", wrap="word")
are important. The first line displays the default text when the application is launched. As a matter of fact, when we initiate the application, the "Treatment" tab is active, so the help box shows the corresponding text. The second line is useful if you want to prevent the user from altering the text in your help box (state="disabled"). The "wrap" argument ensures that words aren't cut off when they move to the next line.
Next, I created a dictionary containing all the text I wanted to display for each corresponding tab. So, if a user navigates to the "Nutrients" tab, the help box will display the appropriate text. To accomplish this, I crafted a function that updates the help box when it's invoked:
def update_helpbox(self):
    self.textbox.configure(state="normal", wrap="word")
    tab = self.master.tabview.get()
    self.textbox.delete("0.0", "end")
    self.textbox.insert("0.0", self.texts[tab])
    self.textbox.configure(state="disabled", wrap="word")
To make changes, we need to enable modifications by setting the state to "normal". Following this, we retrieve the currently active tab from the tabview (which is the second line of the function). Once this is accomplished, we clear the text that's currently being displayed and insert the new text. Lastly, we return to the disabled mode to prevent the user from making changes.
You might be wondering — this function doesn't seem to be called anywhere in the code, right? You're absolutely correct; we need to invoke this function!
# create tabview
self.tabview = customtkinter.CTkTabview(self, width=550, command=self.sidebar.update_helpbox)
self.tabview.place(relx= 0.17, rely=0.025, relwidth=0.82, relheight=0.8)
Now, when we create the tabview in our "Application", we need to provide a command. And that's it! The sidebar should now function as anticipated! It's relatively straightforward, isn't it?
Conclusion
So now you have all the knowledge necessary to understand the principles behind customtkinter. The consistent nature of its use is what makes building GUIs with this library so enjoyable. If you'd like me to go through the complete code of the home page, please let me know! While we've covered the sidebar, there's still plenty more to learn, and I would be delighted to share more insights with you.
Here's a reminder of the link to the complete project: https://github.com/martinflor/RL_for_radiotherapy_treatment/tree/main. 'application.py' is the main file to run. The rest of the GUI implementation can be found in the 'pages' folder.
I hope you found this helpful!
Florian
More content at PlainEnglish.io.
Sign up for our free weekly newsletter. Follow us on Twitter, LinkedIn, YouTube, and Discord.