

This is the 5th article in a larger series on AI agents. LLMs, tools, and context are the key ingredients of agentic systems. However, gluing these components together becomes increasingly cumbersome as more models, apps, and libraries are released. In this article, we'll discuss how Model Context Protocol (MCP) solves this problem by providing us a standard way to connect LLMs to tools and context. I'll start with an overview of the key concepts, then share Python code that implements an MCP server.
MCP is a standard way to connect models to tools and context. Anthropic describes it as the "USB-C port of AI apps". Rather than every AI app developer creating their own custom way of plugging in tools and data, MCP provides a standard that everyone can use [1].
This is valuable because it unlocks the power of community-driven development. Now, apps and tools from different groups can easily talk to one another using a standard process.
Here are a few examples of how MCP can be beneficial.
- Adding custom integrations (e.g. Slack and Google Drive) to Cursor
- Easily connecting a set of personal tools and context to multiple AI apps (e.g. Claude, Cursor, an n8n workflow)
- App developers can benefit from the community-driven ecosystem of pre-built MCP servers, expanding their product capabilities with no extra effort!
How MCP Works
MCP follows a client-server architecture. In other words, MCP clients send requests to MCP servers, which respond with access to tools, resources, and prompts.
This is just like when you (the client) go to a coffee shop and ask a barista (the server) for a pumpkin spice latte (the request), who eventually gives one to you (the response).
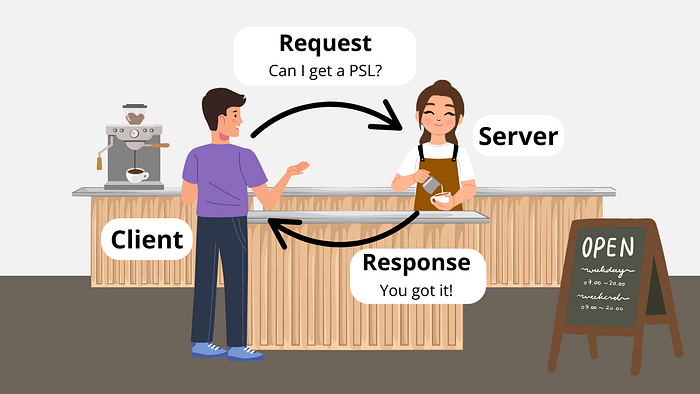
Just like there is a protocol for ordering at a coffee shop (i.e. order, payment, delivery), MCP is the protocol for AI apps to access tools and context. Here are the 3 key parts of the process [2].
- Connect — client initializes connection, server responds, client acknowledges with an initialized notification.
- Exchange — requests, responses, and notifications are exchanged in a JSON format.
- Terminate — 3 ways: client closes, transport disconnected, or error occurs.
MCP Client
MCP clients are built into AI applications e.g. Claude, Cursor, an n8n workflow, or a custom agent built with OpenAI's Agents SDK [1].
They send requests to MCP servers on behalf of the application and are responsible for the following [2].
- Discover server capabilities
- Receive data from the server
- Manage LLM tool execution
If you are using an existing AI app (e.g. Claude, Cursor) or building one using an existing library (e.g. Agents SDK, n8n), you won't need to build MCP clients because this is already taken care of. However, what you may need to build is a custom MCP server.
MCP Servers
MCP servers are independent services for AI apps. They listen for client requests and respond based on their capabilities [2].
Here are the three key primitives that servers provide to AI apps [2][3].
- Prompts = prompt templates
- Resource = data, filesystem, database
- Tools = functions, APIs, image processing
Servers can live locally or remotely. These are facilitated by two default transport mechanisms [2].
- stdio (local) = server runs as a child process and communicates with the client via standard IO streams
- HTTP with Server-Sent Events (SSE) (remote) = HTTP POST requests for client-to-server communication or SSE for server-to-client streaming
Example: Building an MCP Server with Python
Let's make things more concrete with a specific example. Here, I will build an MCP server using Anthropic's Python SDK [3].
The server will provide any external AI app access to the toolset I built in a previous article, where I implemented an Artificial Virtual Assistant (AVA) using OpenAI's Agents SDK. Namely, it will provide access to a prompt template, example emails, and a tool to draft emails in my Gmail mailbox.
The example code is freely available at this GitHub repository.
Installing uv
It's recommended to use uv when developing local MCP servers with Python. We'll see why later in the example, but the short version is that it allows the server to be spun up (with dependencies) using a single command.
Here's how to install uv
# Mac/Linux
curl -LsSf https://astral.sh/uv/install.sh | sh

# Windows
powershell -ExecutionPolicy ByPass -c "irm https://astral.sh/uv/install.ps1 | iex"
Creating Server
Anthropic's Python SDK makes it super easy to spin up a custom MCP server. Here's how we'll create one called "AVA".
from mcp.server.fastmcp import FastMCP

# Create an MCP server
mcp = FastMCP("AVA")
An MCP server has three key primitives: prompts, resources, and tools. Let's add each of these to our server.
Adding Prompts
A prompt is a function that can take in text inputs and dynamically format them into a final prompt. This is handy when you have a boilerplate prompt template you want to use over and over again.
Here is a simple example of one that gives AVA her instructions.
@mcp.prompt()
def ava(user_name: str, user_title: str) -> str:
    """Global instructions for Artificial Virutal Assistant (AVA)"""
    return f"""# AVA (Artificial Virtual Assistant)

You are AVA, a virtual assistant to {user_name} ({user_title}). You help them \
with administrative tasks.

**Preferences:**
- Keep communications to user concise and clear
"""
Adding Resources
Next, we can add a resource. These provide data to an LLM, but should not involve any significant computation [3].
Here's how we can add a few static files as resources. These files are available at the GitHub repo.
import csv

# Define resources
@mcp.resource("email-examples://3-way-intro")
def write_3way_intro() -> str:
    """Example of a 3-way intro email"""
    with open("email-examples/3-way-intro.md", "r") as file:
        return file.read()

@mcp.resource("email-examples://call-follow-up")
def write_call_followup() -> str:
    """Example of a call follow-up email"""
    with open("email-examples/call-follow-up.md", "r") as file:
        return file.read()

@mcp.resource("directory://all")
def get_directory() -> str:
    """Get the entire directory of contacts"""
    with open("directory.csv", "r") as file:
        return file.read()
Adding Tools
Finally, we will add a tool to the server. Tools can perform arbitrary actions e.g. run Python functions, make API call, transform data, etc.
Here I'll define a tool to create new email drafts in my Gmail account.
from tools.gmail import get_gmail_service
from googleapiclient.errors import HttpError
import base64
from email.message import EmailMessage
import os

# Define tools
@mcp.tool()
def write_email_draft(recipient_email: str, subject: str, body: str) -> dict:
    """Create a draft email using the Gmail API.

    Args:
        recipient_email (str): The email address of the recipient.
        subject (str): The subject line of the email.
        body (str): The main content/body of the email.

    Returns:
        dict or None: A dictionary containing the draft information including \
'id' and 'message'
                     if successful, None if an error occurs.

    Raises:
        HttpError: If there is an error communicating with the Gmail API.

    Note:
        This function requires:
        - Gmail API credentials to be properly configured
        - USER_EMAIL environment variable to be set with the sender's email \
address
        - Appropriate Gmail API permissions for creating drafts
    """
    try:
        # create gmail api client
        service = get_gmail_service()

        message = EmailMessage()

        message.set_content(body)

        message["To"] = recipient_email
        message["From"] = os.getenv("USER_EMAIL")
        message["Subject"] = subject

        # encoded message
        encoded_message = base64.urlsafe_b64encode(message.as_bytes()).decode()

        create_message = {"message": {"raw": encoded_message}}
        # pylint: disable=E1101
        draft = (
            service.users()
            .drafts()
            .create(userId="me", body=create_message)
            .execute()
        )

        print(f'Draft id: {draft["id"]}\nDraft message: {draft["message"]}')

    except HttpError as error:
        print(f"An error occurred: {error}")
        draft = None

return draftNote: If you want to integrate this with your own Gmail account, you will need to authorize the server via OAuth. The steps for that are described here.
Local Transport
To host the server locally and run it from the command line we can add the following to the end of our Python script.
if __name__ == "__main__":
    mcp.run(transport='stdio')
Testing Server
To ensure everything works as expected, we can run the server in dev mode from the command line. If you cloned the repo from GitHub, the uvenvironment should already be set up.
uv run mcp dev mcp-server-example.pyThis will launch a GUI in your browser that lets you test the server and view its prompts, resources, and tools. Here's what that looks like.

Integrating into Claude Desktop
Now that we know the server is working as expected, we can integrate it into an AI app. A list of apps and their capabilities is available on the MCP website.
Here we will integrate this server into Claude Desktop. The steps are listed below. Note: we can't add it to claude.ai because the server is only set up to run locally.
- Install Claude Desktop
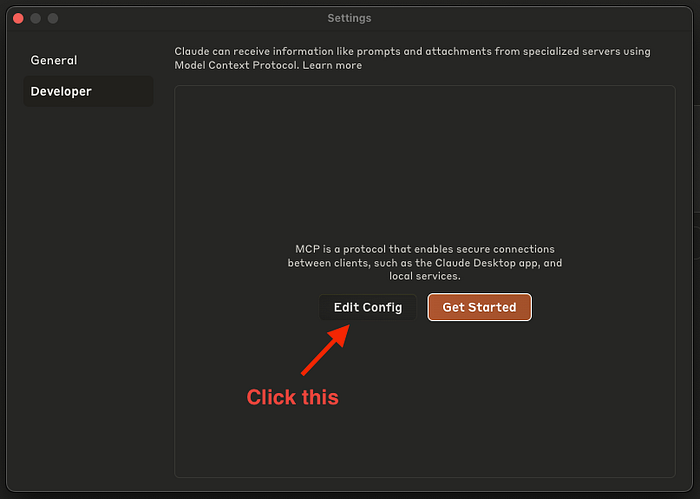
- Navigate to developer settings (Claude > Settings > Developer)
- Click "Edit Config"
4. Paste the following JSON schema into the file
{
  "mcpServers": {
    "AVA": {
      "command": "uv",
      "args": [
        "--directory",
        "/global/path/to/mcp/server/code/",
        "run",
        "mcp-server-example.py"
      ]
    }
  }
}Note: If this doesn't work, you may need to replace "uv" with its global path e.g. "/Users/shawhin/.local/bin/uv" (you can find this via the where uv command
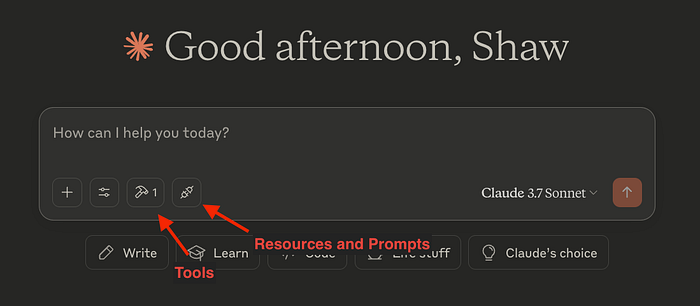
5. Relaunch Claude, and the integrations should appear!
Note:uv is handy here because Claude will run this server locally to use it. Since we had several dependencies for the Python script, the the uv run command takes care of all that for us!
Conclusions
MCP gives us a universal way to connect tools and context to LLM apps. Here, we saw how to create a custom MCP server. While we only connected it to Claude Desktop, we could have just as easily integrated it into Cursor, a custom n8n workflow, an Agents SDK project, or many other MCP clients.
If you have any questions, let me know in the comments :)
🗞️ Join 1,000+ AI builders and get instant access to 30 AI project ideas: https://the-data-entrepreneurs.kit.com/shaw