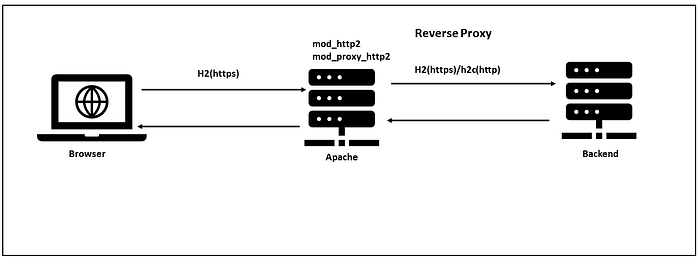


In this tutorial, we will see how to enable Apache Server as a reverse proxy system for a back-end server that is enabled with HTTP/2 protocol in Windows.
What Is HTTP/2?
HTTP/2 is the first upgrade to the Hypertext Transfer Protocol since 1999. Its goal is to improve website performance by optimizing how HTTP is expressed "on-the-wire." It doesn't change the semantics of HTTP, which means header fields, status codes, and cookies work exactly the same way as in HTTP/1.1.
HTTP/2 began its life as Google's SPDY protocol, which they designed to address many of the performance problems inherent in HTTP/1.1. The core benefits of SPDY have made their way into HTTP/2, improved by the global Internet community, and formalized into an Internet Standard.
Benefits of HTTP/2
HTTP/2 introduces several new features, and they're all designed to improve page load times for your website visitors
Multiplexing:
HTTP/1.1 requires each request to use its own TCP connection. Multiplexing, in contrast, allows a browser to include multiple requests in a single TCP connection.
Header Compression:
Modern websites rely on a lot of external assets: images, CSS, JavaScript, and fonts, just to name a few. Each time a browser requests one of these assets, it includes an HTTP header with the request. When the server sends the asset back to the browser, it also includes an HTTP response header. That's a lot of overhead for the typical web page. HTTP/2 forces all HTTP headers to be sent in a compressed format, reducing the amount of information that needs to be exchanged between browser and server.
Server Push:
HTTP/2 Server Push lets our edge network send web assets back to your browser before it even knows it needs them. This speeds up page load times by eliminating unnecessary round trips. For example, when a browser requests an HTML page, you can "push" all of the CSS stylesheets, image resources, and other assets inside of that web page
Stream Priority:
Stream priority is a mechanism for browsers to specify which assets they would like to receive first. For example, an HTTP/2-aware browser can use stream priority to load the HTML for a page first, followed by CSS, then JavaScript, and finally image assets. This order allows the browser to render the page as quickly as possible.
Enable HTTP/2 for Apache
Apache has HTTP/2 support since version 2.4.17. The mod_http2 module enables the required support for h2 protocol in the Apache server.
Most of the browsers currently only support HTTP/2 over an encrypted connection. For practical purposes, this means that your website must be served over HTTPS to take advantage of HTTP/2.
As a first step, enable the SSL for the Apache server. Refer to this article to create a self-signed certificate for the development.
Load the mod_ssl module into the httpd.conf file:
LoadModule ssl_module modules/mod_ssl.soEnable SSL configuration at global or specific to a virtual host:
<VirtualHost *:443>
    ServerAdmin webmaster@dummy-host.example.com
    DocumentRoot "C:\Albin\blogData\htdocs"
    ServerName myexample.com
    ErrorLog "logs/myexample.com-error.log"
    CustomLog "logs/myexample.com-access.log" common

 RewriteEngine  on
 SSLEngine on

 SSLCertificateFile C://Albin/blogData/cors/medium/ssl/server.crt
    SSLCertificateKeyFile C://Albin/blogData/cors/medium/ssl/server.key
</VirtualHost>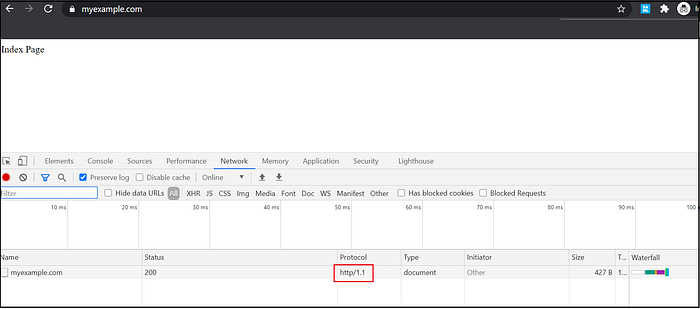
Now the website is accessible through SSL and the HTTP/1.1 protocol. To enable HTTP/2 on your Apache web server, load the http2 module into the httpd.conf file:
LoadModule http2_module modules/mod_http2.soEnable the configuration below inside the virtual host:
Protocols h2 h2c http/1.1- h2 — Instructs Apache to support HTTP/2 protocol over SSL/TLS.
- h2c — Instructs Apache to support HTTP/2 over TCP.
- http/1.1 — If a client doesn't accept HTTP/2, then serve the request over HTTP/1.1.
<VirtualHost *:443>
    ServerAdmin webmaster@dummy-host.example.com
    DocumentRoot "C:\Albin\blogData\htdocs"
    ServerName myexample.com
    ErrorLog "logs/myexample.com-error.log"
    CustomLog "logs/myexample.com-access.log" common

 RewriteEngine  on

 SSLEngine on

 SSLCertificateFile C://Albin/blogData/cors/medium/ssl/server.crt
    SSLCertificateKeyFile C://Albin/blogData/cors/medium/ssl/server.key

 Protocols h2 h2c http/1.1
</VirtualHost>
Now the website is accessible through SSL and the h2 protocol.

Reverse Proxy With HTTP2
Let us now enable the reverse proxy to integrate with the back-end server through the h2 protocol. As a prerequisite, ensure that the back-end server is enabled with the h2 protocol.
As a first step, enable the required proxy modules:
LoadModule proxy_module modules/mod_proxy.so
LoadModule proxy_http2_module modules/mod_proxy_http2.so
Enable these additional proxy configurations into the virtual host:
<VirtualHost *:443>
    ServerAdmin webmaster@dummy-host.example.com
    DocumentRoot "C:\Albin\blogData\htdocs"
    ServerName myexample.com
    ErrorLog "logs/myexample.com-error.log"
    CustomLog "logs/myexample.com-access.log" common

 SSLProxyEngine on
 RewriteEngine  on
 SSLEngine on

 ProxyPass / h2://localhost:8443/
 ProxyPassReverse / http://localhost:8443/

 SSLCertificateFile C://Albin/blogData/cors/medium/ssl/server.crt
    SSLCertificateKeyFile C://Albin/blogData/cors/medium/ssl/server.key

 Protocols h2 h2c http/1.1
</VirtualHost>
Apache proxies the requests to back-end servers through the h2 protocol. Now the end-to-end flow (browser → Apache → back end) is enabled with the h2 protocol.
Here, the back-end server is enabled with the h2 protocol along with SSL on port 8443. If you need to connect with the back-end server that is enabled with h2 over HTTP (no SSL), then use the h2c protocol instead of h2 to connect with the back-end server.
ProxyPass / h2c://localhost:8081/
ProxyPassReverse / http://localhost:8081/
For the demo, I have used the Tomcat server as the back end. Tomcat server version 9+ enables support for the h2 protocol (the mod_jk Apache module can be directly used to connect with Tomcat over h2, but I used mod_proxy_http2 to show the general scenario).
To enable the h2 protocol in Tomcat, add the configuration below into the conf/server.xml and configure the server.crt and server.key paths. I am using the same cert and key files used in the Apache server:
<Connector port="8443" protocol="org.apache.coyote.http11.Http11AprProtocol"
               maxThreads="150" SSLEnabled="true" >
        <UpgradeProtocol className="org.apache.coyote.http2.Http2Protocol" />
        <SSLHostConfig>
            <Certificate certificateKeyFile="conf/server.key"
                         certificateFile="conf/server.crt"
                         type="RSA" />
        </SSLHostConfig>
    </Connector>
Download Apache Portable Runtime (APR). APR is a supporting library for the Apache web server. It provides a set of APIs that map to the underlying operating system. Where the OS does not support a particular function, APR will provide an emulation. The APR module tcnative-1.dll can be downloaded from the following location. Copy tcnative-1.dll to the bin folder of the Tomcat server based on your system architecture.
Enable the configuration below in catalina.bat to include tcnative-1.dll as part of the classpath(modify the existing JAVA_OPTS configuration and enable Djava.library.path as an additional parameter):
set "JAVA_OPTS=%JAVA_OPTS% -Djava.protocol.handler.pkgs=org.apache.catalina.webresources -Djava.library.path=C:\Albin\SW\Reverse-Proxy-Tomcat\8080\apache-tomcat-9.0.30\bin"After the restart, the Tomcat server is now accessible through the h2 protocol over 8443 port with SSL.
The HTTP2 protocol will help us to achieve better performance for websites. This reduces the overall page load time by using advanced features like multiplexing, header compressing, stream priority, and server push. In the next tutorial, we will see how to use the h2 protocol to improve the page load time.
References:
https://www.cloudflare.com/website-optimization/http2/what-is-http2/