

Not a Medium Member, Read this Article, here!
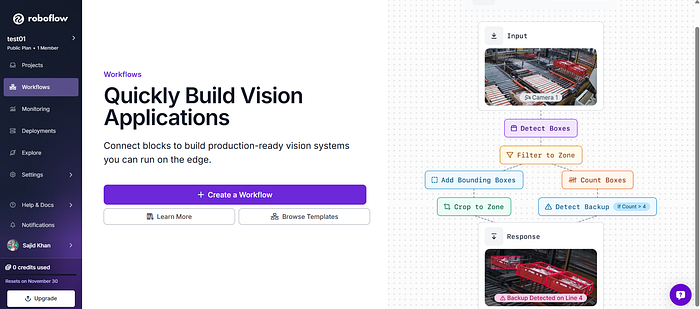
Roboflow is a platform that streamlines every part of the computer vision pipeline: collecting images, labeling them, training models, and deploying them, all without needing deep ML expertise.
This article will take you from zero to your first trained model.
Before diving into the article, lets clear out the basics first.
What is Computer Vision
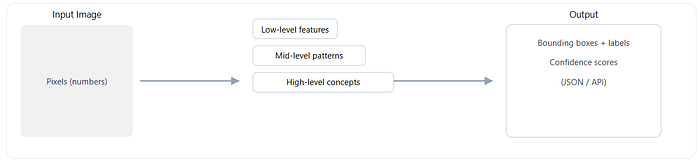
Computer vision for machines is like teaching a kid to recognize objects.
- You show them lots of pictures of cats.
- You point and say, "This is a cat."
- Eventually, they start recognizing cats in new pictures.
A computer does the same thing, but with numbers instead of neurons and with thousands of images instead of a handful.
How a Model "Sees" (Conceptually)
Roboflow helps you manage this entire teaching process.
What problem does Roboflow solve?
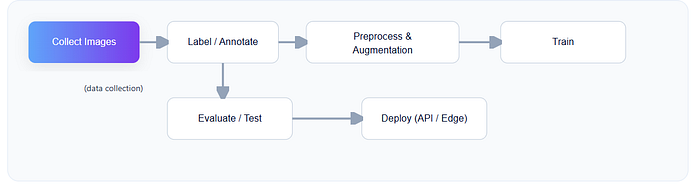
Before Roboflow, building a computer vision project meant handling:
- Data collection
- Annotation
- Augmentation scripts
- Model training environments
- Deployment servers
Roboflow bundles these pieces together, making the workflow smooth and user-friendly:
- Datasets → Upload, organize, annotate
- Preprocessing & Augmentation → Resize, flip, rotate, blur with visual previews
- Model Training → Train with one click using hosted GPUs
- Deployment → API endpoints, sample code, edge devices
Think of Roboflow as your "Compyter-Vision command center."
Step 1: Create a Dataset
Before your model can learn anything, it needs examples, lots of them.
What to upload?
Any images related to your task:
- Cars for a vehicle detector
- Fruits for a classifier
- Tools on a workbench for an inventory model
Once uploaded, Roboflow automatically analyzes the images: size, aspect ratio, duplicates, and more.
Object Detection vs. Classification
Two common CV tasks:
- Classification: "What is in the image?"
- Object Detection: "Where are the objects, and what are they?"
Roboflow supports both (and segmentation if you want to go fancy later).
Step 2: Labeling (Training Your Model's Vocabulary)
Labeling is the process of marking what's in each image.
- For classification, you choose a label for the whole image.
- For object detection, you draw bounding boxes around objects.
Roboflow offers super-friendly in-browser annotation tools.
You can also invite teammates, or outsource the grunt work, which is great for larger projects.
Tip: Consistent labels = better model performance.
Step 3: Preprocessing & Augmentation
This is where the magic of computer vision engineering happens and Roboflow makes it visual.
Preprocessing
Preprocessing prepares images for the model:
- Resizing to a fixed dimension
- Adjusting aspect ratios
- Auto-orienting images
- Removing duplicates
Think of this as cleaning your data before teaching the model.
Augmentation
Augmentation is like showing variations of the same picture so the model becomes more robust.
Roboflow can automatically apply:
- Flips
- Rotations
- Blur
- Noise
- Exposure changes
This reduces overfitting and helps your model perform well in real scenarios.
Step 4: Training Your Model
Here's where your dataset transforms into intelligence.
Roboflow Train provides a one-click training pipeline using modern architectures like YOLOv8, MobileNet, Meta's SAM2 and SAM3. You don't need to set up GPUs or fight with dependencies, the platform handles it.
What's happening during training?
- The model makes predictions on your images
- It compares its guesses to your labels
- It adjusts itself to improve accuracy
This is repeated thousands of times, gradient descent does the heavy lifting.
When training is complete, you get:
- mAP (accuracy metric)
- Loss curves
- Confusion matrix
All visualized neatly.
Step 5: Testing Your Model
Before deploying, you should test on new images.
Roboflow gives you:
- A "playground" to upload test photos
- Confidence scores
- Visualizations of bounding boxes or masks
If results look off, tweak preprocessing or add more training data.
Step 6: Deploying Your Model
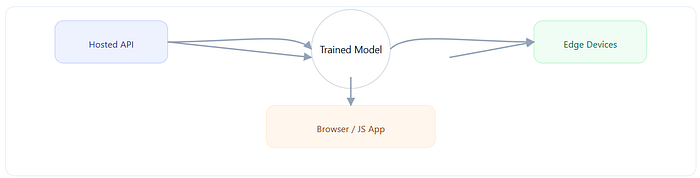
Roboflow makes deployment shockingly easy.
You can use:
- Hosted inference API
- Python SDK
- JavaScript web apps
- Edge devices (NVIDIA Jetson, Raspberry Pi)
Example: Using Python to run inference
from roboflow import Roboflow

rf = Roboflow(api_key="YOUR_API_KEY")
project = rf.workspace().project("your-project")
model = project.version(1).model

prediction = model.predict("test-image.jpg", confidence=40, overlap=30).json()
print(prediction)
You get bounding boxes, labels, and scores directly in JSON.
Example: Run in the Browser (JavaScript)
const model = await roboflow.auth({
    publishable_key: "YOUR_KEY",
}).load({
    model: "your-model",
    version: 1
});

const result = await model.detect(document.getElementById("input-image"));
console.log(result);
Boom! computer vision in your browser
Roboflow is ideal for:
- Prototyping a new CV idea
- Building an MVP fast
- Teaching ML in schools or workshops
- Deploying small to medium-scale vision apps
- Collecting and managing datasets collaboratively
It's not meant to replace advanced custom ML pipelines, but it gets you from idea to execution in hours instead of weeks.
In Summary
Roboflow simplifies the entire computer vision workflow:
- Upload → centralize your images
- Label → teach the model what's important
- Preprocess & Augment → improve quality and robustness
- Train → generate a ready-to-use model
- Deploy → use your model anywhere
Whether you're building a fruit classifier, detecting cracks in machinery, or identifying Pokémon in the wild, Roboflow gives you the tools you need to get started.