

PHOTOGRAPHY
Make your own photographic lightbox
I bought a small 14 x 14-inch lightbox a few years ago. It has a ring of LED lights on the inside roof of the box. It has served me well, but I recently decided to photograph a compilation of thrift store items and found that my box was too small.
My current box also has solid walls which cast a shadow on larger arrangements. The LED light ring at the top of the box wasn't working either. It reflects on shiny surfaces like the ceramic teacups in my arrangement.
I needed an upgrade, and I wanted a 20 x 20-inch lightbox. I can buy one on Amazon, but all the boxes have solid side walls. They are also pricey. I don't mind paying for something that I will use for a long time, but then it must be exactly what I want.
In the end, I decided to make my own lightbox. It won't be a lot cheaper, but at least I'll have the open sides for extra light. I'll also have the box size that I'm looking for.
What is a lightbox, and what do you need to make one?
Lighting is important to the overall quality of any photograph. A lightbox is a small, enclosed space with translucent sides. The photographer can control how much light enters the box through the sides or from the roof of the box. The purpose is to evenly distribute light around the object being photographed. It also helps to minimize distracting shadows.
Here are the supplies I used to make my own lightbox. You can of course adapt the sizes and materials to suit your own photography setup.
What you will need is…
· 4 x foam boards — bought mine at the dollar store
· 1 x poster board — also bought at the dollar store
· 1 x roll of masking tape
· 1 x roll of sheer interfacing
· 2 x 1600 lumens daylight lightbulbs — I prefer 1600 lumens because it is bright enough to shine through the interfacing later in the build
· 2 x desk lamps (these at Amazon are a good example of size/type)
· 1 x ruler
· 1 x pencil
· 1 x exacto knife

I bought everything on the list except the exacto knife and one desk lamp. I paid just over $50 for all my supplies.
Let's make a lightbox
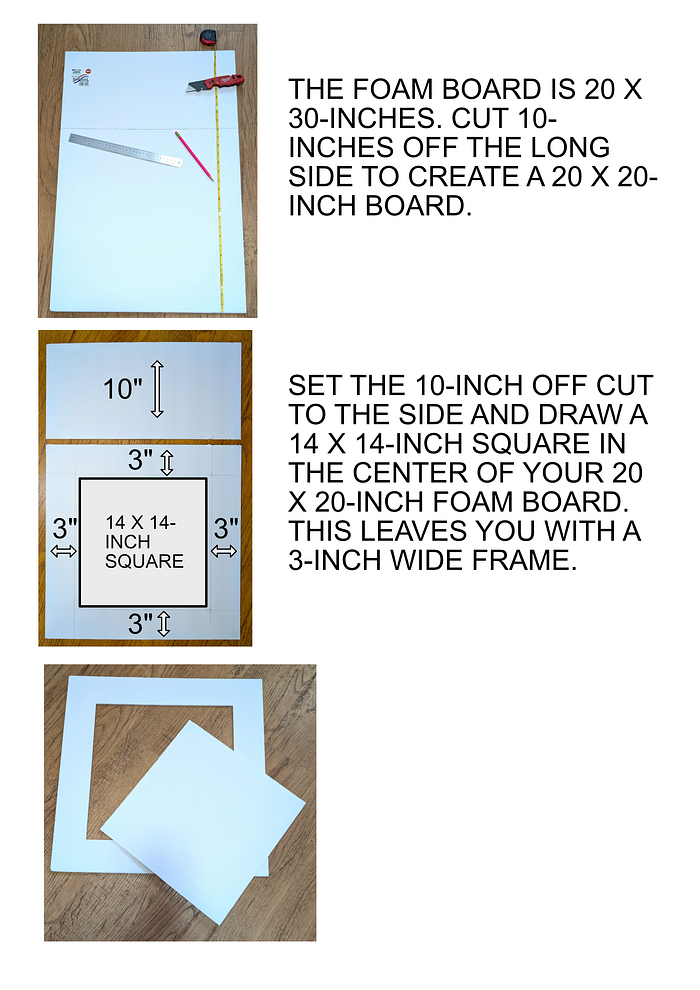
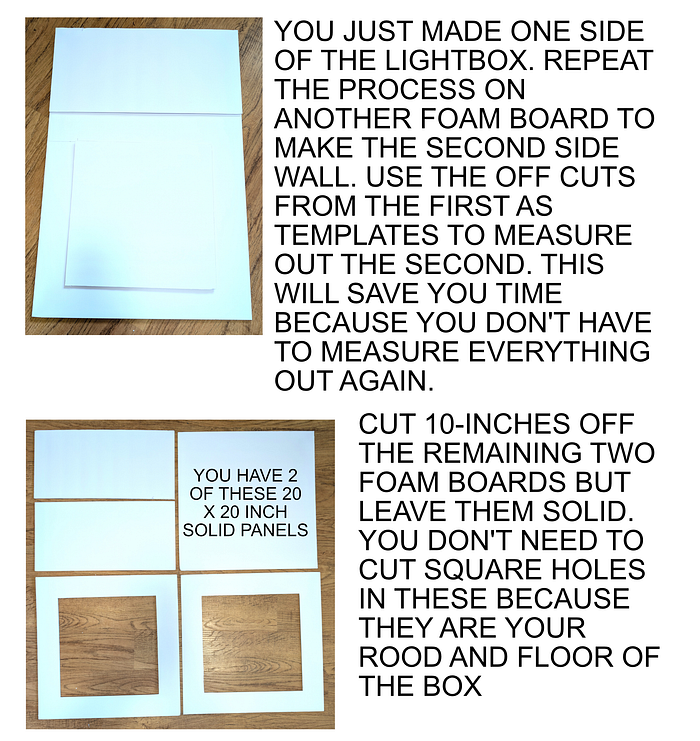
Step 1: Cut all the foam boards down so that you have four 20 x 20-inch squares. Keep the offcuts because they will become the back wall of the box. Foam boards from the dollar store are 20 x 30-inches. So, you are cutting 10-inches off one end only.
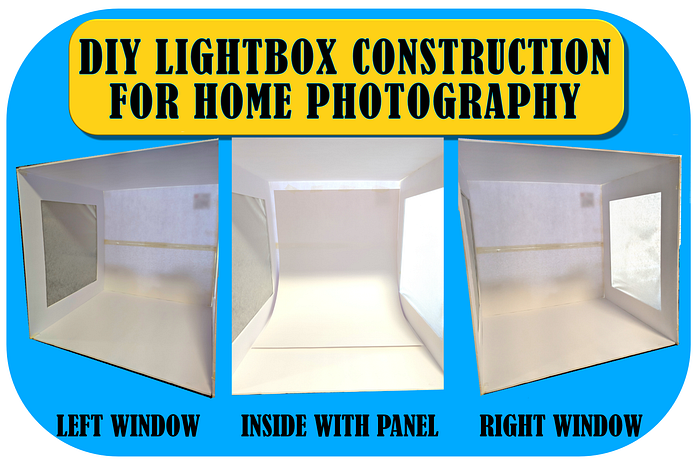
Step 2: Measure a 3-inch border inside two of the boards and cut a square out of the middle of both. The pieces with the holes cut into them are your side walls. The inside piece that you remove will measure 14 x 14-inches.
Tip:
Use the cutouts and cut-offs from the first board as templates. You'll save a lot of time by not having to remeasure each board.
You now have:
- Two 20 x 20-inch solid pieces of foam board — the roof and floor.
- Two 20 x 20-inch pieces of foam board with 14 x 14-inch squares cut out of its middle section — the side walls.
- Two 10 x 20-inch off cuts that you will tape together later — the back wall.
Step 3: Using the masking tape, tape the walls to the floor of the box. The floor is the foam board without a hole cut into it. Then tape the roof to the box.
Step 4: Now tape the two 10 x 20-inch offcuts together and tape them to the walls, floor and roof.
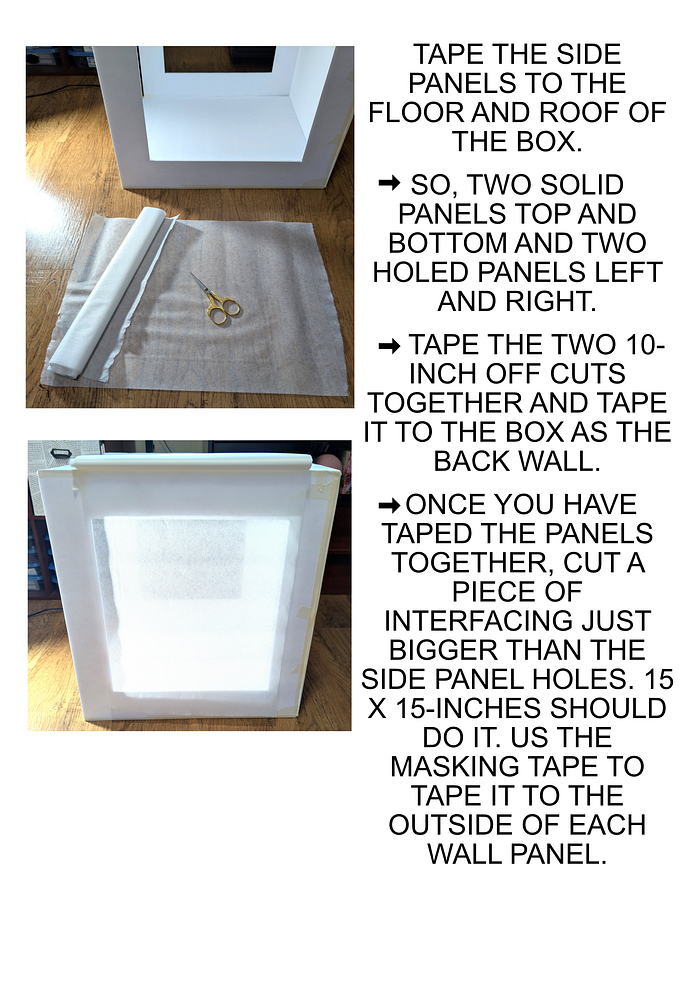
Step 5: Cut two 15 x 15-inch pieces of interfacing and using the masking tape, tape them to the outside of the box walls.

Step 6: The poster board from the dollar store is 22 x 28-inches. You need to trim 2.5-inches off the longest side for it to fit in your box. Using the masking tape, tape the narrow end of the poster board to the top end of the box's back wall. Don't fold the poster board. You want it to curve down to the box floor. This way, when you photograph your items, you have a smooth background.
I think I could have left the poster board a little wider and cut only 2-inches off the side. There is a bit of a gap on one side. It may not matter if you are photographing small pieces.
Arrange your props to try out your new lightbox
Place your lightbox on a flat surface and arrange your props inside. Place the lamps on either side of the box, and switch on the light. You are ready to photograph your arrangement.
Once I'm happy with my image, I'll trim it to take out anything I don't want to see in the image. For me it is the join area on the floor on the sides and in the front.
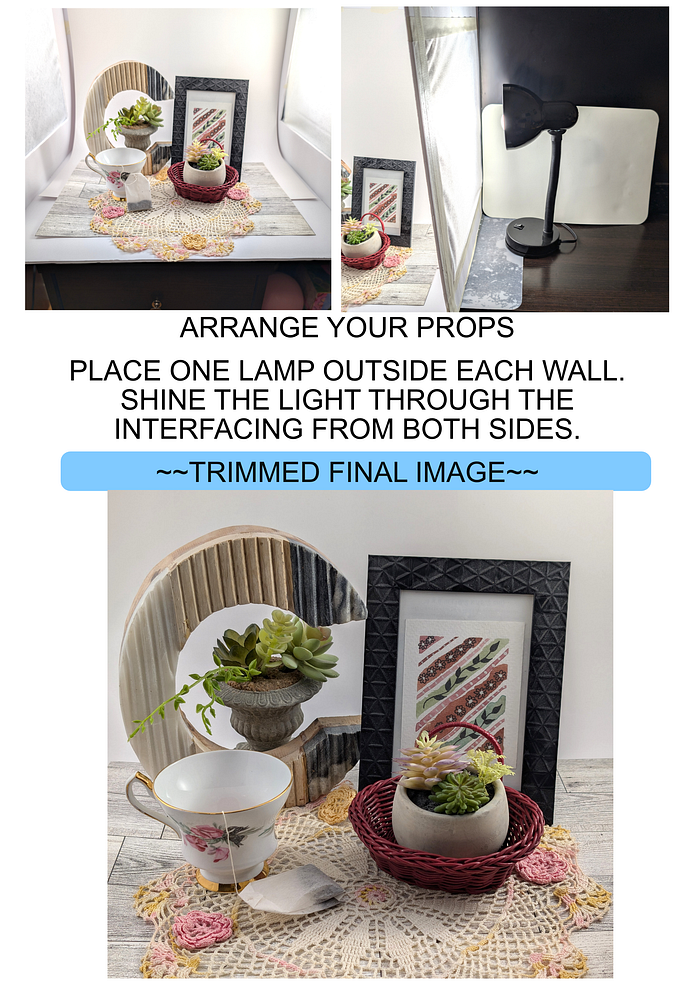
I took this photograph with my Google Pixel 9 Pro XL cell phone camera. I think it turned out well. So, you don't necessarily need fancy equipment to create a high-quality appearance in your photo. However, I did tweak my phone camera settings.
Under phone settings I chose:
PRO;
50MP Resolution;
RAW + JPG;
and my lens selection is on Auto.
I hope you give this a try. There is a lot of work involved creating the lightbox, but the fun you'll have afterwards is worth it.
Let me know if I can answer any questions you may have.